Read time: 5 minutes
Today I want to talk about a topic that is very dear to my heart: CI/CD pipelines.
I’ve been building them for years, and I can tell you that they are a game-changer for any software development team.
Software developers are usually good at writing code, but not so good at making sure it is always ready to be deployed to production.
But the good thing is that with less than 70 lines of yaml you can automate everything needed to validate your code and get it deployed to prod. And forget about it.
Let’s dive in.
The need for automation
Picture this: you spent the last few days working on a shiny new feature, and now want to take it to your production environment, but to get there you have to:
- Build the code
- Test the new feature
- Make sure you did not break other features
- Create a Docker image
- Publish the image to a registry
- Deploy the image to the production boxes
A very time-consuming and error-prone process, which you are usually good at following properly because it is part of the job.
But, this time you forgot to run some of the integration tests (because we are all human) before deploying the new bits to prod.
What could go wrong?

Well, it turns out that the new feature broke the login page, and now your users cannot log in to your application.
You have to roll back the changes, fix the bug, and go through the whole process again.
There has to be a better way.
What is a CI/CD pipeline?
CI/CD stands for Continuous Integration/Continuous Deployment. These two terms are defined as follows:
-
Continuous Integration (CI): A software engineering practice where developers regularly merge their code changes into a central repository, after which automated builds and tests are run.
-
Continuous Deployment (CD): A software engineering practice in which code changes are delivered frequently through automated deployments.
When you combine these two practices, you get a CI/CD pipeline.

In a CI/CD pipeline there’s usually some remote server that listens for any changes to the code repository.
When a change is detected, the CI/CD server will automatically pull the latest code and perform all the steps you would normally do manually.
This brings in huge benefits such as:
-
Improved developer productivity: Developers can focus on writing code and not on the deployment process.
-
The latest code is quickly built, tested and deployed: This means that the latest features are available to the users as soon as possible.
-
Bugs are found early in the pipeline: Automated tests can be run as soon as the code is committed, catching bugs early in the process.
-
Broken code won’t propagate across devs: If you tie the CI tasks to your pull requests, you can prevent broken code from being merged into the main branch, which will avoid headaches for all devs.
-
No dev boxes are needed for build/deploy: The CI/CD server will take care of the build and deployment process, so you don’t need to have a dedicated machine for this.
And, fortunately, you don’t even have to stand up your own CI/CD server.
Many cloud providers can stand up one for you in a matter of minutes, and today I’ll show you how to use one of the most popular ones: Azure Pipelines.
Building a CI/CD pipeline with Azure DevOps
Azure DevOps includes multiple services to help software development teams plan, collaborate, build, and ship software faster.
One of its most popular services is Azure Pipelines, a fully featured CI/CD service that works with any language and platform.
Assuming you already have access to an Azure DevOps account and project, let’s go through the steps needed to build a CI/CD pipeline for your ASP.NET Core application.
Step 1: Create your pipeline
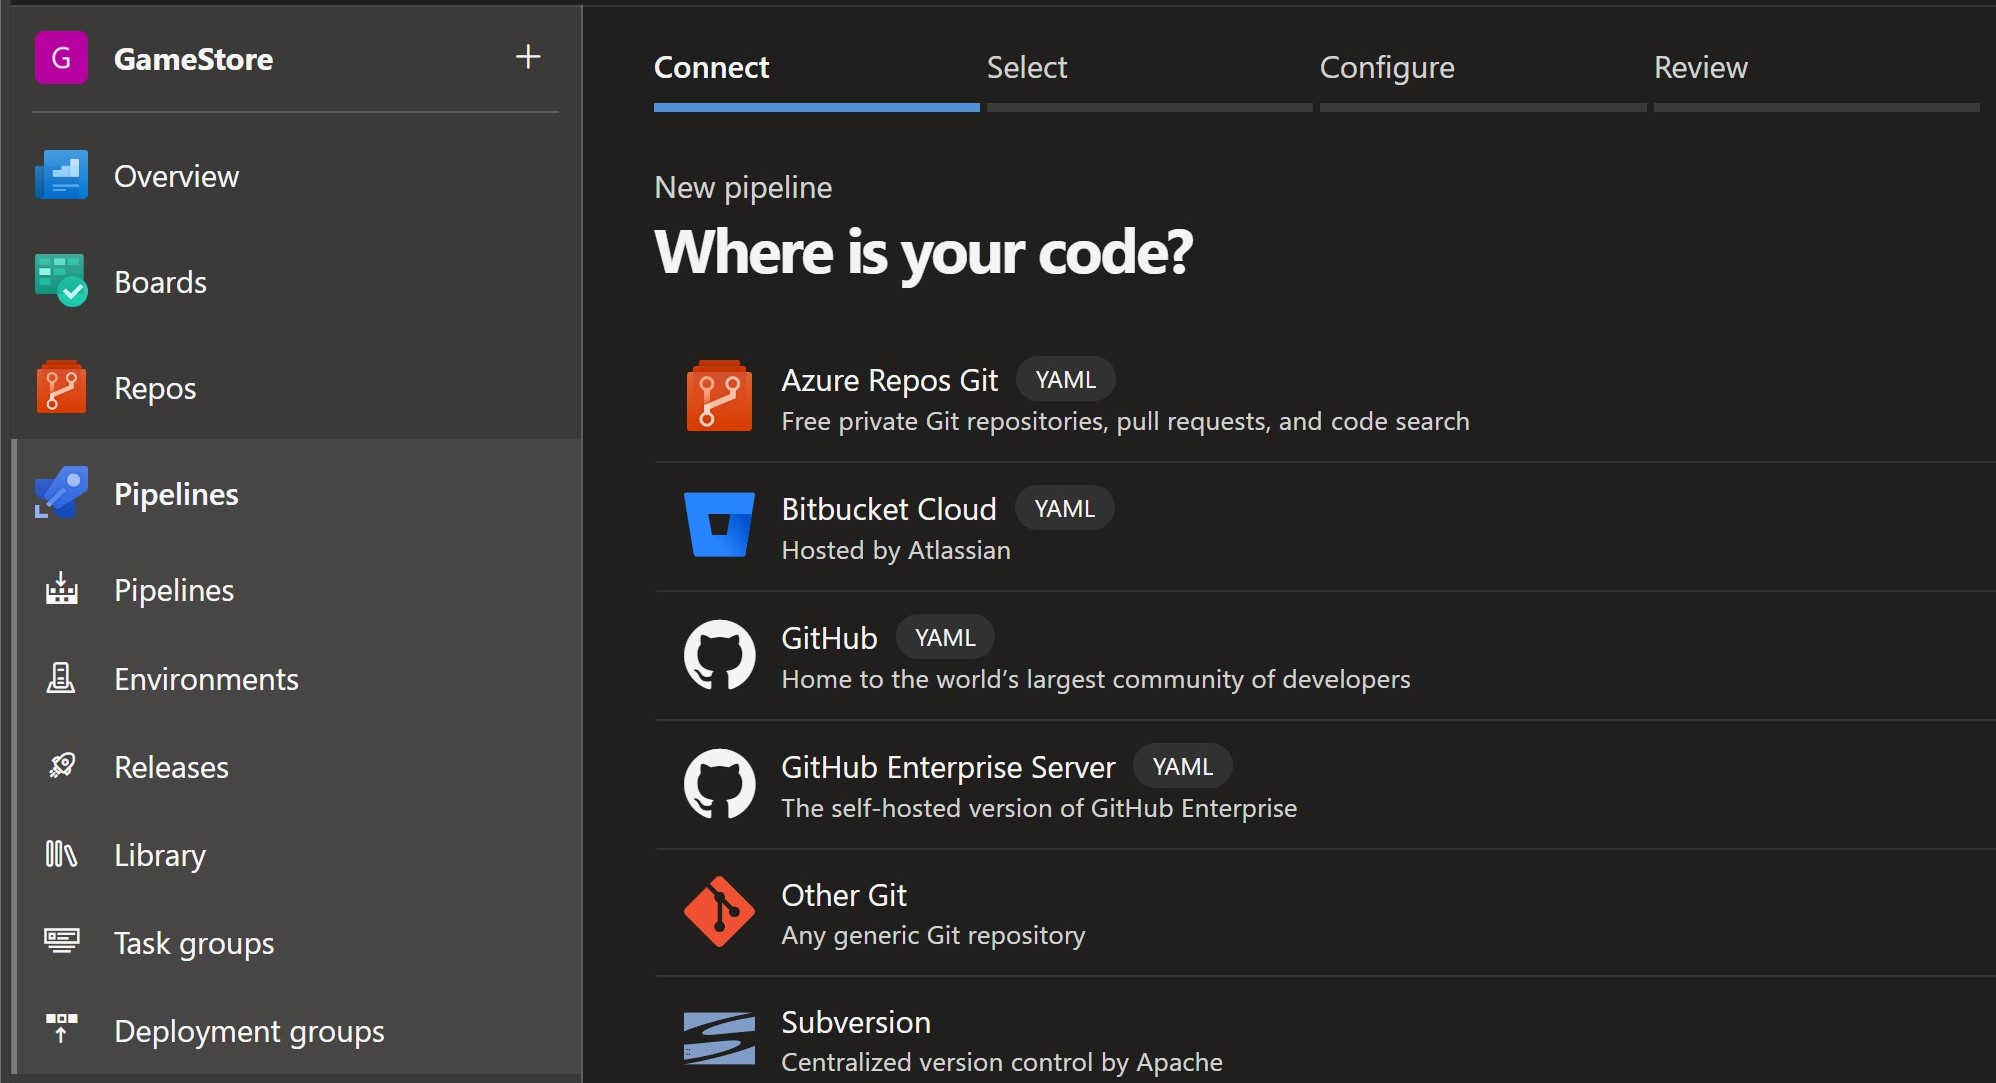
From the Pipelines section of your Azure DevOps portal, kick off the New Pipeline wizard:

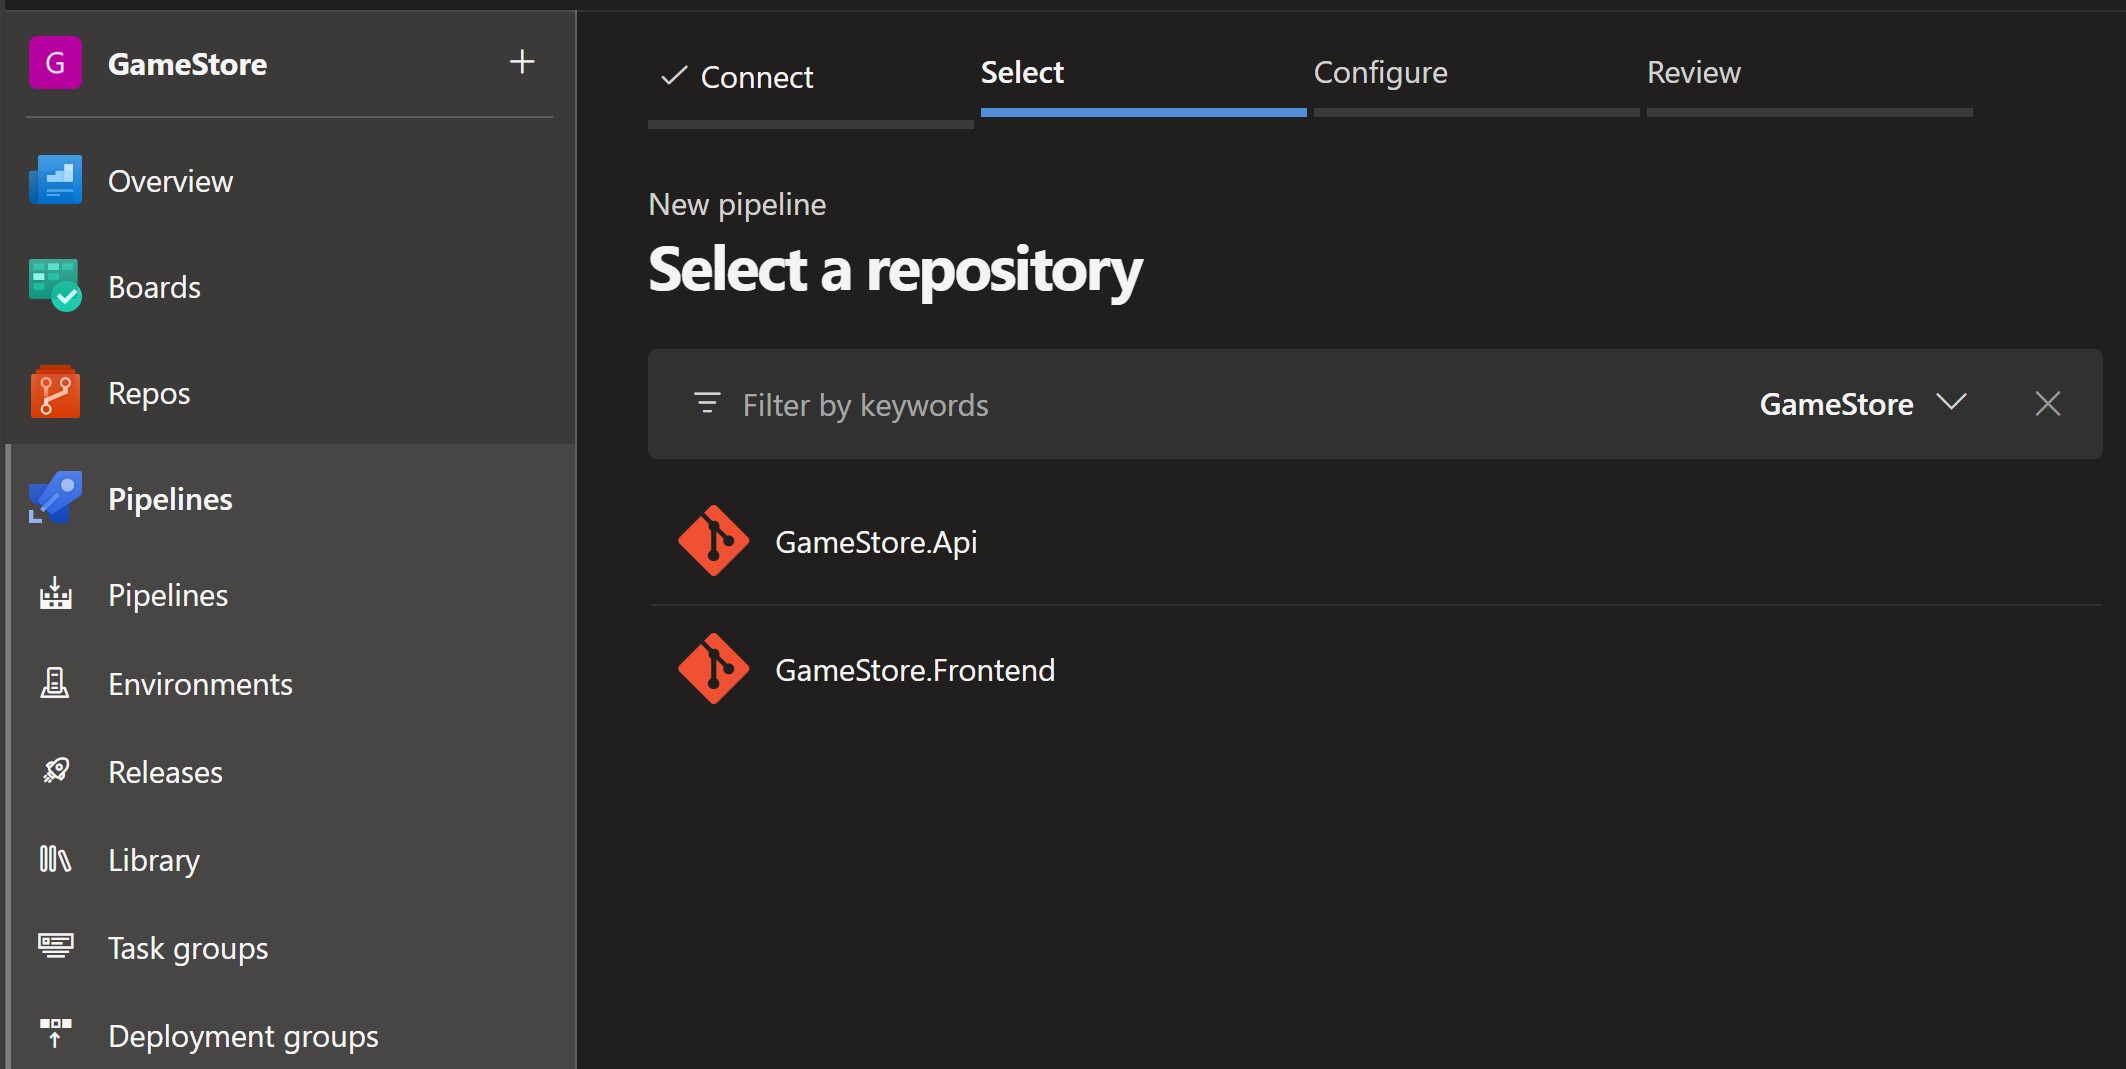
There you will select your Git repository:
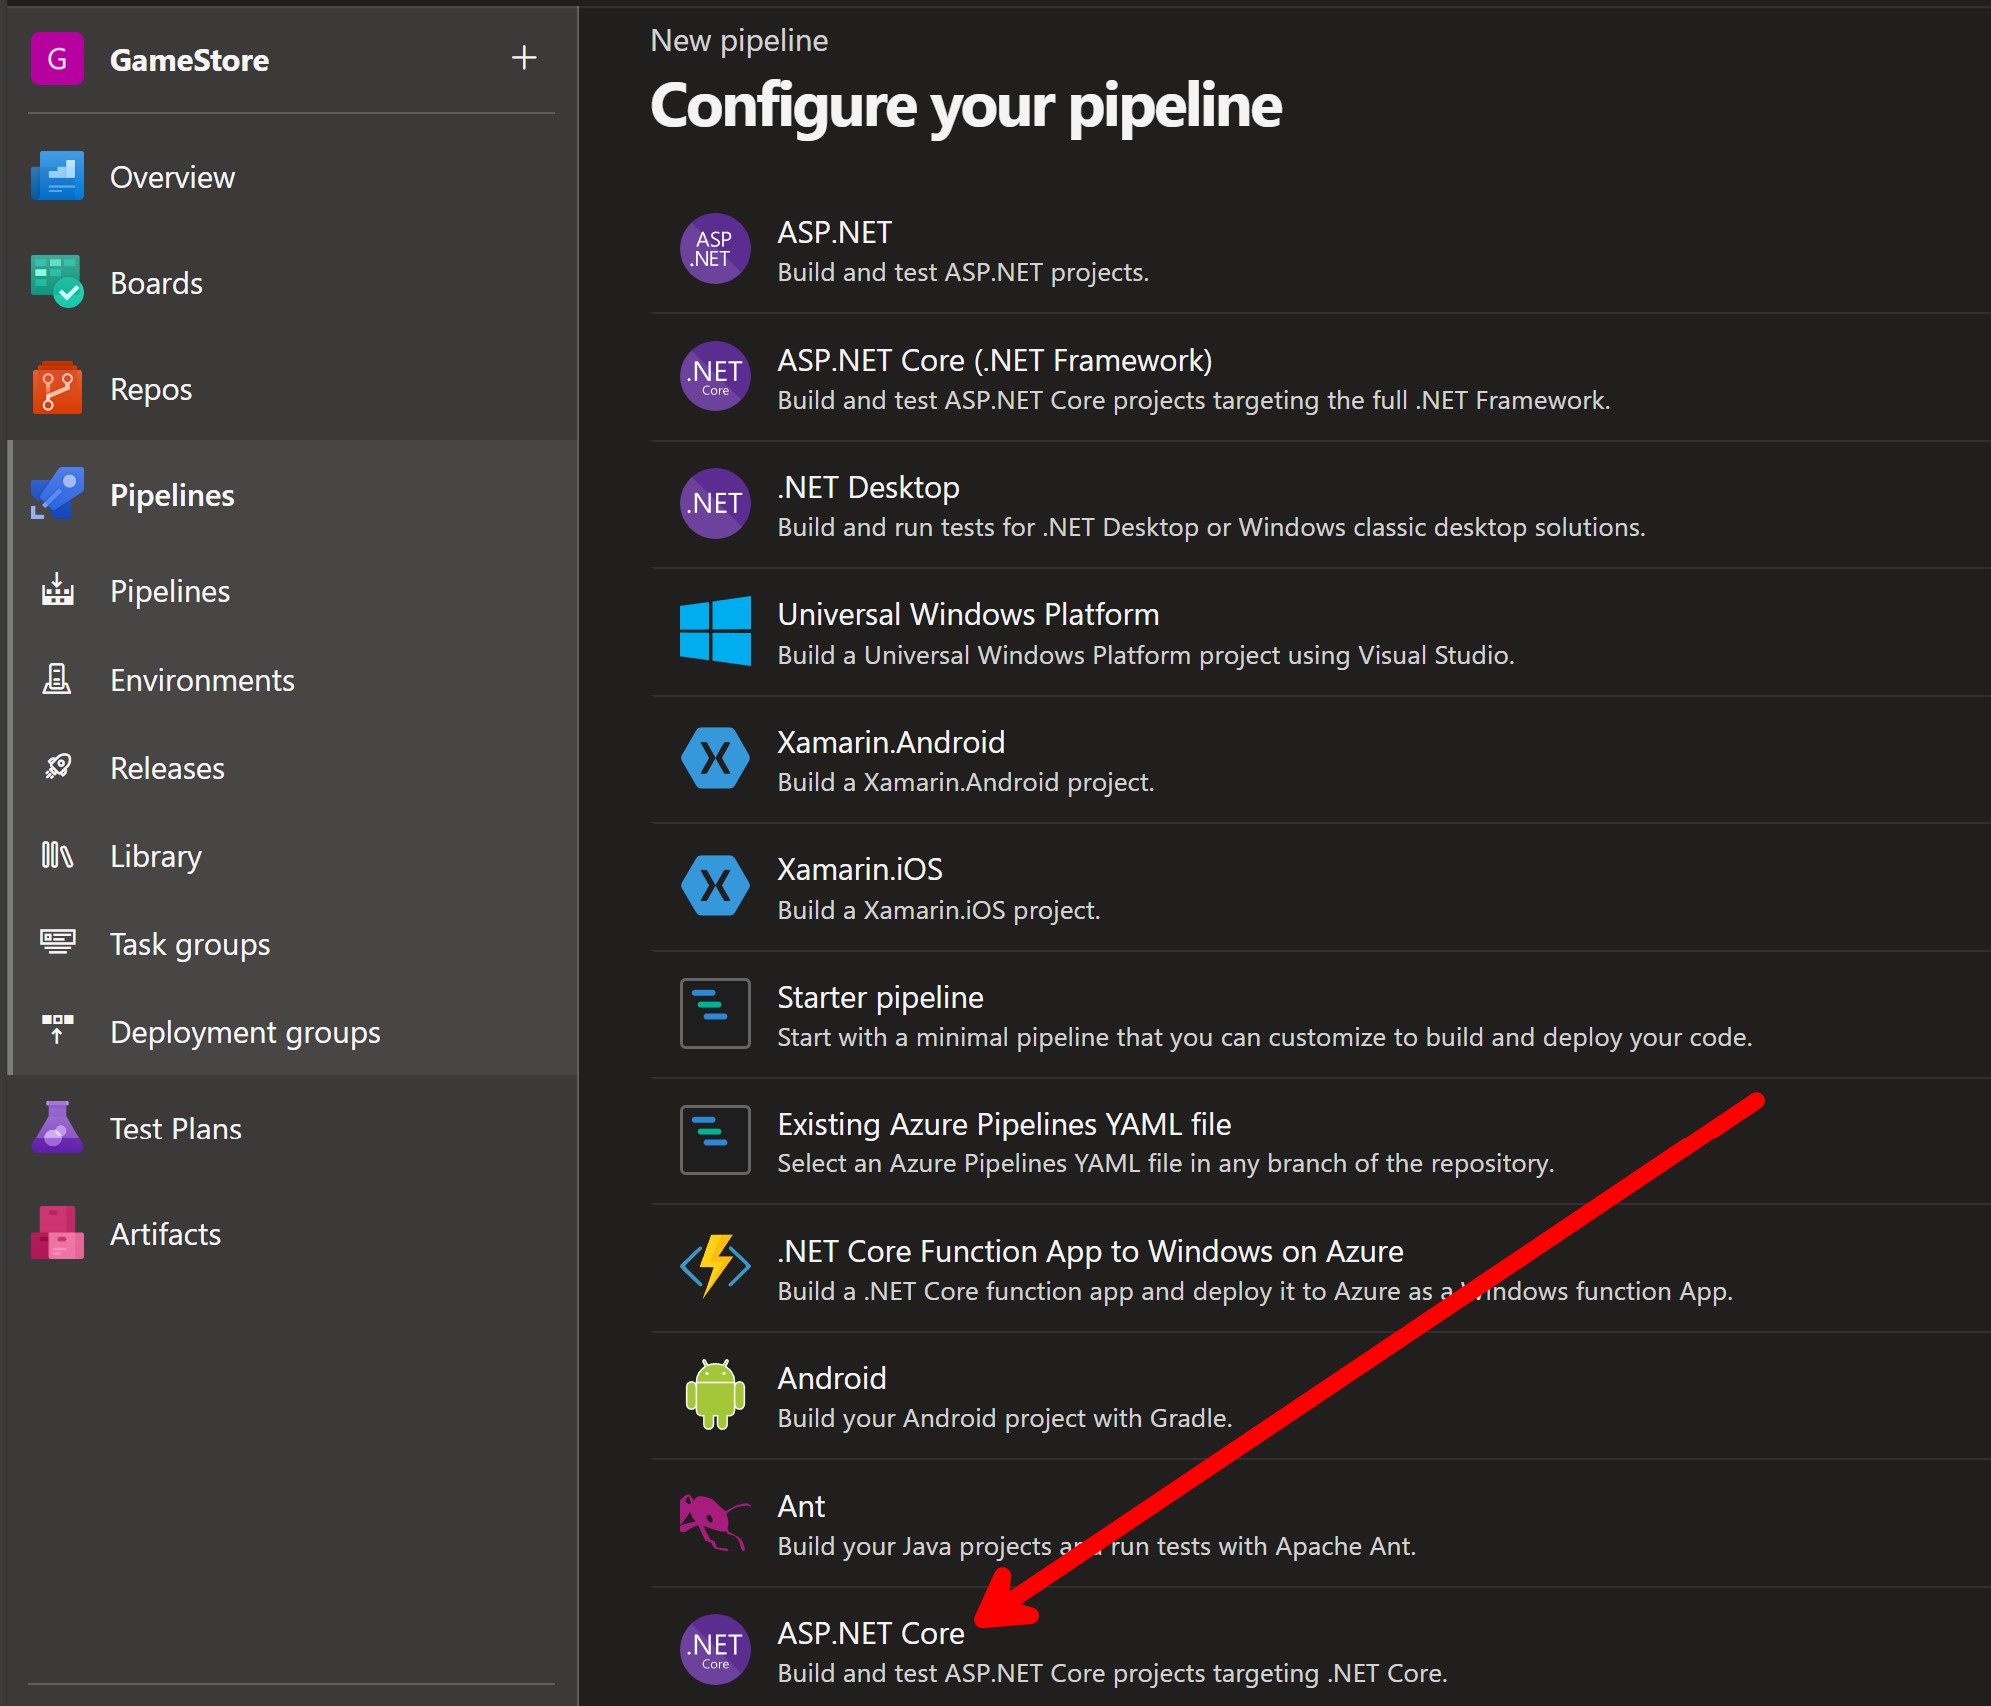
And also pick a template based on the type of application you are building:
You’ll get something like this as your initial pipeline:
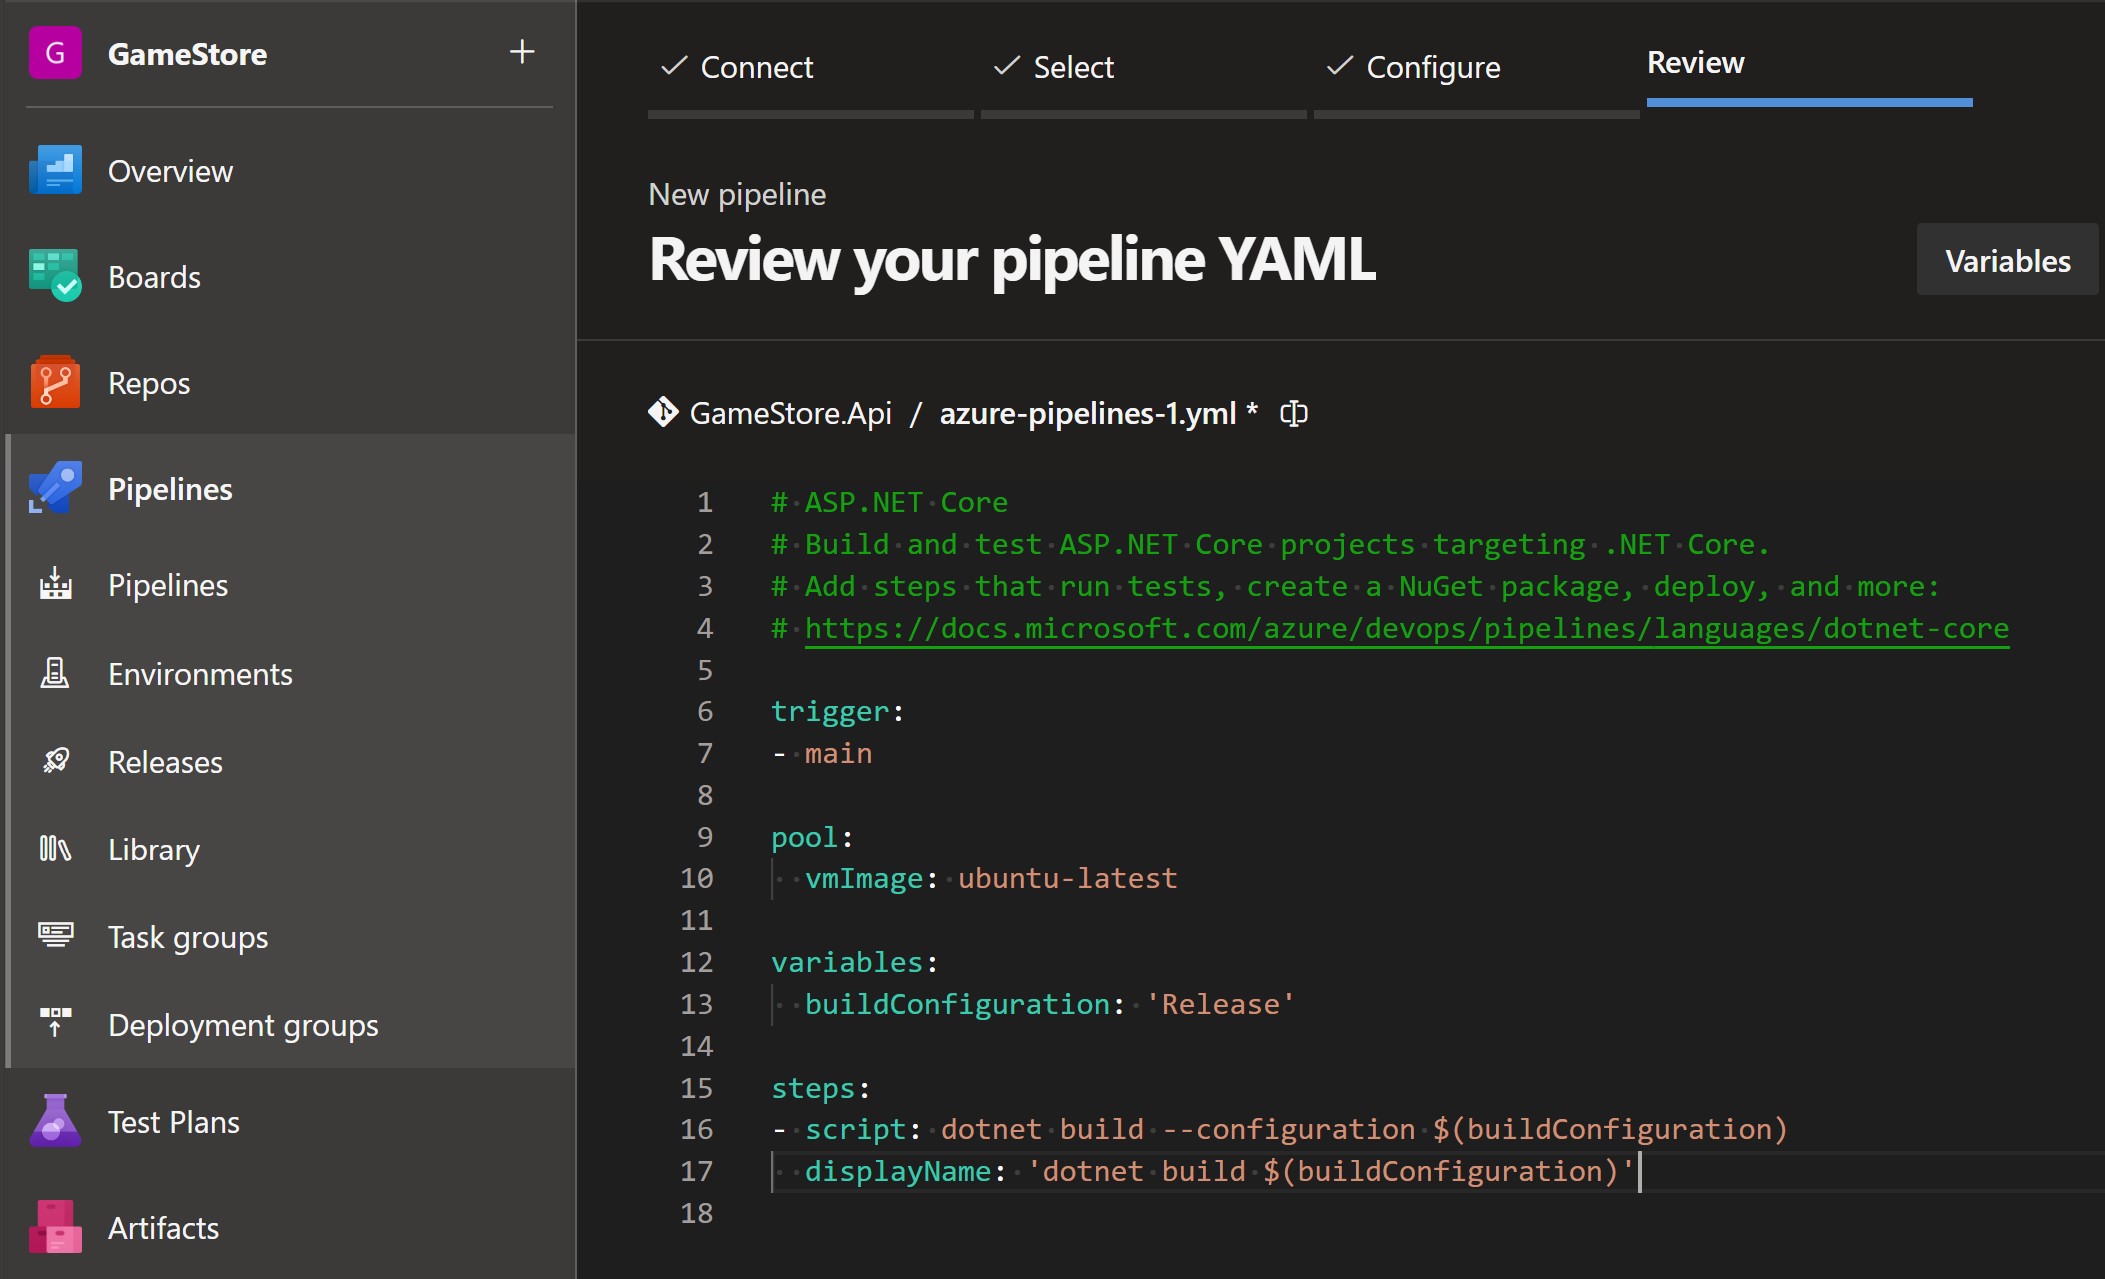
A quick explanation of what you got there:
-
trigger: This is the event that will trigger the pipeline. In this case, it’s set to trigger on any push to the main branch.
-
pool: A pool is a collection of agents that can run your pipeline tasks. In this case, it’s set to use agents based on the latest Ubuntu version in the hosted pool provided by Azure Pipelines.
-
variables: This is where you can define variables that will be used across the pipeline. The build configuration is defined as a variable by default.
-
steps: This is where you define the steps that will be run in the pipeline. By default, you get a single script step that builds your application in the Release configuration.
Step 2: Add your Continuous Integration (CI) steps
You could use the default script based step to build your app, but I prefer to use the Use .NET Core task combined with the .NET Core task to be very explicit about the .NET SDK version to use and avoid typos in the actual .NET command that will get executed:
steps:

- task: UseDotNet@2
  displayName: Use .NET 8 SDK
  inputs:
    packageType: 'sdk'
    version: '8.x'

- task: DotNetCoreCLI@2
  displayName: Build
  inputs:
    command: 'build'
    projects: 'GameStore.sln'
    arguments: '--configuration $(buildConfiguration)'
The .NET Core task supports most of the .NET CLI commands, like the build command in the example above.
Let’s use it again to run all the integration tests:
- task: DotNetCoreCLI@2
  displayName: Test
  inputs:
    command: 'test'
    projects: 'GameStore.Api.IntegrationTests/GameStore.Api.IntegrationTests.csproj'
    arguments: '--configuration $(buildConfiguration)'
    nobuild: true
The last step of the CI process would be to create a Docker image for our app in preparation to publish it to Azure. These days, that can be done in one step, so let’s go over it in the next section.
Step 3: Add your Continuous Deployment (CD) steps
To get docker images published to our Azure Container Registry, our pipeline agent will need to first authenticate to Azure and then to the actual registry. We can achieve both with the Azure CLI task.
The first time you try to use that task (and any task that interacts with Azure), you’ll get asked to grant permissions to the pipeline to access your Azure subscription.
That will automatically create a service connection in your Azure DevOps project, and a corresponding App Registration in your Microsoft Entra ID tenant.
You may need the help of your Azure DevOps admin to get this set up, but once it’s done, you can use this small task to have your pipeline authenticate to your Azure Container Registry:
variables:
  buildConfiguration: 'Release'
  appName: 'gamestore03'

...

- task: AzureCLI@2
  displayName: ACR Login
  inputs:
    azureSubscription: 'My Subscription'
    scriptType: 'pscore'
    scriptLocation: 'inlineScript'
    inlineScript: 'az acr login --name $(appName)'
Notice I also added the appName variable to hold the name of the container registry. This is a good practice to avoid hardcoding values in your pipeline.
With that out of the way, we can now build and push the Docker image to the registry, which as I mentioned here is trivial for .NET apps:
- task: DotNetCoreCLI@2
  displayName: Publish Docker image
  inputs:
    command: 'publish'
    projects: 'GameStore.Api/GameStore.Api.csproj'
    arguments: '-p ContainerRegistry=$(appName).azurecr.io
                -p ContainerImageTag=$(Build.BuildId)
                /t:PublishContainer'
    publishWebProjects: false
    zipAfterPublish: false
    nobuild: true
Notice we are also using the BuildId as the tag for the image. This is a good practice to ensure that the image is unique and can be traced back to the exact build that produced it.
Finally, let’s deploy the image to our Azure Container App:
- task: AzureContainerApps@1
  displayName: Deploy
  inputs:
    azureSubscription: 'My Subscription'
    imageToDeploy: '$(appName).azurecr.io/gamestore-api:$(Build.BuildId)'
    containerAppName: '$(appName)'
    resourceGroup: '$(appName)'
Step 4: Run It!
After you save your pipeline, which will get merged as a new commit in your repo, a new pipeline run will be triggered.
And if everything is set up correctly, you should see something like this:
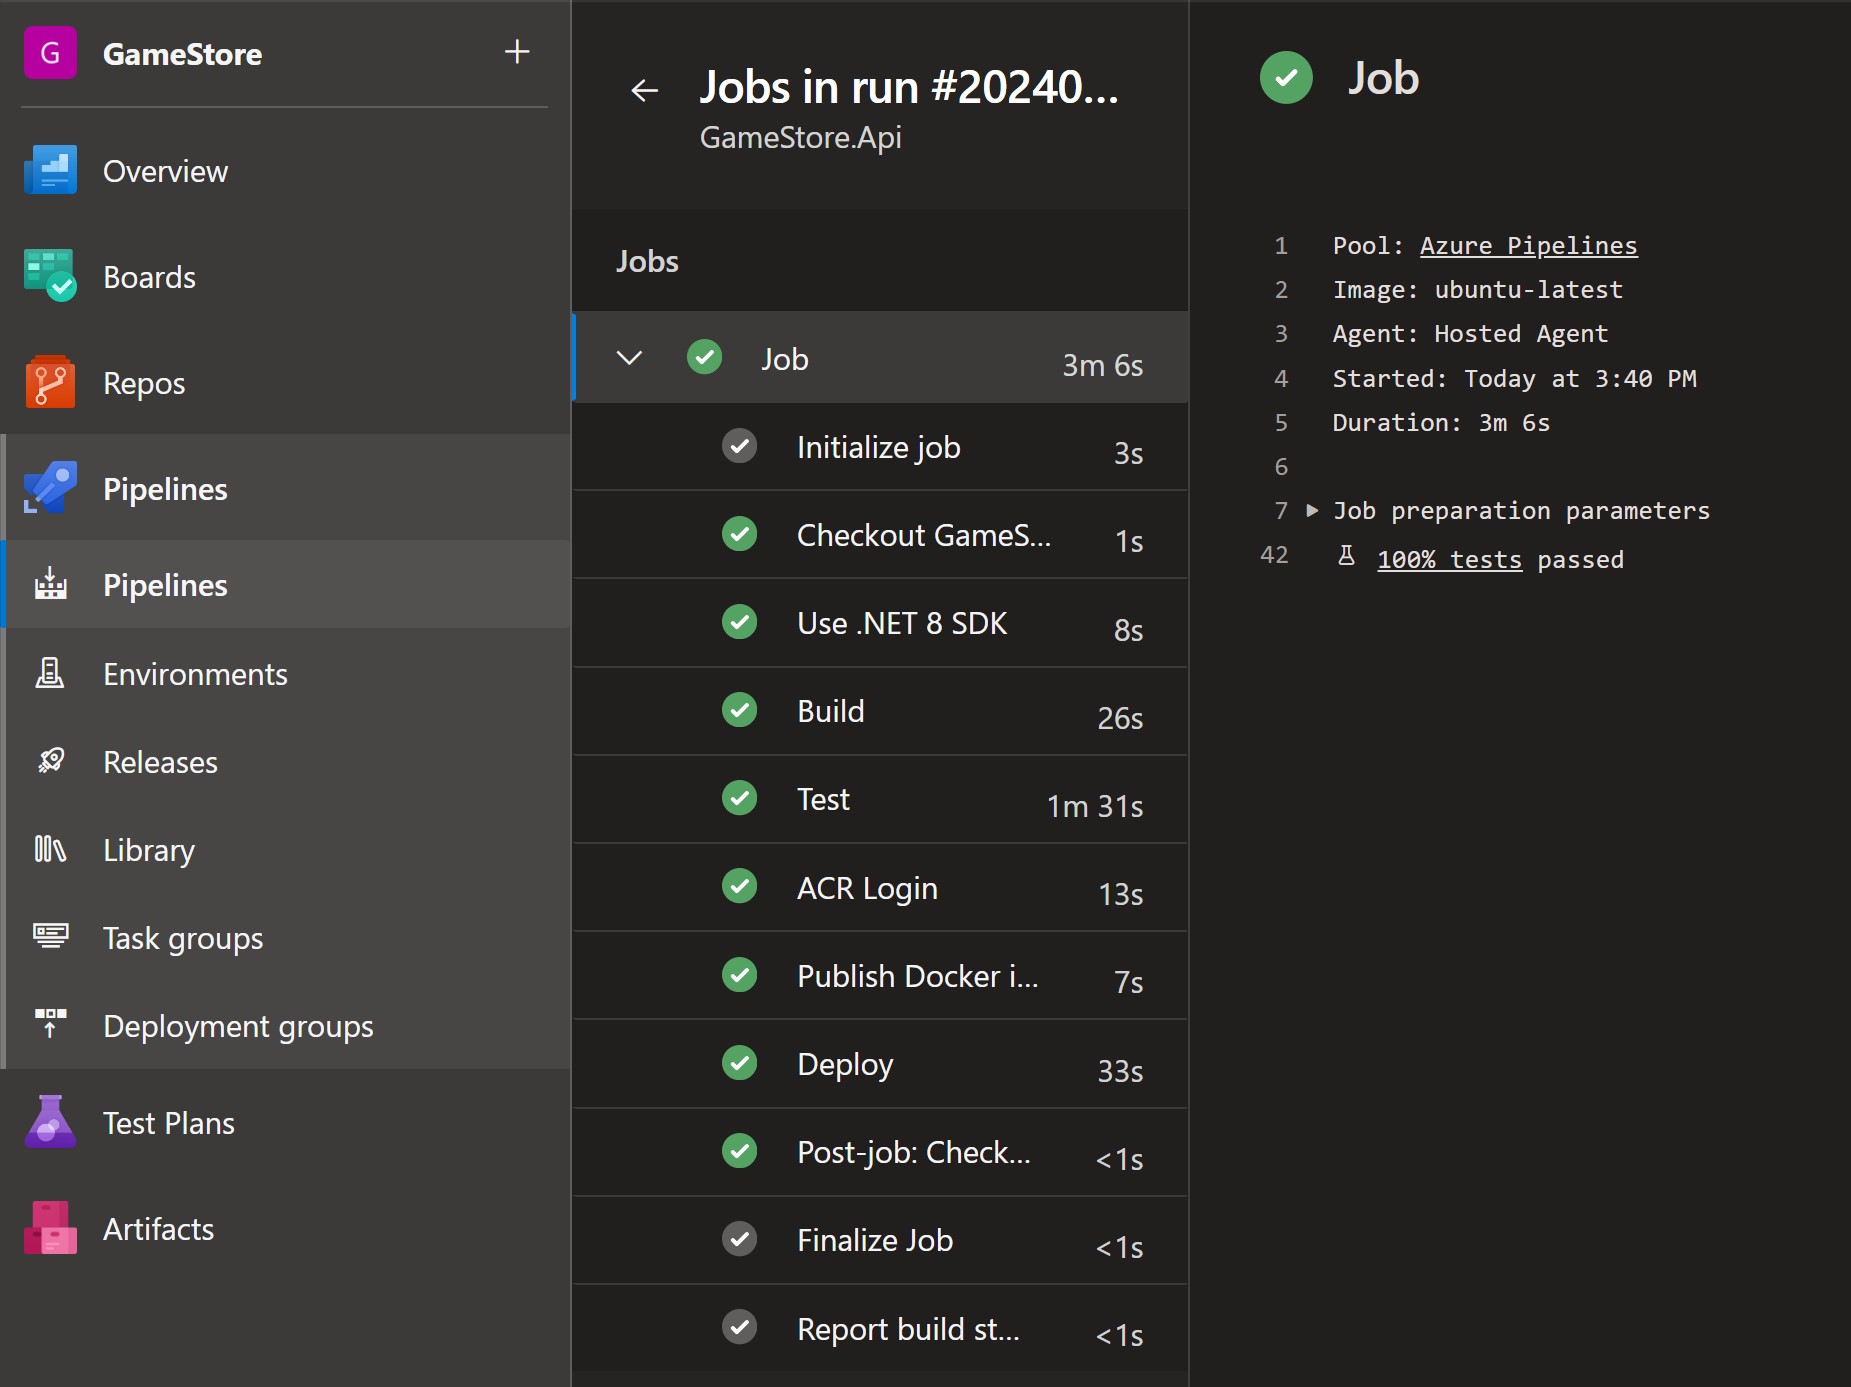
Same pipeline will also run any time you push new changes to your repo, ensuring that:
- You will know right away if you (or anyone else) broke something
- You will have confidence that the latest code is always ready to be deployed to production
- Your users will get the latest features as soon as possible
Mission accomplished!
Whenever you’re ready, there are 3 ways I can help you:
-
.NET Backend Developer Bootcamp: A complete path from ASP.NET Core fundamentals to building, containerizing, and deploying production-ready, cloud-native apps on Azure.
-
Building Microservices With .NET: Transform the way you build .NET systems at scale.
-
Get the full source code: Download the working project from this article, grab exclusive course discounts, and join a private .NET community.
