Read time: 6 minutes
Today I’ll show you how to add MongoDB support to your ASP.NET Core application.
Relational databases are great, but sometimes a NoSQL database like MongoDB can be a better fit to match your requirements.
Sadly, what you know about relational databases won’t apply to MongoDB, since the data is stored differently and there’s no SQL language to interact with the database.
Fortunately, there are some great libraries and tools to help you work with MongoDB in .NET, and I’ll show you how to use them in this tutorial.
Let’s dive in.
What is MongoDB?
MongoDB is a NoSQL database that stores data in flexible, JSON-like documents. It is a popular choice for developers because it is easy to use and can scale with your application.
I like using MongoDB when:
- I need to represent nested relationships in my data
- I want to do rapid prototyping and development where the schema is expected to change frequently
- I want to ensure high write throughput, low latency, and horizontal scalability
MongoDB has support for multiple programming languages, and the C# support is excellent.
Let me show you how to add MongoDB support to an ASP.NET Core API.
A shopping basket ASP.NET Core API
For this tutorial, I have prepared a simple ASP.NET Core API meant to manage the shopping basket of an e-commerce application.
Our minimal API currently defines these 2 endpoints:
app.MapGet("/baskets/{userId}", async (
    Guid userId,
    IBasketRepository repository) =>
{
    Basket basket = await repository.GetAsync(userId)
                                ?? new() { Id = userId };

    return Results.Ok(basket.ToBasketDto());
});

app.MapPut("/baskets/{userId}", async (
    Guid userId,
    UpdateBasketDto updateBasketDto,
    IBasketRepository repository) =>
{
    Basket basket = updateBasketDto.ToEntity(userId);
    await repository.UpsertAsync(userId, basket);

    return Results.NoContent();
});
The first endpoint retrieves the basket for a given user, and the second endpoint updates the basket for a user.
Here are the Basket and BasketItem entities:
public class Basket
{
    public Guid Id { get; set; }

    public List<BasketItem> Items { get; set; } = [];
}

public class BasketItem
{
    public int ProductId { get; set; }
    public required string ProductName { get; set; }
    public decimal Price { get; set; }
    public int Quantity { get; set; }
}
The Id in Basket is the user ID, since each user can have only one basket.
I’ll skip the DTOs and mapping logic since they are not relevant to this tutorial.
What’s more interesting is the IBasketRepository interface, which currently has 2 methods:
- GetAsync: Retrieves the basket for a given user
- UpsertAsync: Creates or updates the basket for a user
With this interface we are using the repository pattern to abstract the data access logic from the API endpoints.
Now we need to implement the interface with a repository that is able to store and retrieve baskets from a MongoDB database.
MongoDB repository implementation
First things first. Let’s install the MongoDB NuGet package into our API project:
dotnet add package Aspire.MongoDB.Driver
Notice that this is not the normal MongoDB C# Driver package, but instead the .NET Aspire MongoDB Component, which not only makes it easier to register MongoDB in the application but also provides health checks, logging and telemetry for free.
If you are new to .NET Aspire, you may want to check out my .NET Aspire article where I explain how to get started with it.
Here’s an initial implementation of our MongoBasketRepository:
public class MongoBasketRepository(IMongoDatabase database) : IBasketRepository
{
    private const string collectionName = "Baskets";
    private readonly IMongoCollection<Basket> collection =
        database.GetCollection<Basket>(collectionName);

    public async Task<Basket> GetAsync(Guid id)
    {
        // TODO
    }

    public async Task UpsertAsync(Guid id, Basket basket)
    {
        // TODO
    }
}
A few things to notice there:
-
An IMongoDatabase instance is injected into the repository’s contructor, giving us access to the MongoDB database. I’ll explain later who is registering this instance.
-
MongoDB uses collections to store documents, just like a relational database uses tables to store rows. We are using a collection named Baskets to store our basket documents.
-
The GetCollection method is used to get a reference to the Baskets collection.
Now let’s implement the GetAsync method:
public async Task<Basket> GetAsync(Guid id)
{
    FilterDefinition<Basket> filter = Builders<Basket>.Filter.Eq(basket => basket.Id, id);
    return await collection.Find(filter).FirstOrDefaultAsync();
}
With the Builders and Filter classes, we can build a filter to query the collection. In this case, we are filtering by the basket’s Id field.
The Find method returns a cursor that we can use to iterate over the results. We are using FirstOrDefaultAsync to get the first document that matches the filter.
You could also use LINQ to query the collection, but I prefer using filter definitions because they are more flexible and powerful.
Now let’s implement the UpsertAsync method:
public async Task UpsertAsync(Guid id, Basket basket)
{
    ArgumentNullException.ThrowIfNull(basket);

    FilterDefinition<Basket> filter = Builders<Basket>.Filter.Eq(basket => basket.Id, id);

    await collection.ReplaceOneAsync(filter,
                                        basket,
                                        new ReplaceOptions { IsUpsert = true });
}
In this method, we are using the ReplaceOneAsync method to replace the document that matches the filter in the collection.
The really cool thing here is that we are using the IsUpsert option to create the document if it doesn’t exist. This is a powerful feature of MongoDB that allows us to create or update a document with a single operation.
This upsert capability is one reason why I’m sticking to using FilterDefinitions for now instead of using the recently released MongoDB Entity Framework Core Provider (you cannot do upserts with that).
Here’s the complete implementation, with a small helper method to build the filter:
public class MongoBasketRepository(IMongoDatabase database) : IBasketRepository
{
    private const string collectionName = "Baskets";
    private readonly IMongoCollection<Basket> collection =
        database.GetCollection<Basket>(collectionName);

    public async Task<Basket> GetAsync(Guid id)
    {
        FilterDefinition<Basket> filter = BuildIdFilter(id);
        return await collection.Find(filter).FirstOrDefaultAsync();
    }

    public async Task UpsertAsync(Guid id, Basket basket)
    {
        ArgumentNullException.ThrowIfNull(basket);

        var filter = BuildIdFilter(id);

        await collection.ReplaceOneAsync(filter,
                                         basket,
                                         new ReplaceOptions { IsUpsert = true });
    }

    private static FilterDefinition<Basket> BuildIdFilter(Guid id)
        => Builders<Basket>.Filter.Eq(basket => basket.Id, id);
}
If you want to take things further, you could add methods to get all baskets, delete a basket, and more. I go over those, and even how to implement a generic MongoDB repository, in my The .NET Developer Bootcamp.
Now let’s see what to do to register that repository in the application.
MongoDB and repository registration
The MongoBasketRepository needs an IMongoDatabase instance to work, and to get that instance you usually have to do something like this:
var connectionString = "mongodb://localhost:27017/gamestore-db";
MongoClient client = new(connectionString);
IMongoDatabase database = client.GetDatabase("gamestore-db");
However, since we are using the .NET Aspire MongoDB Component, we can get all that done with this one line:
builder.AddMongoDBClient("gamestore-db");
Here, gamestore-db is the name of the connection string in the configuration system. The AddMongoDBClient method will read the connection string from the configuration and register the IMongoDatabase instance in the service container.
In the next section I’ll tell you how gamestore-db is defined in the configuration system, but for now we also need these lines in Program.cs:
builder.Services.AddSingleton<IBasketRepository, MongoBasketRepository>();
BsonSerializer.RegisterSerializer(new GuidSerializer(BsonType.String));
That will register the repository in the service container and will also store GUIDs as strings in the database (a personal preference).
Program.cs looks like this now:
var builder = WebApplication.CreateBuilder(args);

builder.AddServiceDefaults();

builder.AddMongoDBClient("gamestore-db");
builder.Services.AddSingleton<IBasketRepository, MongoBasketRepository>();
BsonSerializer.RegisterSerializer(new GuidSerializer(BsonType.String));

var app = builder.Build();

app.MapDefaultEndpoints();

app.MapGet("/baskets/{userId}", async (
    Guid userId,
    IBasketRepository repository) =>
{
    Basket basket = await repository.GetAsync(userId)
                                ?? new() { Id = userId };

    return Results.Ok(basket.ToBasketDto());
});

app.MapPut("/baskets/{userId}", async (
    Guid userId,
    UpdateBasketDto updateBasketDto,
    IBasketRepository repository) =>
{
    Basket basket = updateBasketDto.ToEntity(userId);

    await repository.UpsertAsync(userId, basket);

    return Results.NoContent();
});

app.Run();
Notice the additional calls to AddServiceDefaults and MapDefaultEndpoints, which won’t compile for now since they are enabled by the .NET Aspire ServiceDefaults project, which we’ll create in the next section.
Let’s now see how gamestore-db is defined in the configuration system.
Adding .NET Aspire orchestration
Instead of having to figure out a way to start and configure the MongoDB Docker container and store the relevant connection string in the configuration system, we can use .NET Aspire Orchestration to do all that for us.
To add .NET Aspire support, you can start by creating your .NET Aspire projects:
dotnet new aspire -n GameStore
That will generate a GameStore.AppHost and GameStore.ServiceDefaults projects.
Make sure you add a reference from your API project to the GameStore.ServiceDefaults project, so that the AddServiceDefaults and MapDefaultEndpoints calls in your API project can start working.
Now, add a reference from your new GameStore.AppHost project to your API project and then add this code to the AppHost Program.cs file:
var builder = DistributedApplication.CreateBuilder(args);

var basketDb = builder.AddMongoDB("mongodb")
                      .AddDatabase("gamestore-db");

builder.AddProject<Projects.GameStore_Api>("gamestore-api")
       .WithReference(basketDb);

builder.Build().Run();
This is where the configuration magic happens. Let’s break it down a bit:
-
AddMongoDb is adding a MongoDB Docker container to the application model. The mongodb parameter is the name of the container resource in the model.
-
AddDatabase adds a database resource to the application model. The gamestore-db parameter is the name of the database and is the name we used in the AddMongoDBClient method in the API project.
-
AddProject adds the API project to the application model.
-
WithReference establishes a reference between the API project and the database resource, effectively injecting the MongoDB database connection string into the API project’s configuration.
So, in essence, those few lines are saying:
“I have an API that needs a MongoDB database. You go figure out the details to make the required database available to the API.”
Test the MongoDB integration
Open a terminal in the GameStore.AppHost project and run the project
dotnet run
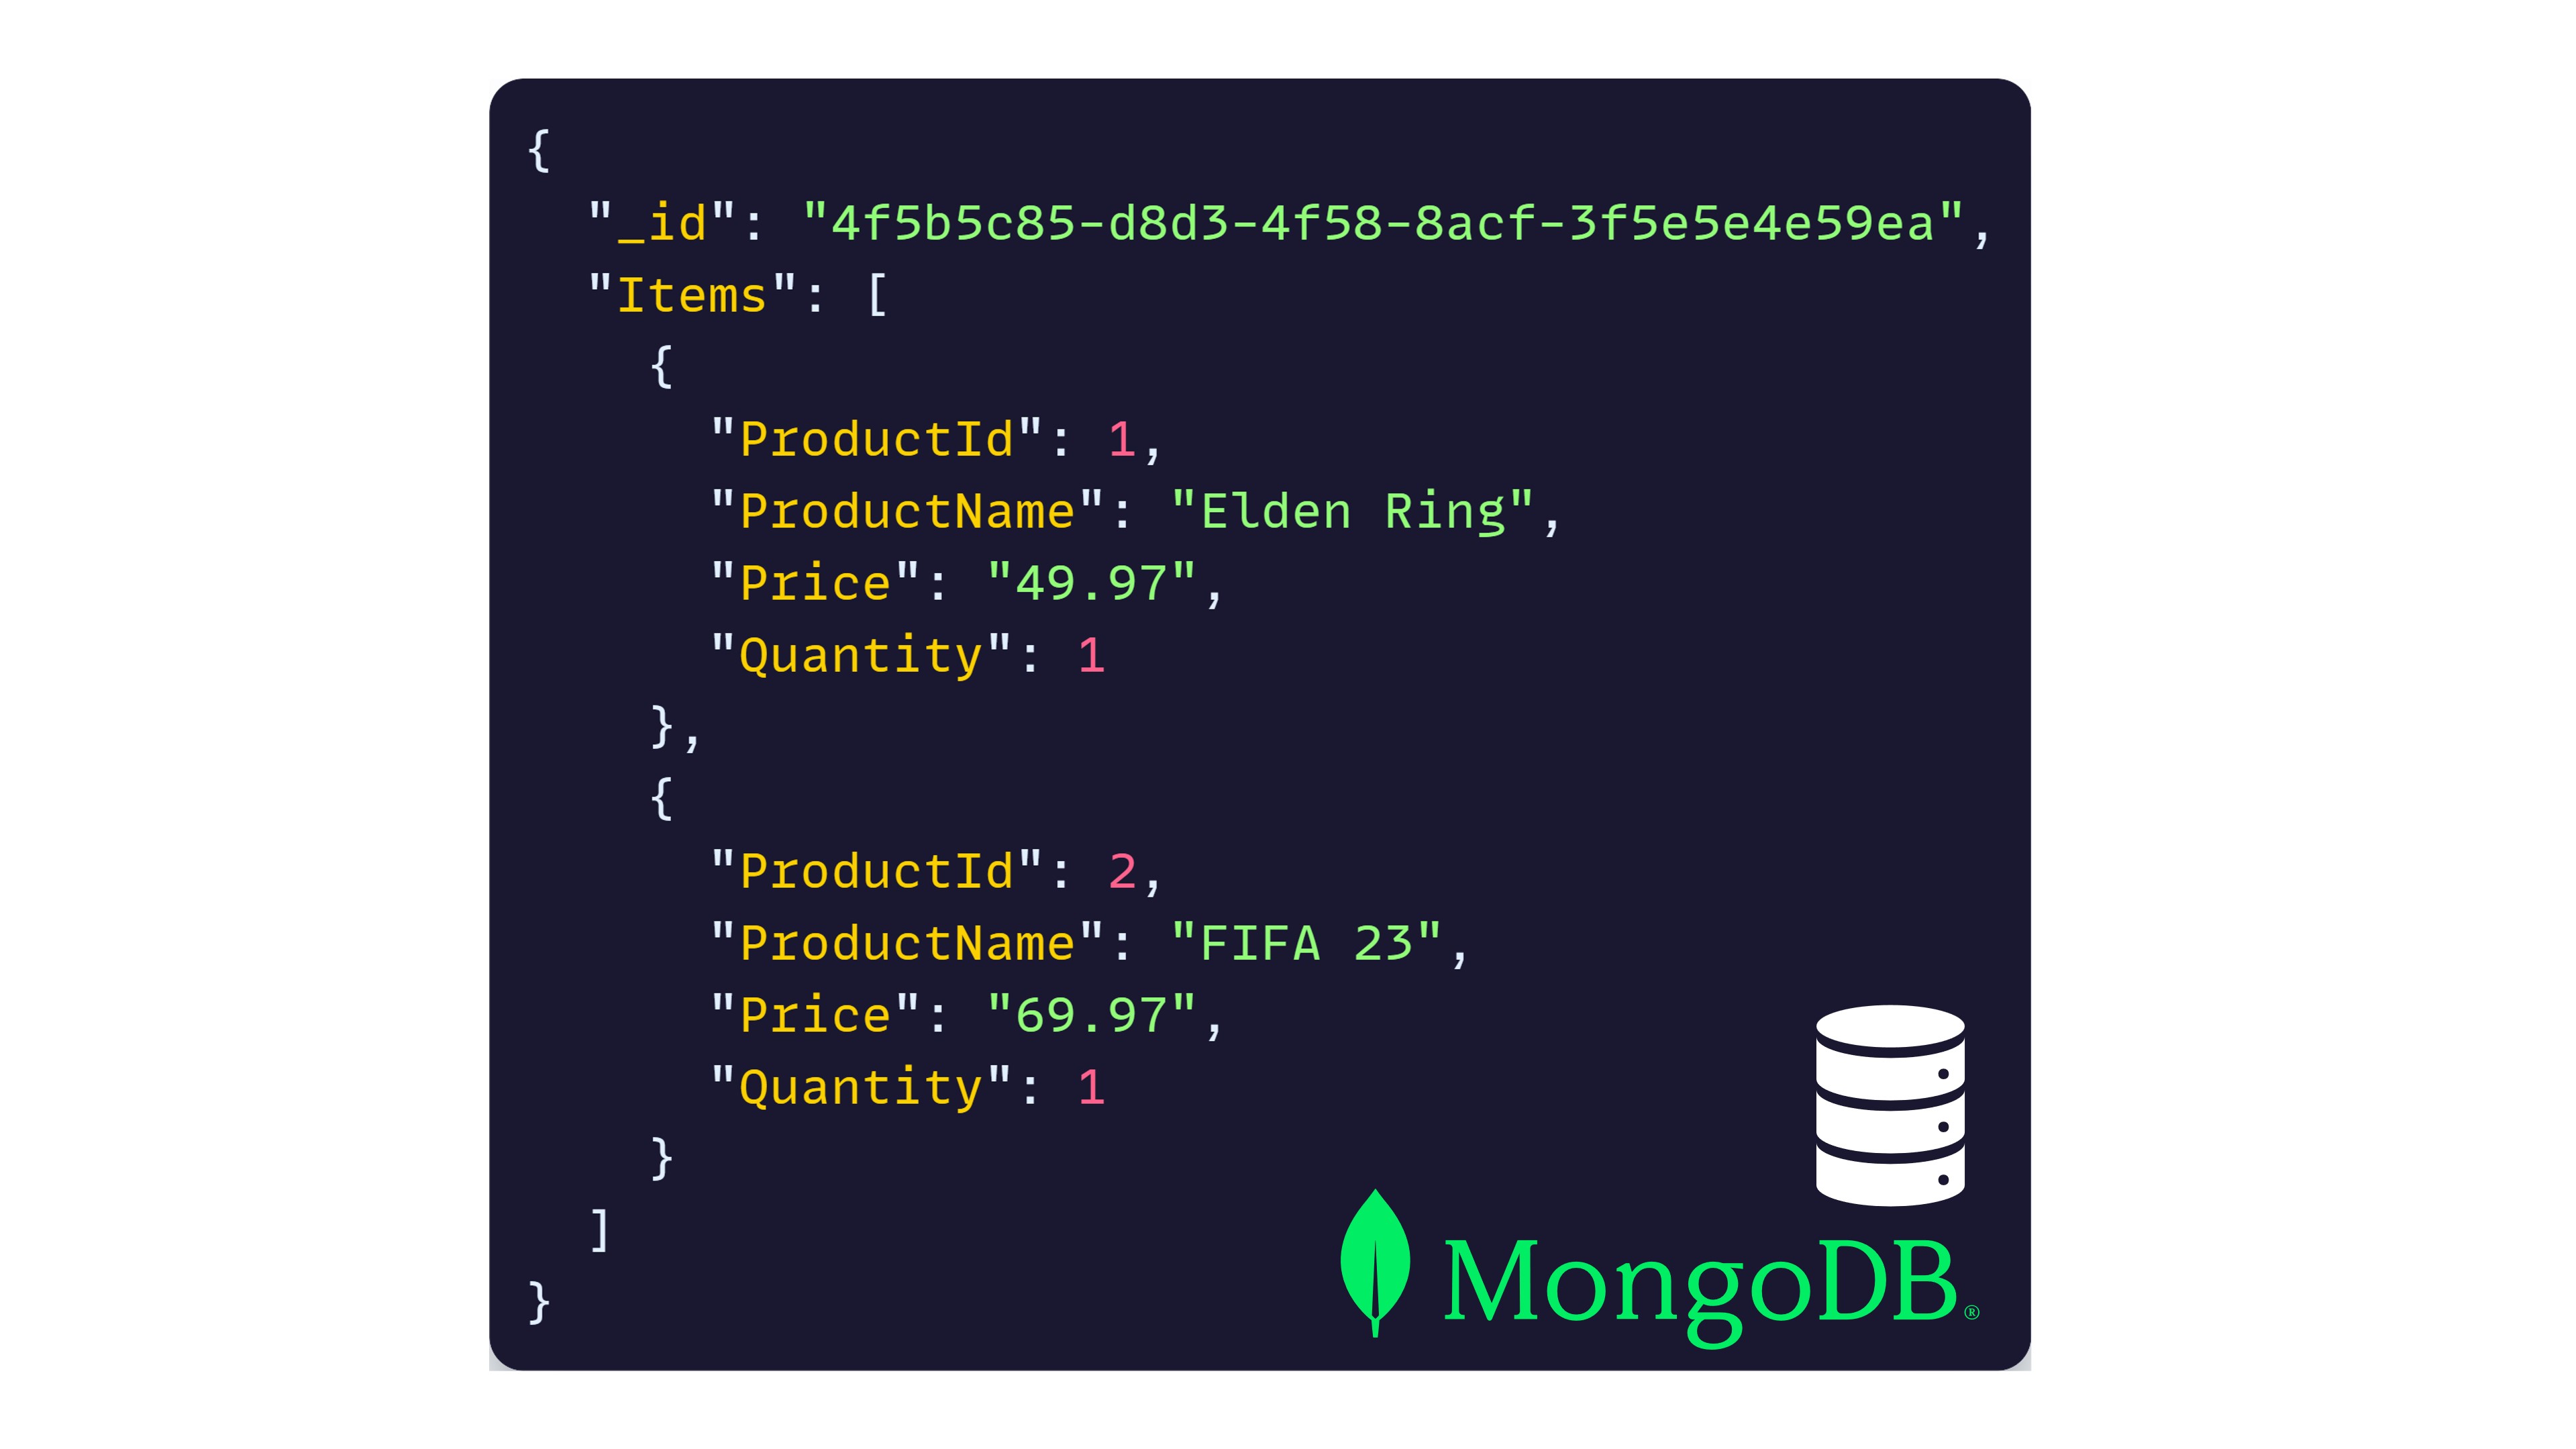
Now, send a PUT request to the API to upsert the basket for a user:
PUT http://localhost:5261/baskets/4f5b5c85-d8d3-4f58-8acf-3f5e5e4e59ea
Content-Type: application/json

{
    "items": [
        {
            "ProductId": 1,
            "ProductName": "Elden Ring",
            "Price": 49.97,
            "Quantity": 1
        },
        {
            "ProductId": 2,
            "ProductName": "FIFA 23",
            "Price": 69.97,
            "Quantity": 1
        }
    ]
}
To confirm the data made it to the database, you can either use your GET endpoint, or peek into your new MongoDB database directly.
But where is the database? Well, start by browsing to your .NET Aspire dashboard using the URL provided in the terminal output:
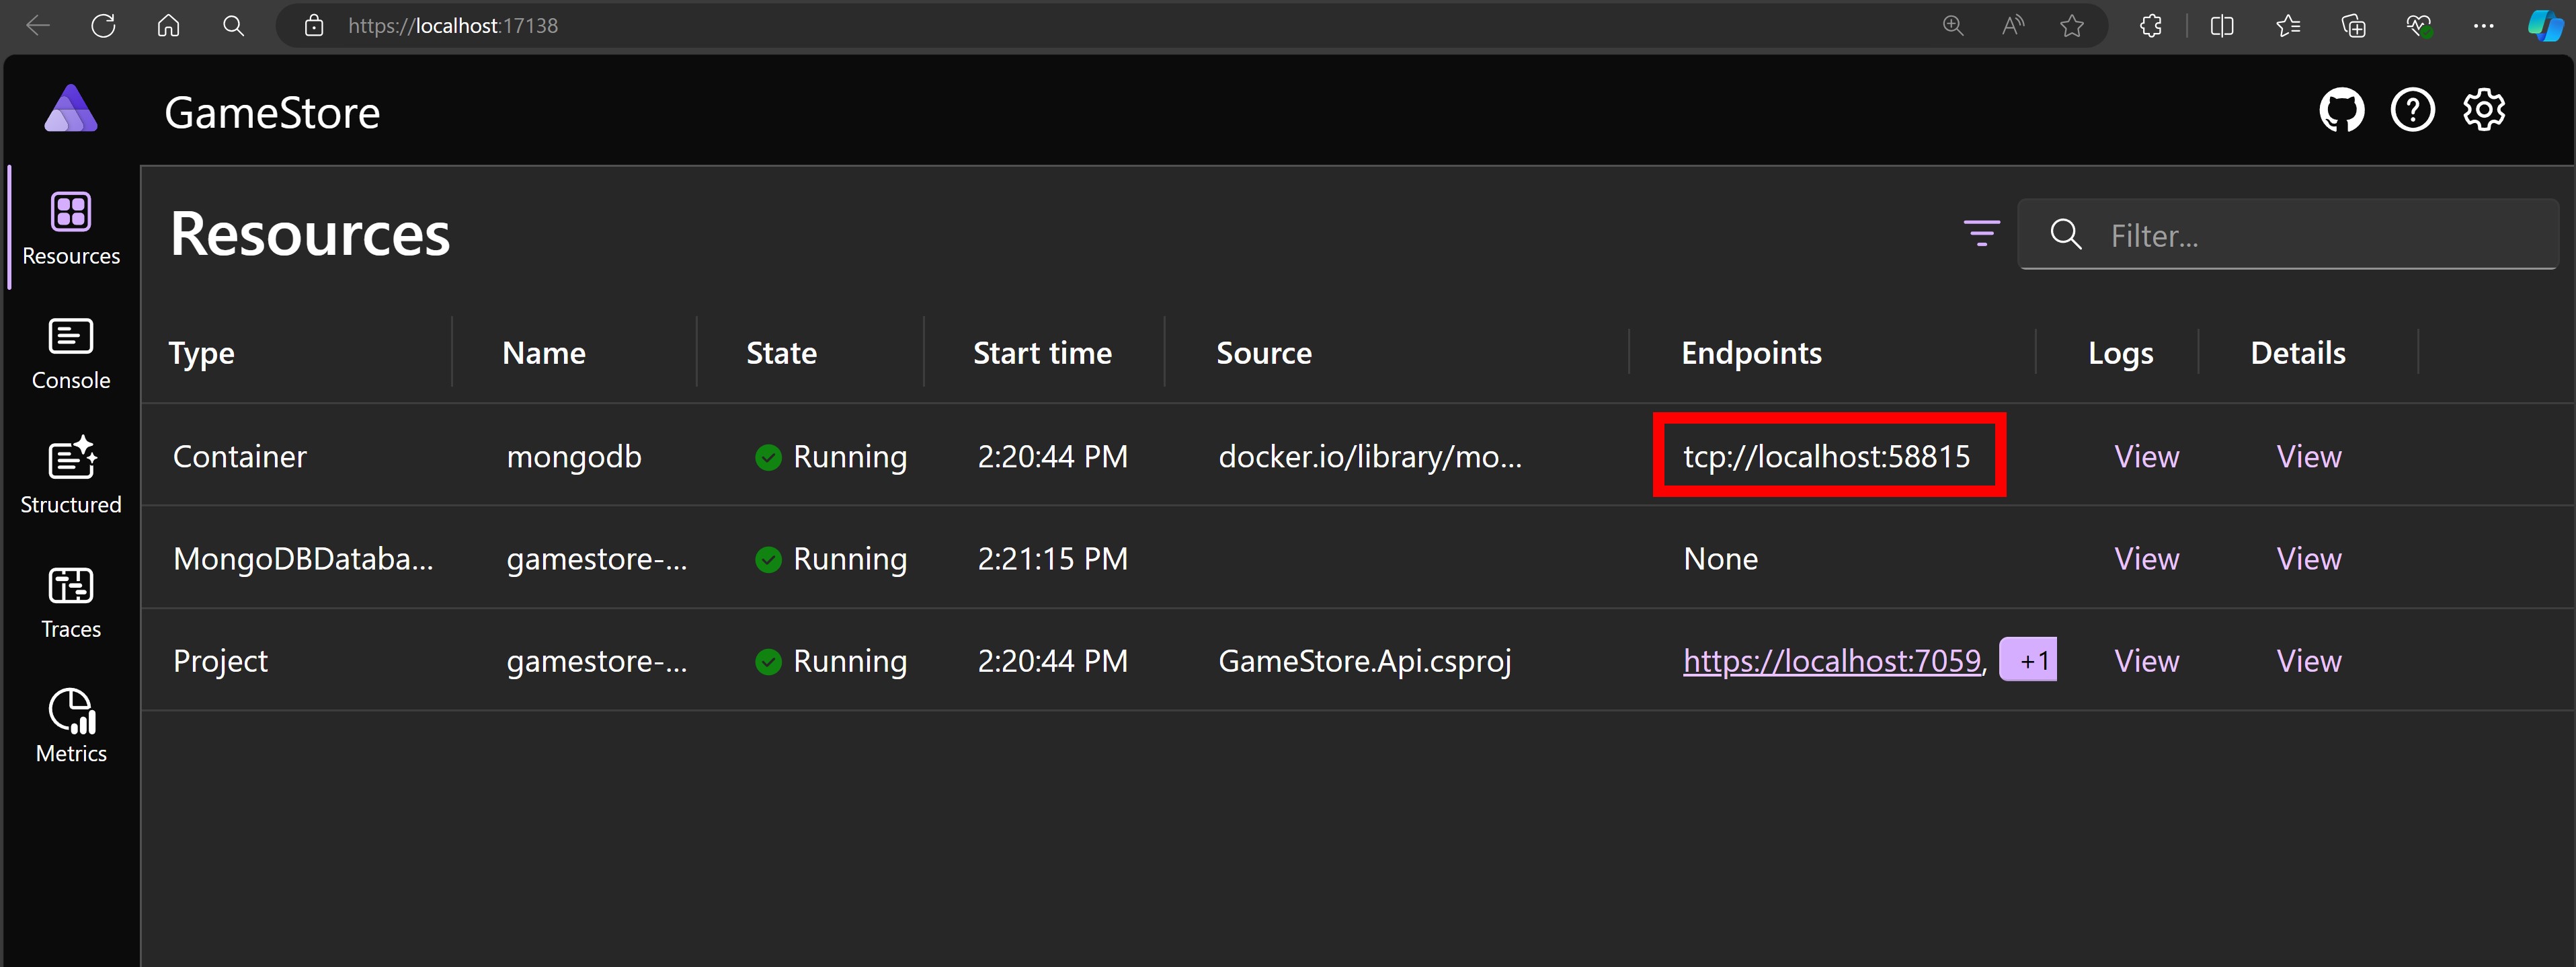
The endpoint for the MongoDB database is listed there, and you can use it to connect to the database using your preferred MongoDB client.
Here I connected using the MongoDB extension for VS Code:
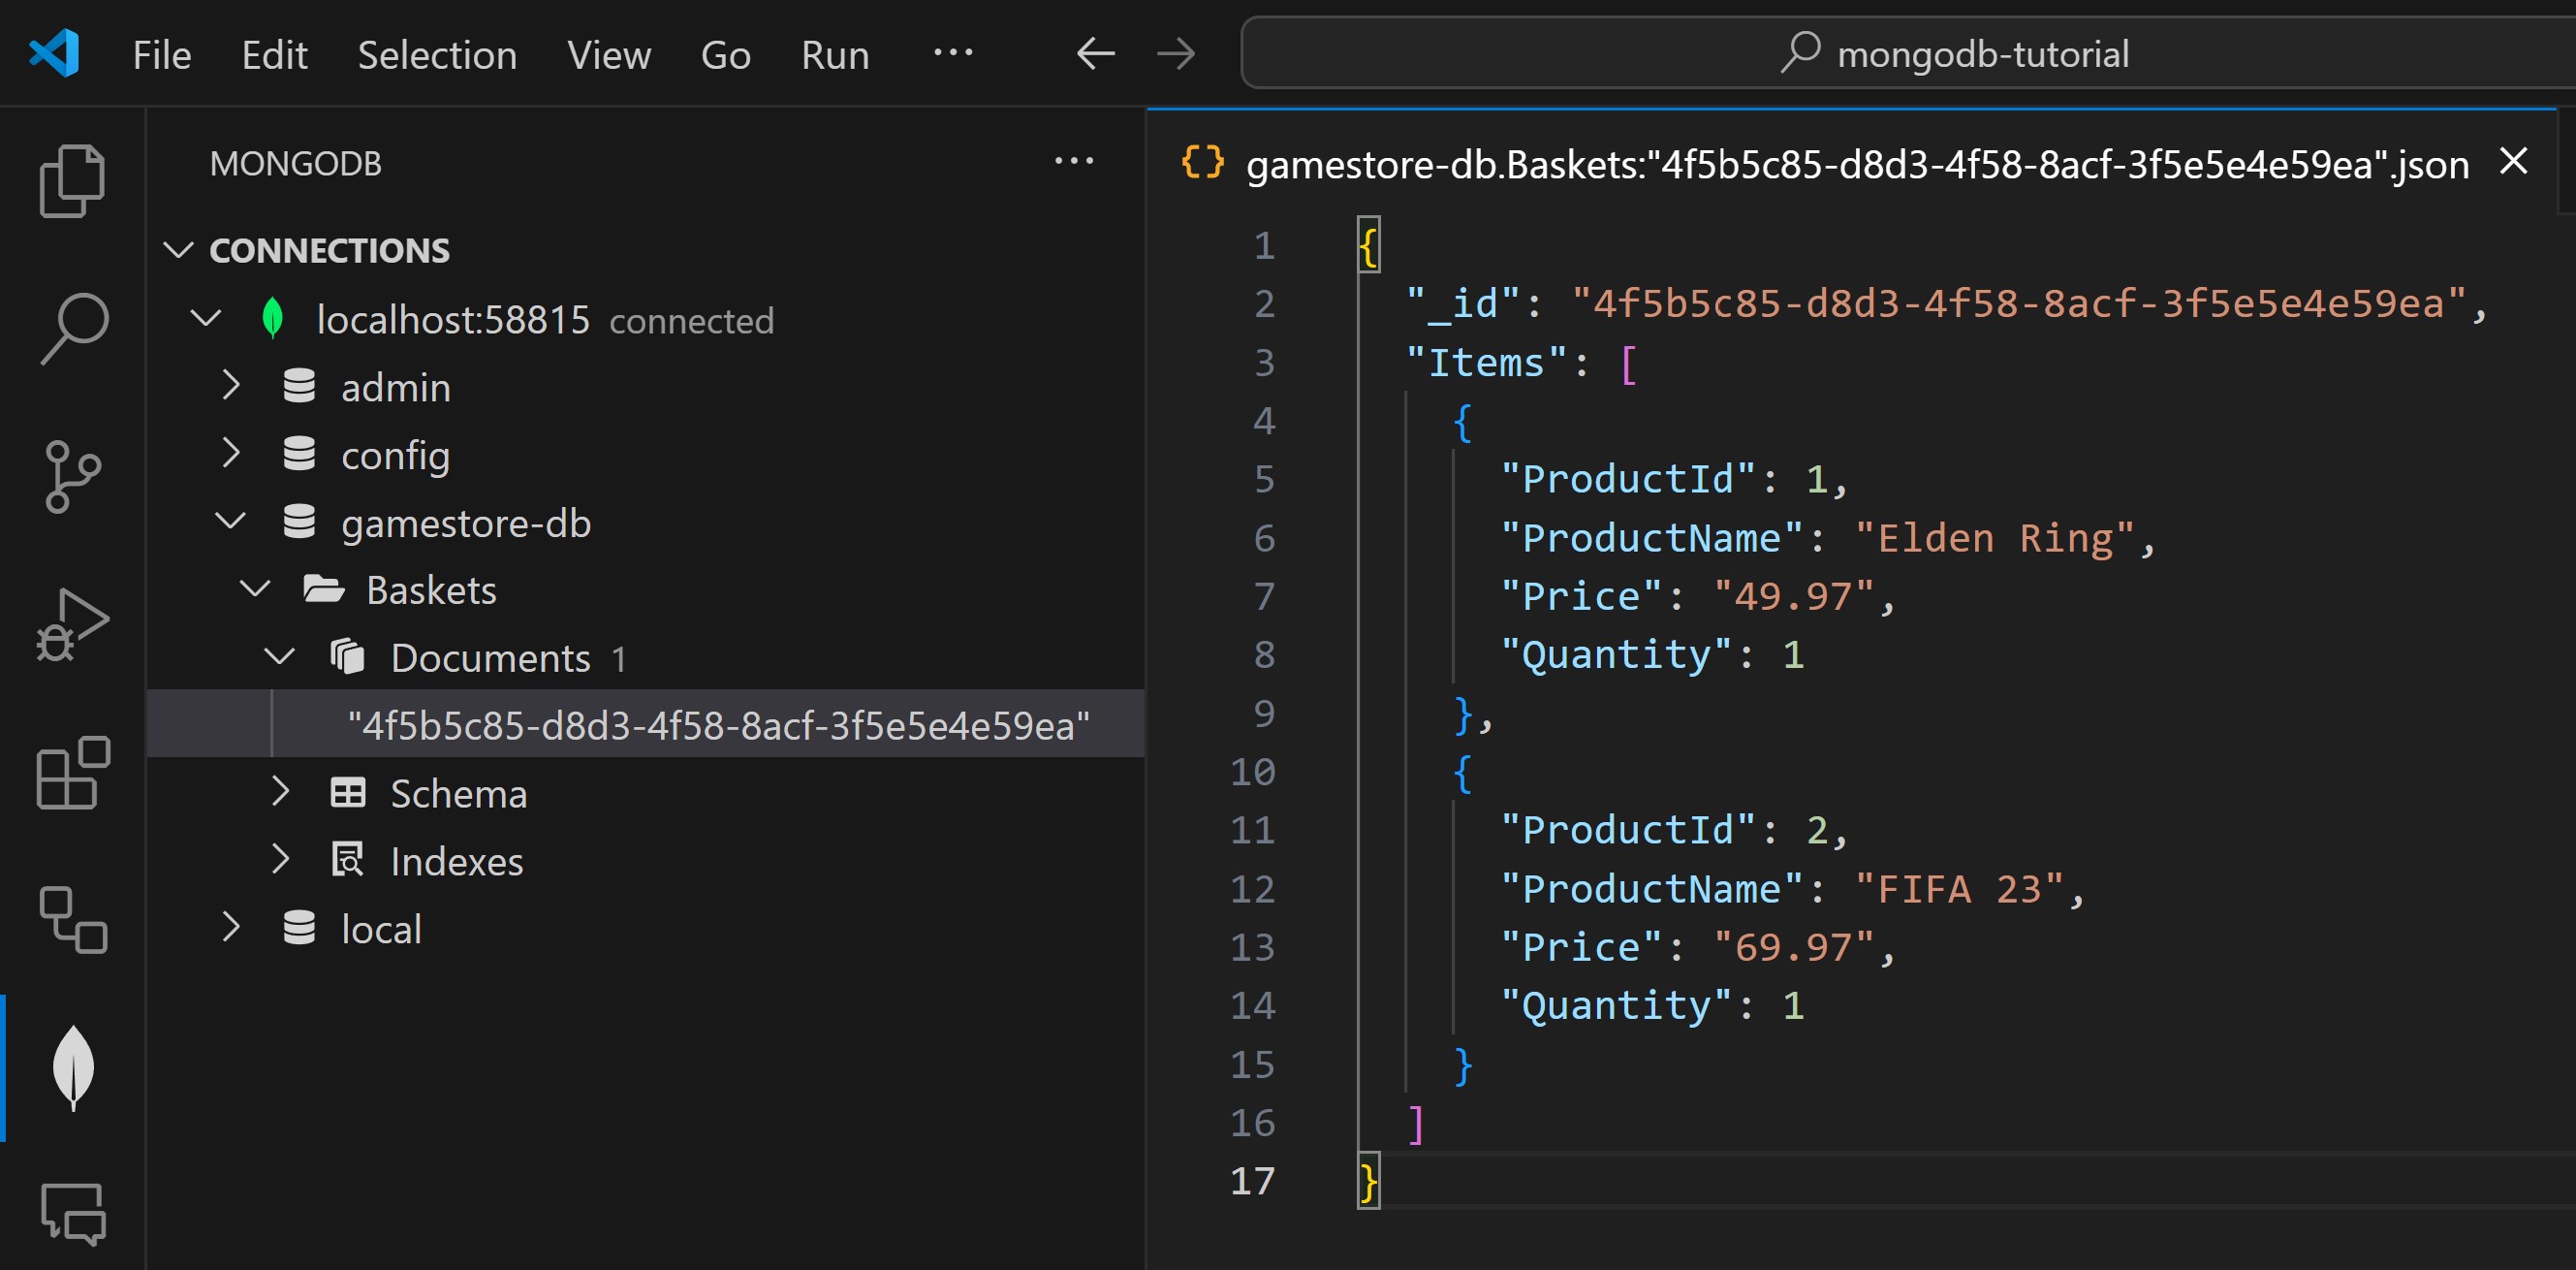
Mission accomplished!
Whenever you’re ready, here’s how I can help:
The .NET Developer Bootcamp: A complete path from ASP.NET Core fundamentals to building, containerizing, and deploying production-ready, cloud-native apps on Azure.
