Read time: 11 minutes
Today I’ll show you how to secure your ASP.NET Core applications using OpenID Connect (OIDC) and Microsoft Entra ID.
OIDC is the industry-standard protocol for authentication and is pretty much the go-to choice for securing full-stack applications these days.
But the sad thing is that there are few things more frustrating than trying to understand and implement OIDC for the first time.
However, it’s not rocket science and once you get the hang of it, you’ll be able to secure your applications with confidence.
Let’s dive in.
What is OpenID Connect?
Any OpenID Connect (OIDC) definition involves OAuth 2.0, so you should first know that OAuth 2.0 is the industry-standard protocol for authorization, allowing a website or application to access resources hosted by other web apps on behalf of a user.
OIDC is nothing more than an authentication protocol built on top of OAuth 2.0 that allows clients to verify the identity of the end-user based on the authentication performed by an authorization server.
OIDC supports several flows to authenticate users depending on your scenario, but one of the most modern and secure flows you can use is the Authorization Code Flow with PKCE.
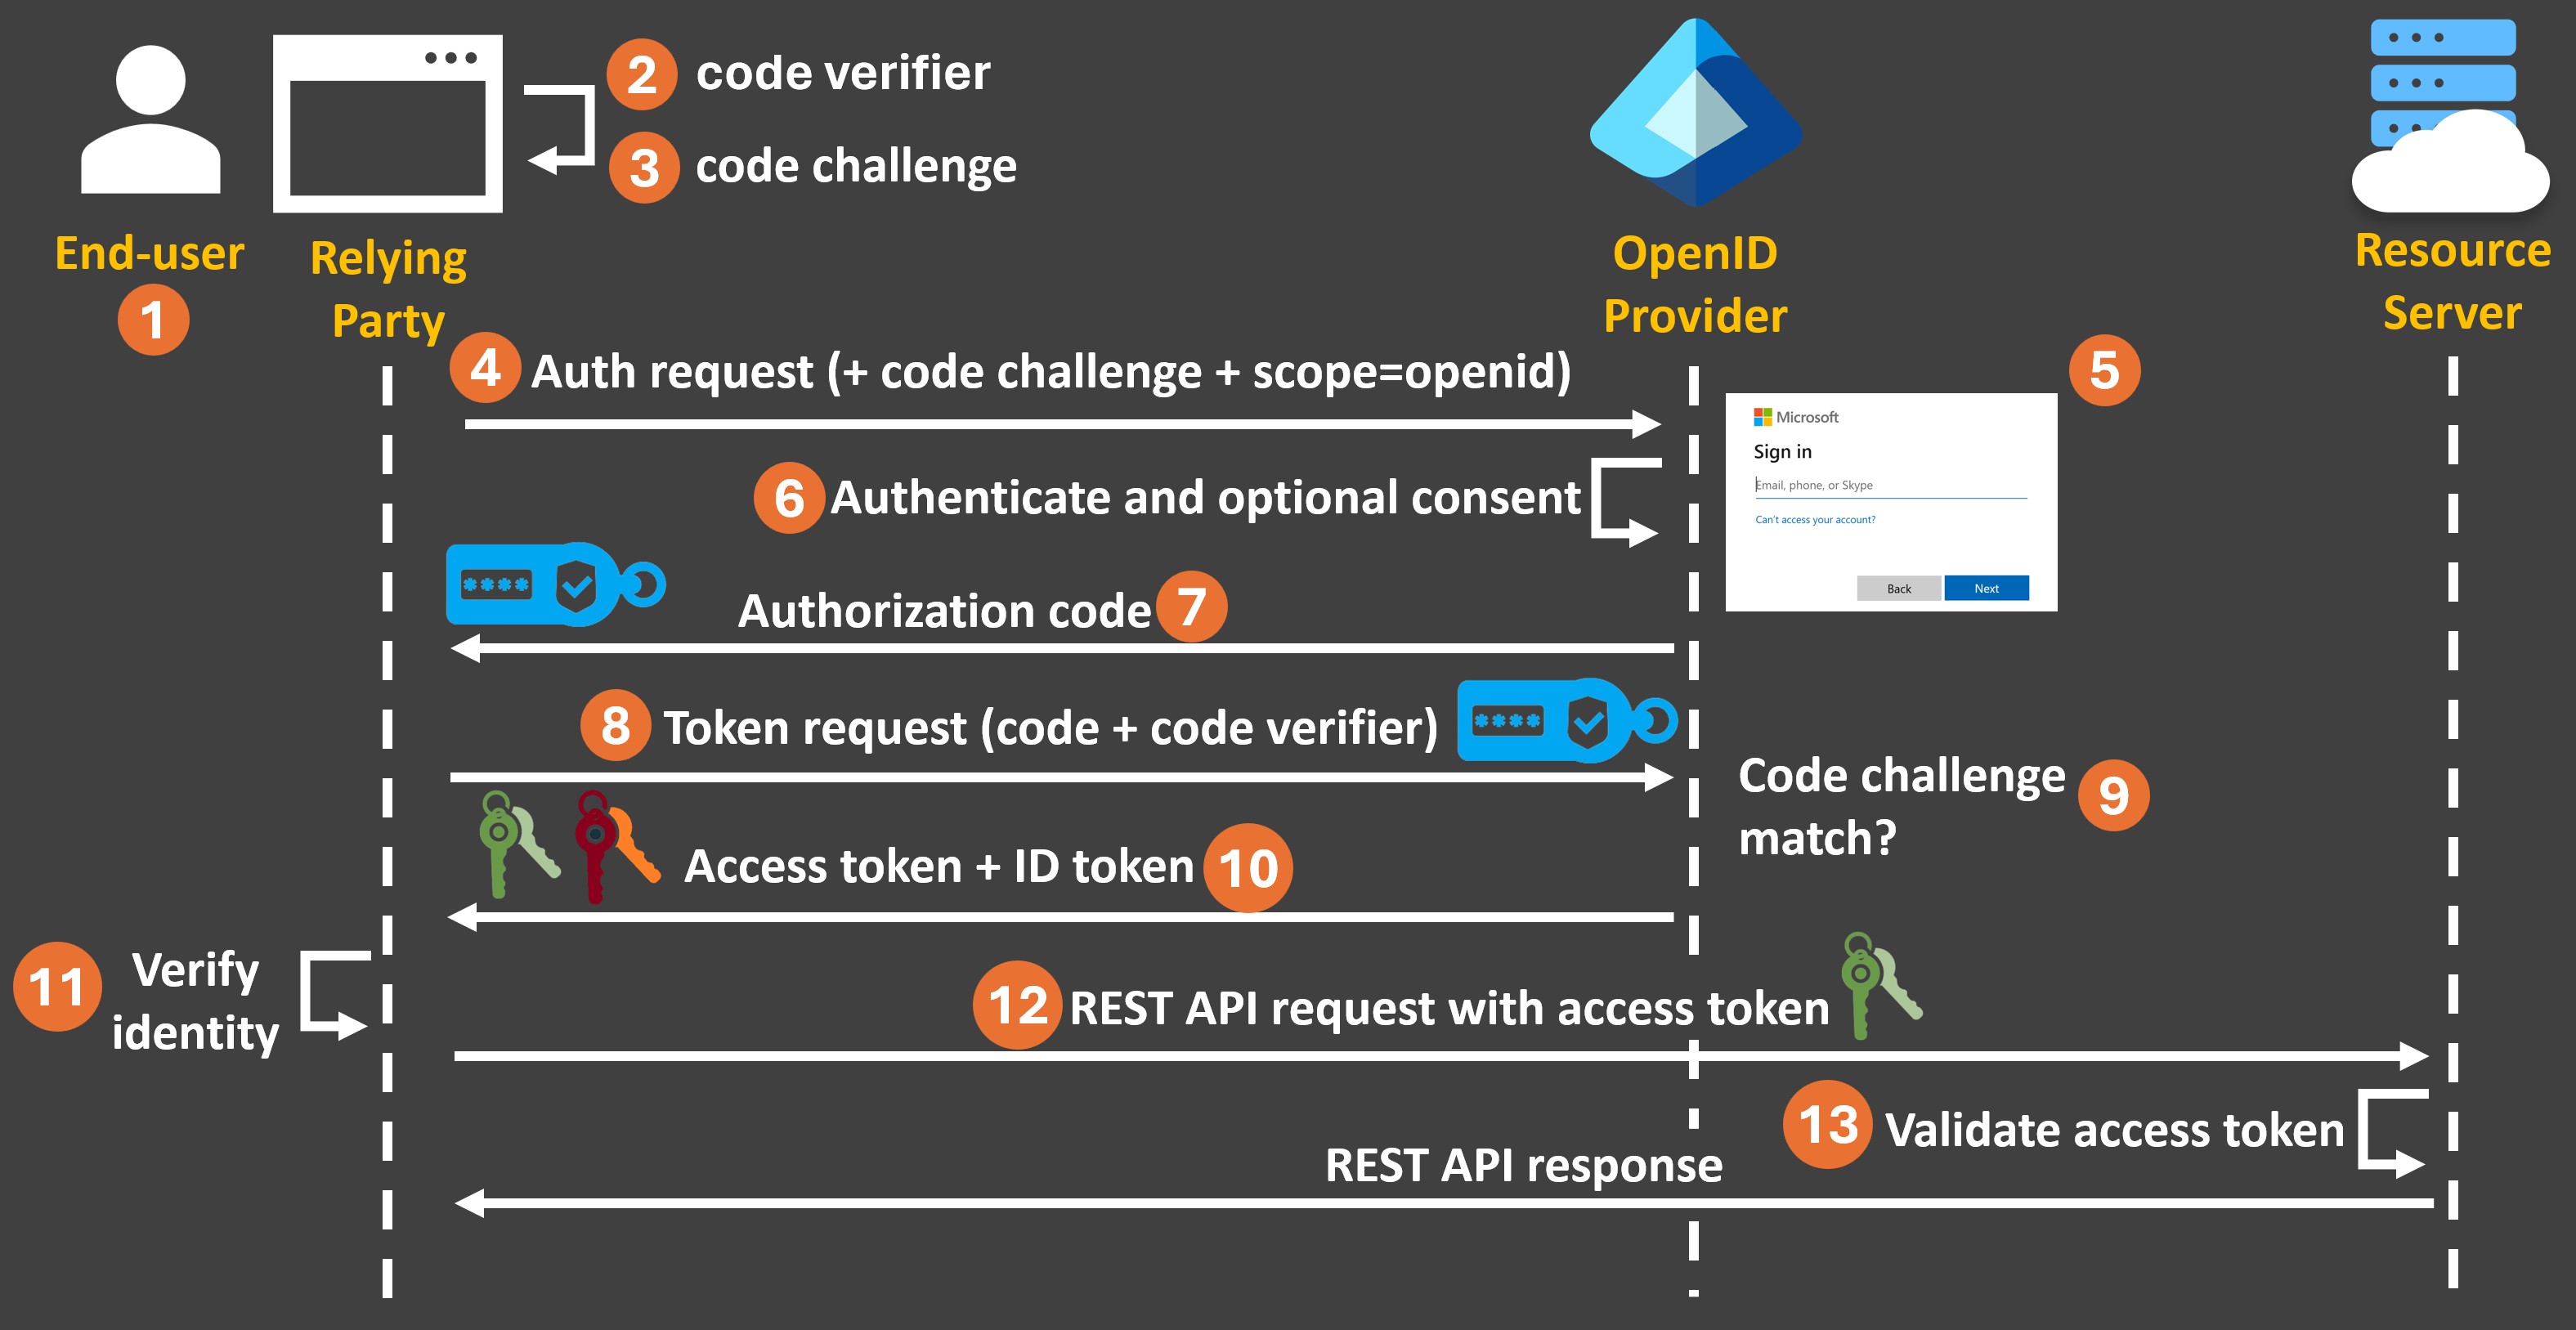
Here’s how the OIDC Authorization Code Flow with PKCE works:
-
The end-user initiates an authorization request to perform some action in the resource server (say, query resources from an ASP.NET Core API) via a client, also known as the relying party.
-
The client generates a code verifier, which is a hard-to-guess value that will be used later in the flow.
-
The client then generates a code challenge, which is an encoded hash value derived from the code verifier.
-
The client sends the code challenge, along with the openid scope, to the authorization server, also known as the OpenID provider. The openid scope indicates that the client wants to authenticate the user.
-
The OpenID provider presents the sign-in page where the end-user can authenticate.
-
After authentication, the OpenID provider might optionally also present an additional page where the end-user can provide explicit consent to which actions can be performed on the resources he owns.
-
After this, the OpenID provider generates an authorization code which it sends back to the client. It also stores the code challenge for future verification
-
Now, the client can request an authorization token by using the received authorization code plus the code verifier it had created at the start of the flow.
-
The OpenID provider verifies the authorization token request by generating the code challenge itself out of the received code verifier and comparing it with the code challenge it had already stored.
-
If all looks good, the OpenID provider generates two tokens: an access token and an ID token.
-
The client can verify the identity of the end-user via the ID token.
-
The client can send requests to the resource server to query for the resources it needs using the access token.
-
The resource server validates the received access token and if all looks good it executes the requested action and returns the corresponding response.
I love this flow because of 3 key reasons:
-
Enhanced Security: Prevents authorization code interception attacks by binding the authorization code to a code verifier.
-
Defense in Depth: Adds an additional layer of security beyond the client secret, making the overall authentication process more robust.
-
Compliance with Best Practices: Aligns with modern security standards and recommendations for OAuth 2.0 and OpenID Connect, ensuring a more secure implementation.
Choosing an OpenID Provider
There are several OpenID providers you can use to enable OIDC in your ASP.NET Core applications.
A few of the popular ones I have used in the past are:
There are many others, but the key thing is that they all implement OIDC, which means that they can all enable the OIDC flow I described above.
Plus, once you understand OIDC via one of them, you can easily switch between providers if needed.
The choice of provider will depend on your specific requirements and constraints, like:
- How much you are willing to pay
- How much control you want over the authentication process
- How much you want to rely on third-party services.
For this post, I’ll focus on Microsoft Entra ID because it’s part of the Microsoft ecosystem, and it’s a great starting point to understand how OIDC works.
Prefer to watch instead? Here’s a full walkthrough:
Let’s see how to secure an ASP.NET Core full-stack application via Microsoft Entra ID in a few simple steps.
Step 1: Register your application in Microsoft Entra ID
Our full-stack application is made of an ASP.NET Core API backend and a Blazor frontend.
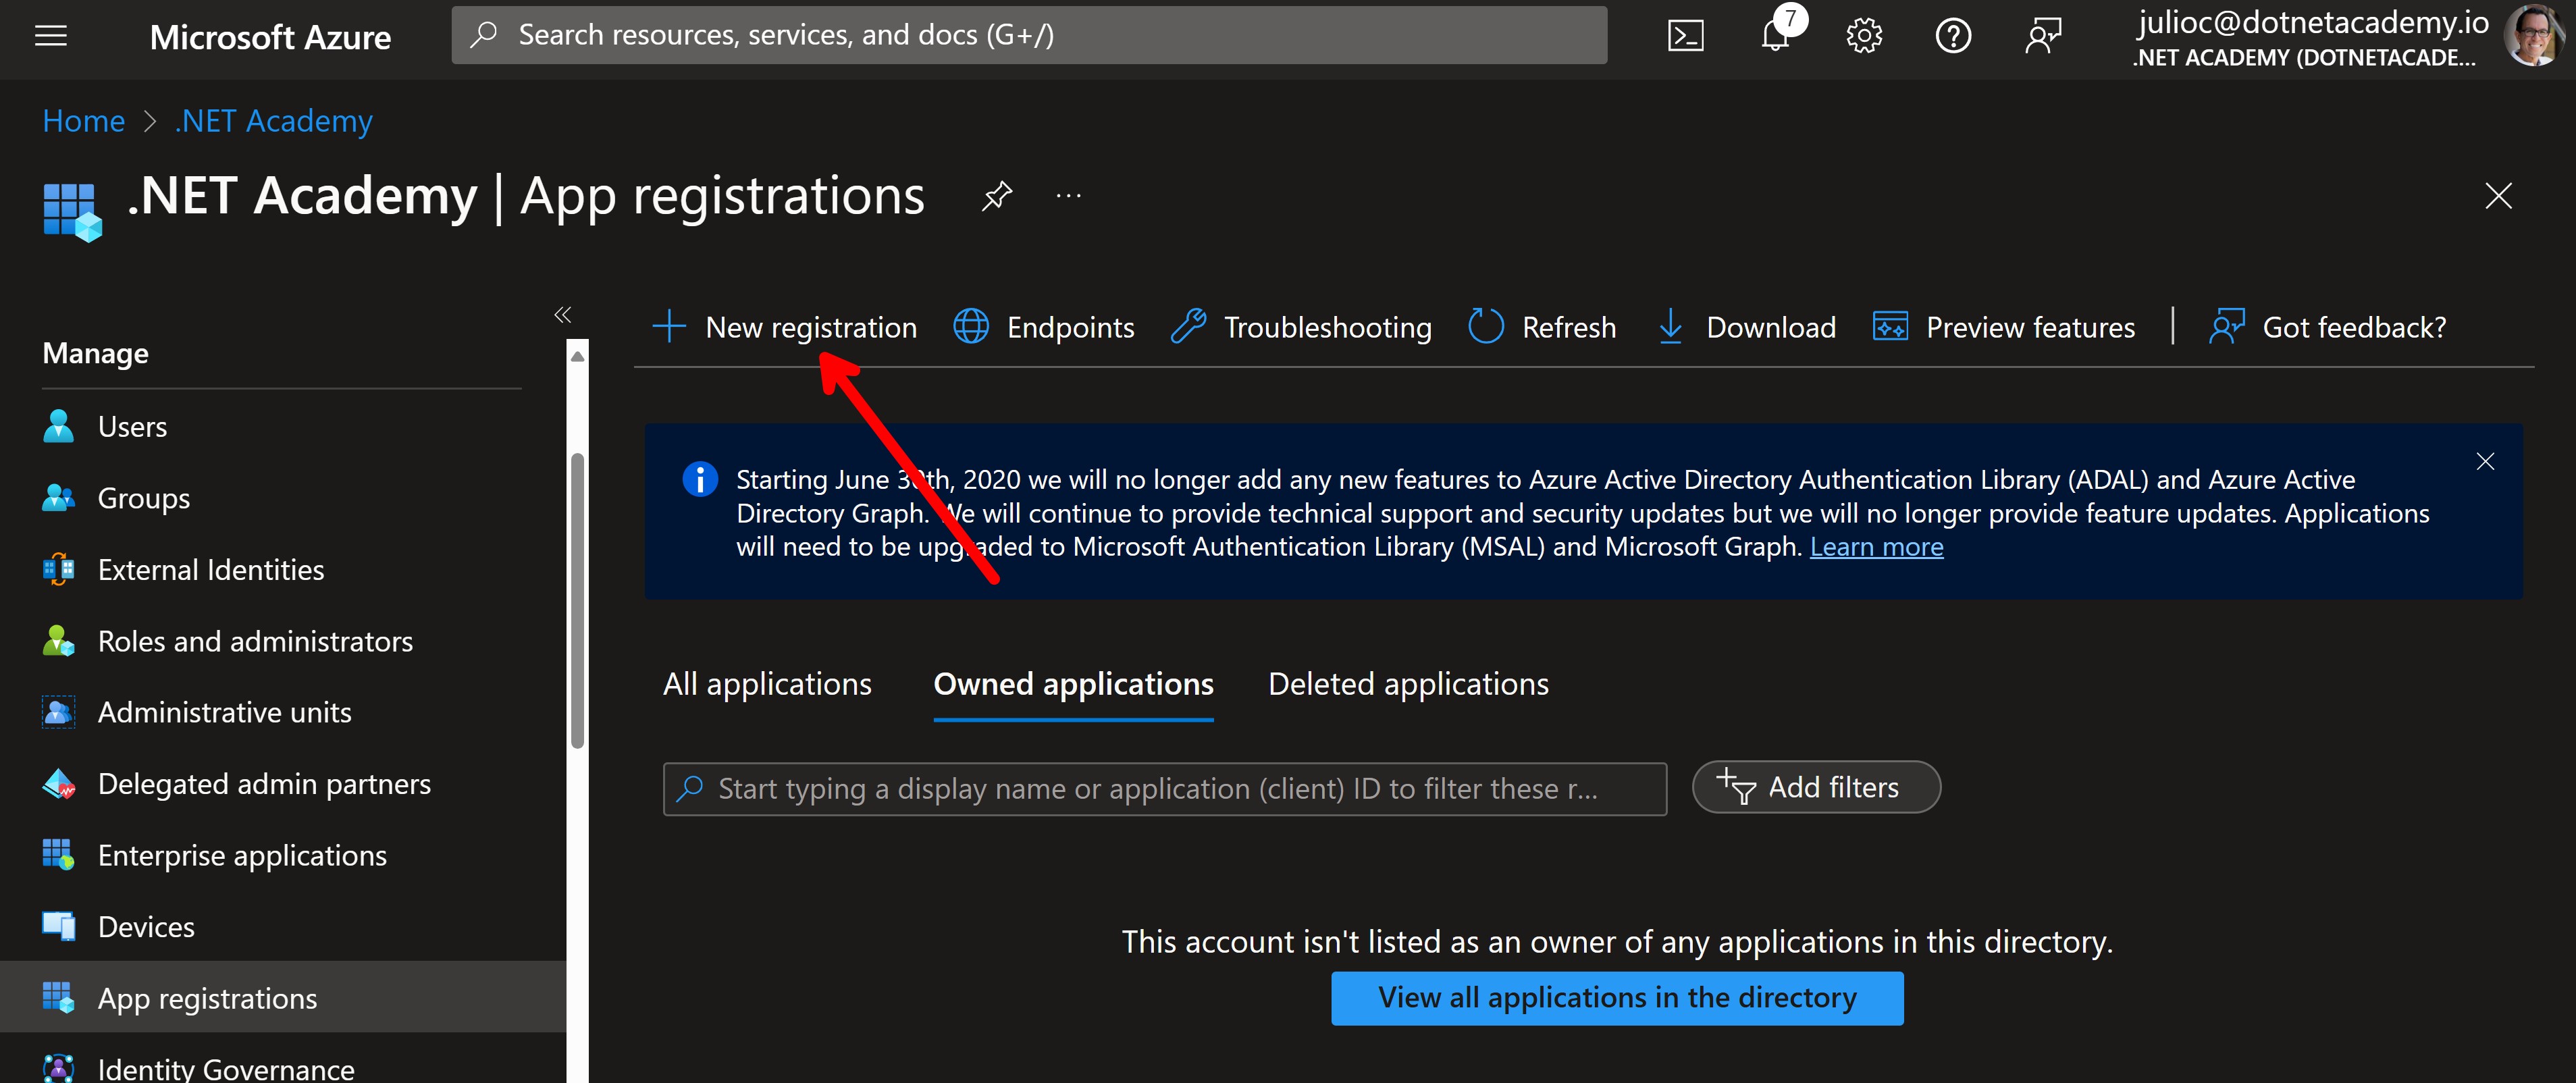
In this step we need to register the Blazor frontend in Microsoft Entra ID, which you can do by going to the App registrations section of Microsoft Entra ID on your Azure Portal.
Here I’ll go for a single-tenant application to keep things simple, will select Web as the platform (since it’s a server-side web application) and add the redirect URI for my Blazor frontend.
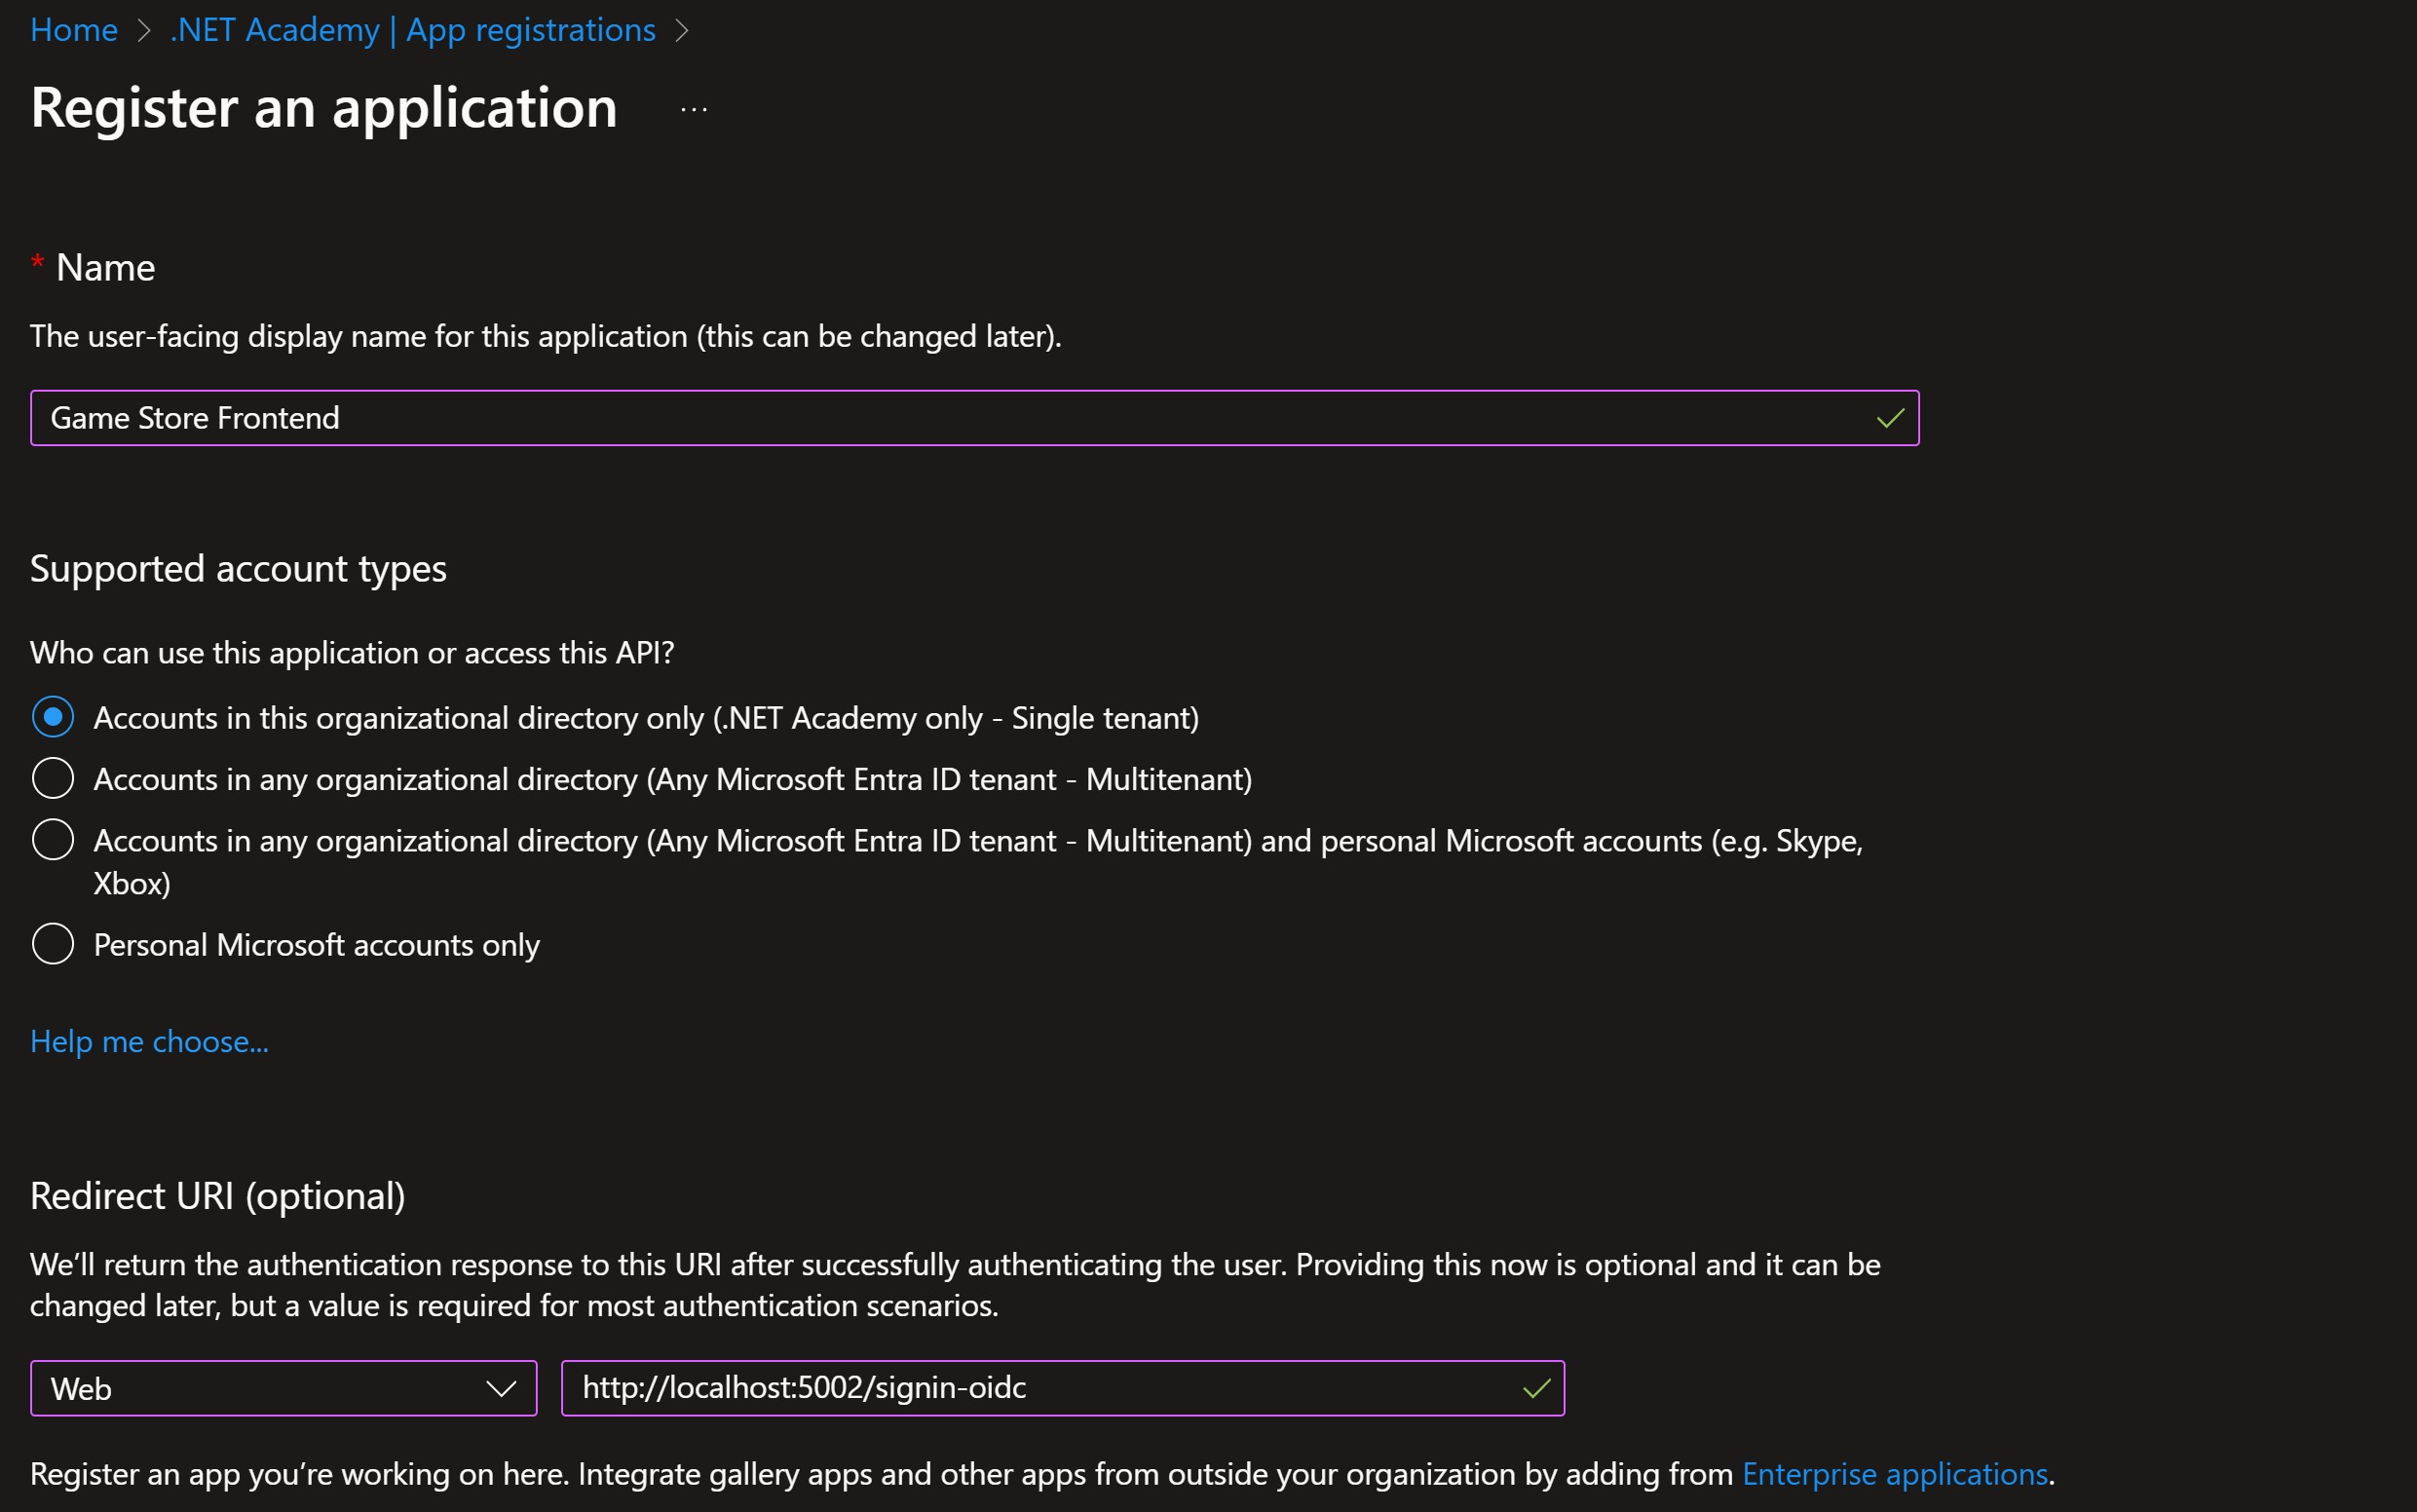
The platform you choose determines what kind of information Entra ID will demand from your app when configuring it for OIDC. For instance, it will not require a client secret for an SPA, but it is required for a Web app.
The redirect URI is the location where Entra ID will send the authorization code after the user authenticates. In this case, it’s just the local URL of my Blazor frontend plus /signin-oidc, the default path where the ASP.NET Core OIDC middleware will listen for the authorization code.
After registering the app, you should go to Expose an API and add the scope(s) that your API backend supports (if any).
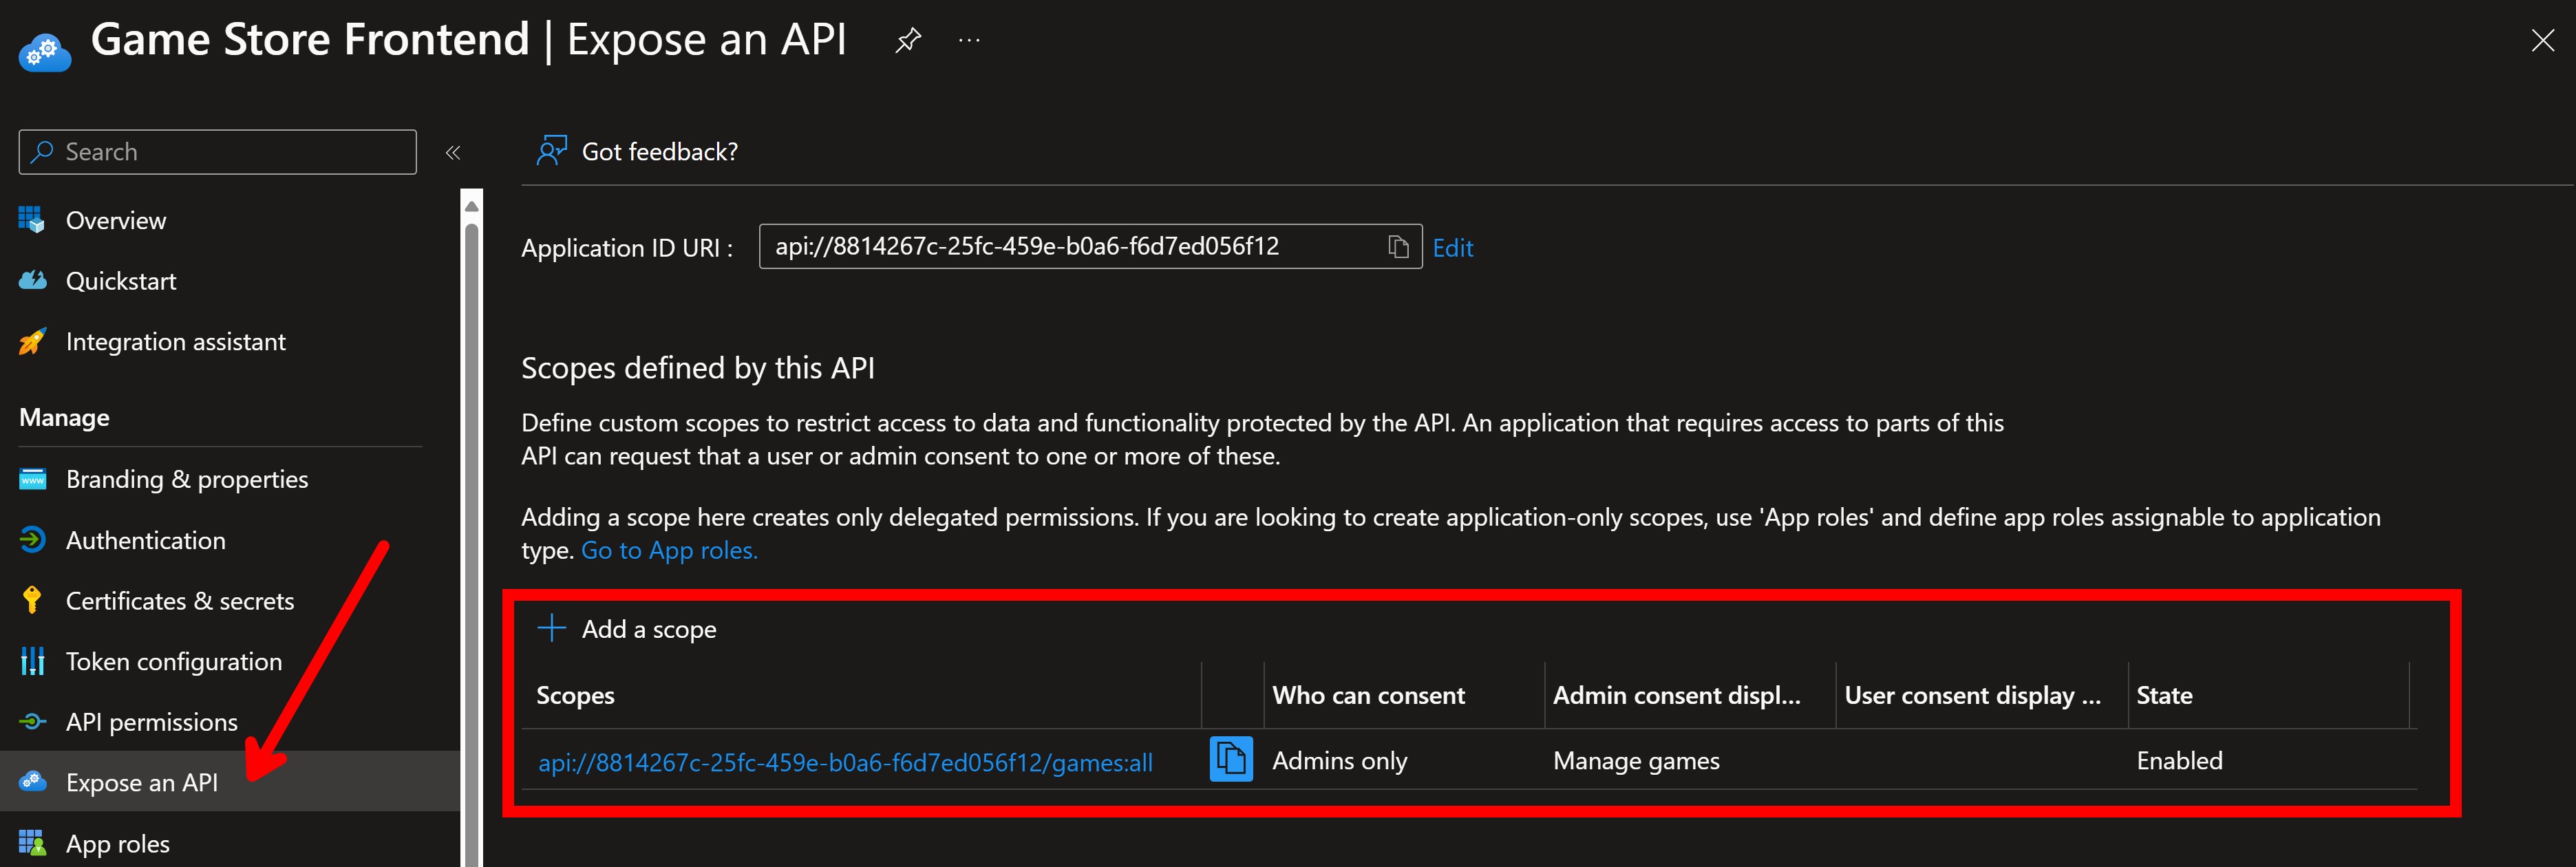
Scopes are a way to define what actions the client can perform on the resources it requests. In this case, the scope api://8814267c-25fc-459e-b0a6-f6d7ed056f12/games:all allows the client to perform any operation on the games managed by the API backend.
The actual scope is games:all, but Entra ID will automatically prepend it with the Client ID assigned to your application.
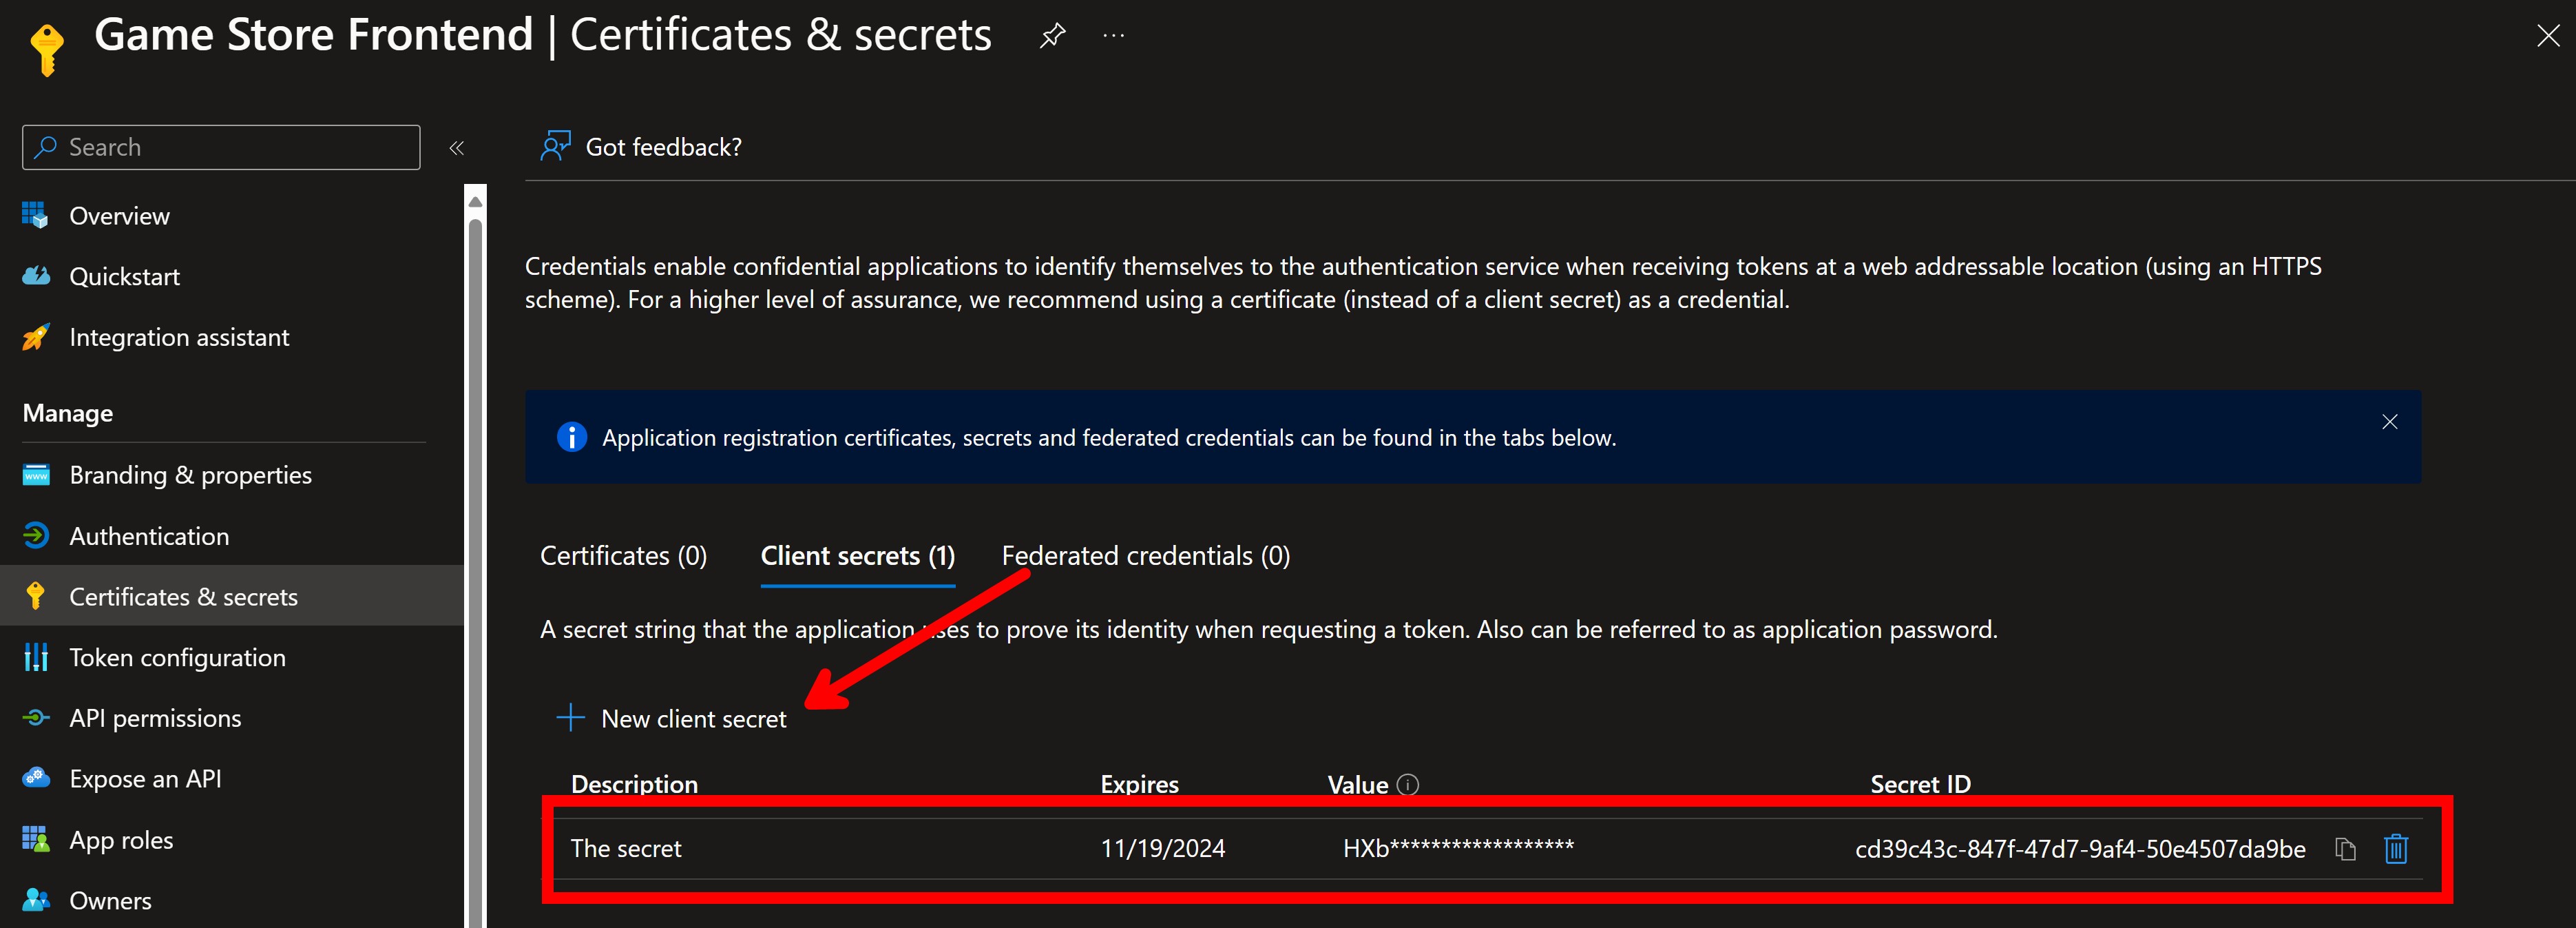
Lastly, you’ll need to head to Certificates & secrets and create a new client secret that you’ll use in your Blazor frontend as part of the OIDC flow.
You’ll need more configuration there if you need to do things like support application roles, but this is good to get started.
Step 2: (Optional) Understand your access tokens
You don’t have to do this, but I find it helpful to understand the access tokens that Entra ID will generate, so I can tell which claims to expect to find in them.
To manually get an access token, you will first need to know your Authorization Endpoint and your Token Endpoint. Get those from the Overview blade of your Entra ID app registration in the Portal:

Then open up Postman, create a new request, and head to the Authorization tab:
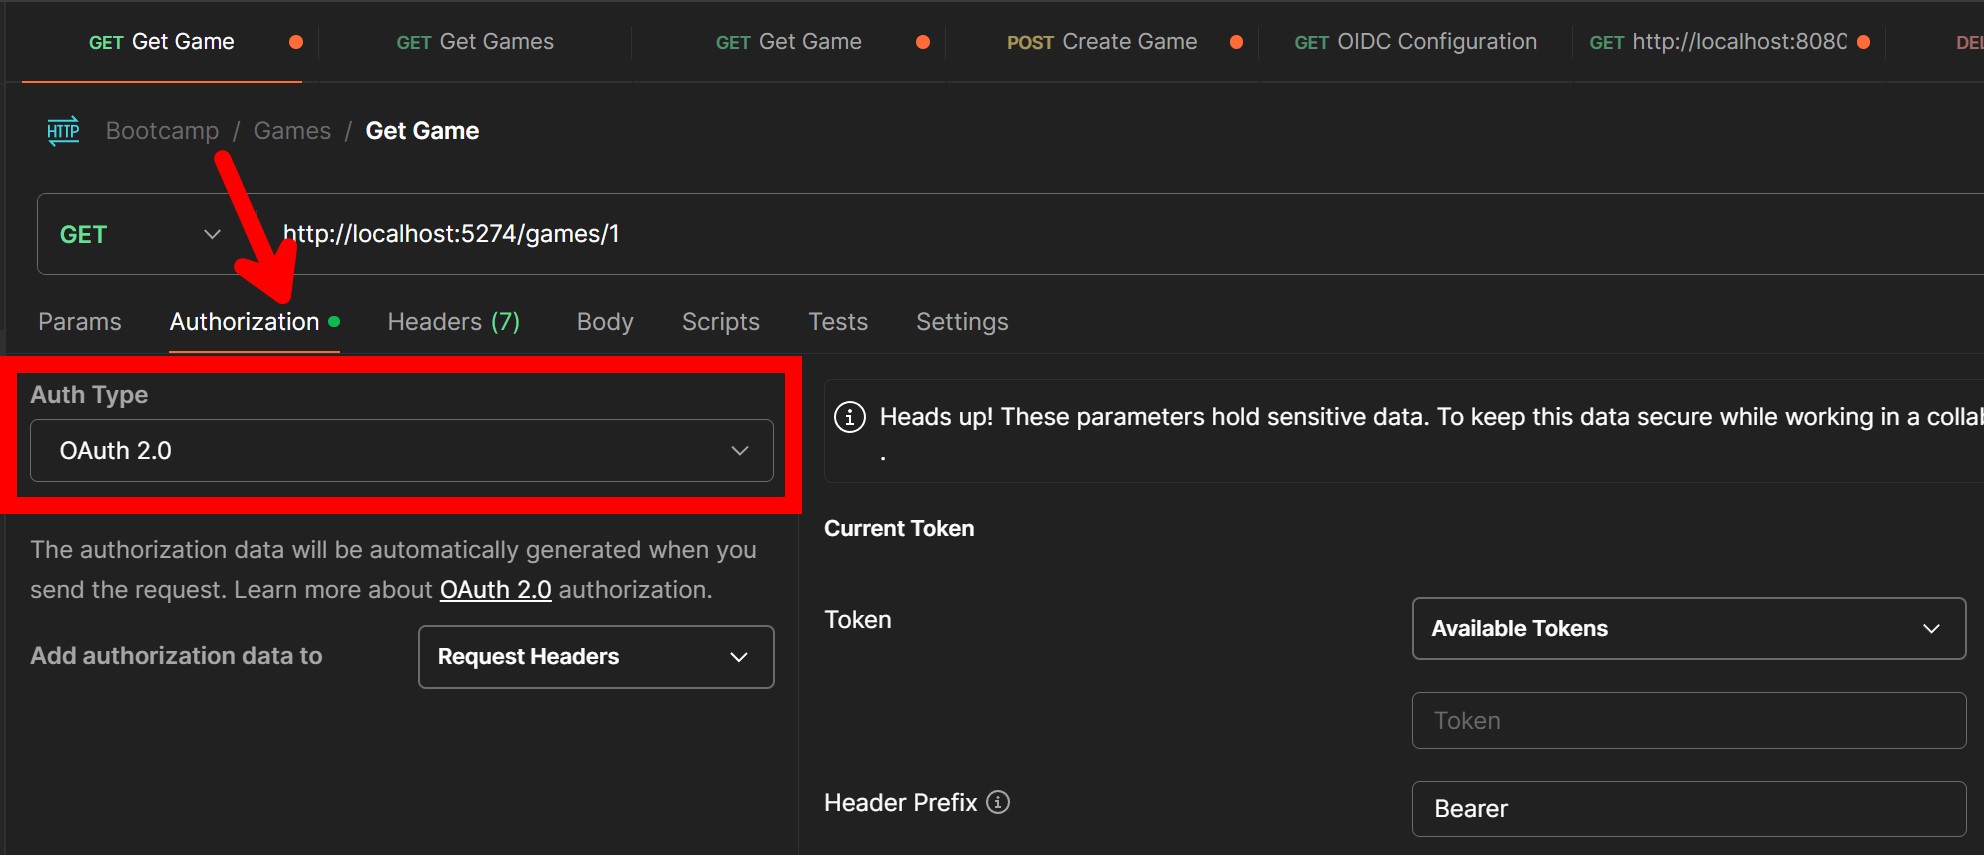
On the right side, under Configure New Token, select Authorization Code (With PKCE) as the grant type, and fill in the boxes I highlighted below with your Redirect URI, Authorization Endpoint, Token Endpoint, Client ID, Client Secret, and Scope (all from your Entra ID app registration in the Portal):
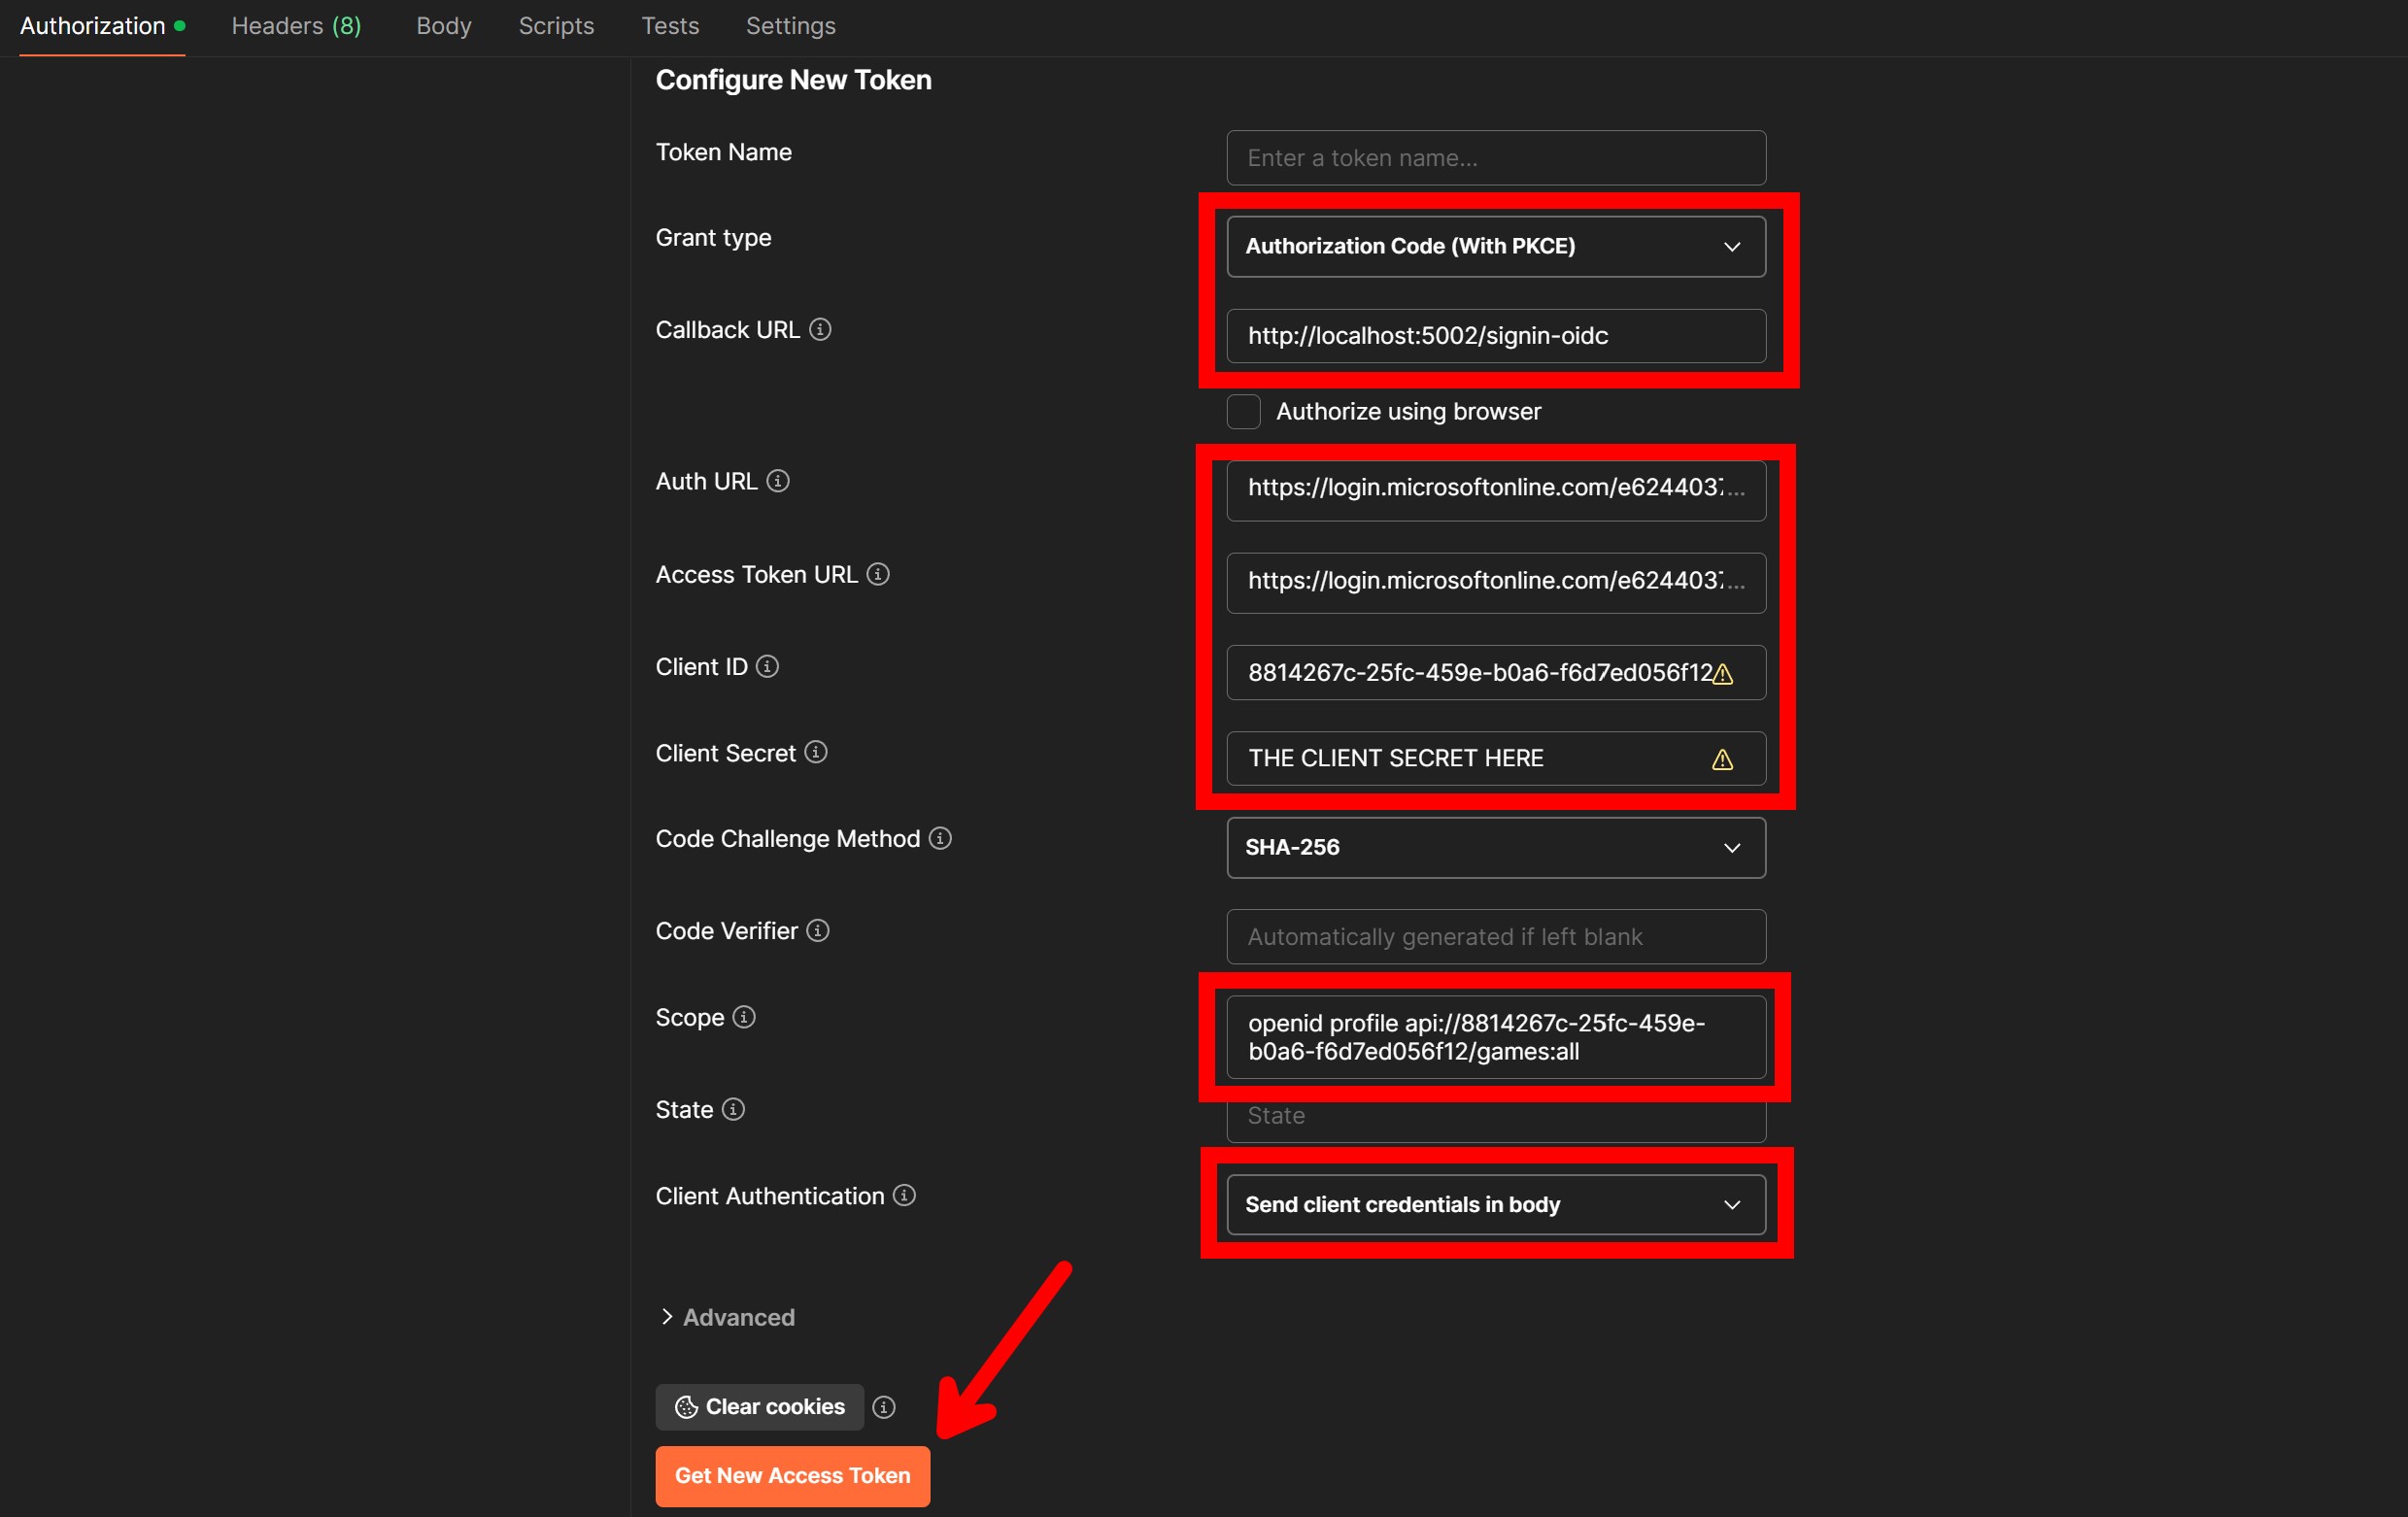
Notice that for Scope I also added openid and profile, so that I can get not just the access token, but also the ID token with some interesting user info on it.
And, make sure you select Send client credentials in body for the Client Authentication setting, or it won’t work.
Click Get New Access Token, which should take you to the Entra ID sign-in page. After signing in, you’ll be back in Postman with your new tokens:
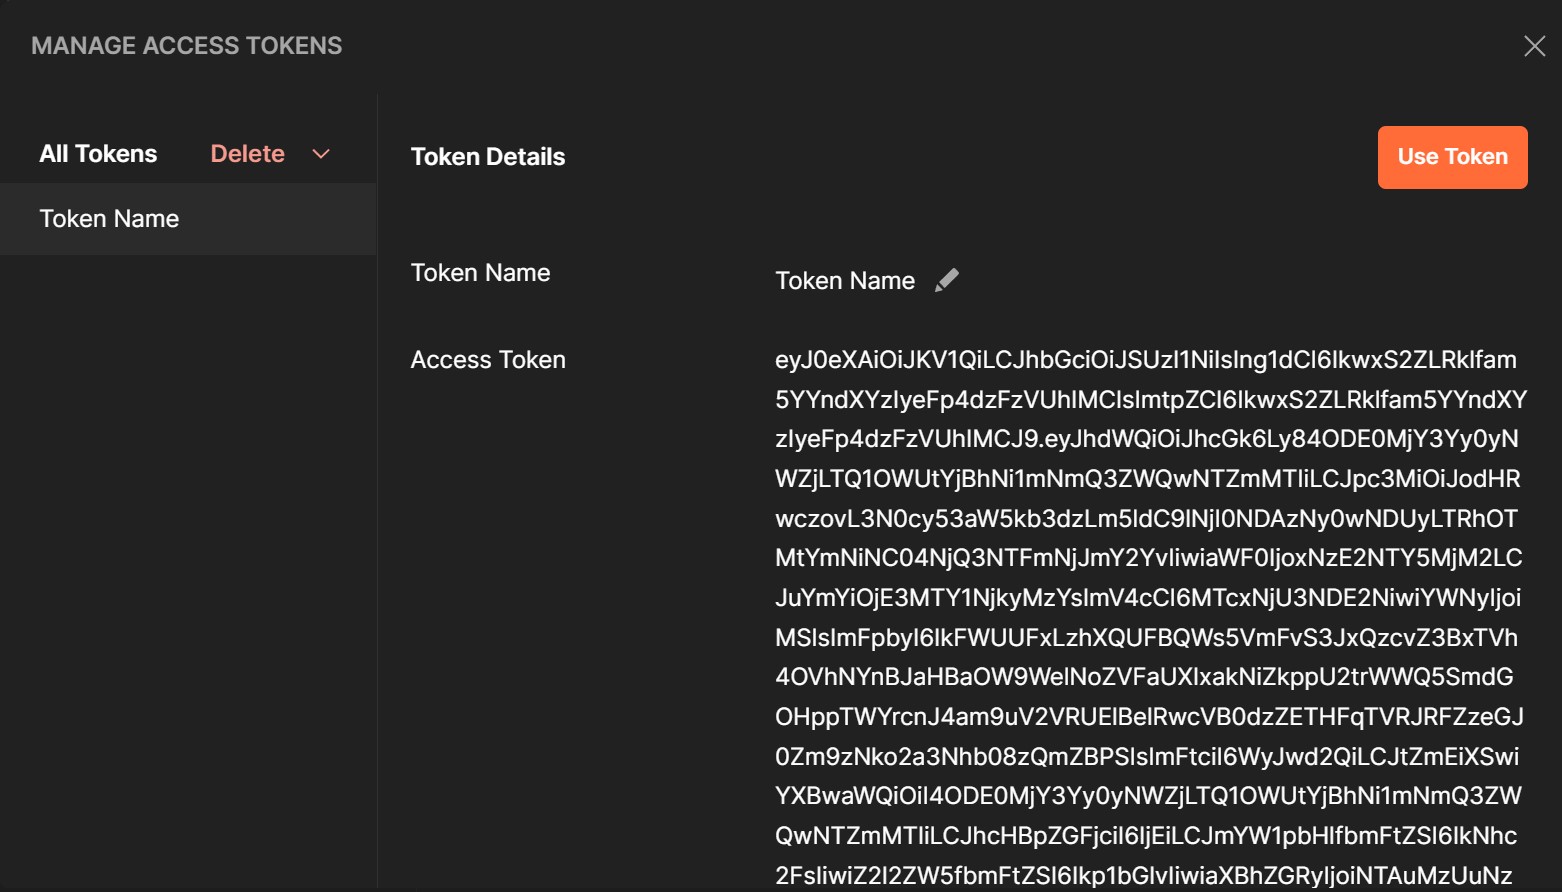
Now, grab your Access Token from Postman and decode it in a page like jwt.ms. Here’s my token decoded:
{
  "typ": "JWT",
  "alg": "RS256",
  "x5t": "L1KfKFI_jnXbwWc22xZxw1sUHH0",
  "kid": "L1KfKFI_jnXbwWc22xZxw1sUHH0"
}.{
  "aud": "api://8814267c-25fc-459e-b0a6-f6d7ed056f12",
  "iss": "https://sts.windows.net/e6244037-0452-4a93-bcb4-864751f62fcf/",
  "iat": 1716569236,
  "nbf": 1716569236,
  "exp": 1716574166,
  "acr": "1",
  "aio": "AVQAq/8WAAAAk9VaoKrqC7/gpqMXx9XMbpIhpZ9oVzSheQZQr1jCbfJiSkkYd9JgF8ziMf+rrxjonWeQPIAzTpqPtw6DLqjMTIDVsxbtfos6J6ksaoO3BfA=",
  "amr": [
    "pwd",
    "mfa"
  ],
  "appid": "8814267c-25fc-459e-b0a6-f6d7ed056f12",
  "appidacr": "1",
  "family_name": "Casal",
  "given_name": "Julio",
  "ipaddr": "50.35.76.187",
  "name": "Julio Casal",
  "oid": "3f7e659c-1aaf-43ec-8ffd-fb6dc91d1045",
  "rh": "0.AXYAN0Ak5lIEk0q8tIZHUfYvz3wmFIj8JZ5FsKb21-0FbxJ2AO4.",
  "scp": "games:all",
  "sub": "ofM-v1Euz4cuFXSEzmQ1DVtz5W5V27vVR4E5iVHgvFk",
  "tid": "e6244037-0452-4a93-bcb4-864751f62fcf",
  "unique_name": "[email protected]",
  "upn": "[email protected]",
  "uti": "l6MNUJEh9UmpJOCnIG-nAA",
  "ver": "1.0"
}.[Signature]
Now you can tell exactly which Audience (aud), Authority (iss), and Scopes (scp) your backend API will receive in the access tokens, besides a bunch of other interesting claims.
From that same Postman dialog, scroll down a bit, grab your id_token and decode it. Should be something like this:
{
  "typ": "JWT",
  "alg": "RS256",
  "kid": "L1KfKFI_jnXbwWc22xZxw1sUHH0"
}.{
  "aud": "8814267c-25fc-459e-b0a6-f6d7ed056f12",
  "iss": "https://login.microsoftonline.com/e6244037-0452-4a93-bcb4-864751f62fcf/v2.0",
  "iat": 1716570599,
  "nbf": 1716570599,
  "exp": 1716574499,
  "name": "Julio Casal",
  "oid": "3f7e659c-1aaf-43ec-8ffd-fb6dc91d1045",
  "preferred_username": "[email protected]",
  "rh": "0.AXYAN0Ak5lIEk0q8tIZHUfYvz3wmFIj8JZ5FsKb21-0FbxJ2AO4.",
  "sub": "ofM-v1Euz4cuFXSEzmQ1DVtz5W5V27vVR4E5iVHgvFk",
  "tid": "e6244037-0452-4a93-bcb4-864751f62fcf",
  "uti": "5vHcMCJMnkG87UQUAZAbAA",
  "ver": "2.0"
}.[Signature]
The ID Token is the one that your Blazor frontend can use to identify the user via interesting claims like name, preferred_username, and sub.
Knowing about all these claims will save you a lot of trouble down the road, trust me.
Let’s now start writing some code.
Step 3: Secure the backend API endpoints
First things first. We have to make sure our endpoints are protected and only accessible to authorized users.
For this, I first defined a couple of authorization policies in the API backend:
builder.Services
       .AddAuthorizationBuilder()
       .AddPolicy("read_access", builder =>
       {
           builder.RequireClaim("scp", "games:read", "games:all");
       })
       .AddPolicy("write_access", builder =>
       {
           builder.RequireClaim("scp", "games:write", "games:all");
       });
The read_access policy is meant for my GET endpoints, while the write_access policy is meant for all endpoints that can modify my games in any way.
In each policy, we require the scp claim to be present in the user’s token. From the access token we inspected earlier, we know that is the claim where Entra ID will place the scope(s) the client was granted.
So, GET endpoints will require either the games:read or games:all scope, while all other endpoints will require either the games:write or games:all scope.
Here’s one of my GET endpoints, which uses the read_access policy:
group.MapGet("/{id}", async (int id, GameStoreContext dbContext) =>
{
    Game? game = await dbContext.Games.FindAsync(id);

    return game is null ? Results.NotFound() : Results.Ok(game.ToGameDetailsDto());
})
.RequireAuthorization("read_access");
You can use the RequireAuthorization method to set the policy for each of your endpoints similarly.
Step 4: Configure the backend API for Entra ID
First, we’ll need one NuGet package to be able to use JWT-bearer authentication:
dotnet add package Microsoft.AspNetCore.Authentication.JwtBearer
Then, we’ll need to configure our Entra ID details like this:
builder.Services
       .AddAuthentication()
       .AddJwtBearer(JwtBearerDefaults.AuthenticationScheme, options =>
       {
           options.Authority = "https://sts.windows.net/e6244037-0452-4a93-bcb4-864751f62fcf/";
           options.Audience = "api://8814267c-25fc-459e-b0a6-f6d7ed056f12";
           options.MapInboundClaims = false;
       });
There we are configuring JWT-bearer authentication with the following details:
-
Authority: The Entra ID authorization server, which is the one that will verify any tokens received by the API. Just replace the GUID there with the Directory (tenant) ID you’ll find in the overview blade of your Entra ID app registration in the Portal.
-
Audience: The Client ID of the Entra ID application for whom the token was issued. With this, the API backend can verify that the token was indeed issued for it. Also found in the overview blade of your Entra ID app registration in the Portal.
-
MapInboundClaims: Setting this one to false is important because it will prevent ASP.NET Core from mapping the claims in the token to claim types that we are not interested in. We want to access the scopes directly from the scp claim, and this will allow us to do so.
There’s a lot more you may want to configure there depending on your scenario, but this will do for now.
Step 5: Configure the Blazor frontend for Entra ID
For this, we’ll need to add one new NuGet package to the Blazor frontend project:
dotnet add package Microsoft.AspNetCore.Authentication.OpenIdConnect
Then, here’s how you can configure the OIDC flow in the frontend:
var authority = "https://login.microsoftonline.com/e6244037-0452-4a93-bcb4-864751f62fcf/v2.0/";

builder.Services
        .AddAuthentication(OpenIdConnectDefaults.AuthenticationScheme)
        .AddOpenIdConnect(options =>
        {
            options.SignInScheme = CookieAuthenticationDefaults.AuthenticationScheme;
            options.SignOutScheme = OpenIdConnectDefaults.AuthenticationScheme;
            options.Authority = authority;
            options.ClientId = "8814267c-25fc-459e-b0a6-f6d7ed056f12";
            options.ClientSecret = "[Read from a configuration source]";
            options.ResponseType = OpenIdConnectResponseType.Code;
            options.SaveTokens = true;
            options.MapInboundClaims = false;
            options.Scope.Add("api://8814267c-25fc-459e-b0a6-f6d7ed056f12/games:all");
            options.TokenValidationParameters.NameClaimType = JwtRegisteredClaimNames.Name;
            options.TokenValidationParameters.RoleClaimType = "roles";
        })
        .AddCookie(CookieAuthenticationDefaults.AuthenticationScheme);
Let’s break down that:
-
SignInScheme: The scheme used to sign in the user. We use cookies here so the user can remain authenticated between requests.
-
SignOutScheme: The scheme used to sign out the user. We use the OIDC scheme so that the user is signed out of both the OIDC provider and the frontend.
-
Authority: The Entra ID authorization server, which is the one that will authenticate the user. Use the same GUID you used for Authority in the backend. It’s just that the format of the URL is different.
-
ClientId: The Client ID of the Entra ID application for whom the token will be issued. It’s the same GUID you used for Audience in the backend configuration.
-
ClientSecret: The client secret you created in the Entra ID app registration. Make sure you read this from some configuration source, not hardcode it in the code.
-
ResponseType: The flow to use to authenticate the user. OpenIdConnectResponseType.Code corresponds to the Authorization Code Flow, which will also use PKCE by default.
-
SaveTokens: Whether to save the tokens received from the authorization server. We need to save them so we can use them when we send requests to the backend.
-
MapInboundClaims: Same idea as what we did in the backend.
-
Scope: The scope(s) the client wants to request from the authorization server. This is the exact scope we defined when registering the app in the Entra ID portal.
-
TokenValidationParameters.NameClaimType: Setting this to JwtRegisteredClaimNames.Name will make sure the user’s name is populated in the claims principal after the user authenticates, so we can easily display it in the frontend.
You also need to add these other two lines to your Program.cs in the frontend:
builder.Services.AddAuthorizationBuilder();
builder.Services.AddCascadingAuthenticationState();
The first line adds the authorization services to the frontend, while the second one adds the services needed to propagate the authentication state to all components in the Blazor app.
We should also add an endpoint in the frontend to kick off the OIDC sign-in flow:
app.MapGet("/authentication/login", ()
    => TypedResults.Challenge(
        new AuthenticationProperties { RedirectUri = "/" }))
    .AllowAnonymous();
That endpoint will be invoked by an anchor tag in the Blazor Login component. Something like this:
<a href="authentication/login" class="btn btn-warning">Login</a>
Now, that configuration should be enough for your frontend to authenticate users via Entra ID.
But, there’s one more thing needed to let the frontend make authenticated requests to the backend.
Step 6: Add an authorization handler
Just because the user is authenticated in the frontend doesn’t mean the backend will automatically trust the frontend to make requests on behalf of the user.
We need to make sure we attach the access token as a header on every request we make to the backend API endpoints that require authorization.
We could do this manually in every request, but it’s easier via a delegating handler like this:
public class AuthorizationHandler(IHttpContextAccessor httpContextAccessor) : DelegatingHandler
{
    protected override async Task<HttpResponseMessage> SendAsync(
        HttpRequestMessage request,
        CancellationToken cancellationToken)
    {
        var httpContext = httpContextAccessor.HttpContext ??
            throw new InvalidOperationException(
                "No HttpContext available from the IHttpContextAccessor!");

        var accessToken = await httpContext.GetTokenAsync("access_token");

        if (!string.IsNullOrEmpty(accessToken))
        {
            request.Headers.Authorization = new AuthenticationHeaderValue(
                "Bearer",
                accessToken);
        }

        return await base.SendAsync(request, cancellationToken);
    }
}
As you can see, all we do there is get the access token from the current HTTP context and attach it as a Bearer token in the Authorization header of the request.
Finally, to enable our authorization hander, we need to register it and add it to the HTTP client in the frontend:
builder.Services.AddHttpContextAccessor();
builder.Services.AddTransient<AuthorizationHandler>();

builder.Services.AddHttpClient<GamesClient>(
    client => client.BaseAddress = new Uri("http://localhost:5274"))
    .AddHttpMessageHandler<AuthorizationHandler>();
Step 7: ASP.NET Core + Entra ID in action
Now run your backend and frontend applications and navigate to the frontend in your browser:
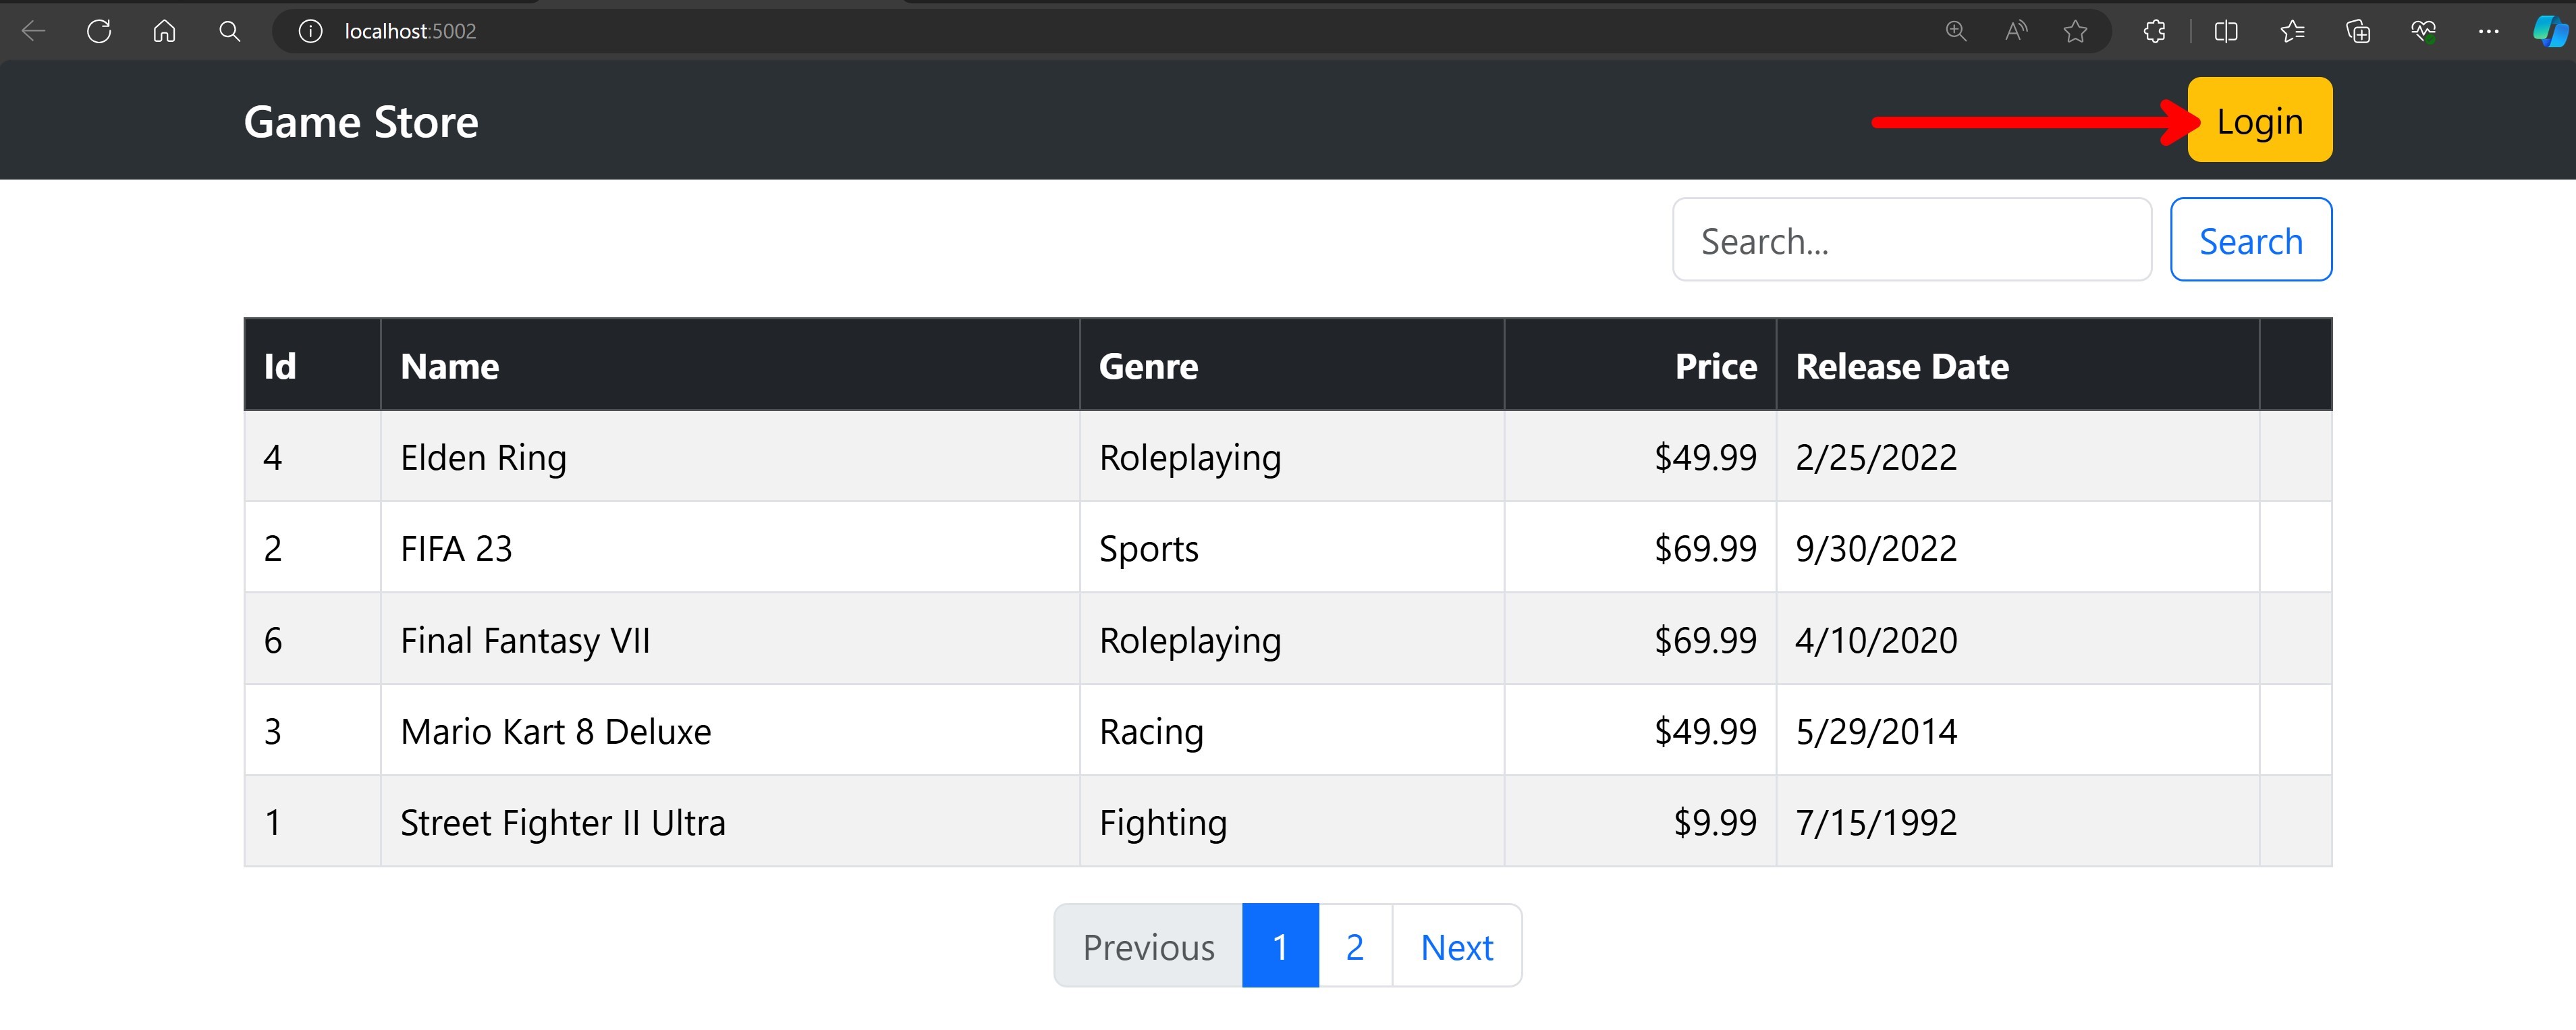
How is the home page able to query games without signing in? That’s because I didn’t want users to have to sign in just to be able to list the games, so I didn’t add any authorization policy to the GET endpoint that retrieves all games from the backend.
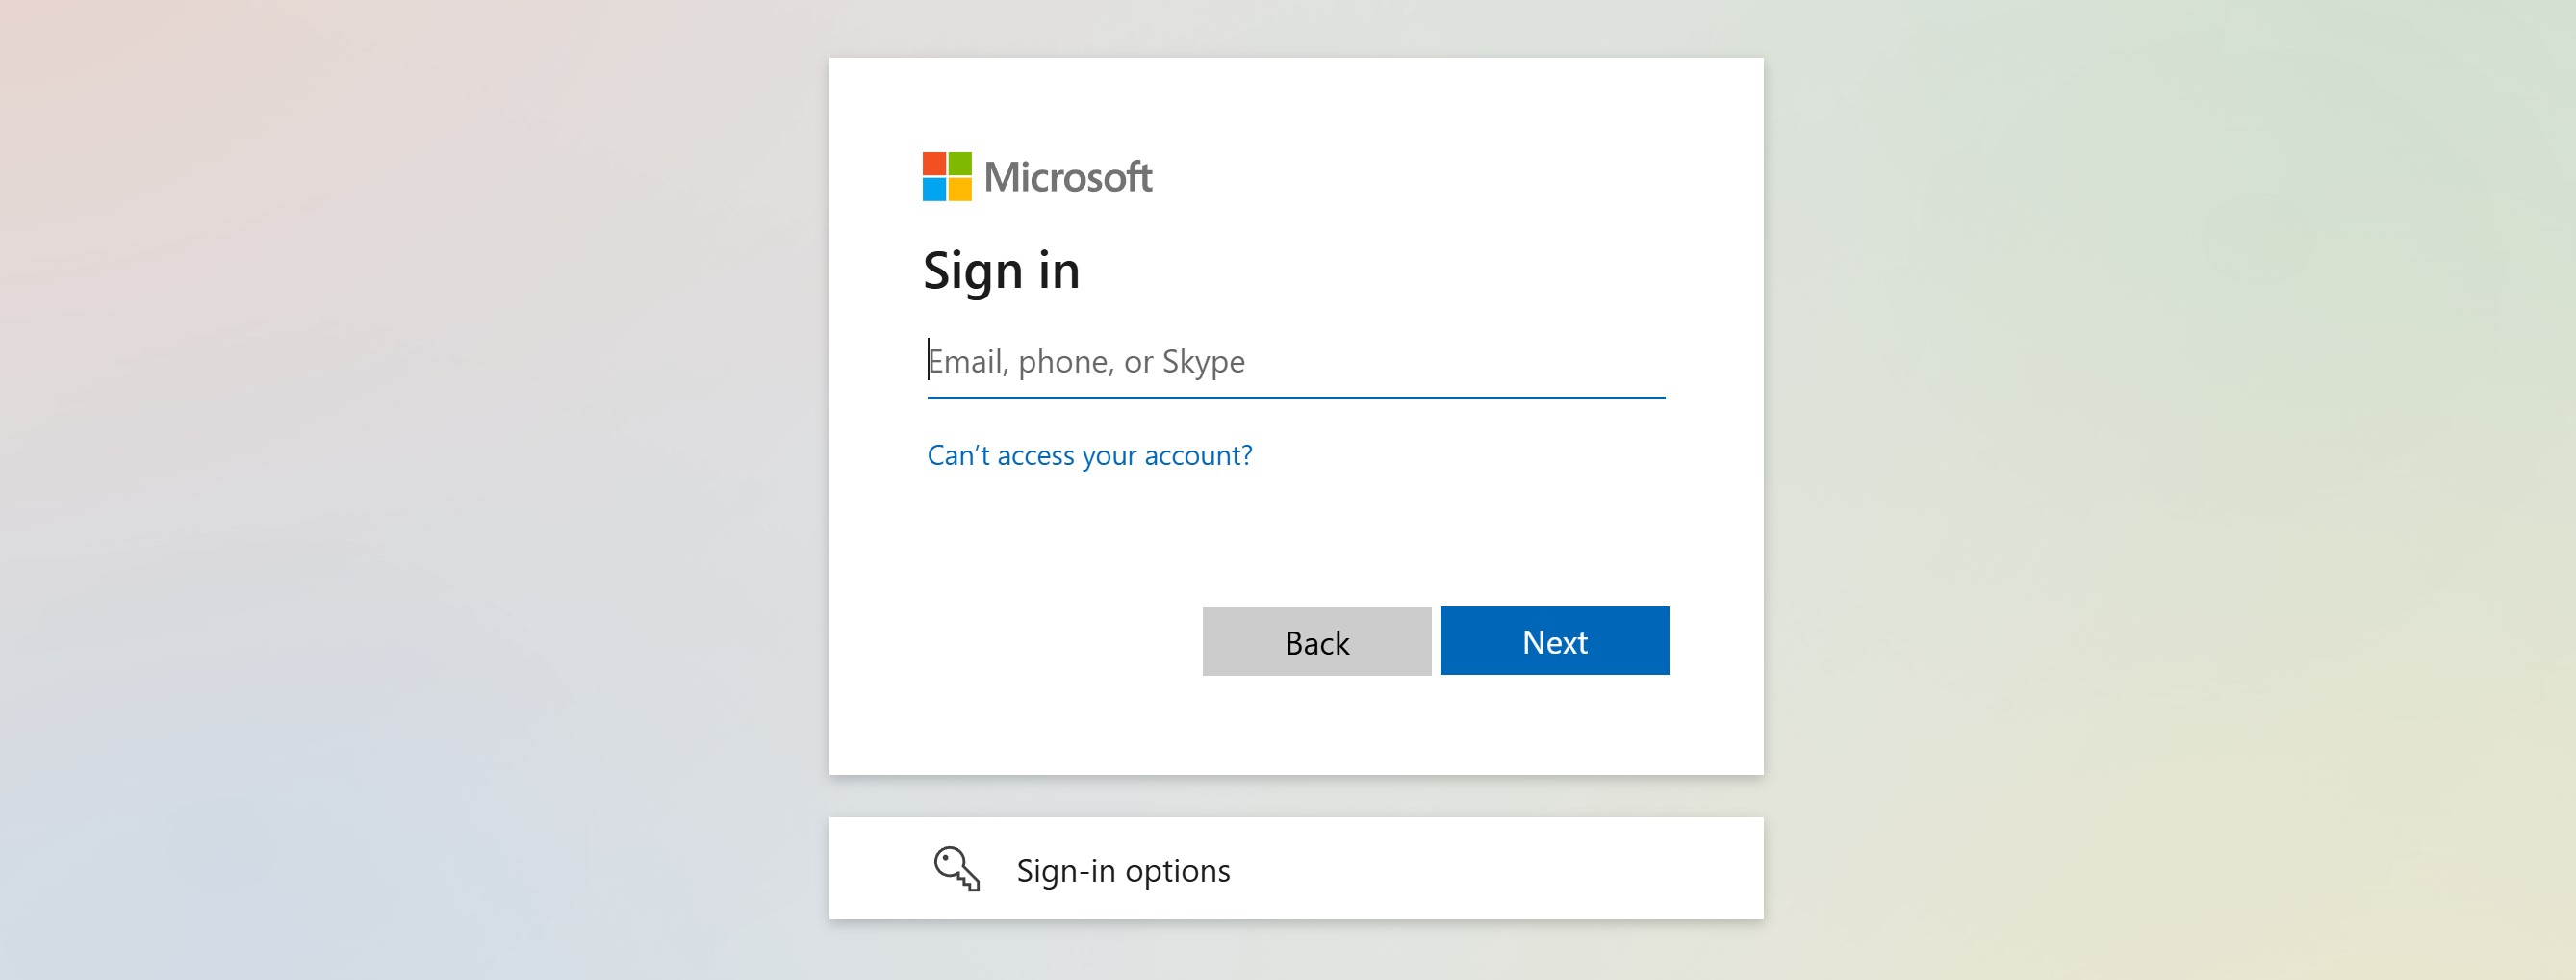
Clicking the Login button should take you to a sign-in page like this:
And, after authenticating, you should be redirected back to the frontend:
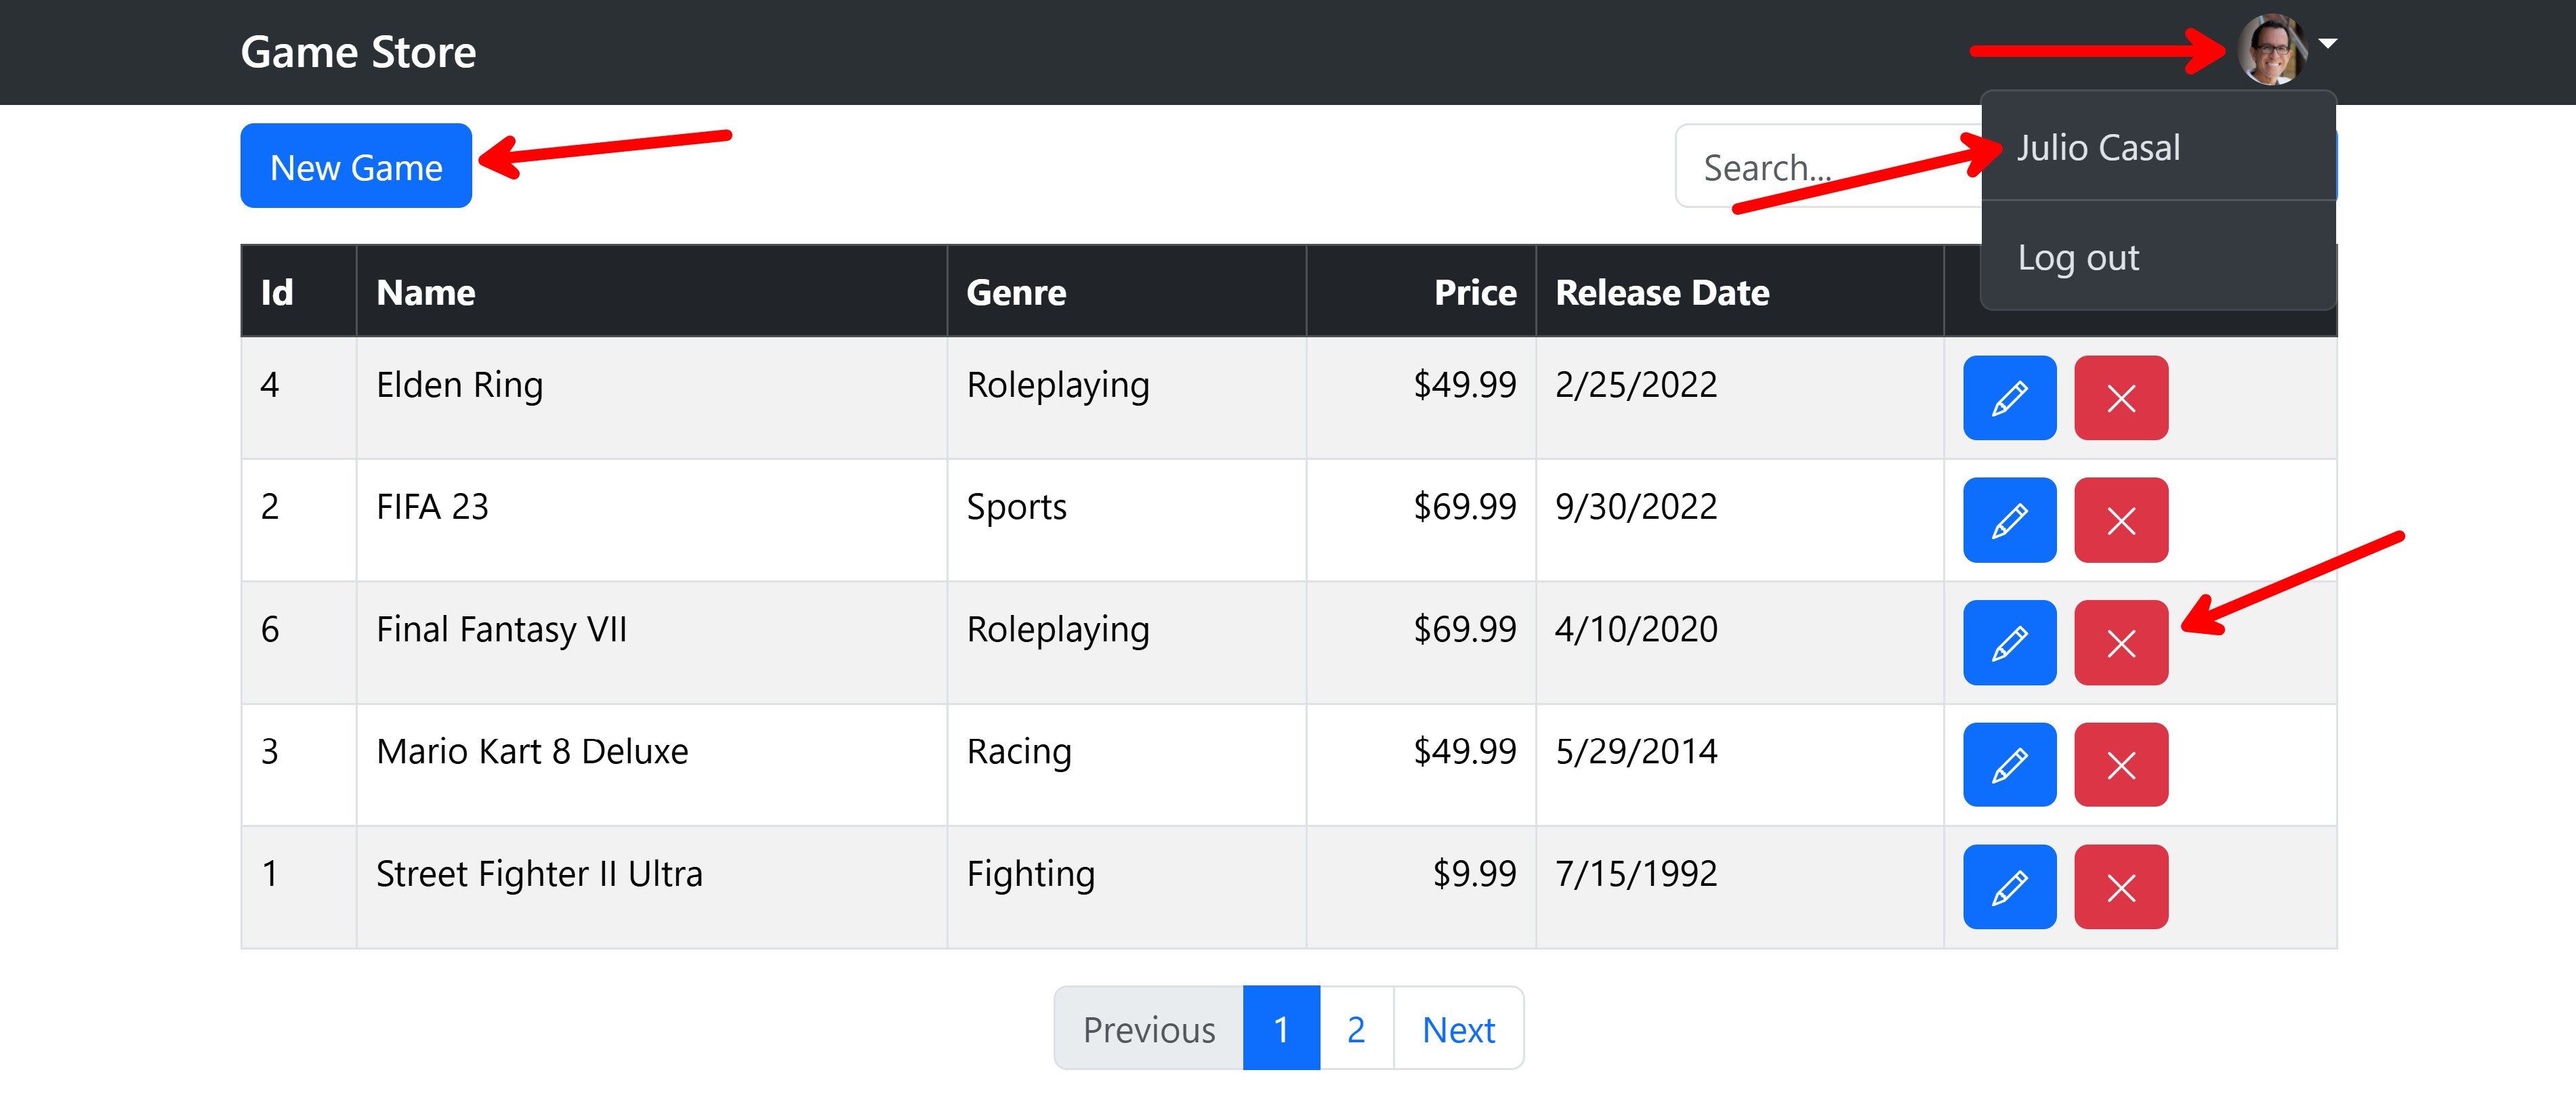
Thanks to the claims available in the ID token provided by Entra ID, I was able to display the user’s name and generate a Gravatar image where the login button was before.
I was also able to show New Game, Edit and Delete buttons for each game, which are only visible if the user is authenticated.
And if I click on the Edit button, I can see the game details and update them:
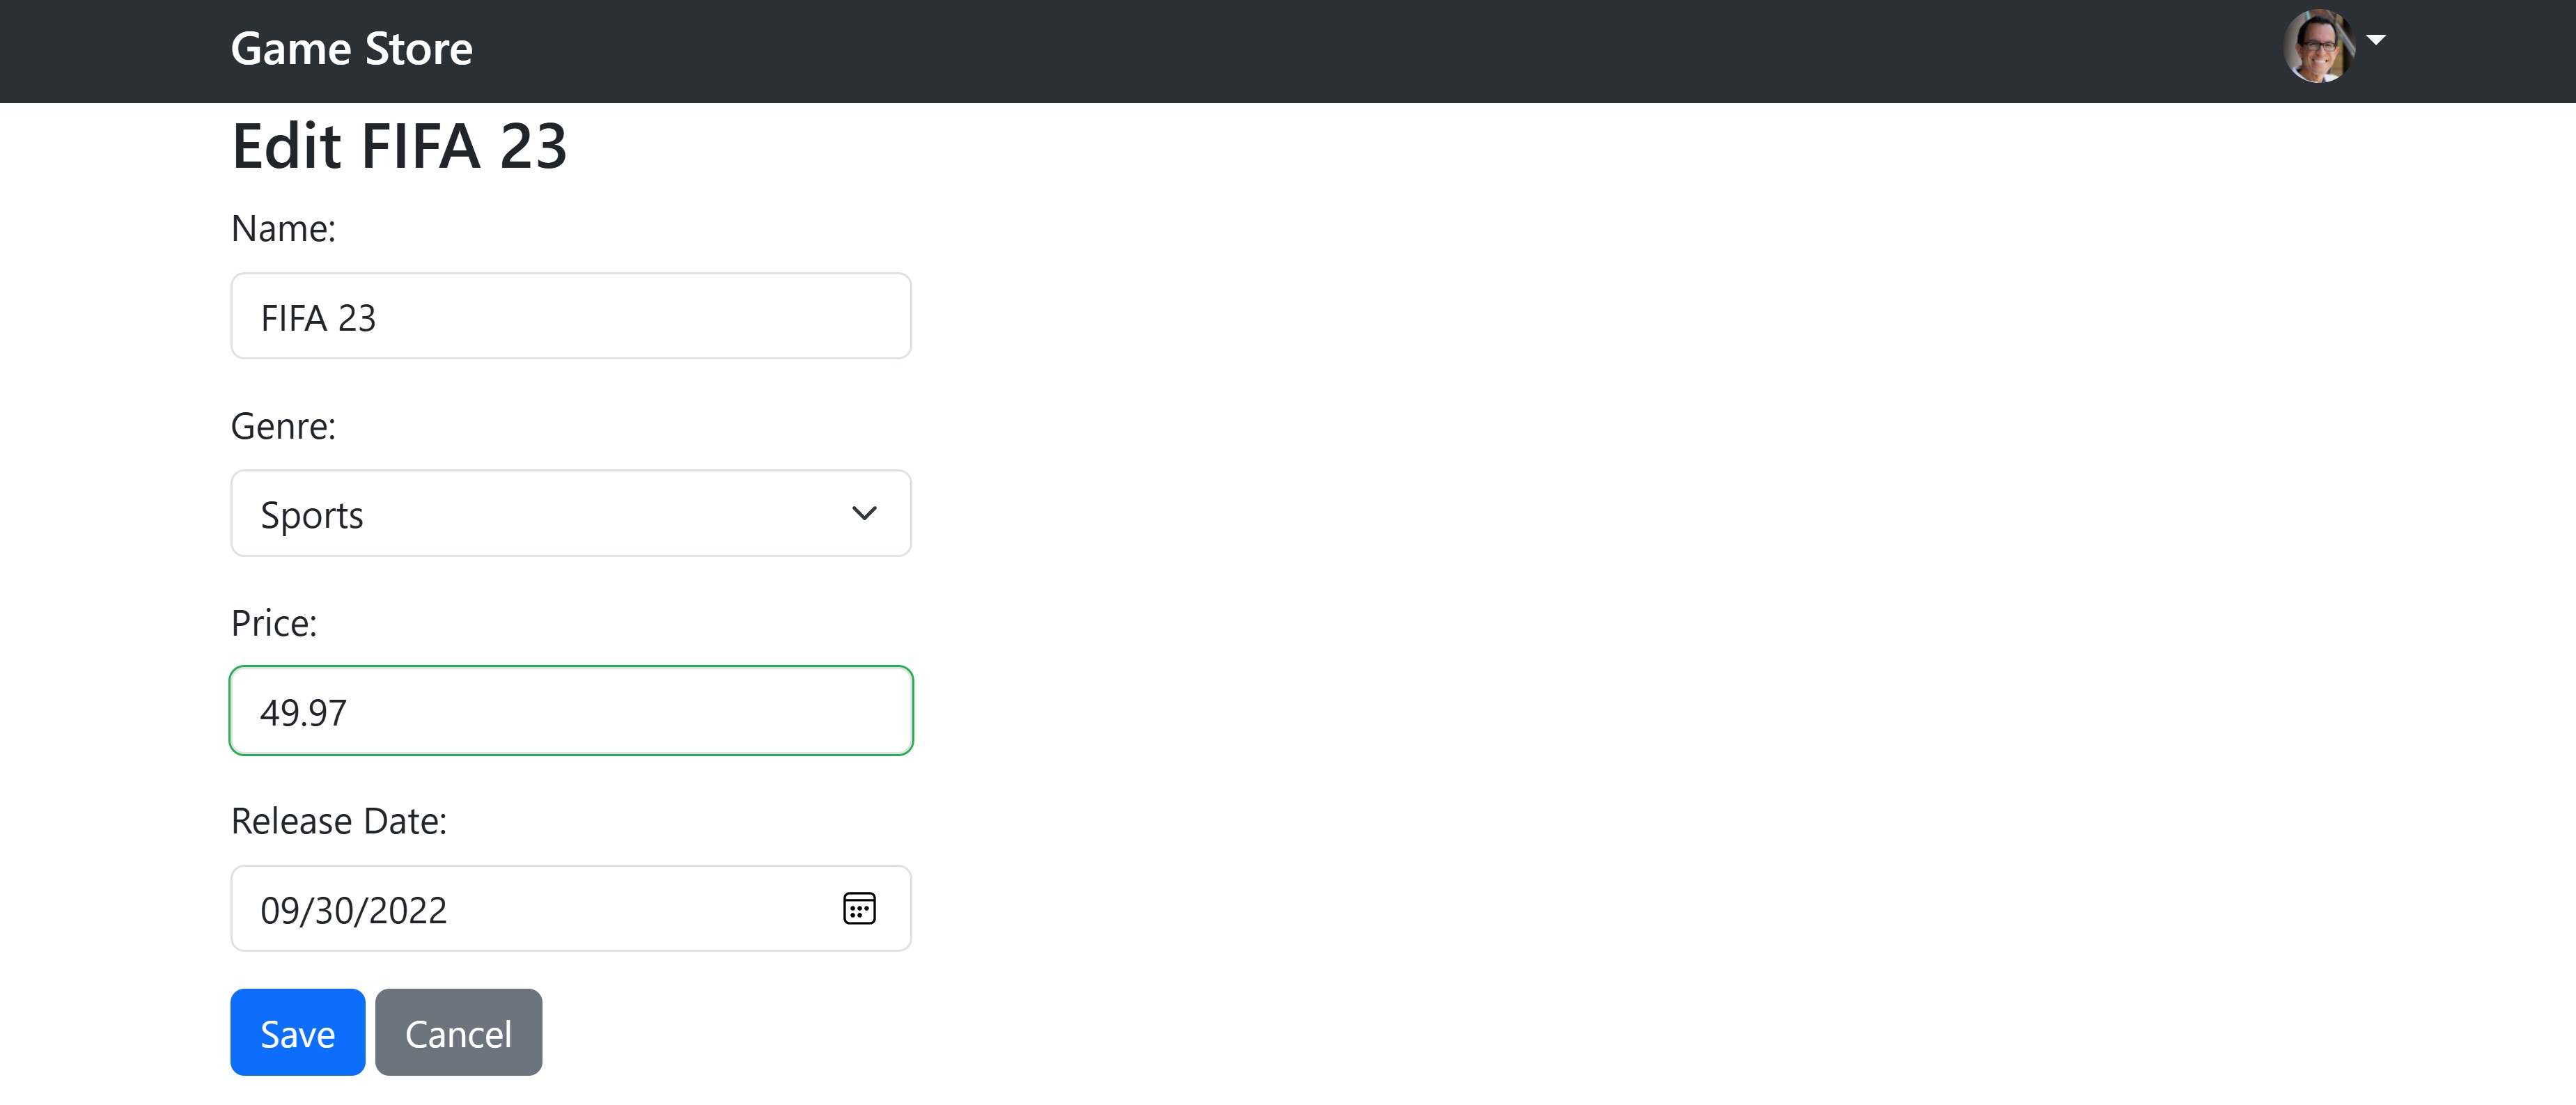
Both the GET and PUT backend endpoints used by this page require authorization, so if you can load the page and save the updates, the access token was correctly attached to the requests by the authorization handler.
Mission accomplished!
Whenever you’re ready, here’s how I can help:
The .NET Developer Bootcamp: A complete path from ASP.NET Core fundamentals to building, containerizing, and deploying production-ready, cloud-native apps on Azure.
