Read time: 8 minutes
Today we’ll see how to implement file uploads in ASP.NET Core.
Uploading a file as part of a form submission is a common requirement in web applications, so it’s important to know how to do it properly.
And the interesting thing is that implementing such a feature goes way beyond just the backend API or the frontend part, which is what most tutorials focus on.
Here I’ll cover the whole flow, from the frontend, to the backend API and to Azure Blob Storage, so you can see how all the pieces fit together.
Let’s dive in.
What are we trying to do?
Here’s the scenario: You have a page in your ASP.NET Core application where users can create or update a product, and include an image as part of the product details.
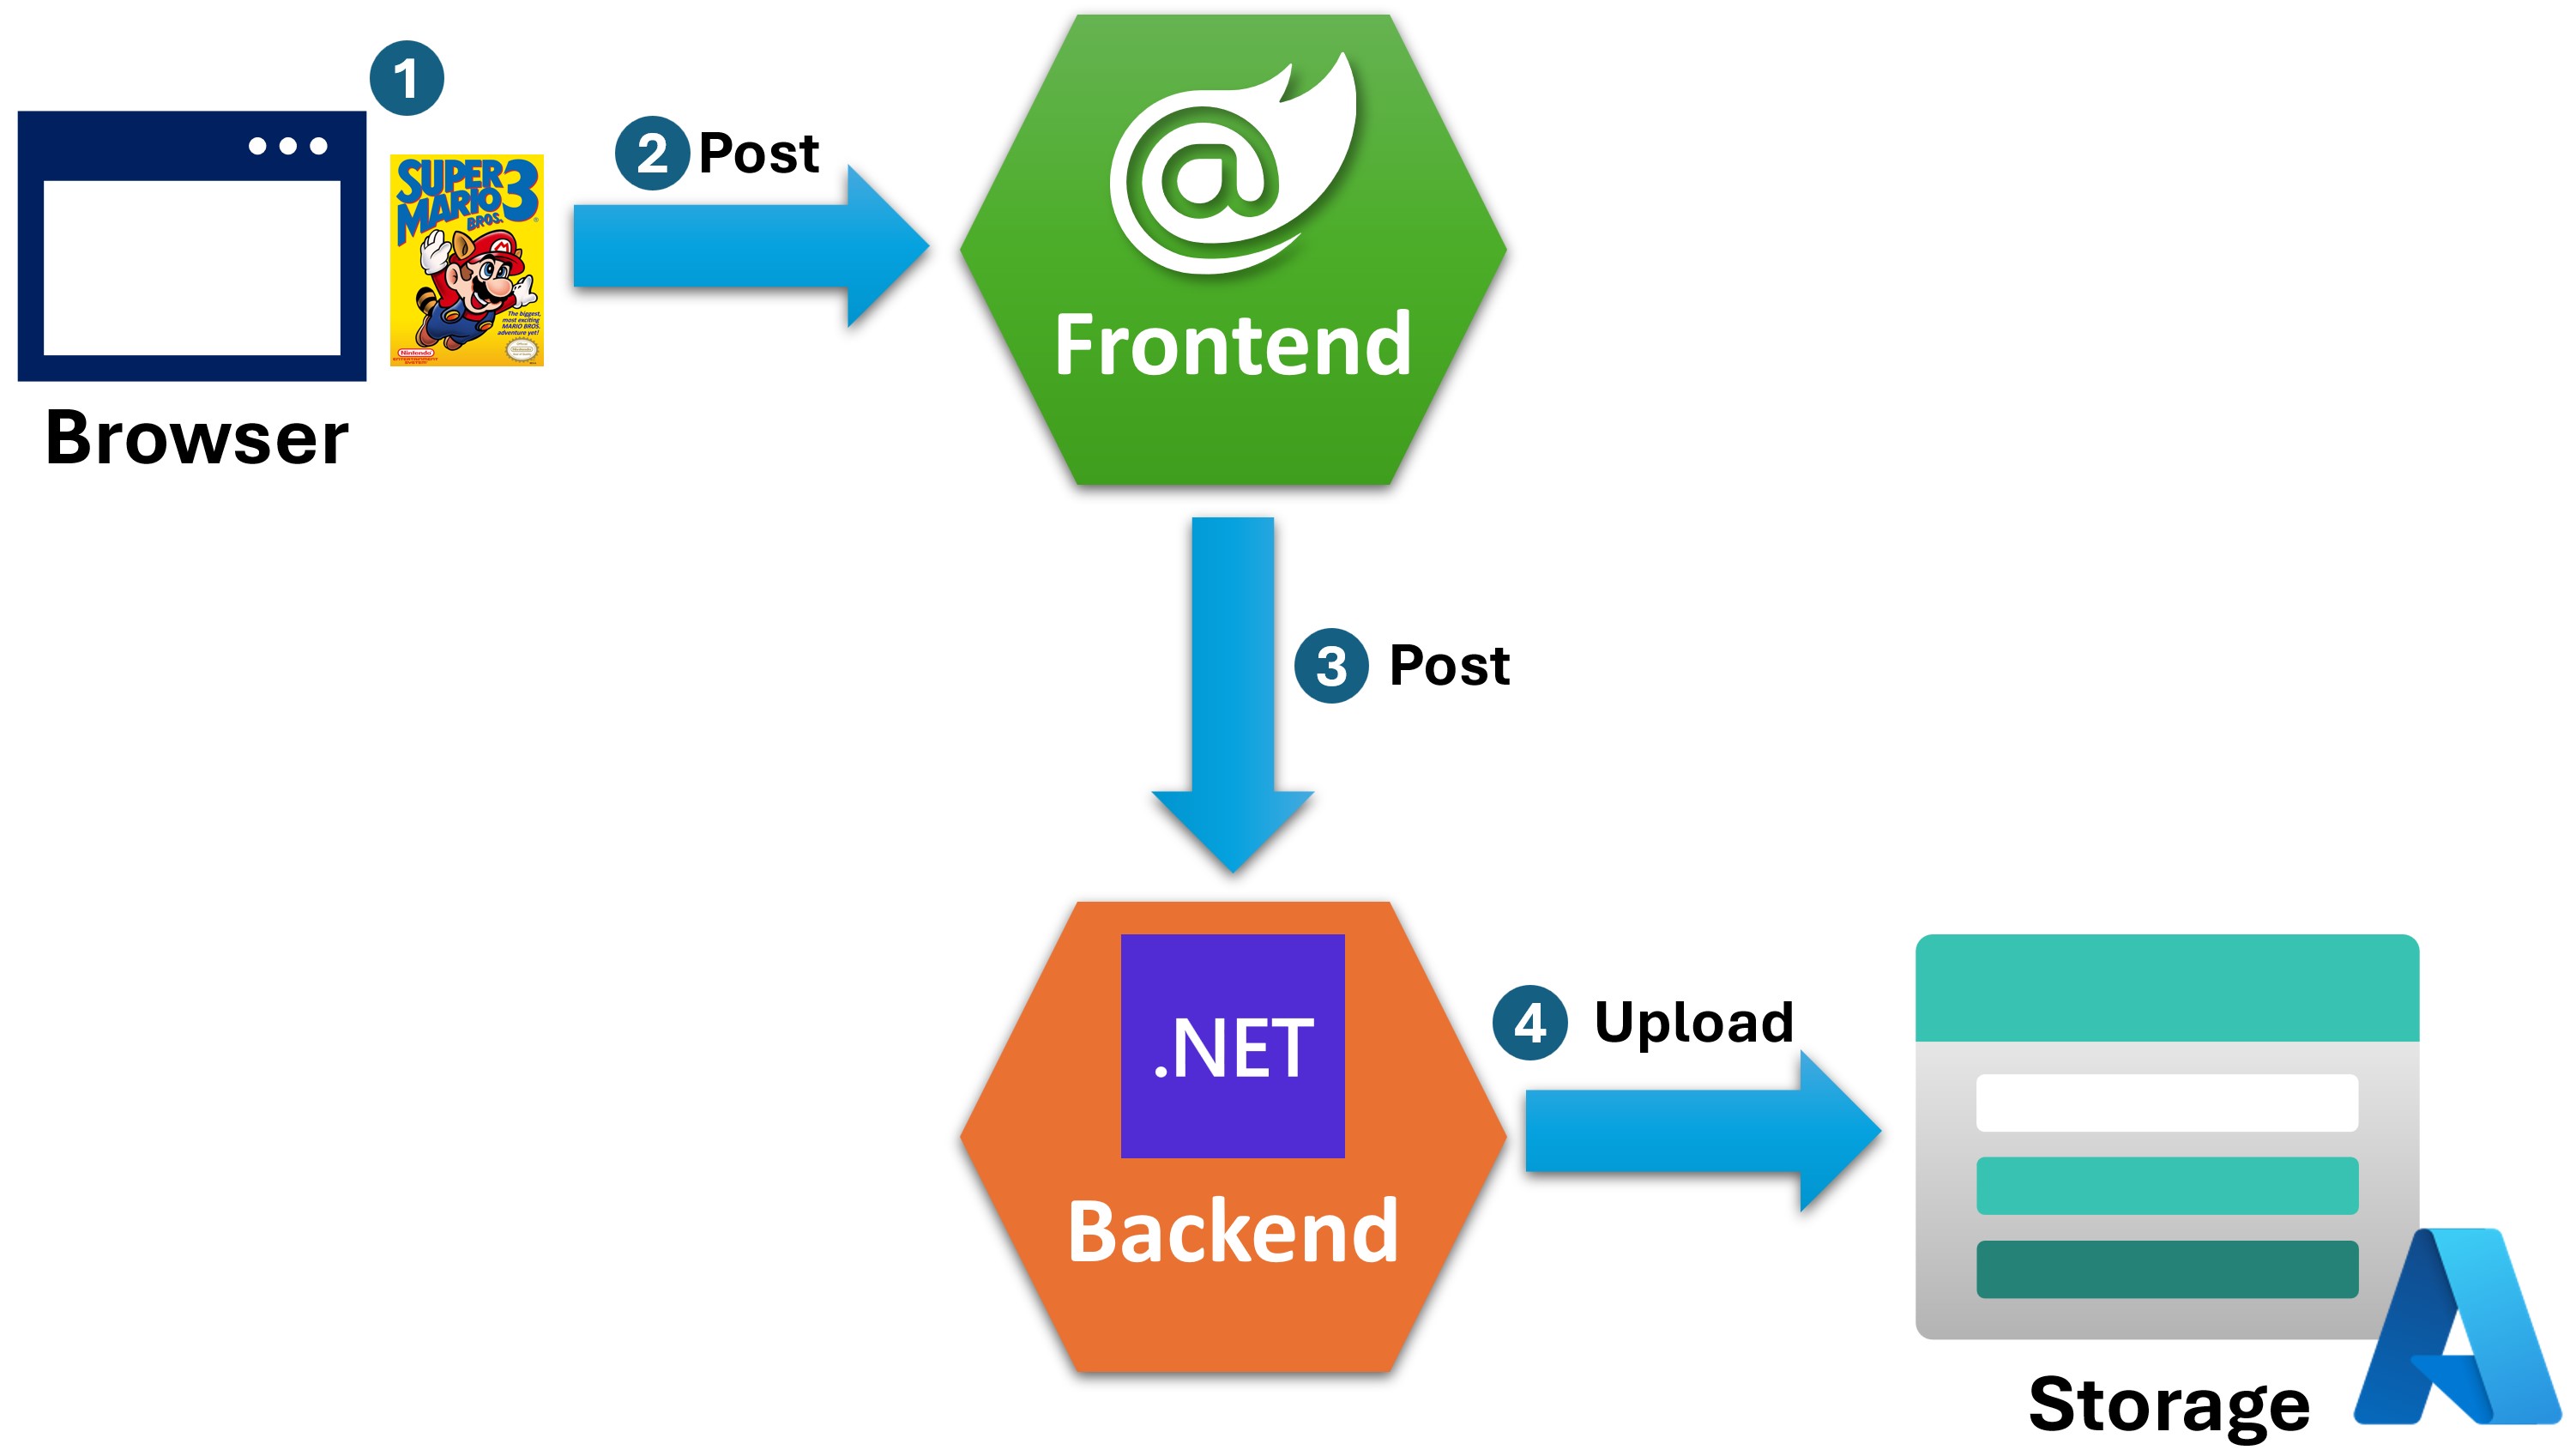
Specifically, we would like to enable this specific flow:
1. The user uses a file picker to select an image file from the machine and clicks the “Save” button
2. The browser sends a post request to the Blazor Static SSR frontend that includes the image file
3. The Blazor Static SSR frontend sends the image file to the ASP.NET Core backend, where we have an API endpoint ready to receive it
4. The ASP.NET Core API receives the image file and uploads it to Azure Blob Storage
Let me quickly tackle a couple of questions you might have:
Why are we not storing the images in the server file system?
That won’t work since we plan on running both backend and frontend in the cloud as Docker containers, which will be scaled and destroyed as needed, causing tons of trouble with anything stored directly in them (we could use volumes, but it would only complicate things).
Why are we not uploading the image directly from the frontend to Azure Blob Storage?
Because the frontend will be exposed to the public Internet, and we don’t want to keep sensitive information like Azure Blob Storage connection strings there.
Also, we want to have a clear separation of concerns, with the frontend only responsible for UI rendering and the backend responsible for all important server-side operations. That way, if we ever decide to change the frontend tech (which happens frequently), we won’t have to redo the blob upload logic.
Now let’s see how to implement this in 5 quick steps, starting with the backend.
Step 1: Implement a file uploader service
Let’s start by installing the Azure Blob Storage NuGet package in the backend project:
dotnet add package Aspire.Azure.Storage.Blobs
Notice that this is not the normal Azure Storage Blobs client package, but instead the .NET Aspire Blob Storage component, which not only makes it easier to register Blob Storage in the application but also provides health checks, logging, and tracing for free.
If you are new to .NET Aspire, you may want to check out my .NET Aspire article where I explain how to get started with it.
Now we can create a small service to handle the file upload:
public class FileUploader(BlobServiceClient blobServiceClient)
{
    public async Task<string> UploadImageAsync(IFormFile file, string containerName)
    {
        // Create a blob container if it doesn't exist
        var containerClient = blobServiceClient.GetBlobContainerClient(containerName);
        await containerClient.CreateIfNotExistsAsync(PublicAccessType.Blob);

        // Delete the existing blob if it exists
        var blobClient = containerClient.GetBlobClient(file.FileName);
        await blobClient.DeleteIfExistsAsync();

        // Upload the new blob
        using var fileStream = file.OpenReadStream();
        await blobClient.UploadAsync(
            fileStream,
            new BlobHttpHeaders { ContentType = file.ContentType });

        // Return the URI of the uploaded blob
        return blobClient.Uri.ToString();
    }
}
The code should be easy to follow, but let me explain a few things:
-
BlobServiceClient is the class you can use to interact with Azure Blob Storage. We’ll see where and how that class is registered in a bit.
-
IFormFile is the class that represents the uploaded file. In the next step, we’ll see how to define a property of that type in the DTO that our API endpoint will receive.
-
containerName is the name of the container where the image will be stored. All files in Azure Blob Storage must be stored in a container.
Now, let’s add the following lines to Program.cs to register the BlobServiceClient and our FileUploader:
builder.AddAzureBlobClient("AzureBlobs");
builder.Services.AddSingleton<FileUploader>();
The AddAzureBlobClient method is provided by .NET Aspire and is the one that registers the BlobServiceClient we injected into FileUploader.
The AzureBlobs parameter is the name of the connection that defines how to access the Azure Blob Storage account. Where does that connection come from? That’s provided by the .NET Aspire AppHost project, which we’ll cover in Step 4.
Now let’s move into defining the API endpoint.
Step 2: Implement the backend API
Our API endpoint will receive not just the image file, but also all the product details, since users will upload the image as part of the page where products are created.
Let’s start by defining the relevant DTO:
public record class CreateGameDto(
    string Name,
    int GenreId,
    decimal Price,
    DateOnly ReleaseDate,
    string Description,
    IFormFile ImageFile);
Notice the ImageFile property, which is of type IFormFile. This is the property that will hold the uploaded image file.
Now let’s define the API endpoint:
app.MapPost("/games", async (
    [FromForm] CreateGameDto newGame,
    CatalogContext dbContext,
    FileUploader fileUploader) =>
{
    // Upload the image to blob storage
    string imageUri = await fileUploader.UploadImageAsync(newGame.ImageFile, "images");

    // Save the game to the DB
    Game game = newGame.ToEntity(imageUri);
    dbContext.Games.Add(game);
    await dbContext.SaveChangesAsync();

    // Return the created game details
    return Results.CreatedAtRoute(
        "GetGame",
        new { id = game.Id },
        game.ToGameDetailsDto());
});
A key thing to notice here is the [FromForm] attribute in the newGame parameter. This attribute tells ASP.NET Core to bind the incoming request into the CreateGameDto object by grabbing the properties from the form data.
We have to use the [FromForm] attribute because the image file (and everything else in the request) is sent as a form field, not as a JSON payload. Images are binary data, and we can’t send them as JSON, which is a text-based format.
Also, we can’t mix JSON and form data in the same request, so we have to choose one or the other. In this case, we chose form data because it’s the only way to send binary data.
I won’t go over the ToEntity and ToGameDetailsDto methods, since those are simple mapping methods. The important part is that the image URI is saved in the database, so we can use it later to display the image in the frontend.
Now let’s move into the frontend side of things.
Step 3: Implement the frontend Razor component
The first thing we’ll need in our Blazor frontend is some model to hold the product details and the image file:
public class GameDetails
{
    public int Id { get; set; }
    public required string Name { get; set; }
    public string? GenreId { get; set; }
    public decimal Price { get; set; }
    public DateOnly ReleaseDate { get; set; }
    public required string Description { get; set; }
    public IFormFile? ImageFile { get; set; }
    public string? ImageUri { get; set; }
}
There, ImageFile will hold the image selected by the user when creating a game, and ImageUri will hold the URI of an initial image we’ll use as a placeholder.
Now let’s define the typed HttpClient that will know how to prepare the request to send to the backend API:
public class GamesClient(HttpClient httpClient)
{
    public async Task AddGameAsync(GameDetails game) =>
        await httpClient.PostAsync("games", ToMultiPartFormDataContent(game));

    public static MultipartFormDataContent ToMultiPartFormDataContent(GameDetails game)
    {
        var formData = new MultipartFormDataContent
        {
            { new StringContent(game.Name), nameof(game.Name) },
            { new StringContent(game.GenreId!), nameof(game.GenreId) },
            { new StringContent(game.Price.ToString()), nameof(game.Price) },
            { new StringContent(game.ReleaseDate.ToString()), nameof(game.ReleaseDate) },
            { new StringContent(game.Description), nameof(game.Description) }
        };

        if (game.ImageFile is not null)
        {
            var streamContent = new StreamContent(game.ImageFile.OpenReadStream())
            {
                Headers = { ContentType = new MediaTypeHeaderValue(game.ImageFile.ContentType) }
            };

            formData.Add(streamContent, "ImageFile", game.ImageFile.FileName);
        }

        return formData;
    }
}
Notice how we can’t just send the GameDetails object as JSON, since it contains the IFormFile property.
Instead, we have to convert it, property by property, into a MultipartFormDataContent object, with some special logic to handle the ImageFile.
Now let’s see how to use this GamesClient in a Razor component. First, the HTML part:
@page "/catalog/editgame"

@inject NavigationManager NavigationManager
@inject GamesClient GamesClient

<PageTitle>@title</PageTitle>
<h3>@title</h3>

@if (game is null)
{
    <p><em>Loading...</em></p>
}
else
{
    <div class="row mb-2">
        <div class="col-md-4">
            <EditForm Model="@game"
                        FormName="editGame"
                        OnValidSubmit="HandleSubmitAsync"
                        enctype="multipart/form-data"
                        Enhance>
                <div class="mb-3">
                    <label for="name" class="form-label">Name:</label>
                    <InputText id="name" @bind-Value="game.Name" class="form-control" />
                </div>
                <div class="mb-3">
                    <label for="genre" class="form-label">Genre:</label>
                    <InputSelect id="genre" @bind-Value="game.GenreId" class="form-select">
                        <option value="">Select a genre</option>
                        <option value="1">Fighting</option>
                        <option value="2">Kids and Family</option>
                        <option value="3">Racing</option>
                    </InputSelect>
                </div>
                <div class="mb-3">
                    <label for="description" class="form-label">Description:</label>
                    <InputTextArea id="description"
                                   @bind-Value="game.Description"
                                   class="form-control" />
                </div>
                <div class="mb-3">
                    <label for="price" class="form-label">Price:</label>
                    <InputNumber id="price" @bind-Value="game.Price" class="form-control" />
                </div>
                <div class="mb-3">
                    <label for="releaseDate" class="form-label">Release Date:</label>
                    <InputDate id="releaseDate"
                               @bind-Value="game.ReleaseDate"
                               class="form-control" />
                </div>
                <div class="mb-3">
                    <label for="imageUri" class="form-label">Image:</label>
                    <input id="imageUri"
                            type="file"
                            name="game.ImageFile"
                            class="form-control"
                            accept=".png, .jpg, .jpeg"
                            onchange="previewImage(event)"/>
                    <img id="imagePreview"
                        src="@game.ImageUri"
                        class="img-thumbnail mt-2" />
                </div>
                <button type="submit" class="btn btn-primary">Save</button>
                <a role="button" class="btn btn-secondary" href="/catalog">Cancel</a>
            </EditForm>
        </div>
    </div>
}
Regarding this piece, notice the following:
- You must specify enctype=”multipart/form-data” in the EditForm tag, so the form can send binary data. Otherwise, the ImageFile property of the GameDetails object will never get populated with the image file!
- The name attribute of the input tag must match the name of the property in the GameDetails object. This is how Blazor binds the uploaded file to the ImageFile property.
- previewImage is a small javascript function that will show a preview of the image selected by the user in the img tag below the file picker.
Here’s the javascript function, which you can define in a separate .js file somewhere under the wwwroot folder and include in your App.razor file:
window.previewImage = (event) => {
    var reader = new FileReader();
    reader.onload = function() {
        var output = document.getElementById('imagePreview');
        output.src = reader.result;
    }
    reader.readAsDataURL(event.target.files[0]);
};
Now let’s add the C# part of our Razor component:
@code {
    private const string defaultImageUri = "https://placehold.co/100";

    [SupplyParameterFromForm]
    private GameDetails? game { get; set; }

    private string title = string.Empty;

    protected override void OnInitialized()
    {
        if (game is not null)
        {
            return;
        }

        game = new()
            {
                Name = string.Empty,
                ReleaseDate = DateOnly.FromDateTime(DateTime.UtcNow),
                ImageUri = defaultImageUri,
                Description = string.Empty
            };

        title = "New Game";
    }

    private async Task HandleSubmitAsync()
    {
        await GamesClient.AddGameAsync(game);

        NavigationManager.NavigateTo("/catalog");
    }
}
Let me break down the code a bit:
- defaultImageUri is a placeholder image that will be shown when the user hasn’t selected an image yet.
- Using [SupplyParameterFromForm] in the game property tells Blazor to bind the form data to the game object when the user submits the form.
- All we do in the OnInitialized method is create a new GameDetails object to hold the form data. Just have to check if the game object is already populated since Blazor will call this method even when the user submits the form.
- The HandleSubmitAsync method is called when the user clicks the “Save” button. It sends the game object to the backend API using the GamesClient.
My actual Razor component is a bit more complex, with validation logic, error handling, and the ability to handle both creating and editing games. But I hope this simplified version gives you a good idea of how to implement the file upload piece.
Finally, let’s see how to connect frontend, backend, and Azure Blob Storage to be able to run the whole thing.
Step 4: Add .NET Aspire orchestration
Instead of having to play around with hosts, ports, and storage connection strings, we can use .NET Aspire Orchestration to figure out all the details for us.
I have already covered the details of how to get started with .NET Aspire in my .NET Aspire article, so here I’ll just focus on the AppHost project I created for this tutorial.
Here are the contents of the Program.cs file in the AppHost project:
var builder = DistributedApplication.CreateBuilder(args);

var blobs = builder.AddAzureStorage("Storage")
                   .RunAsEmulator(builder =>
                   {
                        builder.WithDataVolume();
                   })
                   .AddBlobs("AzureBlobs");

var catalogApi = builder.AddProject<Projects.Catalog_Api>("catalog-api")
                 .WithReference(blobs);

builder.AddProject<Projects.GameStore_Frontend>("gamestore-frontend")
       .WithReference(catalogApi);

builder.Build().Run();
Let’s see what’s going on with that Azure Blob Storage part:
- AddAzureStorage Adds an Azure Storage resource to the application model.
- RunAsEmulator Configures an Azure Storage resource to be emulated using the Azurite container. That way, we can run the application locally without having to connect to a real Azure Storage account.
- AddBlobs Adds a Blob Storage resource to the Azure Storage resource and makes the connection details available to any resource that references it via the AzureBlobs connection name. Remember that we used this name when calling AddAzureBlobClient in the backend API project.
- By calling WithReference(blobs) in the catalogApi project, we make sure that the AzureBlobs connection details are available to the backend API project.
Step 5: Run it!
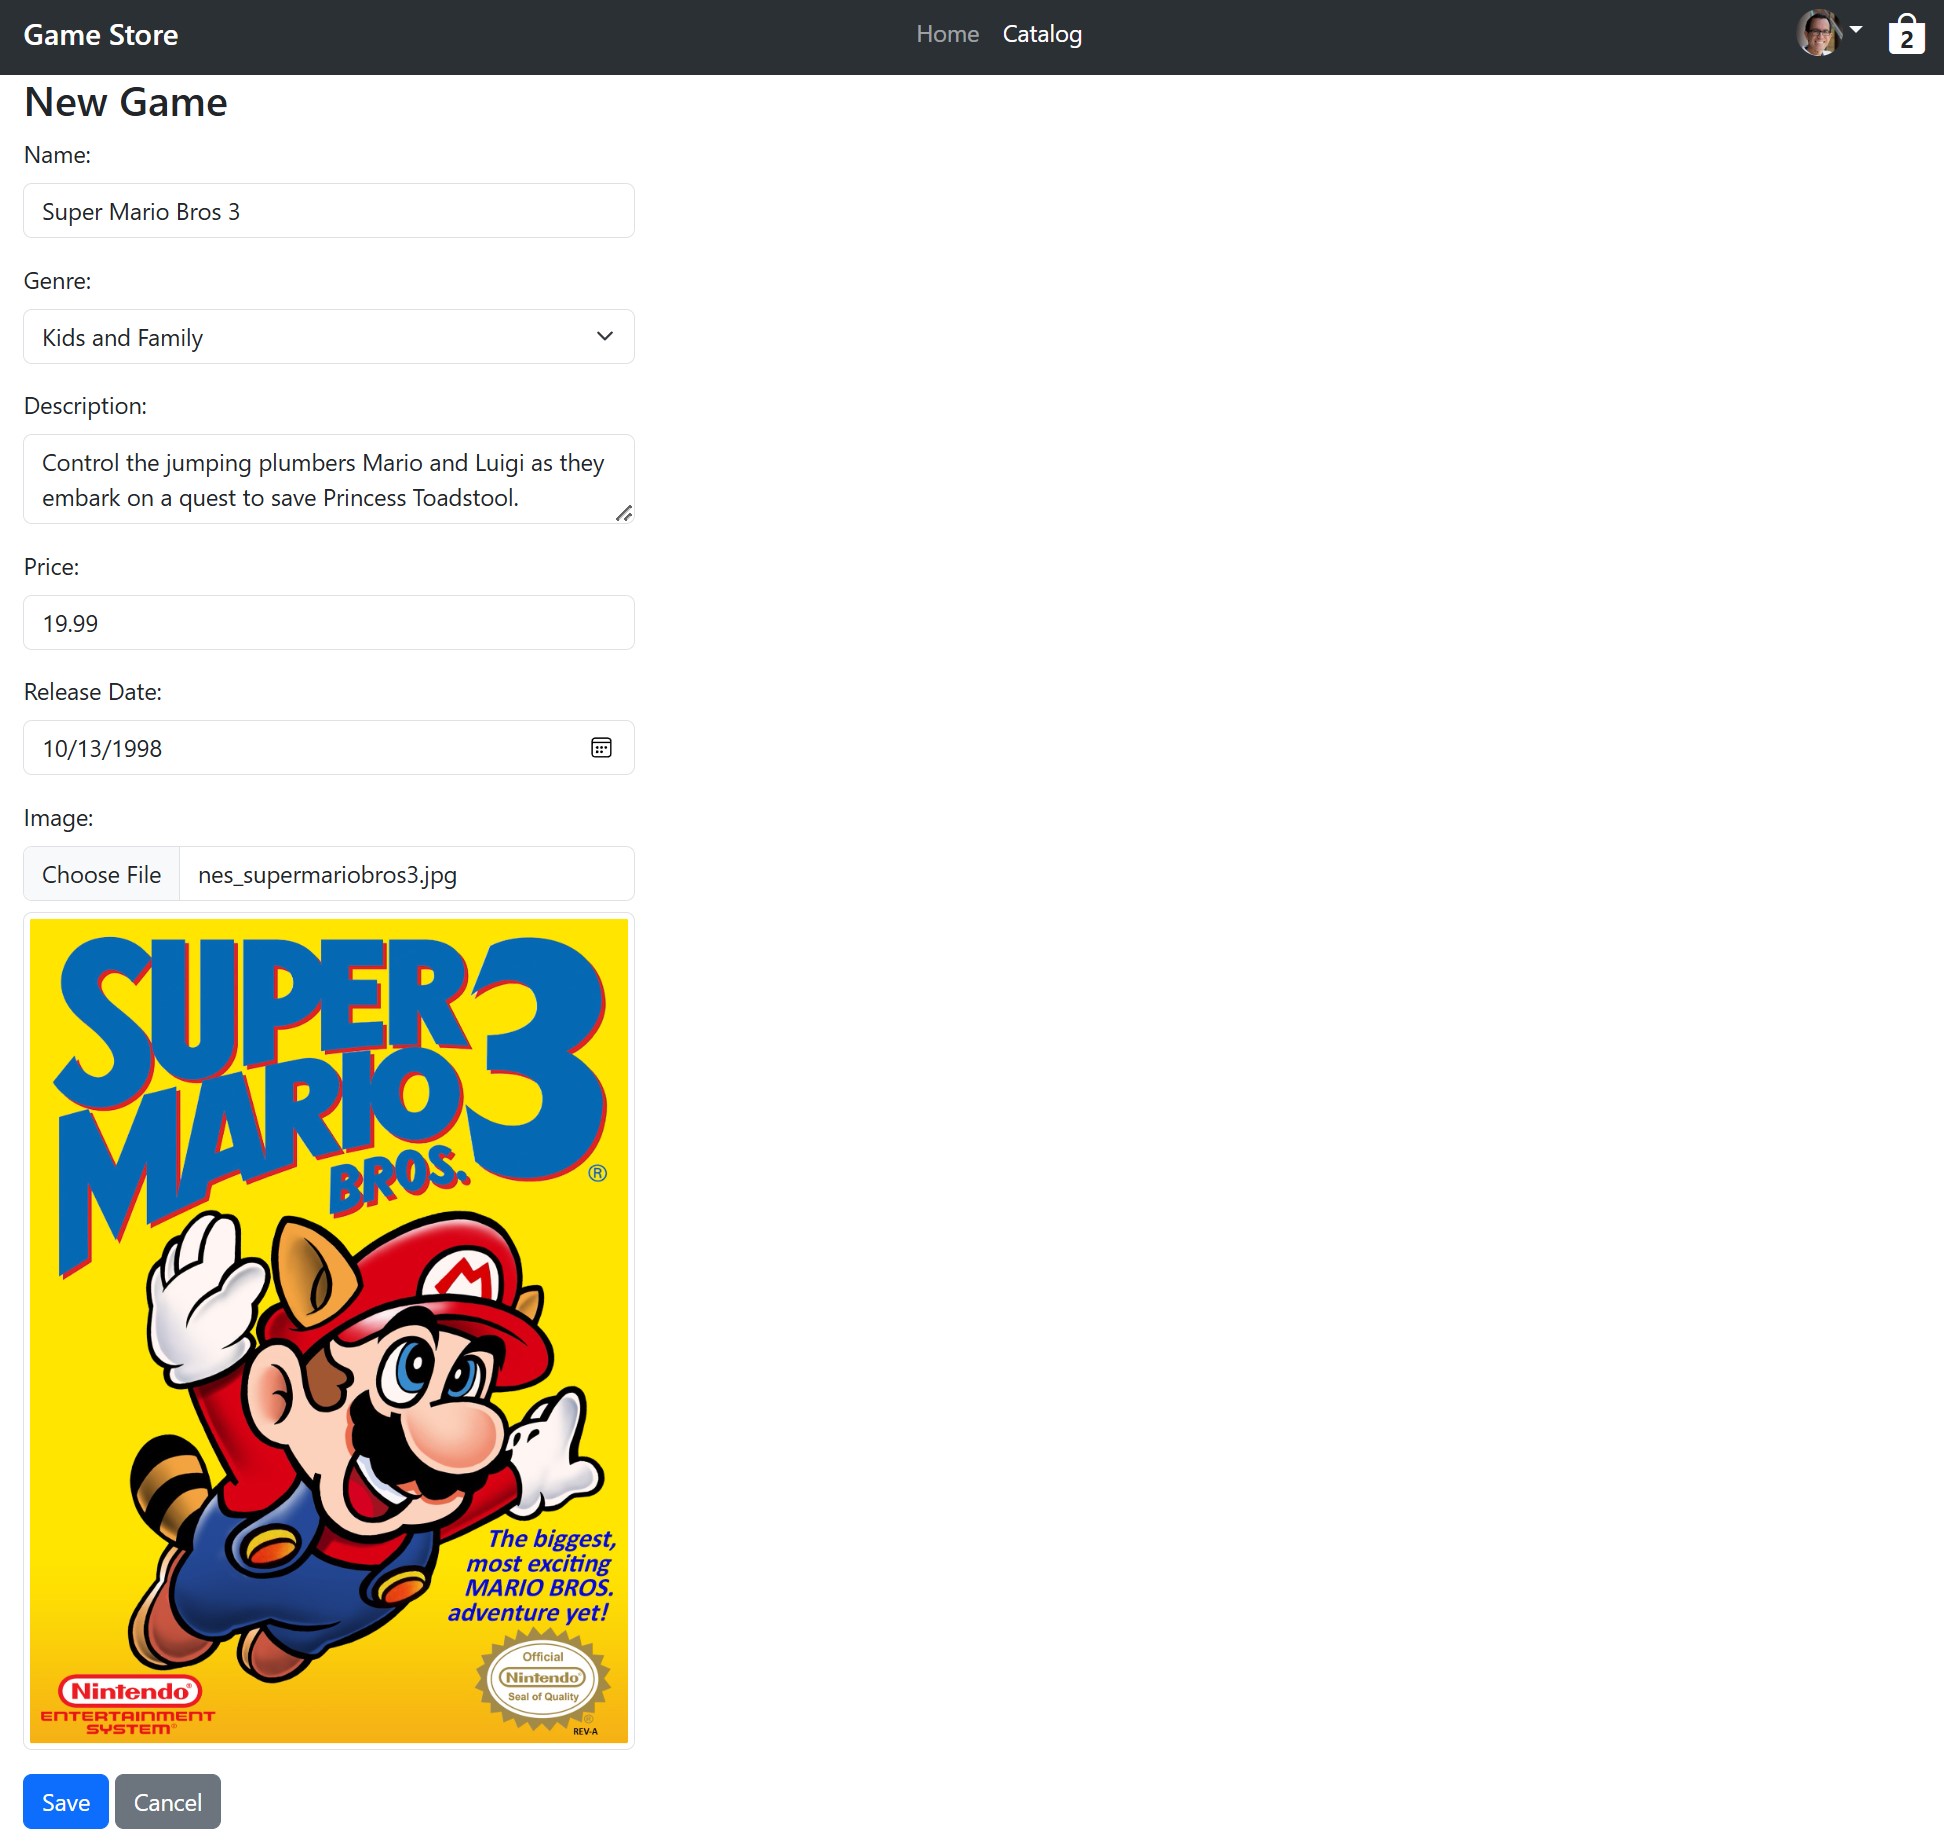
After running the AppHost project, let’s navigate to the Edit page in the frontend. Things will look like this just before the user submits the form:
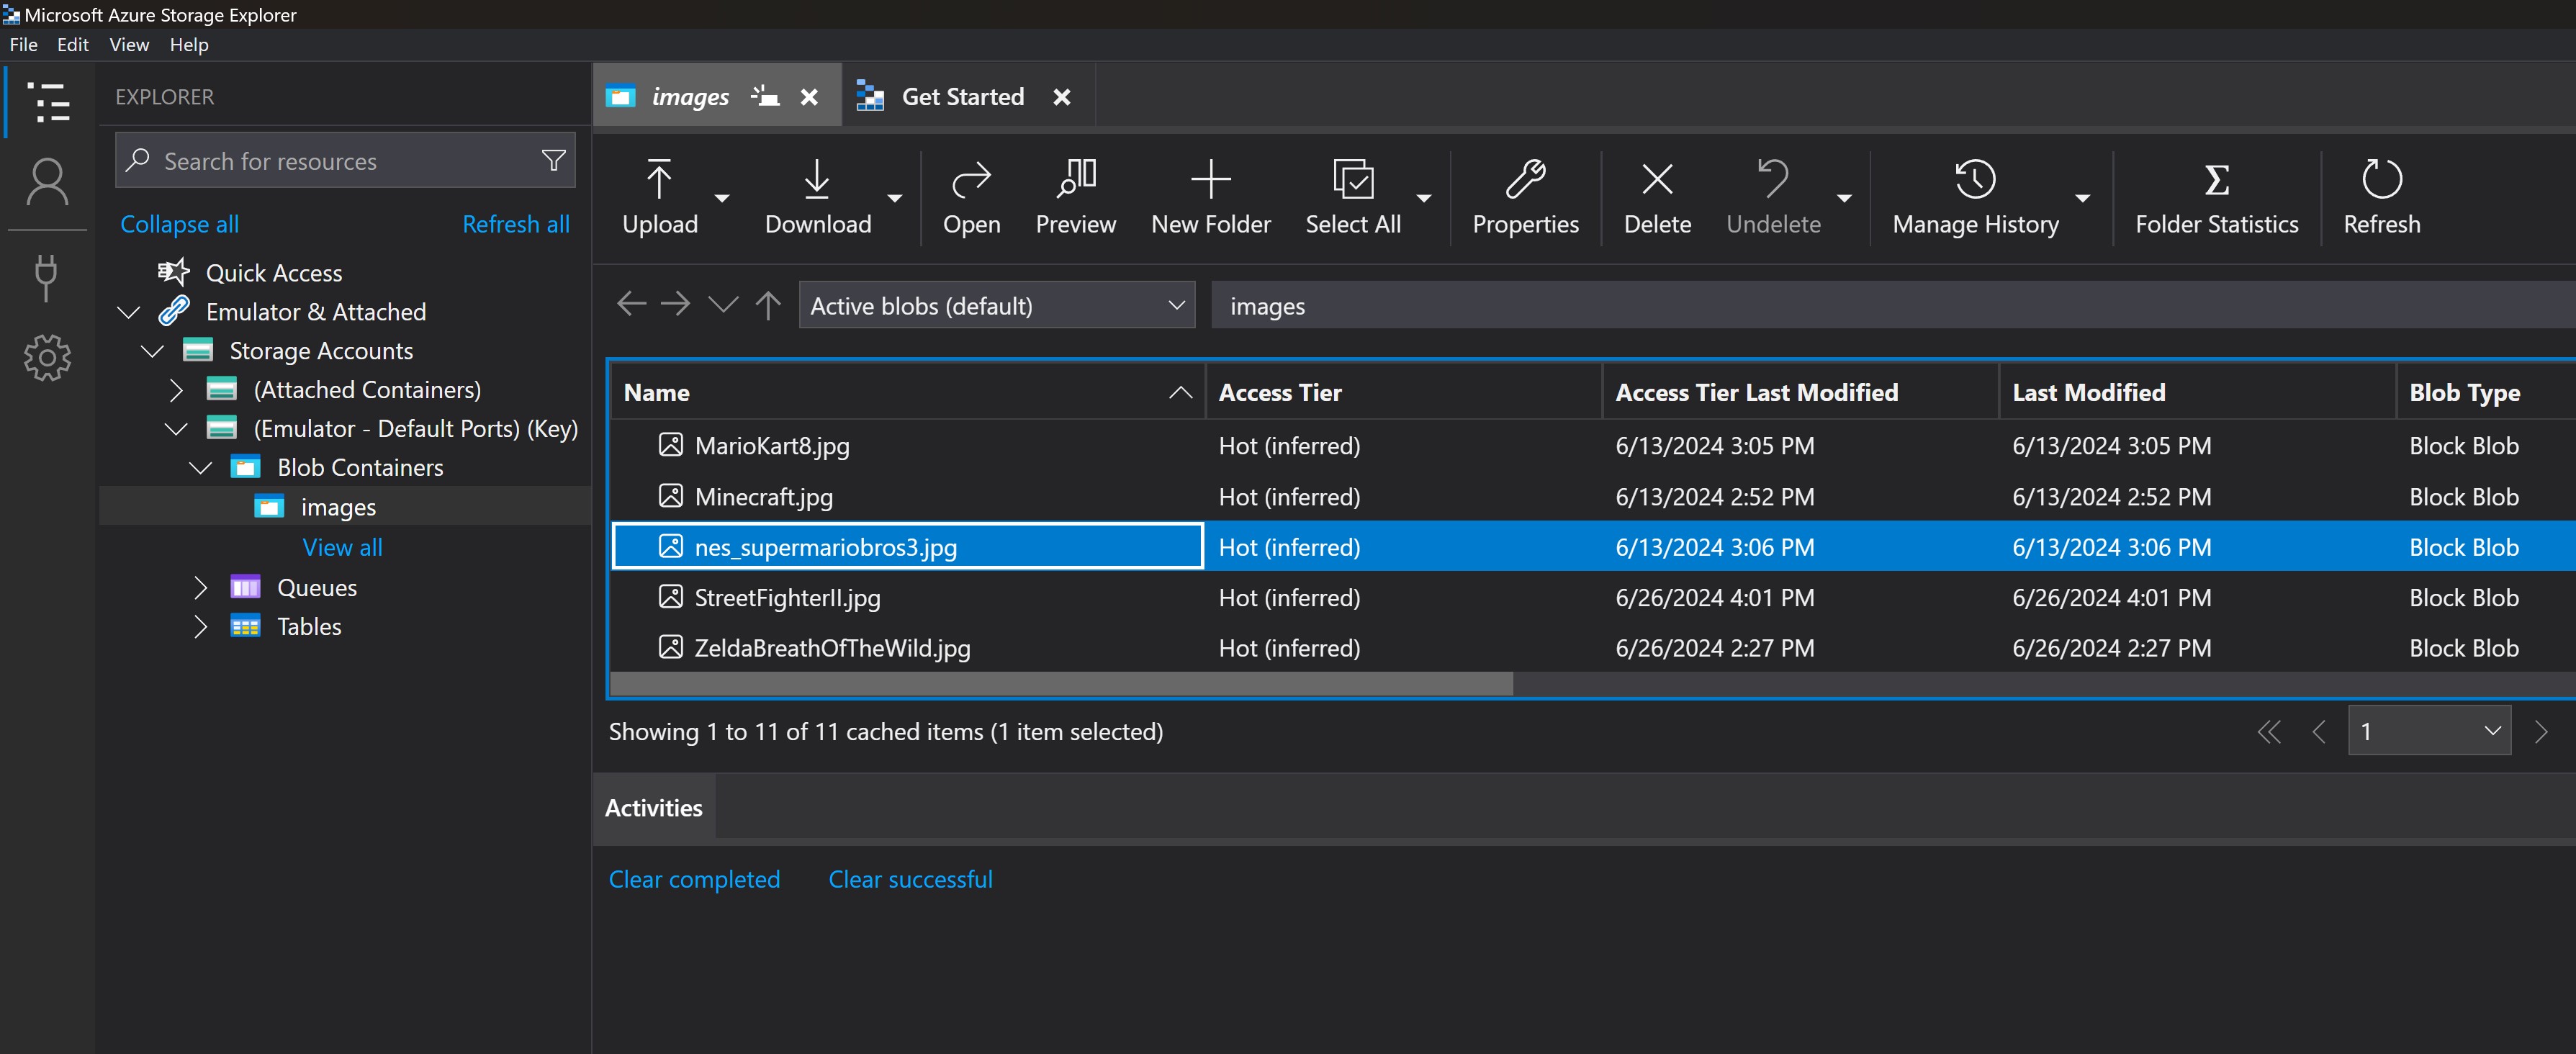
And, after saving changes, you should be able to see the image uploaded to the Azurite emulator, here via the Azure Storage Explorer:
Mission accomplished!
Whenever you’re ready, here’s how I can help:
The .NET Developer Bootcamp: A complete path from ASP.NET Core fundamentals to building, containerizing, and deploying production-ready, cloud-native apps on Azure.
