Read time: 5 minutes
Today I want to show you how to deploy your ASP.NET Core applications to Azure Kubernetes Service (AKS).
Kubernetes is the fundamental building block of cloud-native development, and it’s a great way to manage your containers in a production environment.
Many companies want to move to Azure and Kubernetes due to its many benefits, but understandably most .NET developers find it overwhelming to onboard to this new environment.
However, it’s not as hard as it seems, and I’m going to show you how to get your apps deployed to AKS in 5 simple steps.
Let’s start.
What is Kubernetes?
Let’s say you have embraced Docker containers for your ASP.NET Core applications, which is a great step towards a more modern and scalable architecture.
Now you want to take them to your production environment, but you start facing a few issues:
- How do you manage the lifecycle of your containers?
- How do you scale them?
- How do you make sure they are always available?
- How do you manage the networking between them?
- How do you make them available to the outside world?
This is where Kubernetes comes in. Kubernetes is a container orchestration platform that helps you solve all these problems and more.
It is a powerful tool that can help you manage your containers in a production environment.

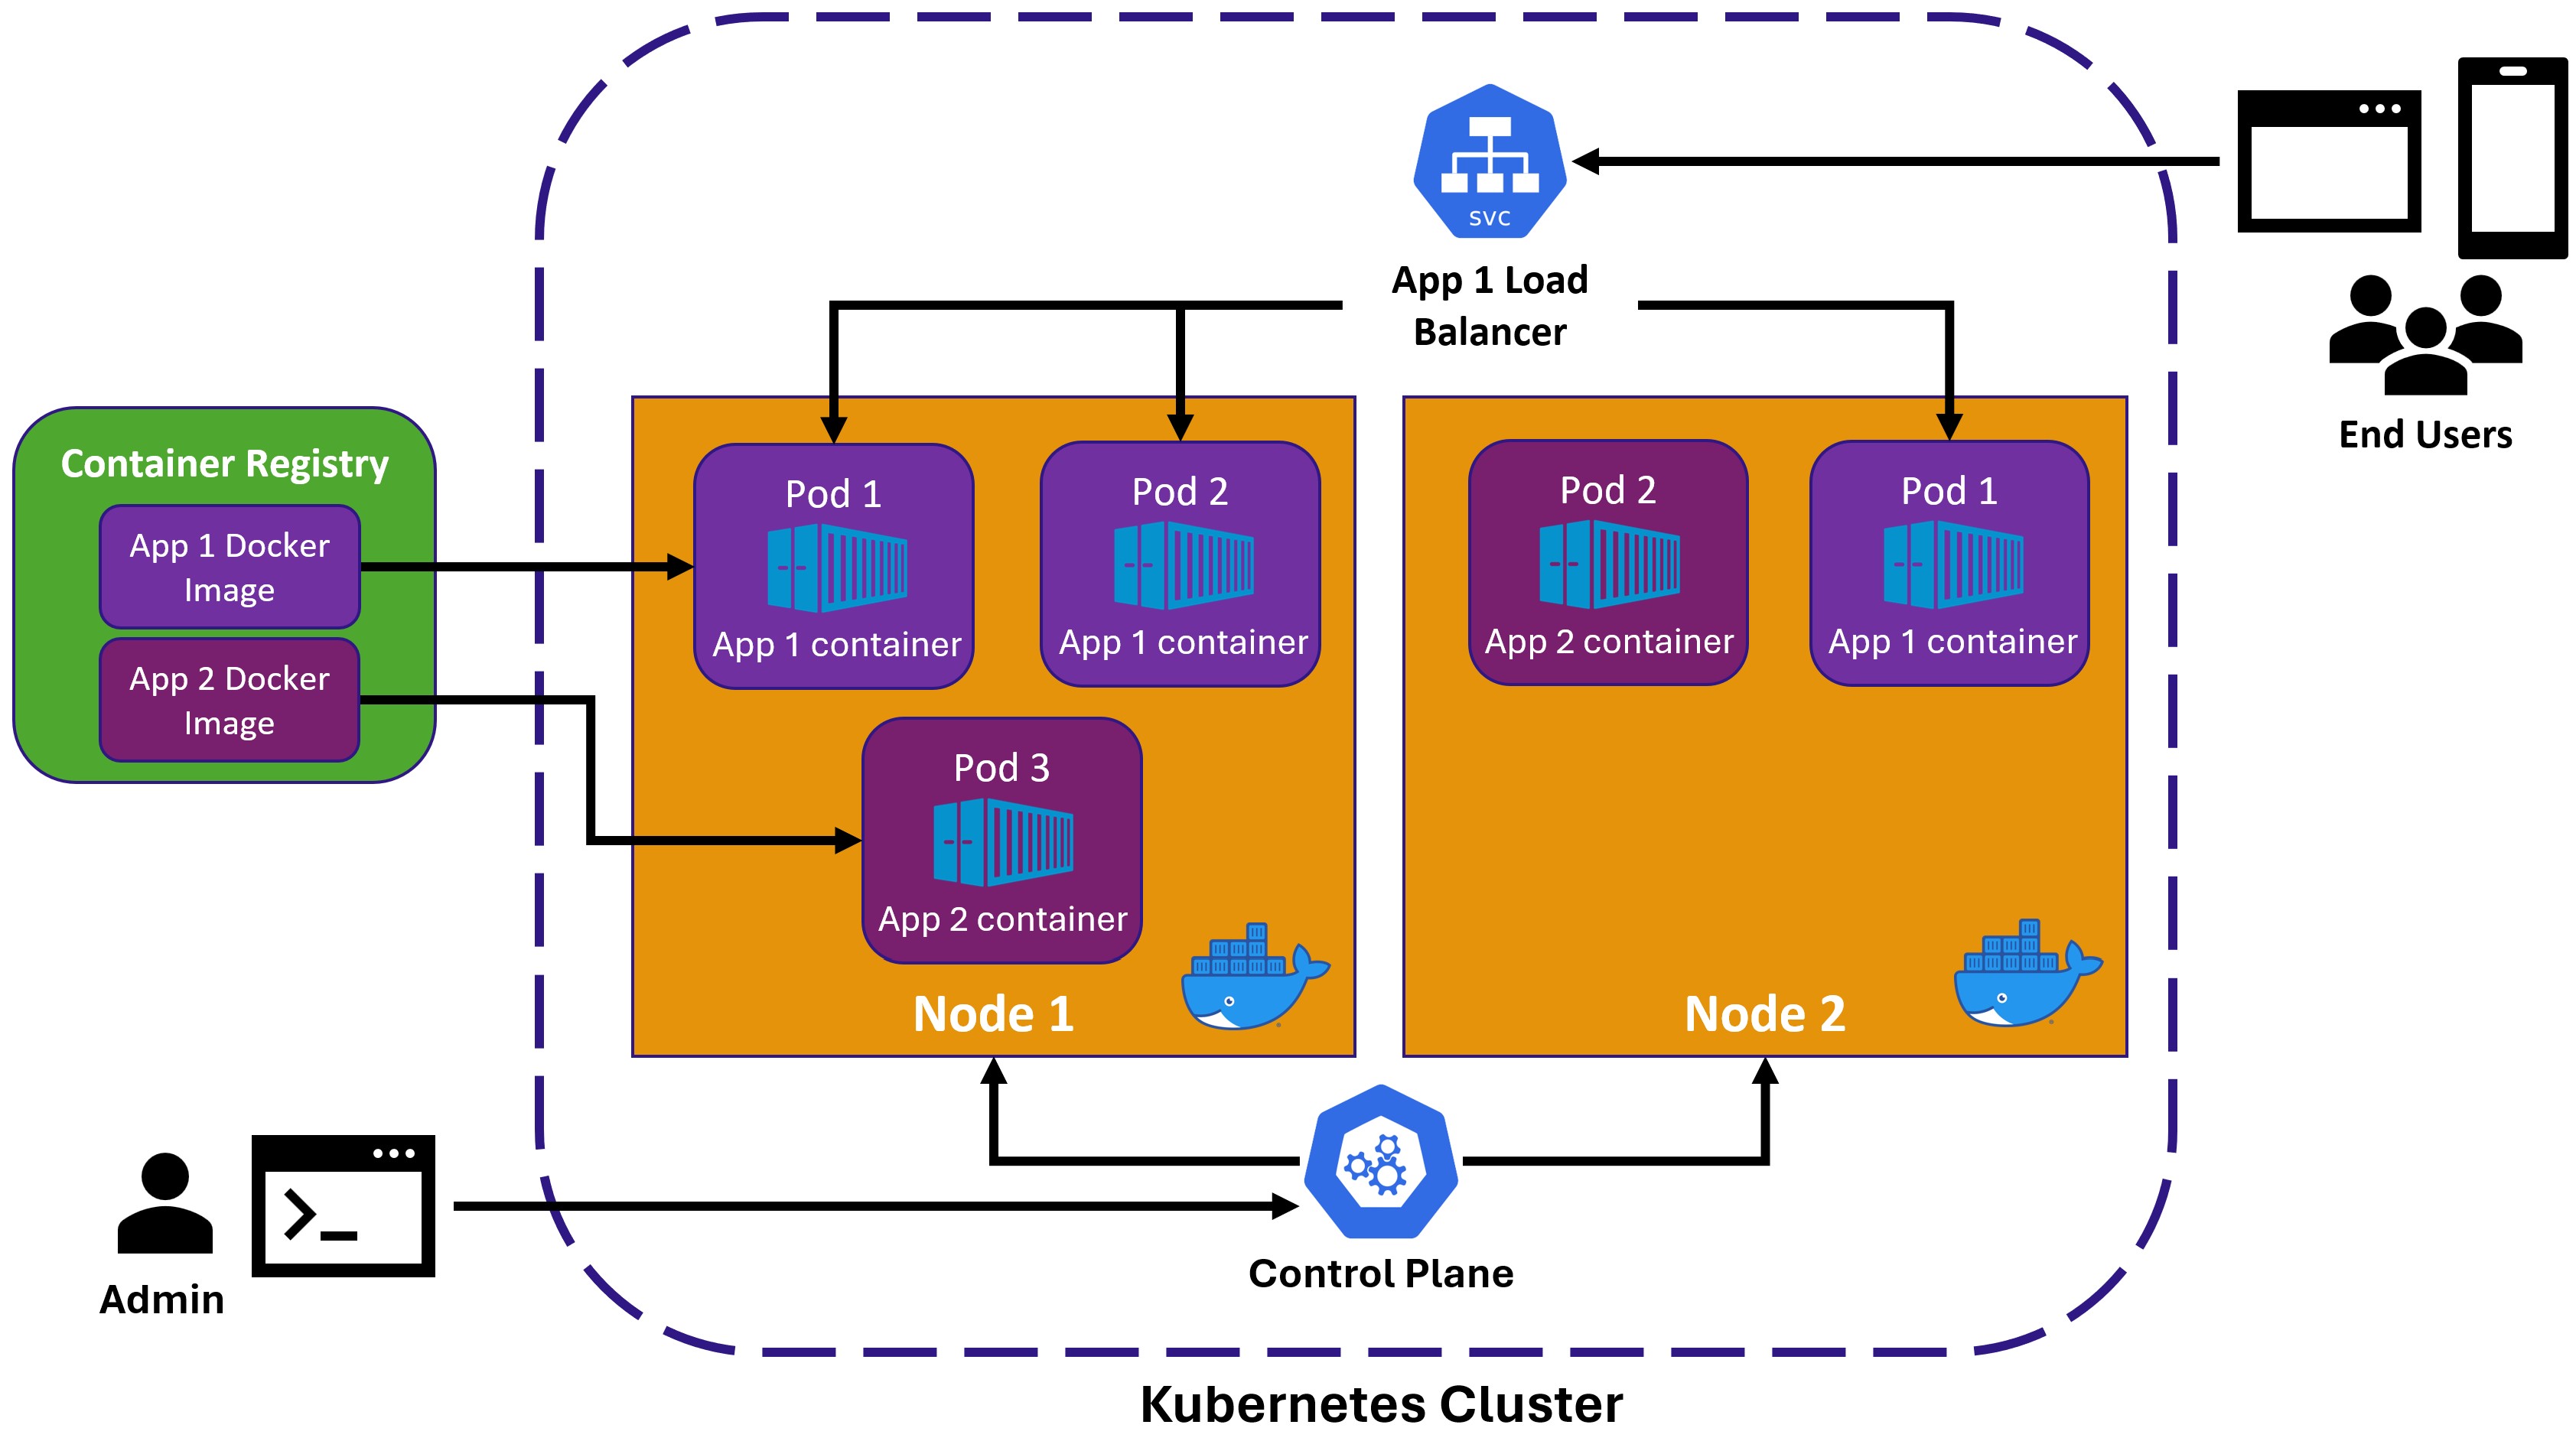
I won’t go deep into Kubernetes architecture details here (it can get very complex), but here’s a high-level overview of the main concepts you should understand:
- Kubernetes Cluster: A set of machines, called nodes, that run containerized applications.
- Node: A Docker-enabled machine that runs your pods. It can be a physical machine or a virtual machine.
- Pod: The smallest deployable unit in Kubernetes. Your containers run inside these pods.
- Service: An abstraction that defines how to access your pods. One type of service is a load balancer, which allows external clients to interact with your pods.
- Control Plane: Takes care of managing the Kubernetes cluster. Admins use tools to interact with the cluster via the control plane.
You can stand up your own Kubernetes cluster on-premises, but managing that can be a lot of work.
That’s why most people use a managed Kubernetes cluster in the cloud, like Azure Kubernetes Service (AKS), Amazon Elastic Kubernetes Service (EKS), or Google Kubernetes Engine (GKE).
Let’s see how to deploy your ASP.NET Core applications to AKS in 5 simple steps.
Step 1: Publish your Docker image to ACR
I have already created a resource group called hello-aks in my Azure subscription and I have my ASP.NET Core app Docker image already published to my helloaksacr Azure Container Registry (ACR).
If you need a refresher on how to turn your ASP.NET Core app into a Docker image and publish it to an ACR, check out my Docker Tutorial For .NET Developers.
But, for a quick recap, here’s the command I used to publish my ASP.NET Core app as a Docker image to helloaksacr:
dotnet publish /t:PublishContainer -p ContainerImageTag=1.0.0 \
-p ContainerRegistry=helloaksacr.azurecr.io
Step 2: Create an AKS cluster
I’ll be using the Azure CLI for this tutorial, but you can also use the Azure Portal if you prefer.
Now, let’s login:
az login
And then create the AKS cluster:
az aks create --resource-group hello-aks --name hello-aks-cluster --node-count 1 \
--node-vm-size Standard_B2ls_v2 --attach-acr helloaksacr --generate-ssh-keys
That will create a cluster with 1 node of the Standard_B2ls_v2 VM size (one of the cheapest available at the time of writing this tutorial).
It will also grant our cluster the AcrPull role assignment in our helloaksacr ACR, so that it can pull images from it.
That’s going to take a few minutes to complete, so let’s move on to the next step.
Step 3: Define your AKS resources
The way to tell Kubernetes what to do is by creating YAML files that define the resources you want to deploy.
The first resource we will need is a Deployment. This is a resource that tells Kubernetes to run a certain number of instances of a certain container.
Here’s the deployment for our Hello-AKS ASP.NET Core API:
apiVersion: apps/v1
kind: Deployment
metadata:
  name: helloaks-deployment
spec:
  selector:
    matchLabels:
      app: helloaks-api
  template:
    metadata:
      labels:
        app: helloaks-api
    spec:
      containers:
      - name: helloaks-api
        image: helloaksacr.azurecr.io/helloaks-api:1.0.0
        resources:
          limits:
            memory: "128Mi"
            cpu: "500m"
        ports:
        - containerPort: 8080
There we are asking Kubernetes to run a container called helloaks-api from the helloaksacr ACR, with the 1.0.0 tag.
We are also defining how much memory and CPU should be allowed for our container, and we are letting Kubernetes know in which port our container will be listening.
Kubernetes will provision pods based on those specifications.
However, that’s not enough. We might eventually have multiple pods running our ASP.NET Core app, and we don’t want to have to know the IP address of each pod to access them.
That’s where the Service resource comes in. It provides a single, stable IP address and DNS name for our pods and it will load balance traffic between them.
So let’s define our Kubernetes service:
apiVersion: v1
kind: Service
metadata:
  name: helloaks-service
spec:
  type: LoadBalancer
  selector:
    app: helloaks-api
  ports:
  - port: 80
    targetPort: 8080
Since we want our app to be exposed to the outside world, we are using a LoadBalancer service type. Other types like ClusterIP would only give internal access to the pods.
We are also asking Kubernetes there that it should forward incoming traffic from port 80 to port 8080 targeting all the pods whose app label is helloaks-api.
That should be enough to get our ASP.NET Core app running in AKS, so let’s apply those resources to our cluster.
Step 4: Deploy resources to the AKS cluster
First, let’s make sure we are connected to our AKS cluster:
az aks get-credentials --resource-group hello-aks --name hello-aks-cluster
And now, let’s apply our resources:
kubectl apply -f hello-aks.yaml
There I’m using kubectl, the Kubernetes command-line client. That’s the tool you use to interact with your Kubernetes cluster.
You usually get kubectl with your Docker Desktop installation, but if you don’t have it you can also get it via the az aks install-cli command.
Now you can confirm your pods are alive in your cluster with this command:
kubectl get pods
Which will print something like this:
NAME                                   READY   STATUS    RESTARTS   AGE
helloaks-deployment-7bb587499c-qgfkb   1/1     Running   0          6s
And to get the public IP address of your service, you can run:
kubectl get service
Which will print out this:
NAME               TYPE           CLUSTER-IP     EXTERNAL-IP    PORT(S)        AGE
helloaks-service   LoadBalancer   10.0.101.200   20.125.90.95   80:32148/TCP   24s
kubernetes         ClusterIP      10.0.0.1       <none>         443/TCP        5m14s
Your public IP address will be in the EXTERNAL-IP column, 20.125.90.95 in this case.
We are ready to access our ASP.NET Core app running in AKS!
Step 5: Access your AKS deployed app
Our ASP.NET Core app is the default Weather Forecast API that gets created when you create a new ASP.NET Core Web API project.
So let’s send a GET request to it:
GET http://20.125.90.95/weatherforecast
Which returns this:
[
  {
    "date": "2024-02-09",
    "temperatureC": 2,
    "summary": "Cool",
    "temperatureF": 35
  },
  {
    "date": "2024-02-10",
    "temperatureC": -13,
    "summary": "Freezing",
    "temperatureF": 9
  },
  {
    "date": "2024-02-11",
    "temperatureC": 6,
    "summary": "Sweltering",
    "temperatureF": 42
  },
  {
    "date": "2024-02-12",
    "temperatureC": 38,
    "summary": "Warm",
    "temperatureF": 100
  },
  {
    "date": "2024-02-13",
    "temperatureC": 36,
    "summary": "Bracing",
    "temperatureF": 96
  }
]
Mission accomplished!
And if standing up and maintaining your own AKS cluster is too much, you can instead use the Azure Container Apps (ACA) service, covered in detail in my .NET Backend Developer Bootcamp, which abstracts away the Kubernetes complexity and lets you focus on your code.
Welcome to cloud-native development!
Whenever you’re ready, there are 3 ways I can help you:
-
.NET Backend Developer Bootcamp: A complete path from ASP.NET Core fundamentals to building, containerizing, and deploying production-ready, cloud-native apps on Azure.
-
Building Microservices With .NET: Transform the way you build .NET systems at scale.
-
Get the full source code: Download the working project from this article, grab exclusive course discounts, and join a private .NET community.
