Read time: 4 minutes
Today I’ll show you how to go passwordless with Azure Managed Identities, so that you can stop using connection strings and other secrets in your ASP.NET Core APIs.
I probably don’t have to tell you that you should never store secrets in your code, given the huge security risk of leaking them by mistake.
And even if you manage to keep those secrets out of the code base, you still have to manage them somehow, which is a pain.
But what if you could stop using secrets altogether?
It’s doable. And it’s easier than you think.
What are Azure Managed Identities?
Here’s one typical ASP.NET Core API, deployed as an Azure Web App, that needs to access 3 Azure resources: a SQL Database, an Storage Account and a Service Bus Namespace:

To access each of these Azure resources, the API is currently using connection strings.
The problem with this is that connection strings are secrets, and having to manage secrets have several drawbacks:
-
Secrets are hard to distribute: you need to make sure that the right people have access to the right secrets.
-
Secrets are hard to revoke: if a secret is compromised, you need to revoke it and generate a new one.
-
Secrets are hard to audit: you need to keep track of who has access to which secrets, and when they were last used.
-
Secrets are hard to rotate: you need to make sure that all the applications that use a secret are updated with the new value.
-
Secrets are hard to secure: you need to make sure that secrets are not stored in plain text, and that they are not leaked in logs or error messages.
Instead of using connection strings, you can use passwordless connections via Azure Managed Identities:
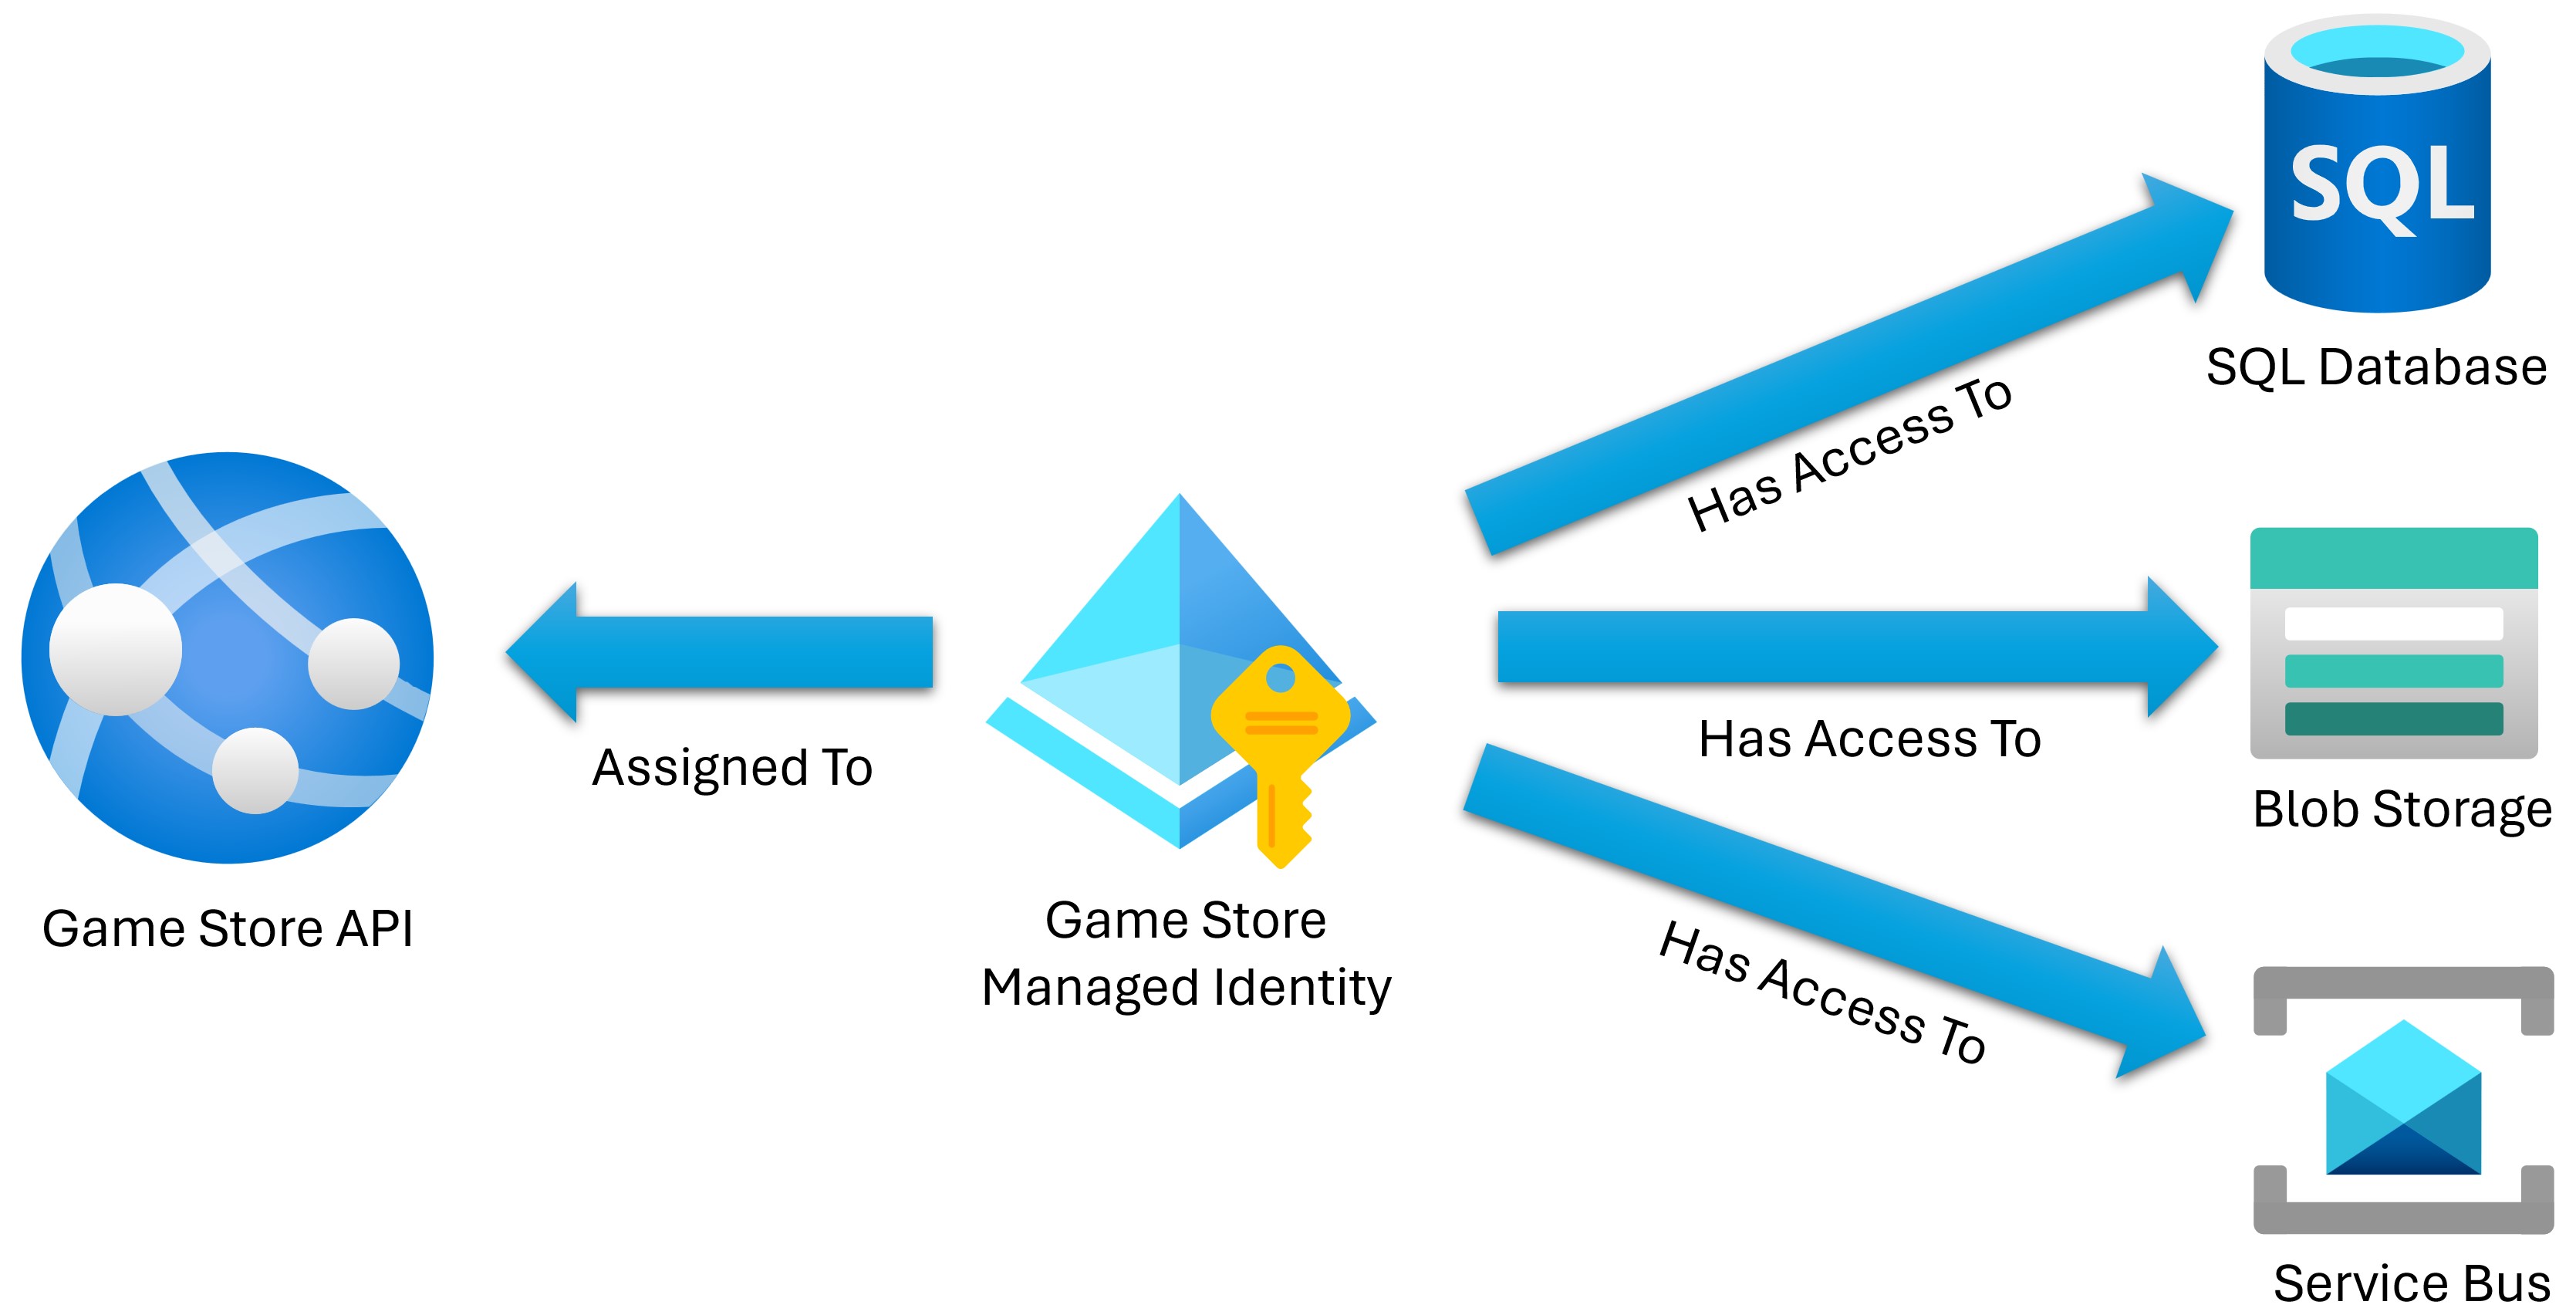
A Managed Identity is an Azure resource that provides an automatically managed identity in Microsoft Entra ID.
Applications can use these managed identities to obtain tokens from Microsoft Entra without having to manage any credentials.
With this, all you have to do is to grant the managed identity access to the Azure resources that it needs to access, and then use the managed identity in your application to obtain tokens for those resources.
No more connection strings, no more secrets to manage.
You can start using managed identities in 3 simple steps.
Step 1: Assign a Managed Identity to your Azure Web App
There are 2 types of managed identities:
-
System-assigned: these are enabled directly on an Azure service instance (like your Web App). Azure creates an identity for the instance in the Microsoft Entra directory that’s trusted by the subscription of the instance.
-
User-assigned: these are standalone Azure resources that are created separately from the Azure service instances that use them. You can assign a user-assigned managed identity to one or more Azure service instances.
System-assigned managed identities work great for simple scenarios, but I prefer user-assigned managed identities because they can be reused across multiple Azure services (think a frontend and a backend) and they won’t be destroyed in the case I need to delete my app.
I won’t go over the creation of the managed identity since it’s super trivial and there’s a great official guide here to create it via the Azure Portal, Azure CLI, PowerShell or even ARM.
But when you have your managed identity ready, you can quickly assign it to your Azure Web App from its Identity section in the Azure Portal (or using the Azure CLI):
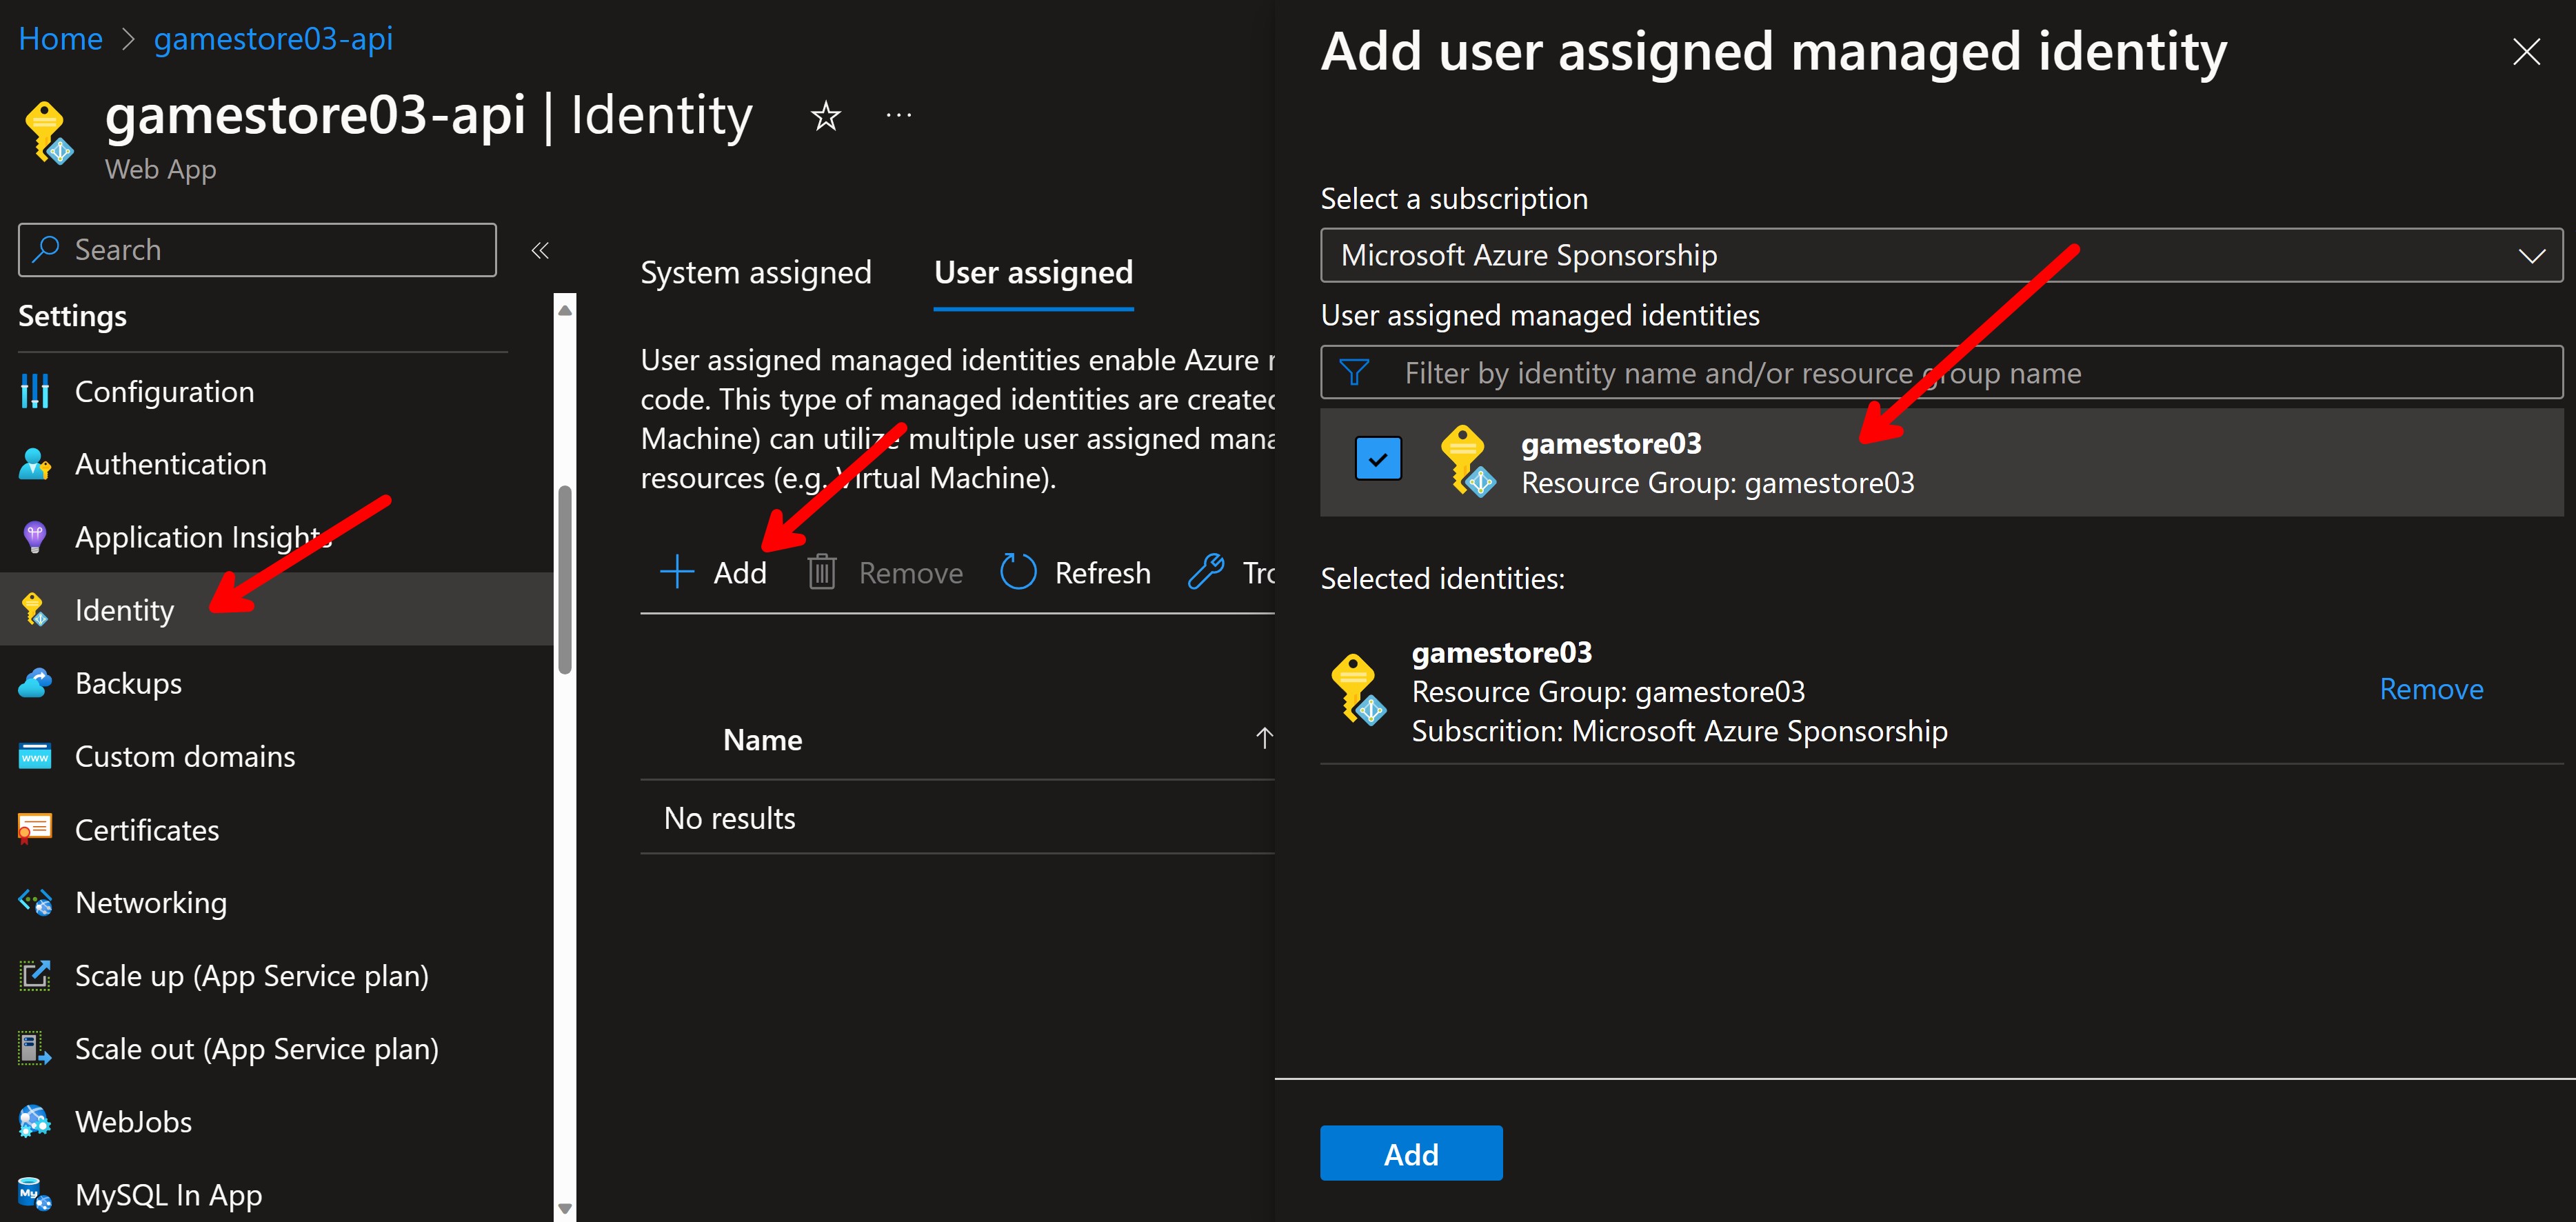
Now that the gamestore03 managed identity is assigned to my Web App, the ASP.NET Core API that I’ll deploy there can use the identity to access any Azure resource that I grant access to.
Next, let’s see how to grant the required access to the managed identity.
Step 2: Add a role assignment for the managed identity
Our Game Store API needs to access 3 Azure resources: a SQL database, an storage account and a service bus namespace, but for the purposes of this tutorial let’s focus on just one of them: the storage account.
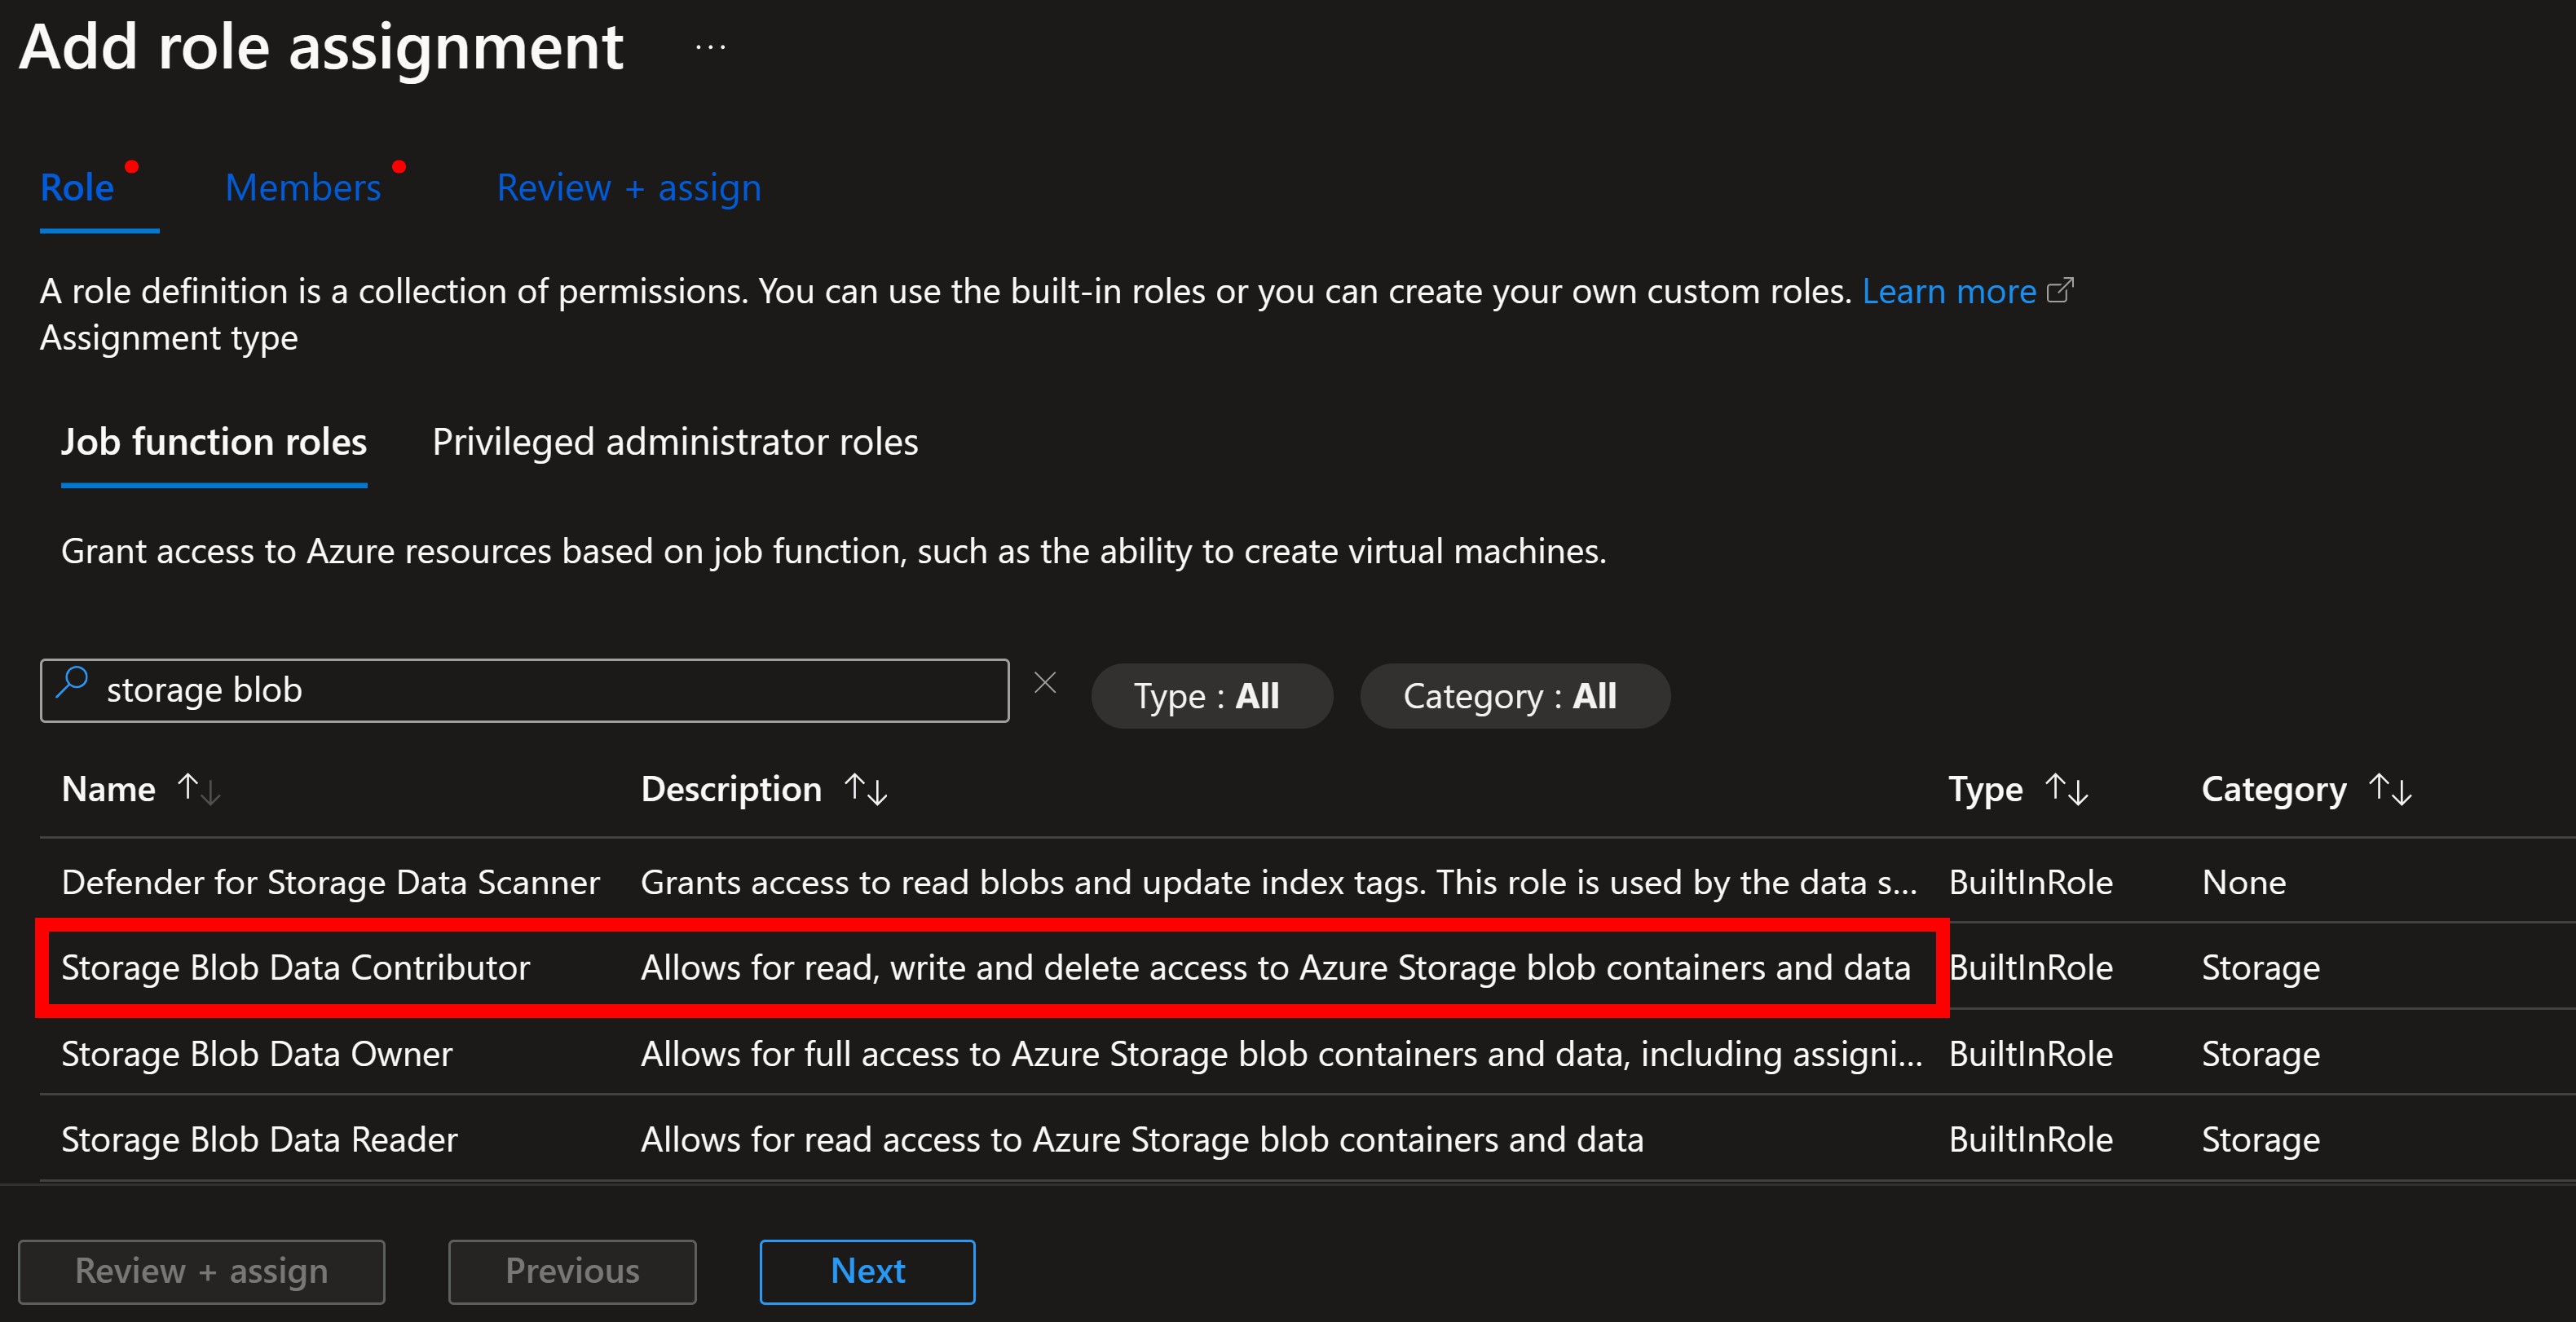
First, you would go to the Access Control (IAM) blade of the storage account and click on Add role assignment:

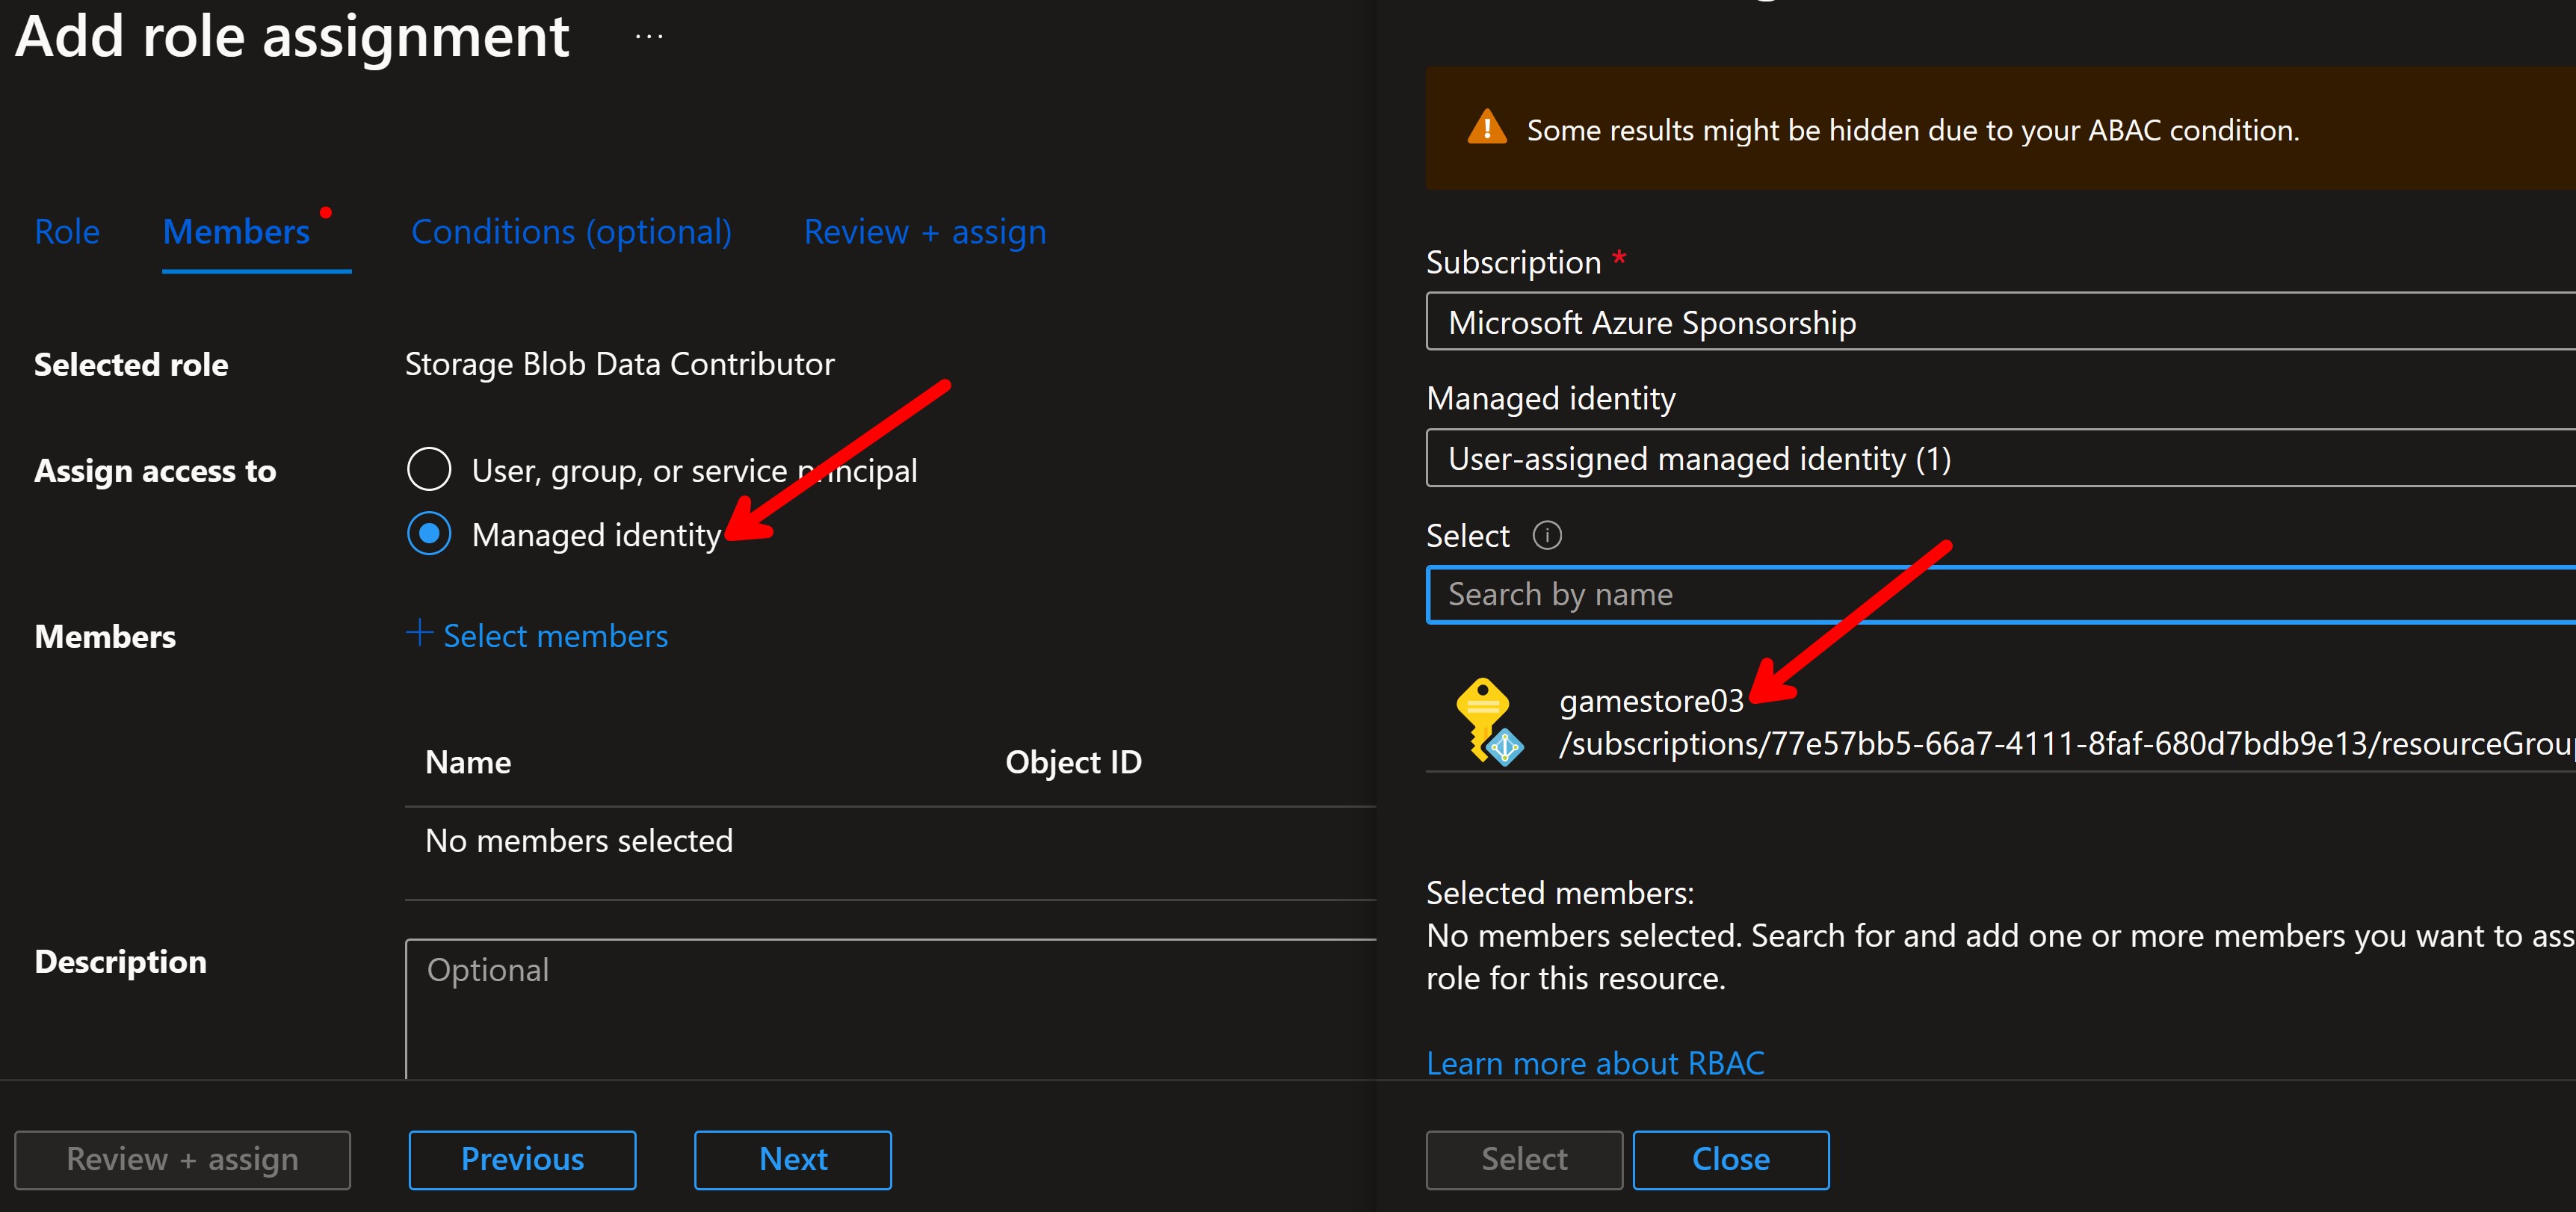
Then you select the role that you want to assign to the managed identity. Since all my app needs is to store files, Storage Blob Data Contributor would be the right role:
Lastly, you select the managed identity that you want to assign the role to (in this case, gamestore03):
Now all that’s left is to write a bit of code to use the managed identity in our ASP.NET Core API.
Step 3: Use the managed identity in your ASP.NET Core API
First, install the Azure.Identity NuGet package:
dotnet add package Azure.Identity
Then, wherever you construct your BlobServiceClient (for which you need the Azure.Storage.Blobs NuGet package), you can now use the overload that takes a TokenCredential object:
var blobServiceClient = new BlobServiceClient(
    new Uri("https://[STORAGE_ACCOUNT_NAME].blob.core.windows.net/"),
    new ManagedIdentityCredential(clientId: "[MANAGED_IDENTITY_CLIENT_ID]"));
You would replace [STORAGE_ACCOUNT_NAME] with the name of your storage account, and [MANAGED_IDENTITY_CLIENT_ID] with the client ID of your managed identity (found in Azure Portal).
Here I’m using ManagedIdentityCredential to automatically obtain a token for the managed identity. This would only work if the app is running in Azure, since the managed identity is only available there.
Another option is to use DefaultAzureCredential, which will work both locally and in Azure since it tries to use any credential available via a managed identity, VS Code, Visual Studio, the Azure CLI and others.
I don’t like DefaultAzureCredential since it can be very slow, but you can try it out and see if it works better for you.
You are now passwordless!
You can now deploy your app to Azure, as usual, and it will be able to access the storage account without any connection string or secret.
Your connections to Azure resources are now passwordless and more secure than ever.
Mission accomplished!
Whenever you’re ready, there are 3 ways I can help you:
-
.NET Backend Developer Bootcamp: A complete path from ASP.NET Core fundamentals to building, containerizing, and deploying production-ready, cloud-native apps on Azure.
-
Building Microservices With .NET: Transform the way you build .NET systems at scale.
-
Get the full source code: Download the working project from this article, grab exclusive course discounts, and join a private .NET community.
