Read time: 5 minutes
Today I’ll show you how to share your reusable libraries with NuGet and Azure Artifacts.
As your team grows and you start finding repeated code across different repos and projects, you’ll want to extract and centralize that code into reusable libraries.
Most devs are very comfortable with consuming NuGet packages, but not so much with creating and sharing them.
But it’s actually a very simple process, and it’s something you should definitely learn how to do if you want to become a better .NET developer.
So let me break down the process for you in a few simple steps.
Let’s start.
What is NuGet?
In a nutshell, NuGet is a package manager for .NET.
It’s a tool that allows you to easily add third-party libraries to your .NET projects.
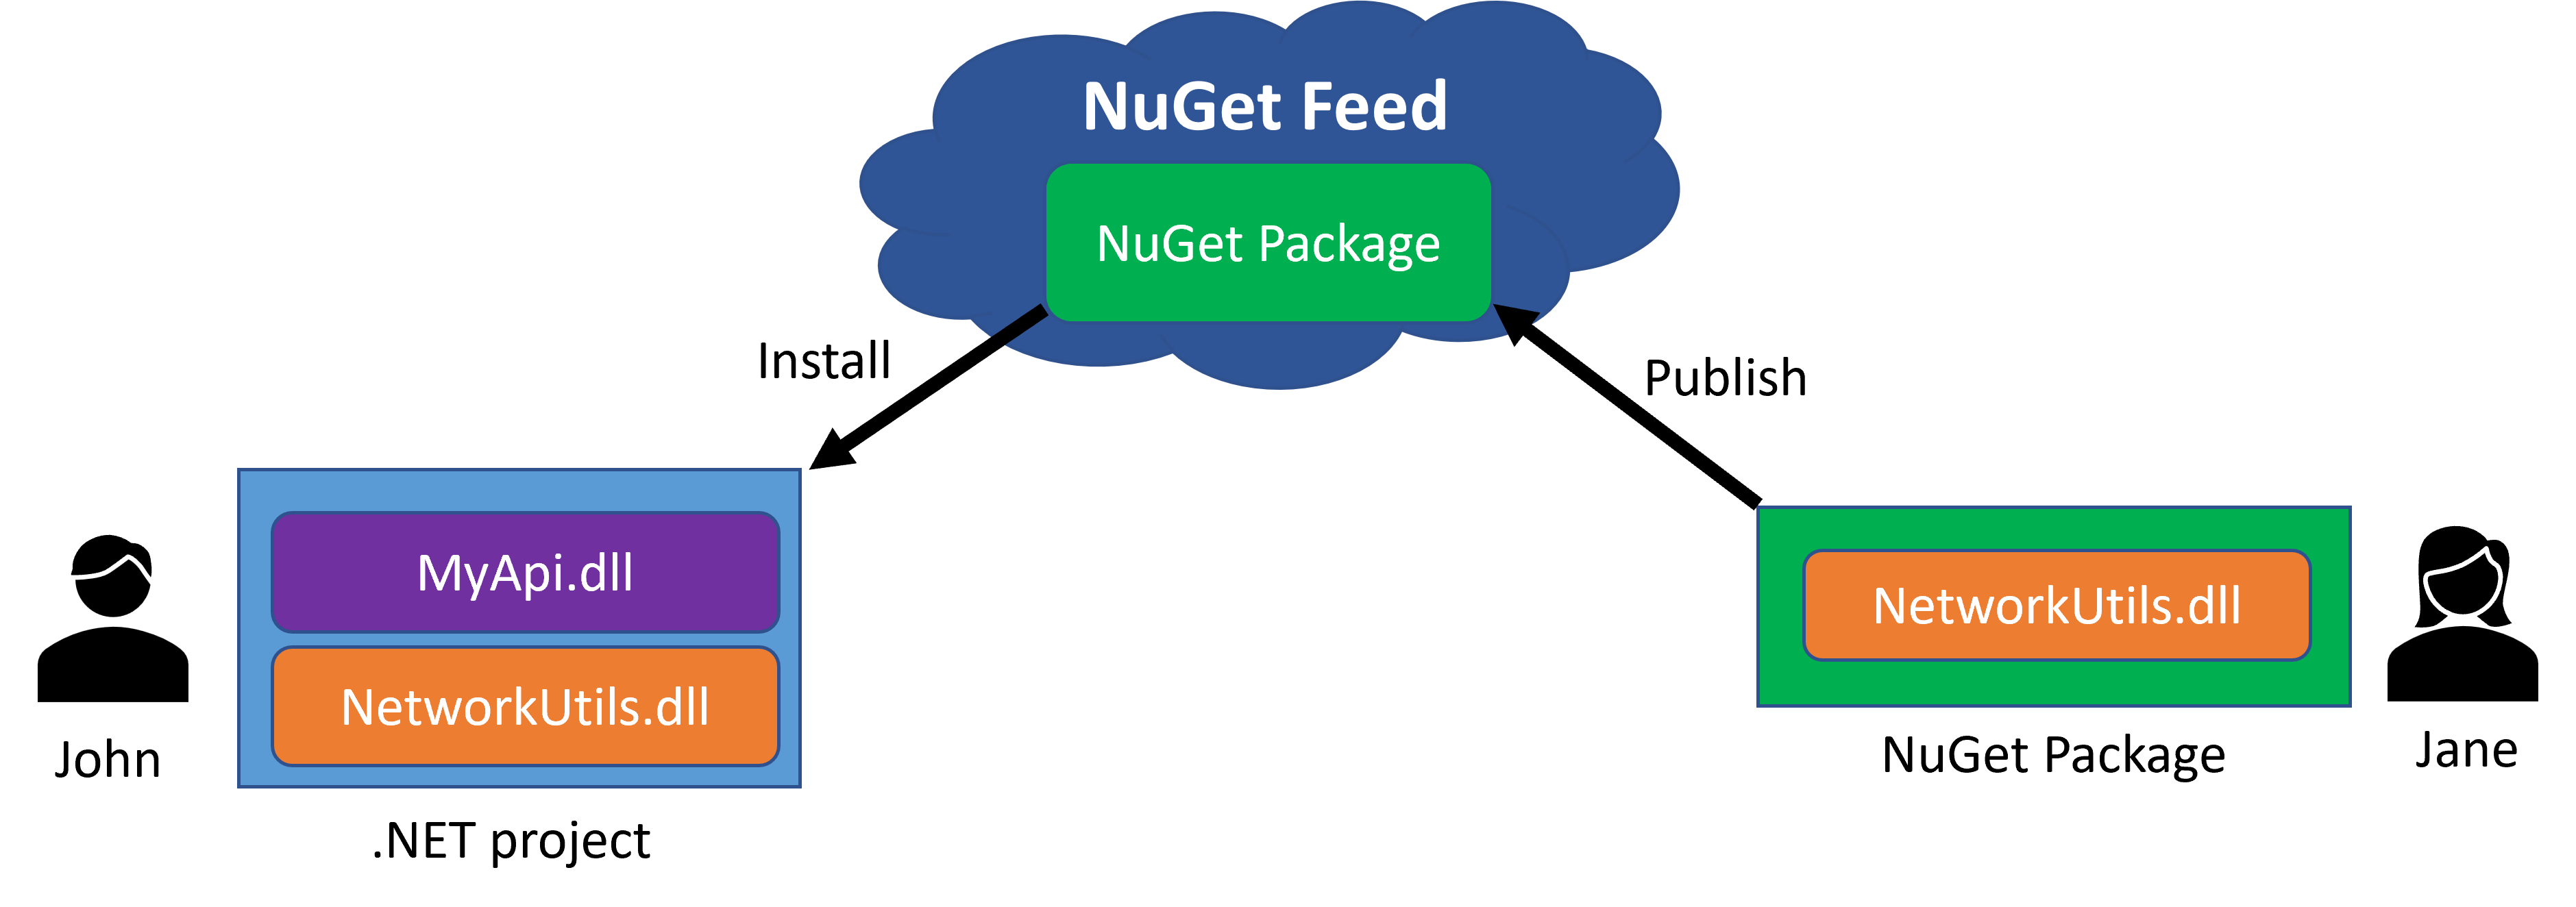
It’s also a tool that allows you to create your own libraries and share them with other folks in your team, in your organization or anywhere in the world.
Let’s now take an existing small library and see how to turn it into a NuGet package.
The NetworkUtils library
Let’s say we have created a small NetworkUtils class library that includes a handy AddressGenerator class with methods for generating random IP addresses and ports:
namespace Servers.NetworkUtils
{
    public static class AddressGenerator
    {
        public static string GetIpAddress()
        {
            var random = new Random();
            var ip = $"{random.Next(0, 255)}."
                     + $"{random.Next(0, 255)}."
                     + $"{random.Next(0, 255)}."
                     + $"{random.Next(0, 255)}";
            return ip;
        }

        public static int GetPort()
        {
            var random = new Random();
            var port = random.Next(1024, 65535);
            return port;
        }
    }
}
The class library currently targets .NET Standard 2.0 to make sure it can be consumed by most .NET projects:
<Project Sdk="Microsoft.NET.Sdk">

  <PropertyGroup>
    <TargetFramework>netstandard2.0</TargetFramework>
  </PropertyGroup>

</Project>
It turns to be that multiple teams in our organization are interested in using this library in their different repositories.
So let’s see how to turn it into a NuGet package so that we can share it with them.
Step 1: Add NuGet package properties
It’s good to describe your NuGet package so that other folks know what it’s about.
To do so, you can add a few properties like Description, Authors and Company to your project file:
<Project Sdk="Microsoft.NET.Sdk">

  <PropertyGroup>
    <TargetFramework>netstandard2.0</TargetFramework>
    <Description>Server networking utilities.</Description>
    <Authors>Julio Casal</Authors>
    <Company>Game Shop</Company>
  </PropertyGroup>

</Project>
Those properties will be used by NuGet to populate the package metadata.
Other properties like Version and PackageId will be automatically populated by NuGet based on the project file name and the version we specify in the command line, if any.
Step 2: Create the NuGet package
You can create your NuGet package by running the dotnet pack command in your terminal at the root of your project:
dotnet pack -o ..\packages
The -o flag specifies the output directory where the NuGet package will be created.
After running that command you’ll get something like this:
Successfully created package 'D:\projects\NuGetTutorial\packages\Servers.NetworkUtils.1.0.0.nupkg'.
With the package ready, it’s time to figure out how to share it with other folks.
Step 3: Connect to your Azure Artifacts NuGet Feed
A NuGet feed is a repository where you can store your NuGet packages.
Azure Artifacts is a cloud service that allows you to host your own private NuGet feeds in the cloud.
There are many other ways to host your NuGet feeds, but I’ll go with Azure Artifacts since it’s likely the most popular option for .NET and Azure developers these days.
I’ll assume you already have an Azure DevOps project with Azure Artifacts enabled in your organization, and that you have enough permissions to access it, so I won’t go into the details of how to set that up.
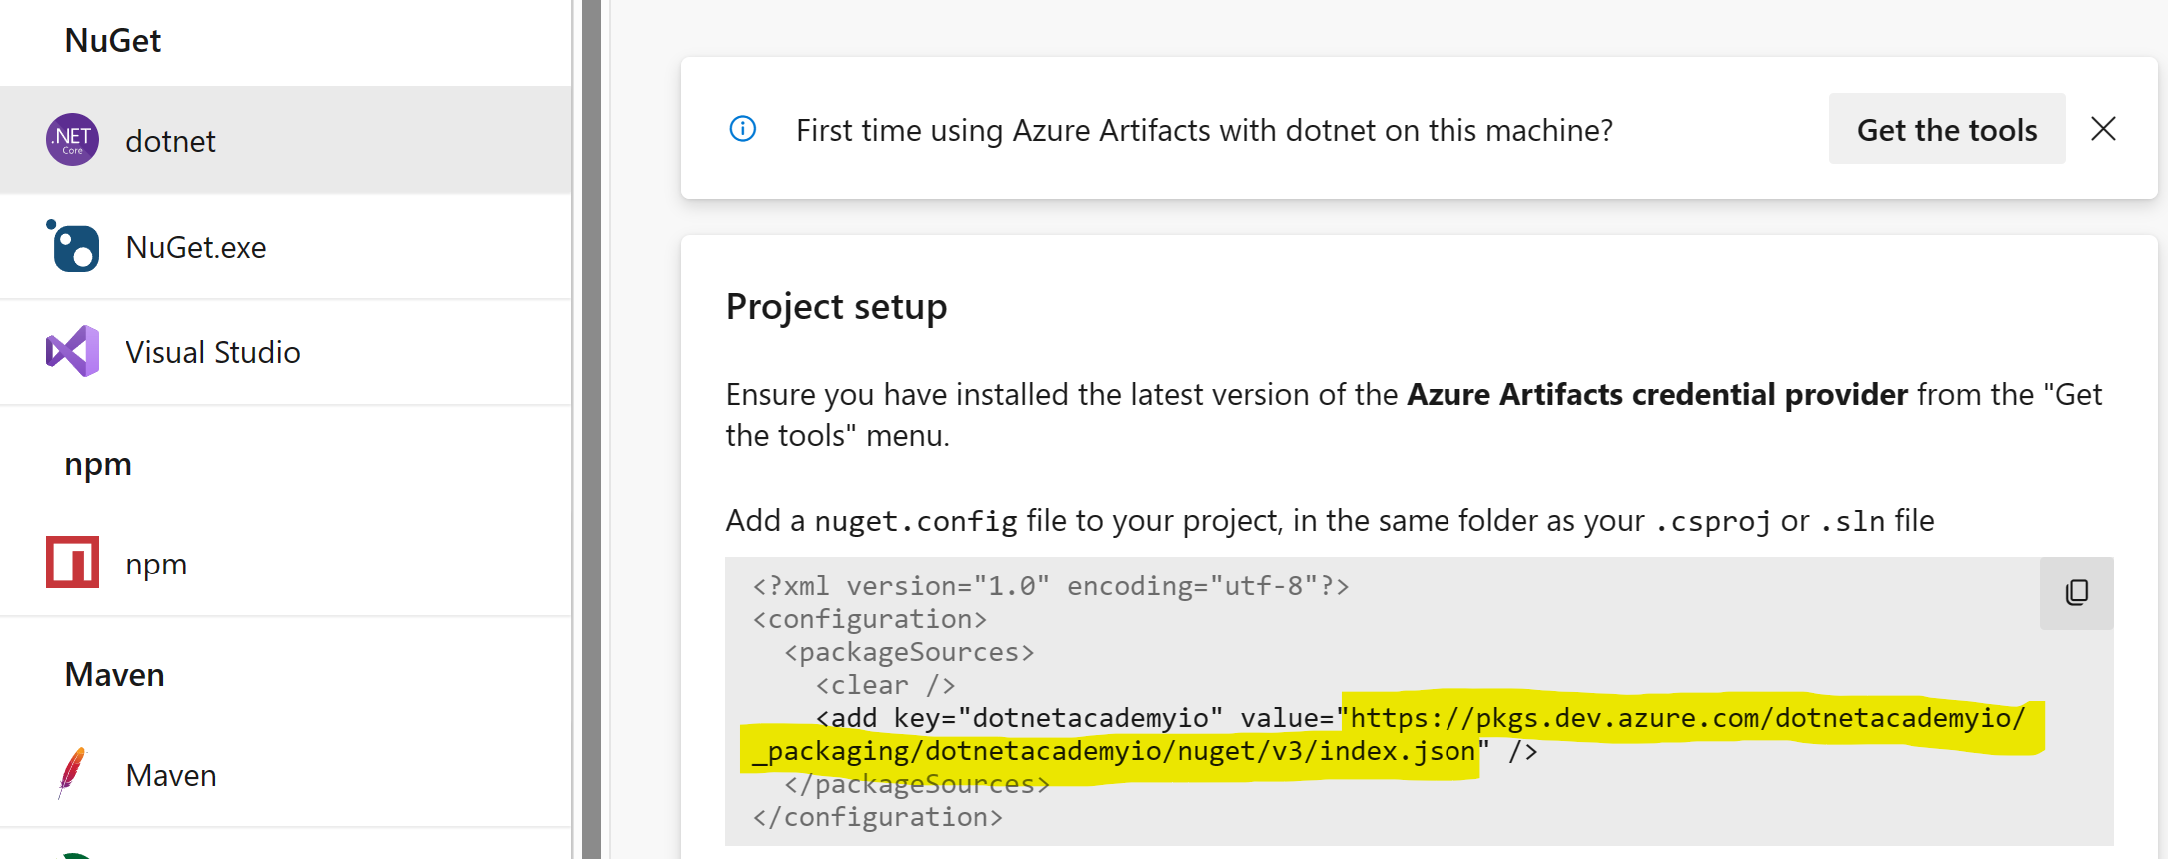
Now, go to Artifacts and into Connect to Feed:

And in the Connect to Feed dialog, select dotnet under NuGet on the left side, and then click on Get the tools.

From there you want to follow the steps to install the Azure Artifacts credential provider, which is what’s going to authenticate you against your feed when you try to push your NuGet packages to it.

After you install the credential provider, close the Get the tools dialog and copy the feed address under the Project Setup section:
Now, open your terminal and use this command to add the feed a source to our local NuGet configuration:
dotnet nuget add source -n DotnetAcademy https://pkgs.dev.azure.com/dotnetacademyio/_packaging/
dotnetacademyio/nuget/v3/index.json
The -n flag specifies the name of the source (which can be whatever you want), and the URL is the feed address you just copied.
We are now ready to publish our NuGet package to the feed.
Step 4: Publish your NuGet package
To publish your NuGet package, switch to the location where you packaged it in your terminal and then run the following command:
dotnet nuget push Servers.NetworkUtils.1.0.0.nupkg --source DotnetAcademy --api-key AZ
--interactive
Here, DotnetAcademy is the name of the source we added in the previous step. For api-key you can use any string, it doesn’t matter.
Also, the very first time you do this you want to include that –interactive flag so that you can authenticate against your feed in the browser. That’s where the credential provider kicks in.
Once the package gets published successfully, you can get back to your Azure Artifacts home page, refresh it, and you should see your shiny new package there:

The package is ready to be consumed by other folks in your organization.
Step 5: Consume your NuGet package
First thing your teammates need to do to consume your package is to add the feed as a source to their local NuGet configuration, just like we did in step 3:
dotnet nuget add source -n DotnetAcademy https://pkgs.dev.azure.com/dotnetacademyio/_packaging/
dotnetacademyio/nuget/v3/index.json
Then, all they had to do is add the NuGet package to their project just like you would do with any other package:
dotnet add package Servers.NetworkUtils --interactive
Notice they will also want to use the –interactive flag the very first time they do this so that they can authenticate against the feed in the browser.
And, after that, the new package reference will show up in their project:
<Project Sdk="Microsoft.NET.Sdk.Web">

  <PropertyGroup>
    <TargetFramework>net7.0</TargetFramework>
    <Nullable>enable</Nullable>
    <ImplicitUsings>enable</ImplicitUsings>
  </PropertyGroup>

  <ItemGroup>
    <PackageReference Include="Servers.NetworkUtils" Version="1.0.0" />
  </ItemGroup>

</Project>
And now they can go ahead and use your library classes as if they would use any other third-party library:
app.MapPost("/servers", () =>
{
    int id = Random.Shared.Next(1, 1000);

    return new GameServer(
        id,
        $"Server-{id}",
        AddressGenerator.GetIpAddress(),
        AddressGenerator.GetPort());
});
Mission accomplished!
Next Steps
There are a bunch of things I didn’t get to cover here, like:
- How to version your NuGet packages
- How to consume NuGet packages from private feeds in Docker
- How to build and publish NuGet packages in your CI/CD pipelines
If you are interested, I cover that and a bunch of other related topics in my .NET Backend Developer Bootcamp.
I hope you liked it.
Till next time!
Whenever you’re ready, there are 3 ways I can help you:
-
.NET Backend Developer Bootcamp: A complete path from ASP.NET Core fundamentals to building, containerizing, and deploying production-ready, cloud-native apps on Azure.
-
Building Microservices With .NET: Transform the way you build .NET systems at scale.
-
Get the full source code: Download the working project from this article, grab exclusive course discounts, and join a private .NET community.
