Read time: 9 minutes
It’s done! A couple of days ago I finally completed the Game Store system, the distributed .NET Web application that will drive the upcoming .NET Backend Developer Bootcamp (Is that a good name? Let me know!).
I’m amazed by how much the tech has advanced in the .NET and Azure world in the last few years. There’s so much going on in this field that I have no idea how folks are solving today’s chaotic puzzle to learn cloud development with .NET.
I was lucky enough to enter the .NET and Azure era more than a decade ago, so I got a good sense of how to approach cloud development with .NET, and that’s what the bootcamp is all about.
With the core project ready, I’ll now switch gears to the next step: try to rebuild the entire thing in the most “teachable” way. This means building it in a way that is easy to understand even for most beginners, taking plenty of notes along the way, and figuring out which parts deserve a good slide deck to land solid concepts.
I’m very excited to start this next phase, and at some point I’ll tell you more about how I like to approach teaching (quite different from other instructors) but first let me tell you what I had to do to get the Game Store properly deployed via Azure DevOps.
On to this week’s update.

Quick recap: The CI/CD Pipeline
First, a quick recap of the CI/CD pipeline we are trying to build:
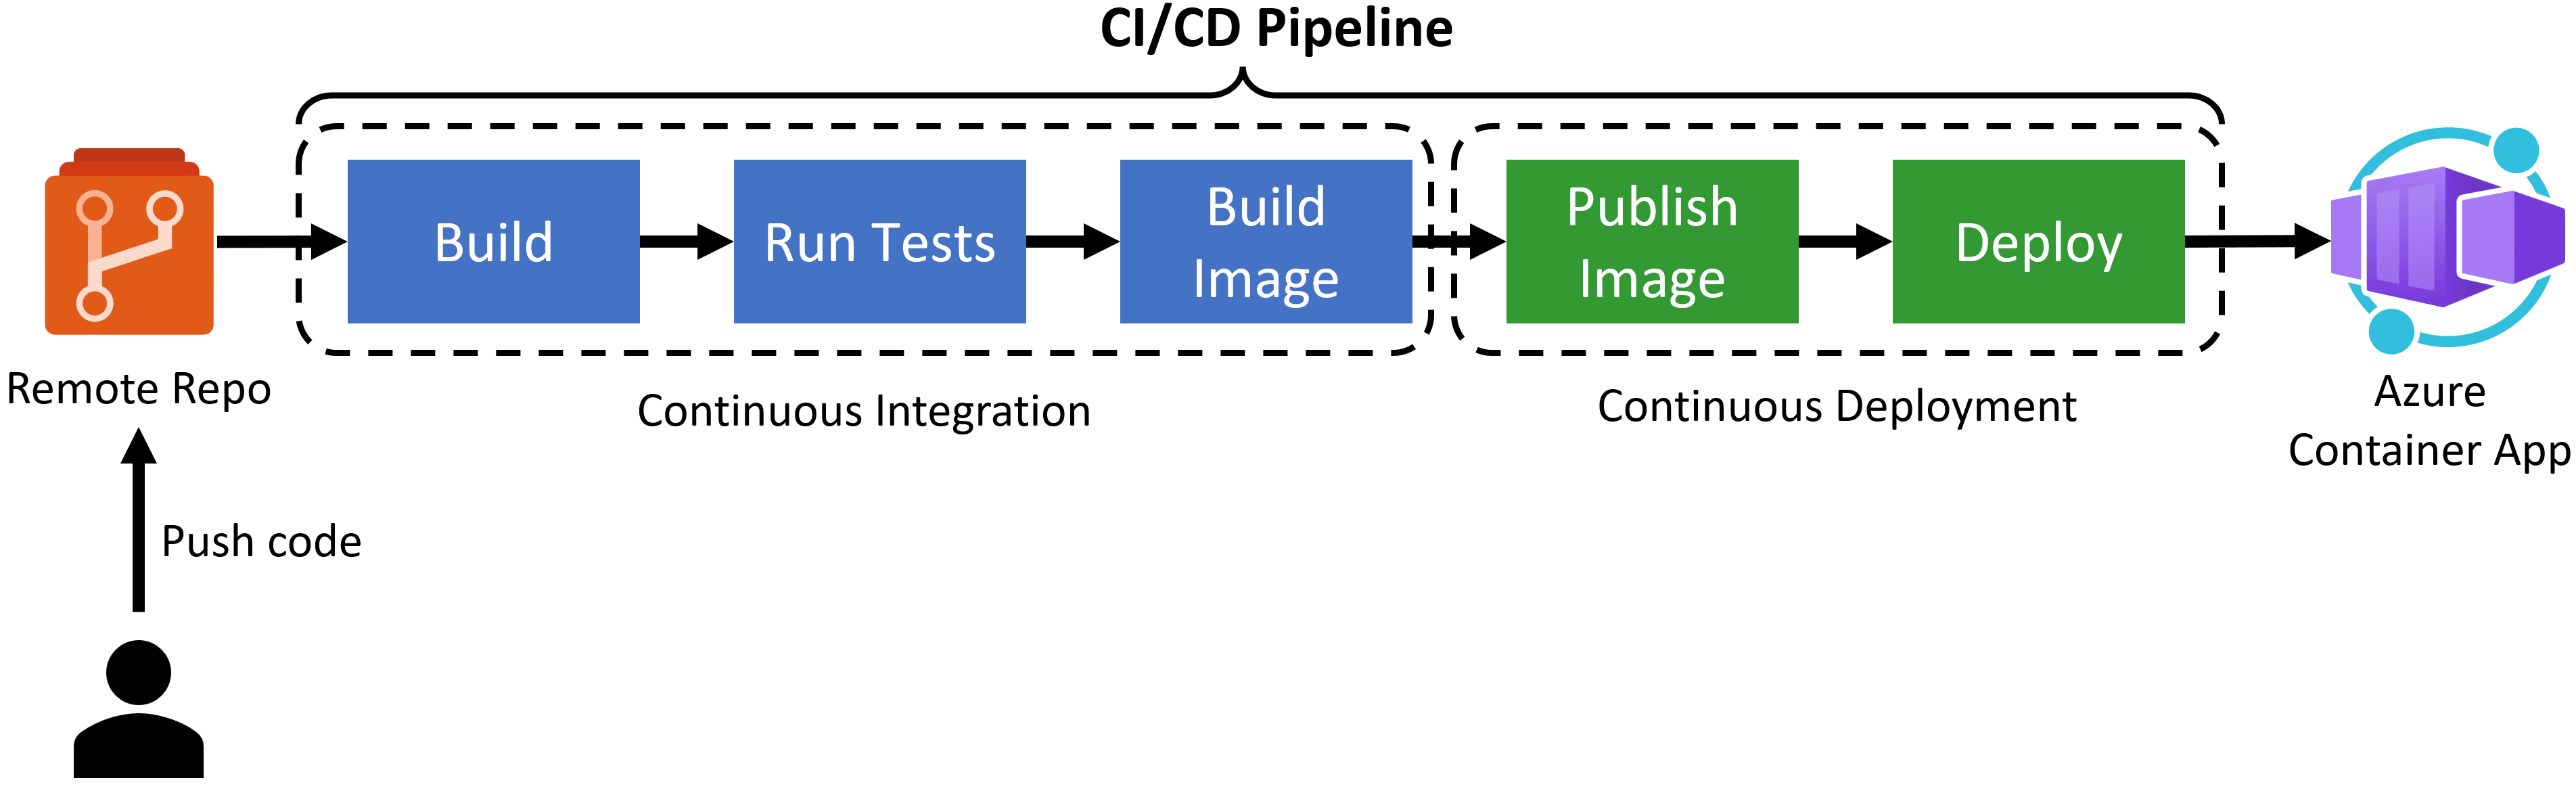
We want to use Azure Pipelines (part of Azure DevOps) to automatically do these steps after every push to our remote repo:
- Build the app
- Run integration tests
- Build the Docker image
- Push the Docker image to Azure Container Registry
- Deploy the Docker image as a container to Azure Container Apps
Last week I explained the challenges involved in getting each of the microservices repos ready for this automation. But with those resolved, now let’s see how to create the actual pipelines.
The ServiceDefaults CI pipeline
ServiceDefaults is the project where all the shared cross-cutting logic has been centralized for easy reusability. Everything from authorization to error handling, Azure configurations, health checks, telemetry, etc., is there.

Every microservice consumes this library in the form of a NuGet package, so we need a CI pipeline to produce and publish that package on every push to the remote branch.
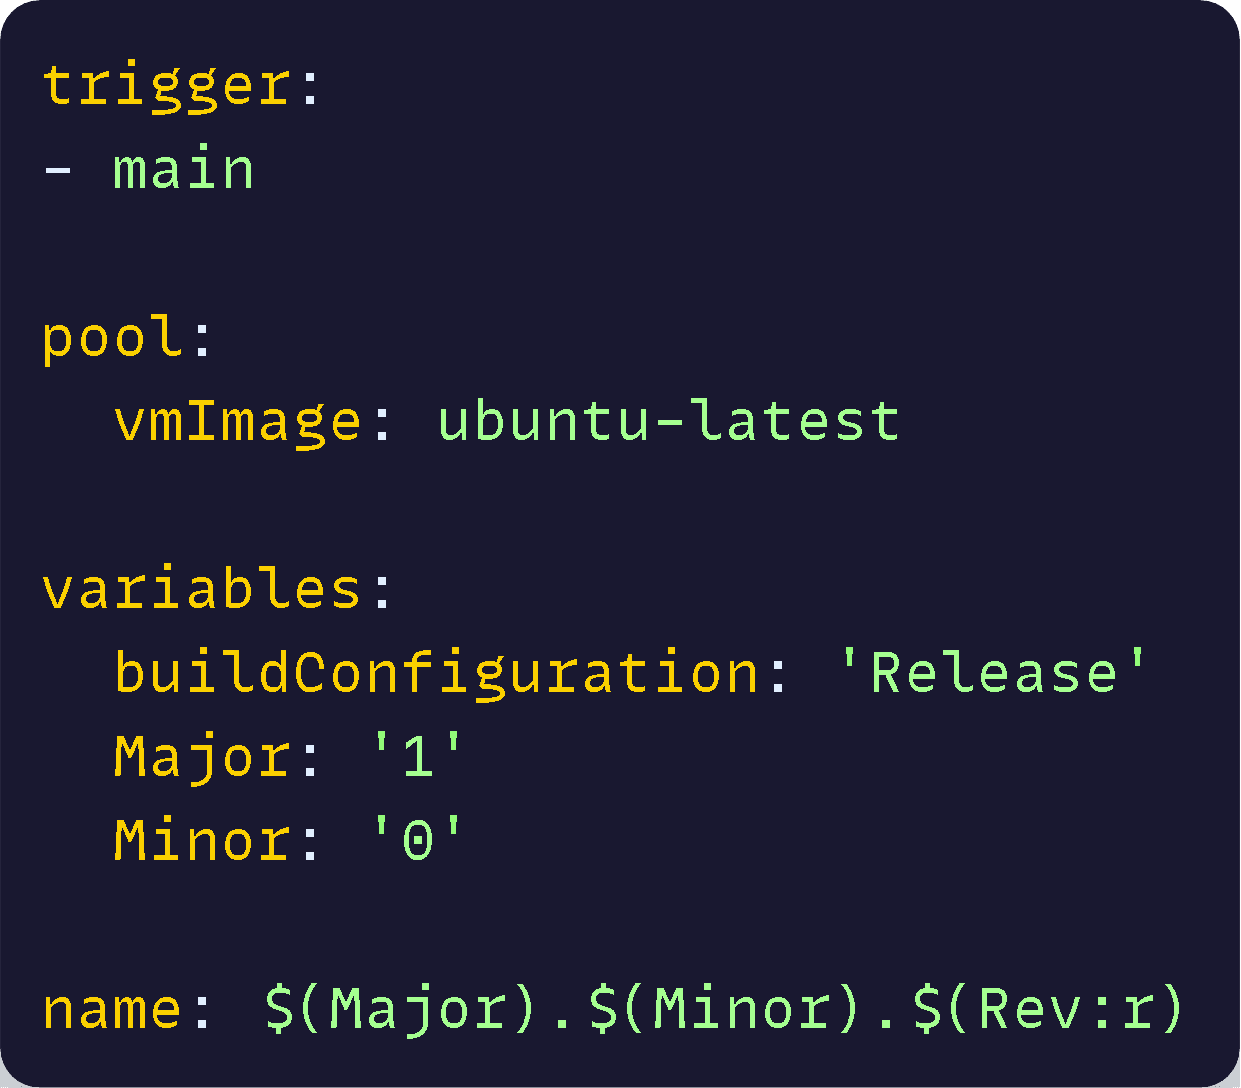
I already covered how to create a pipeline over here, so today I’ll just show you the yaml I used to define this specific one:
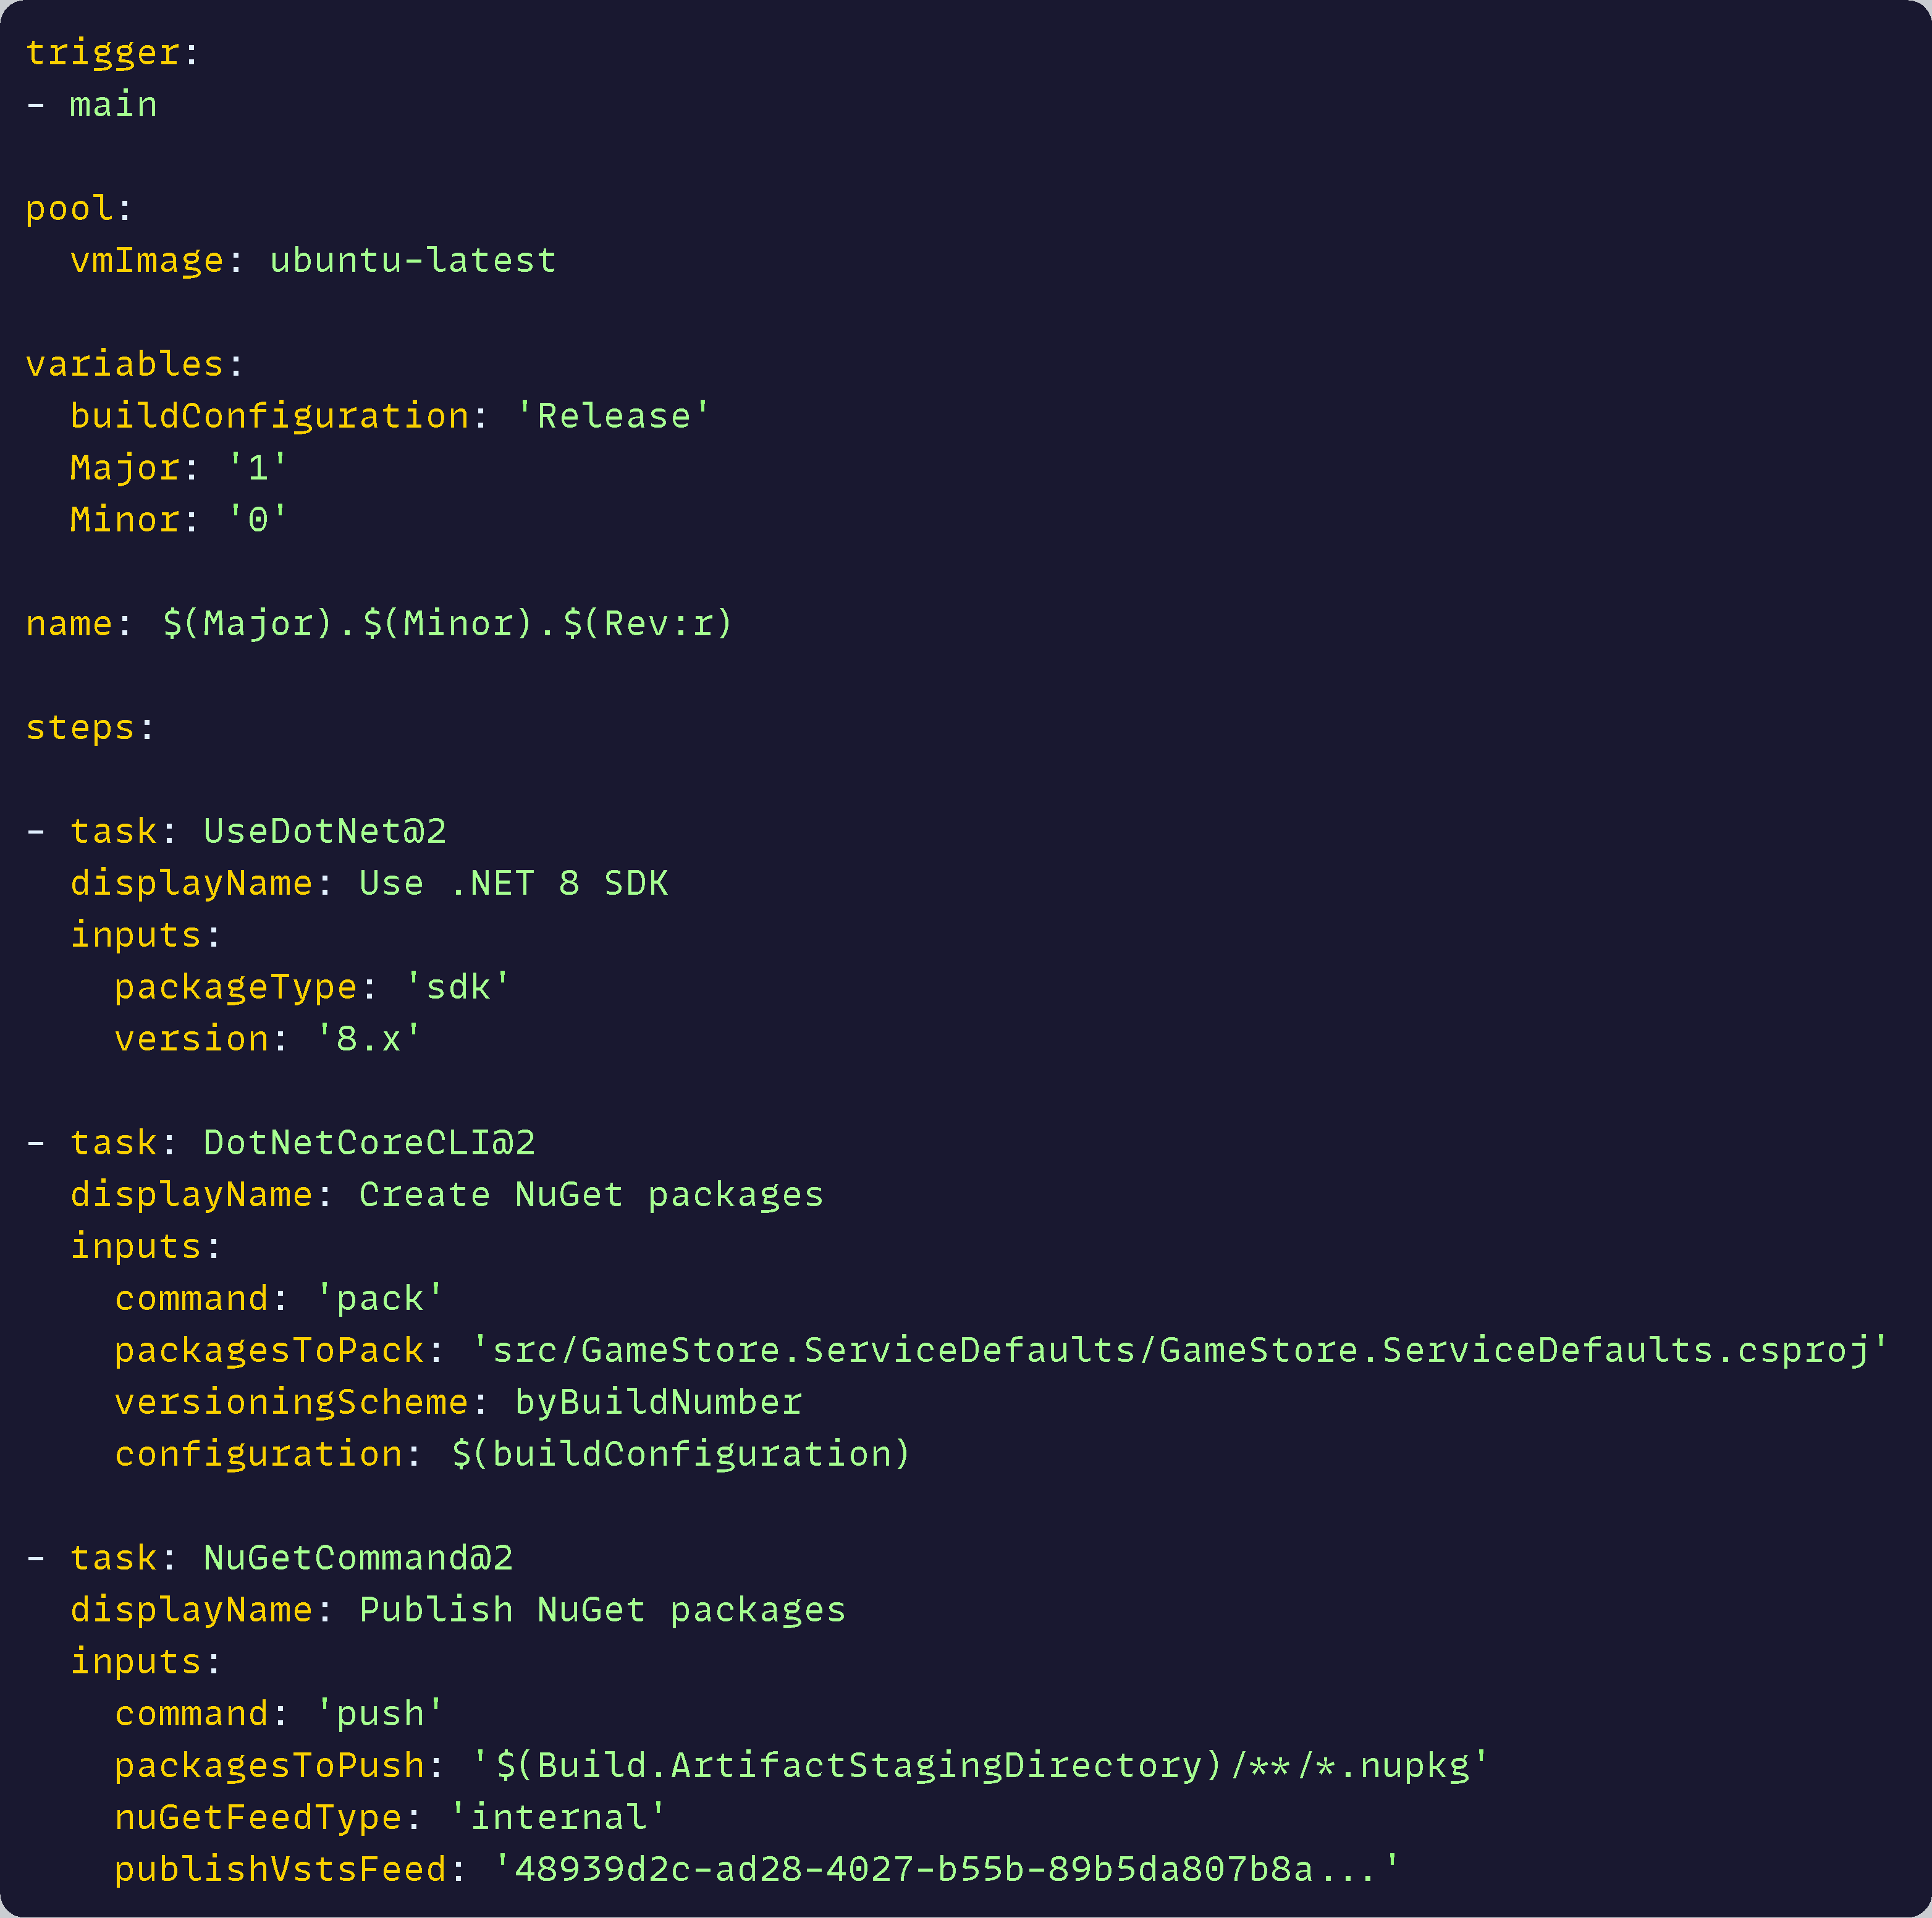
About this pipeline:
- It runs automatically on every push to main branch
- It uses the $(Major).$(Minor).$(Rev:r) convention to define how to generate the build numbers
- It creates the NuGet package using the build number as the version
- It publishes the package to Azure Artifacts
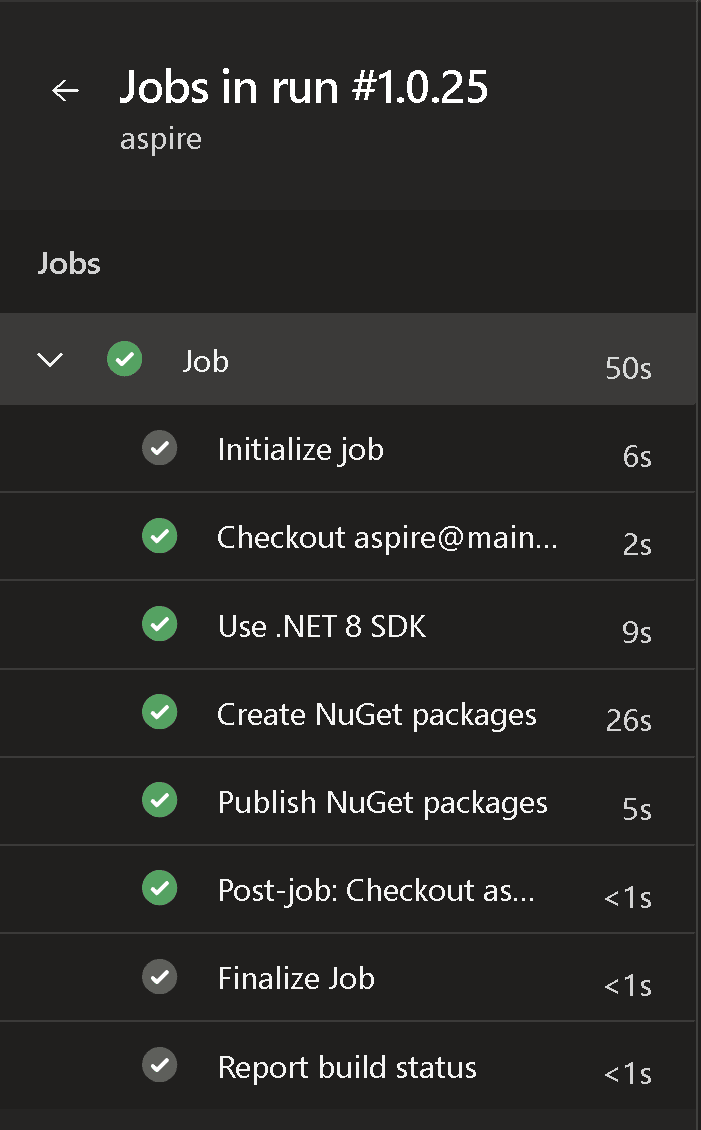
When it runs, the build looks like this:
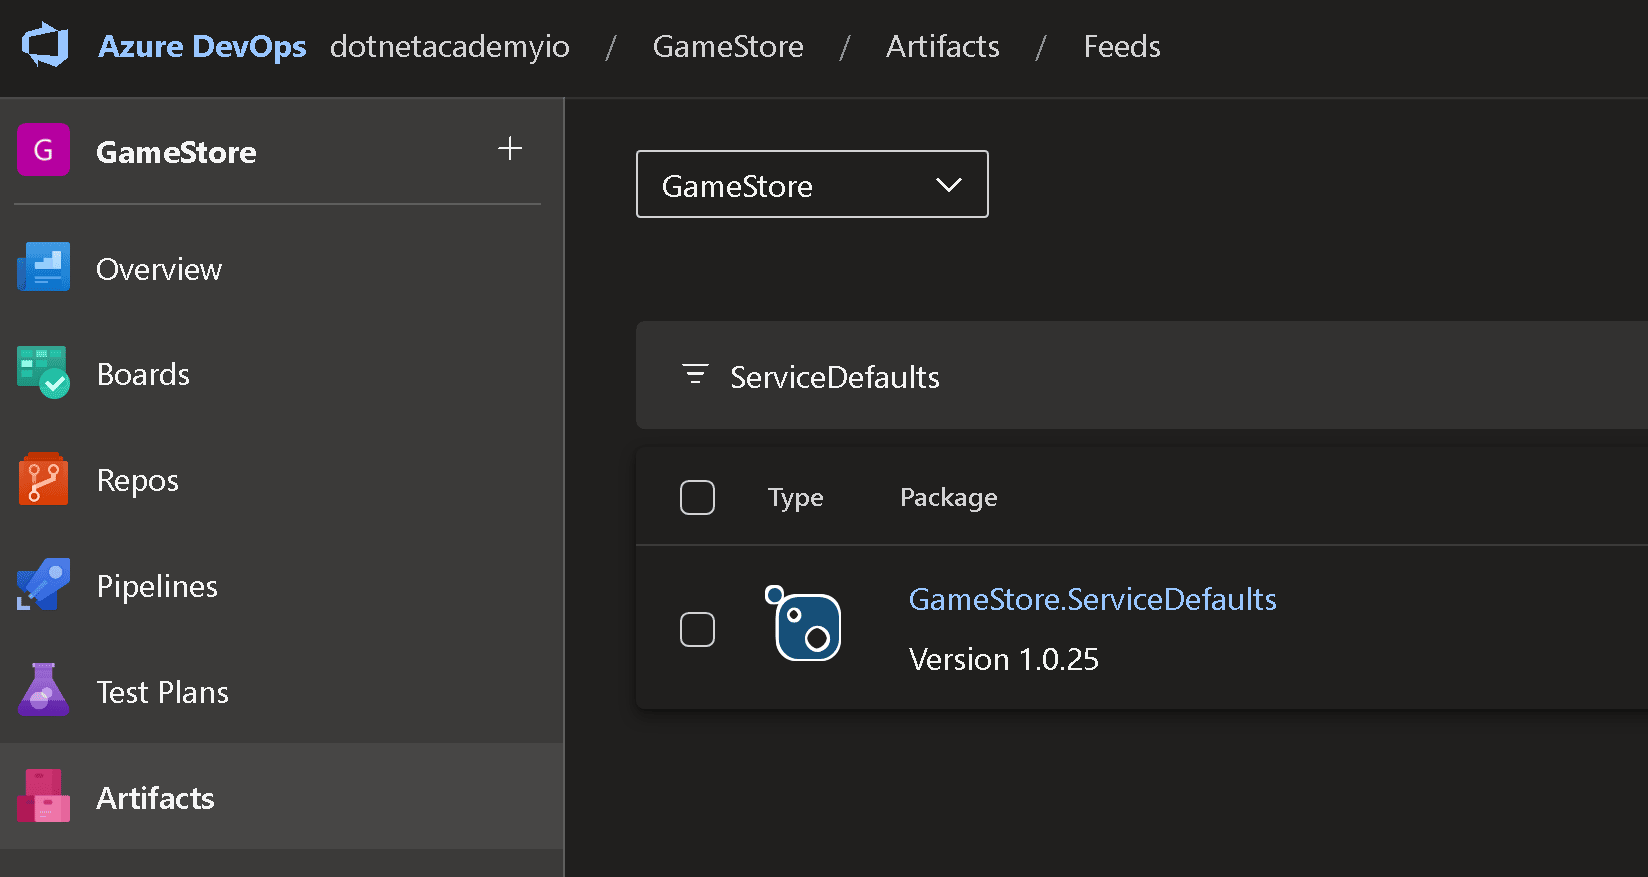
And the end result is this published package:
Now, that’s the easy one. Next, the microservice CI/CD pipeline.
The microservice CI/CD pipeline
The yaml for this pipeline is bigger, so I’ll go over it in smaller chunks. But first, we define the same initial parameters we did in the other pipeline:
The main steps in this pipeline are:
- Build the code
- Run the tests
- Publish contracts (if any)
- Deploy
I organized each of these main steps into what Azure Pipelines calls jobs, so that I can do a few cool things along the way.
Let’s go over each of the 4 jobs next.
1. Build the code
Here’s the Build job:

The highlights for this one are:
- We explicitly restore dependencies using our Azure Artifacts NuGet feed (where ServiceDefaults live). Otherwise, just building the code will fail claiming it can’t find the package.
- We build the app in Release mode. This will also build the integration test binaries.
- We publish the test binaries into an artifact that can be used in later jobs
2. Run Tests
We have a series of integration tests that will verify the app in a close-to real-world setting. Meaning, they use real databases, message brokers, storage accounts, etc, except that they run in Docker containers. Plus, they run against an actual web server (even if it runs in memory).
Here’s the test job:
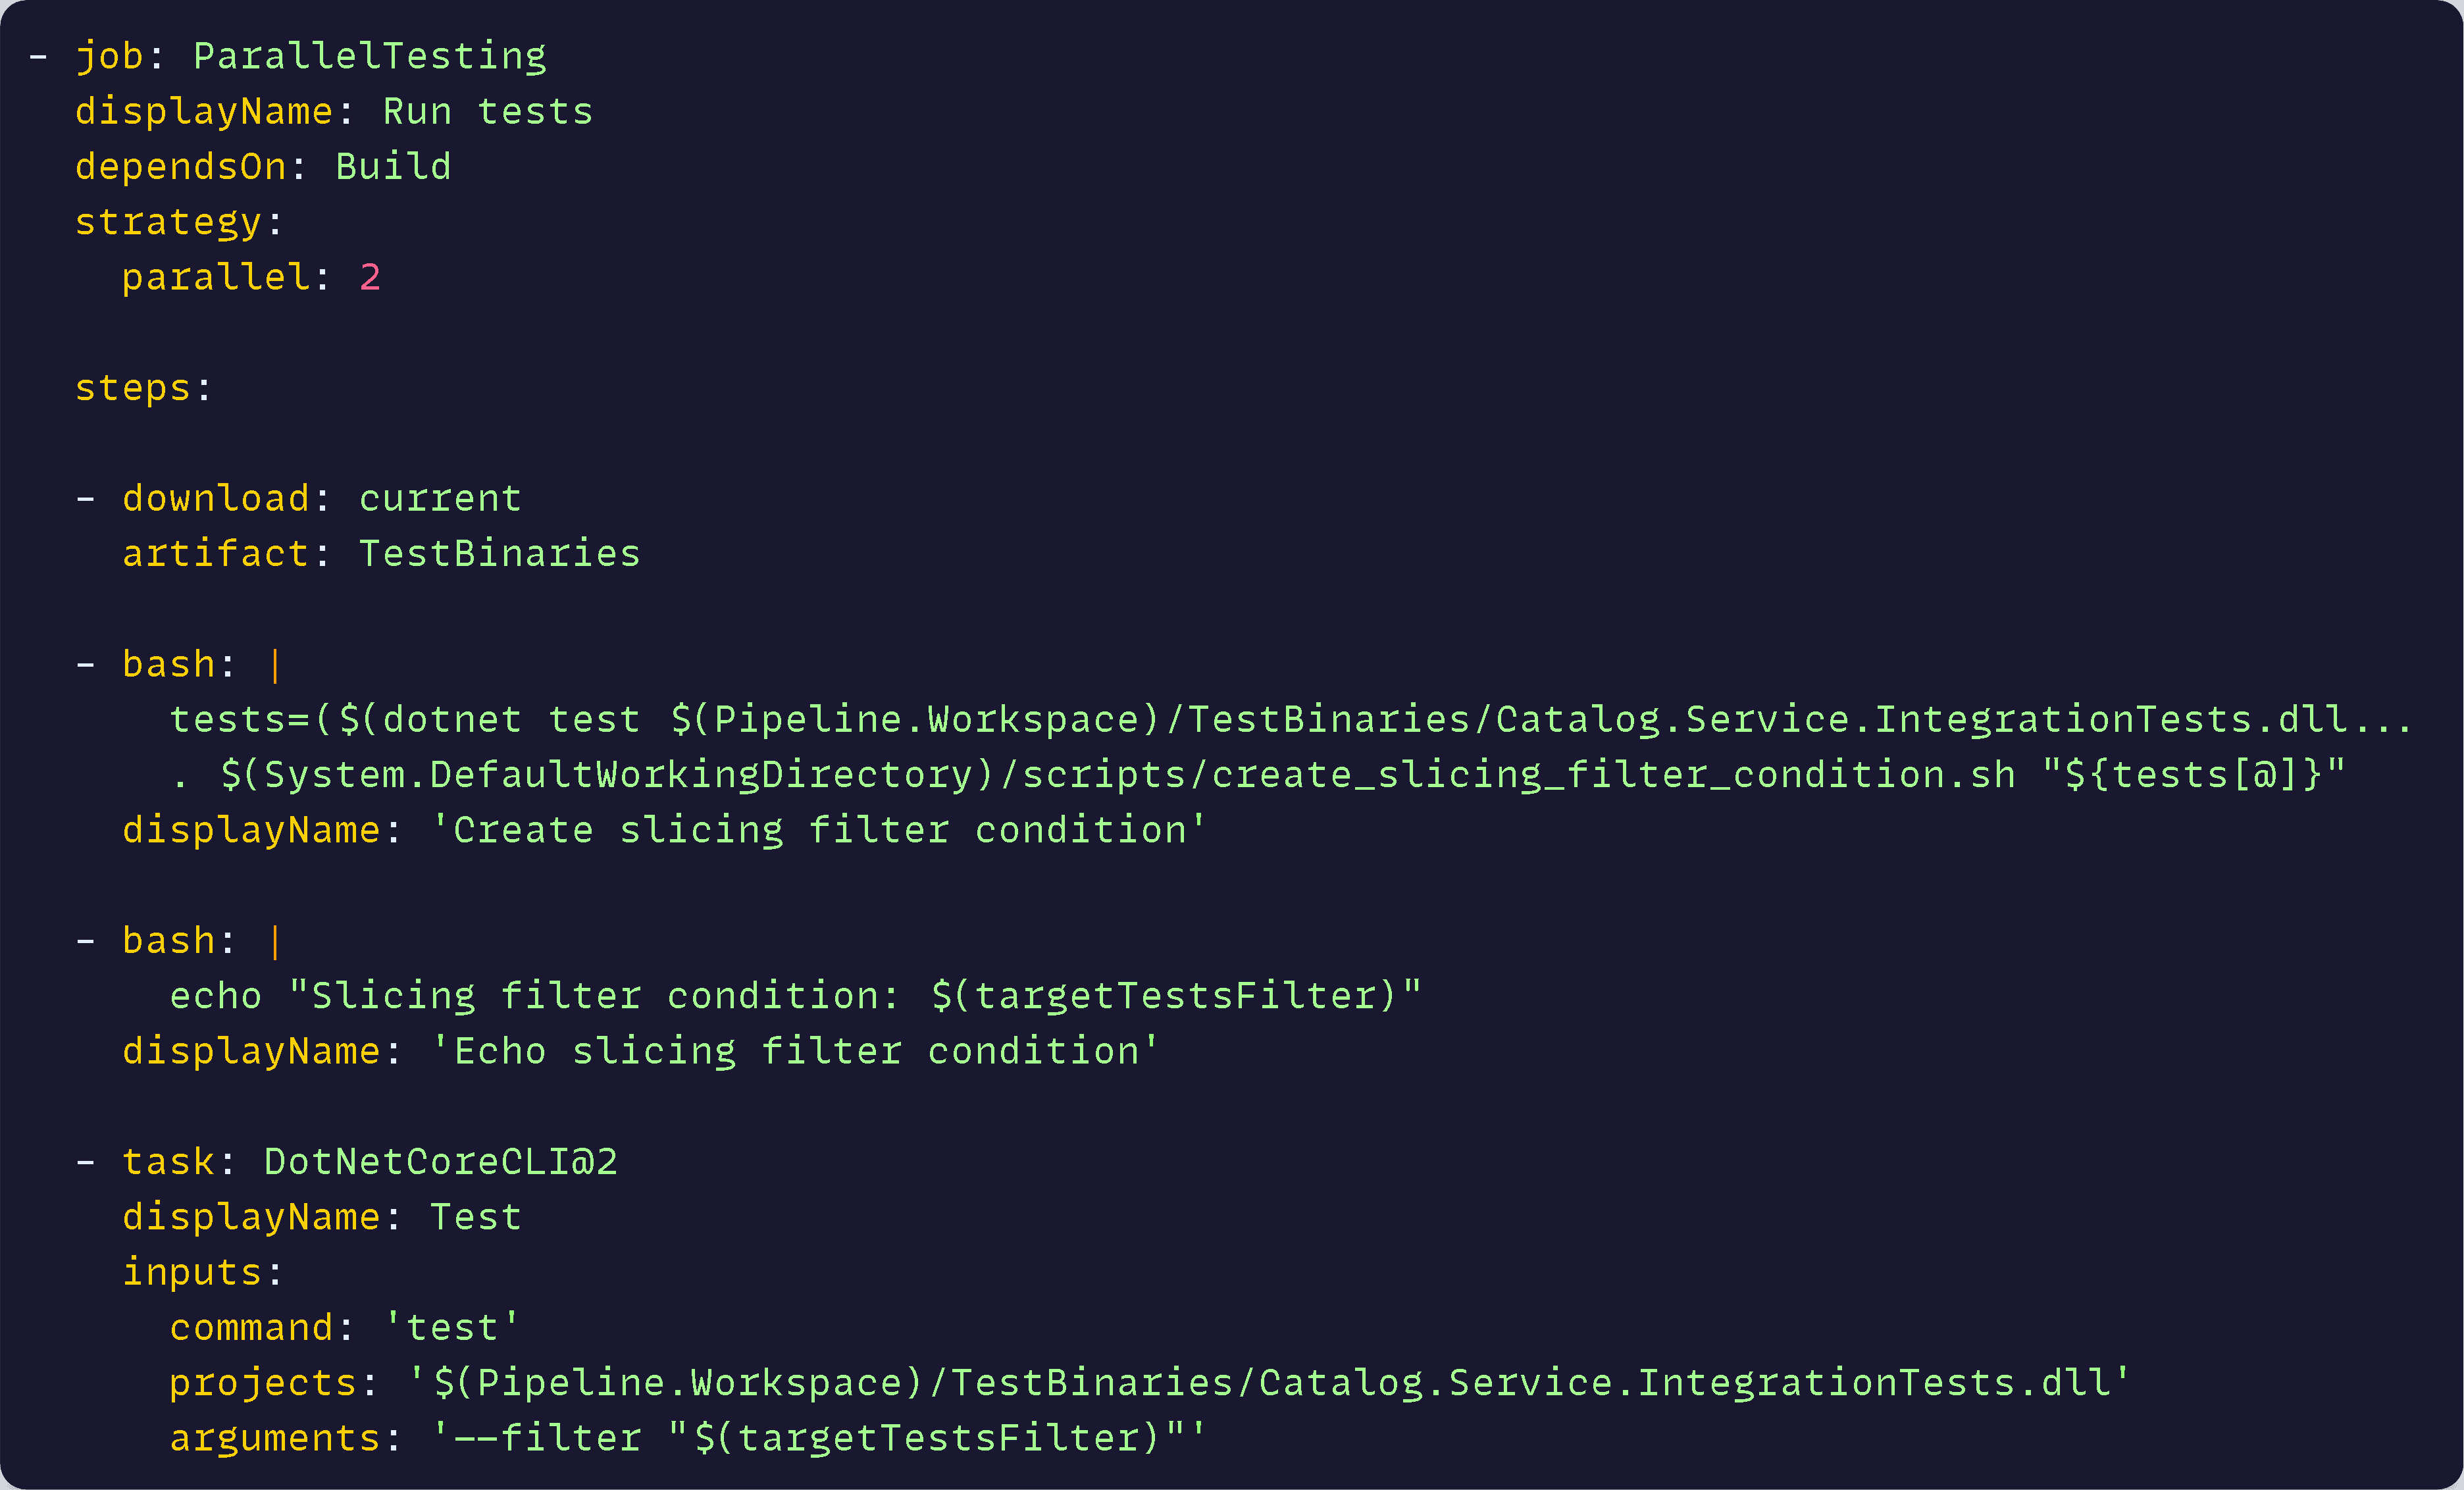
About that job:
- It uses a parallel strategy with 2 agents, which allows us to run these slow tests across 2 machines at same time, significantly shortening the time to get results.
- It grabs the test binaries from the artifact published by the previous job
- It uses a small Bash script to select half the tests and build a test filter with their names
- It runs the tests using that filter
That parallel execution is really neat and a must for integration tests. Unit tests would not need that since they should complete in just a few seconds.
3. Publish contracts
Most microservices expose REST APIs that expose contracts (DTOs) to interact with them. In this job we publish those contracts as NuGet packages in a similar way as we did with ServiceDefaults:
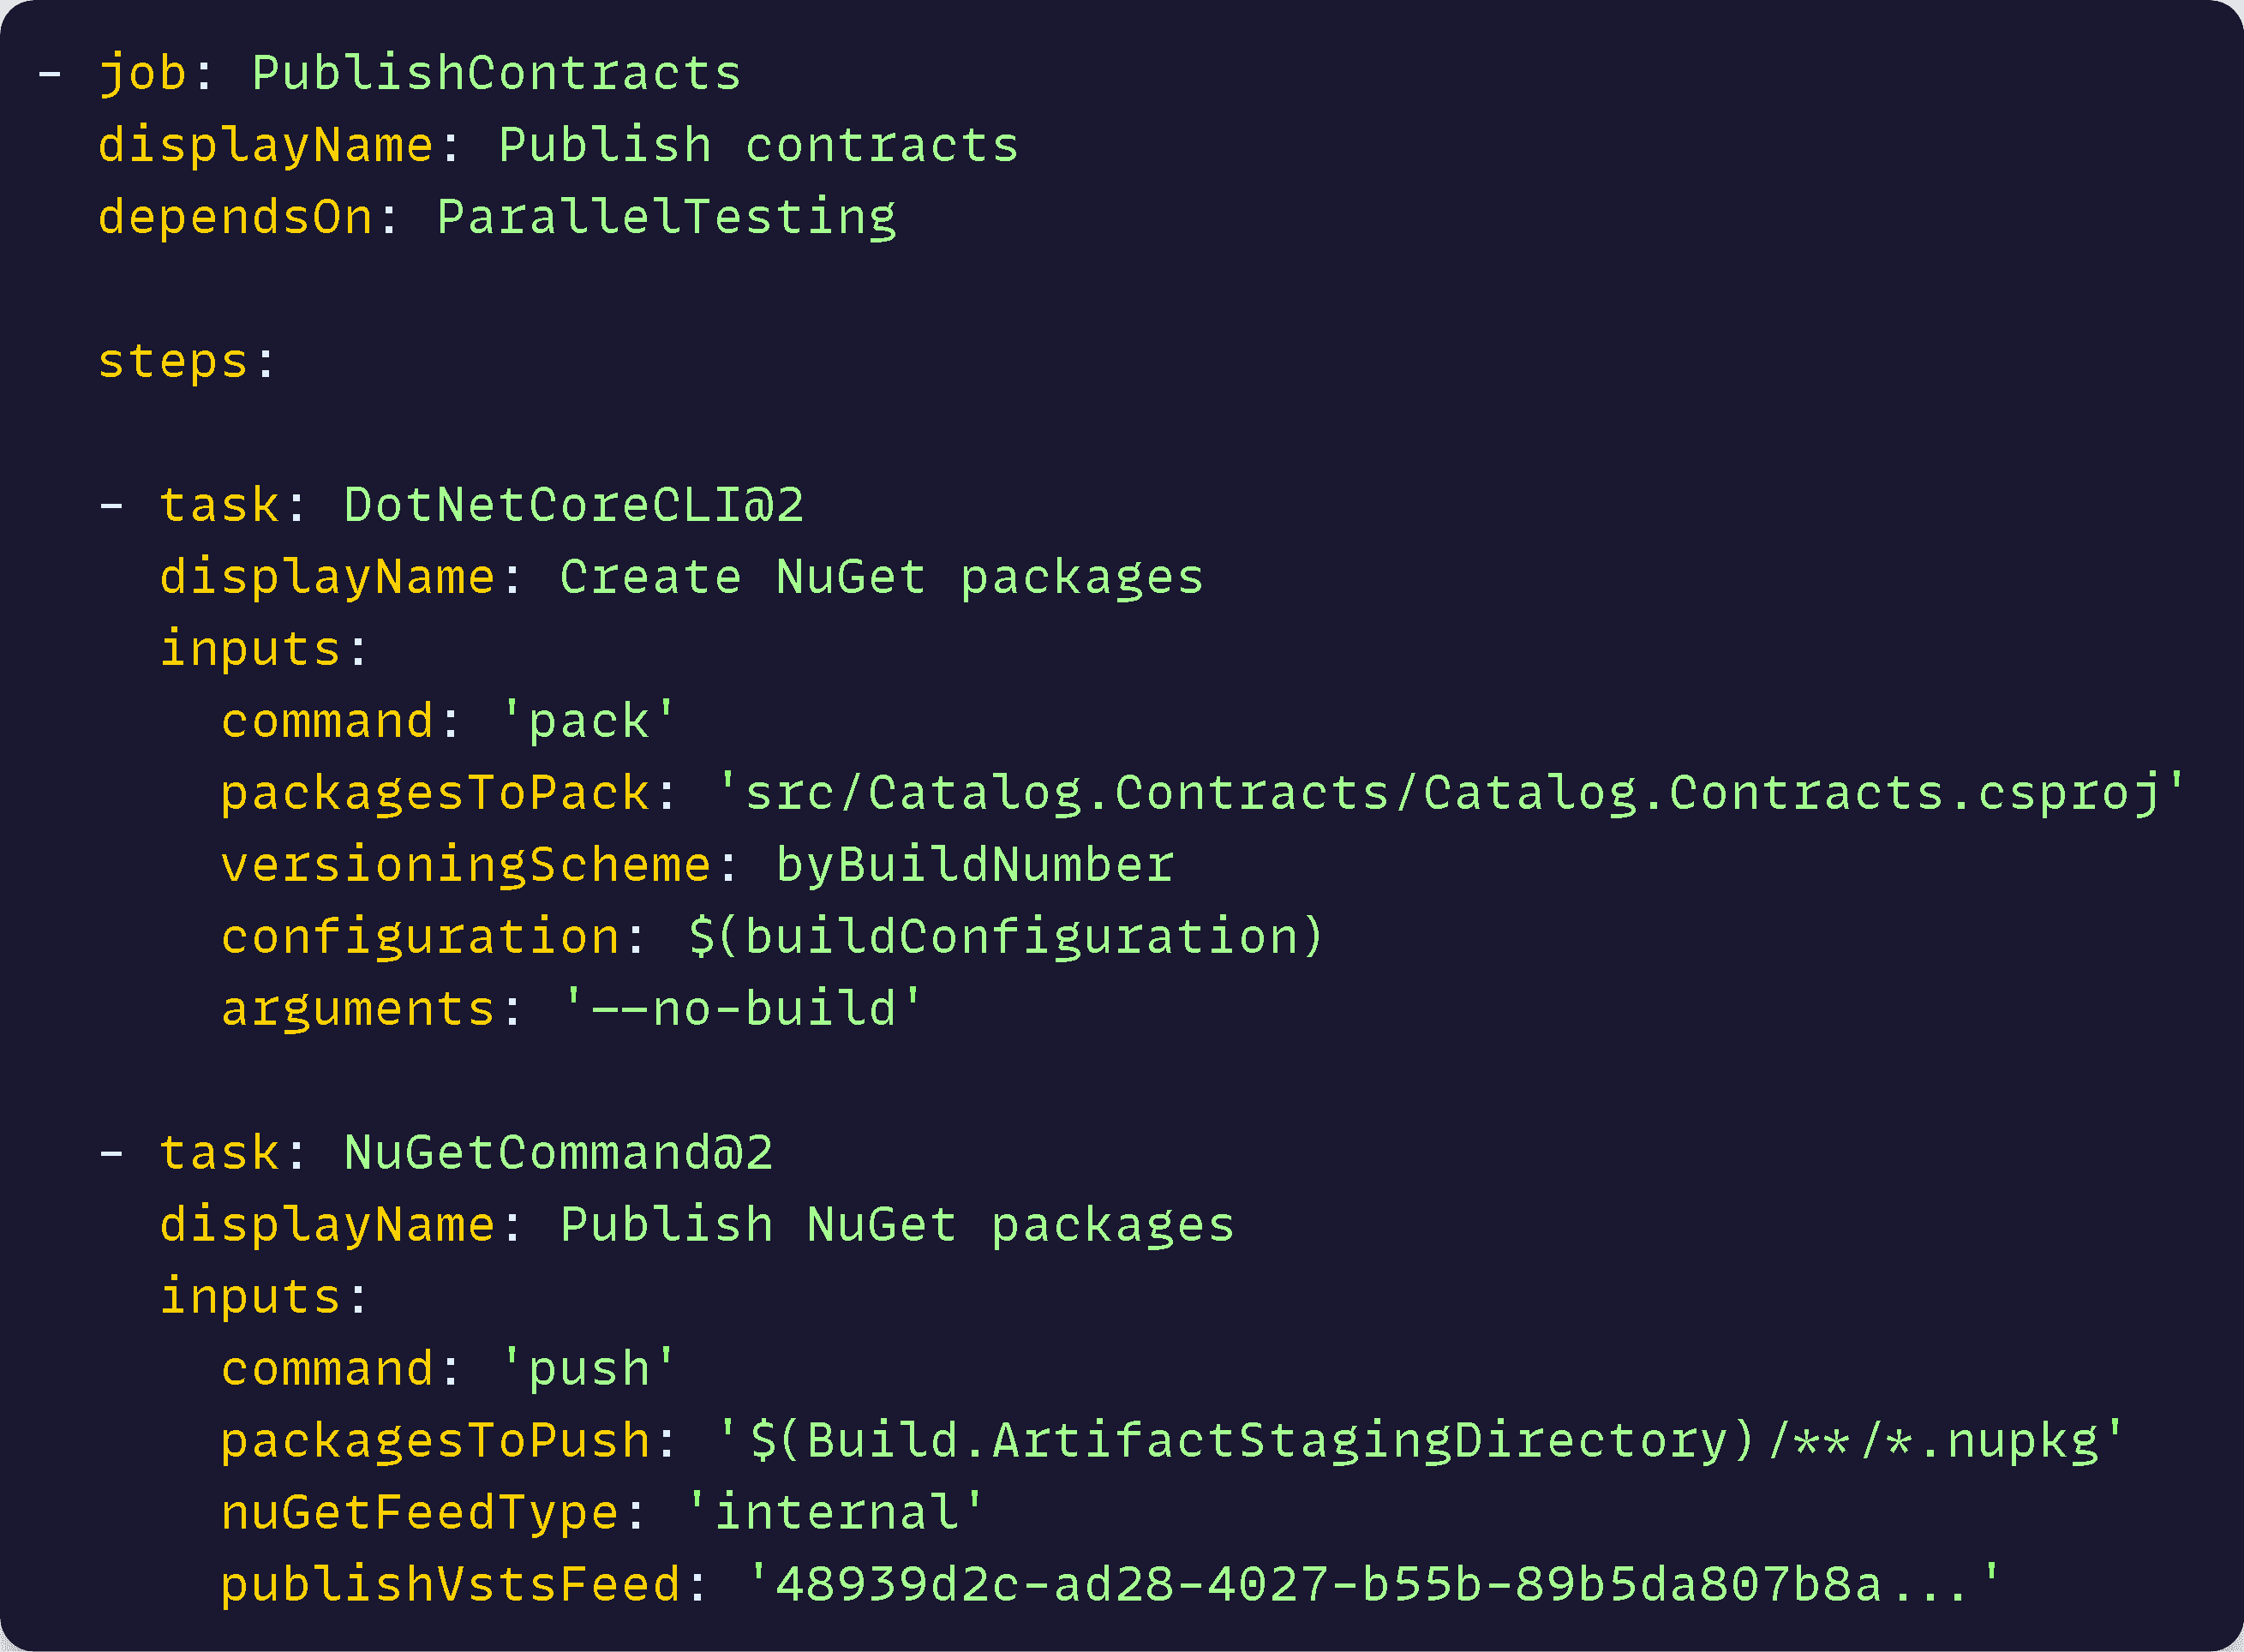
The only special thing there is the dependsOn property. By setting that property to ParallelTesting we ensure this job will not run until all integration tests have passed, which is not a bad idea.
4. Deploy
This is the one that took me the most time to get right, since it’s the one that touches Azure resources and requires a series of environment variables with the correct values.
The job:
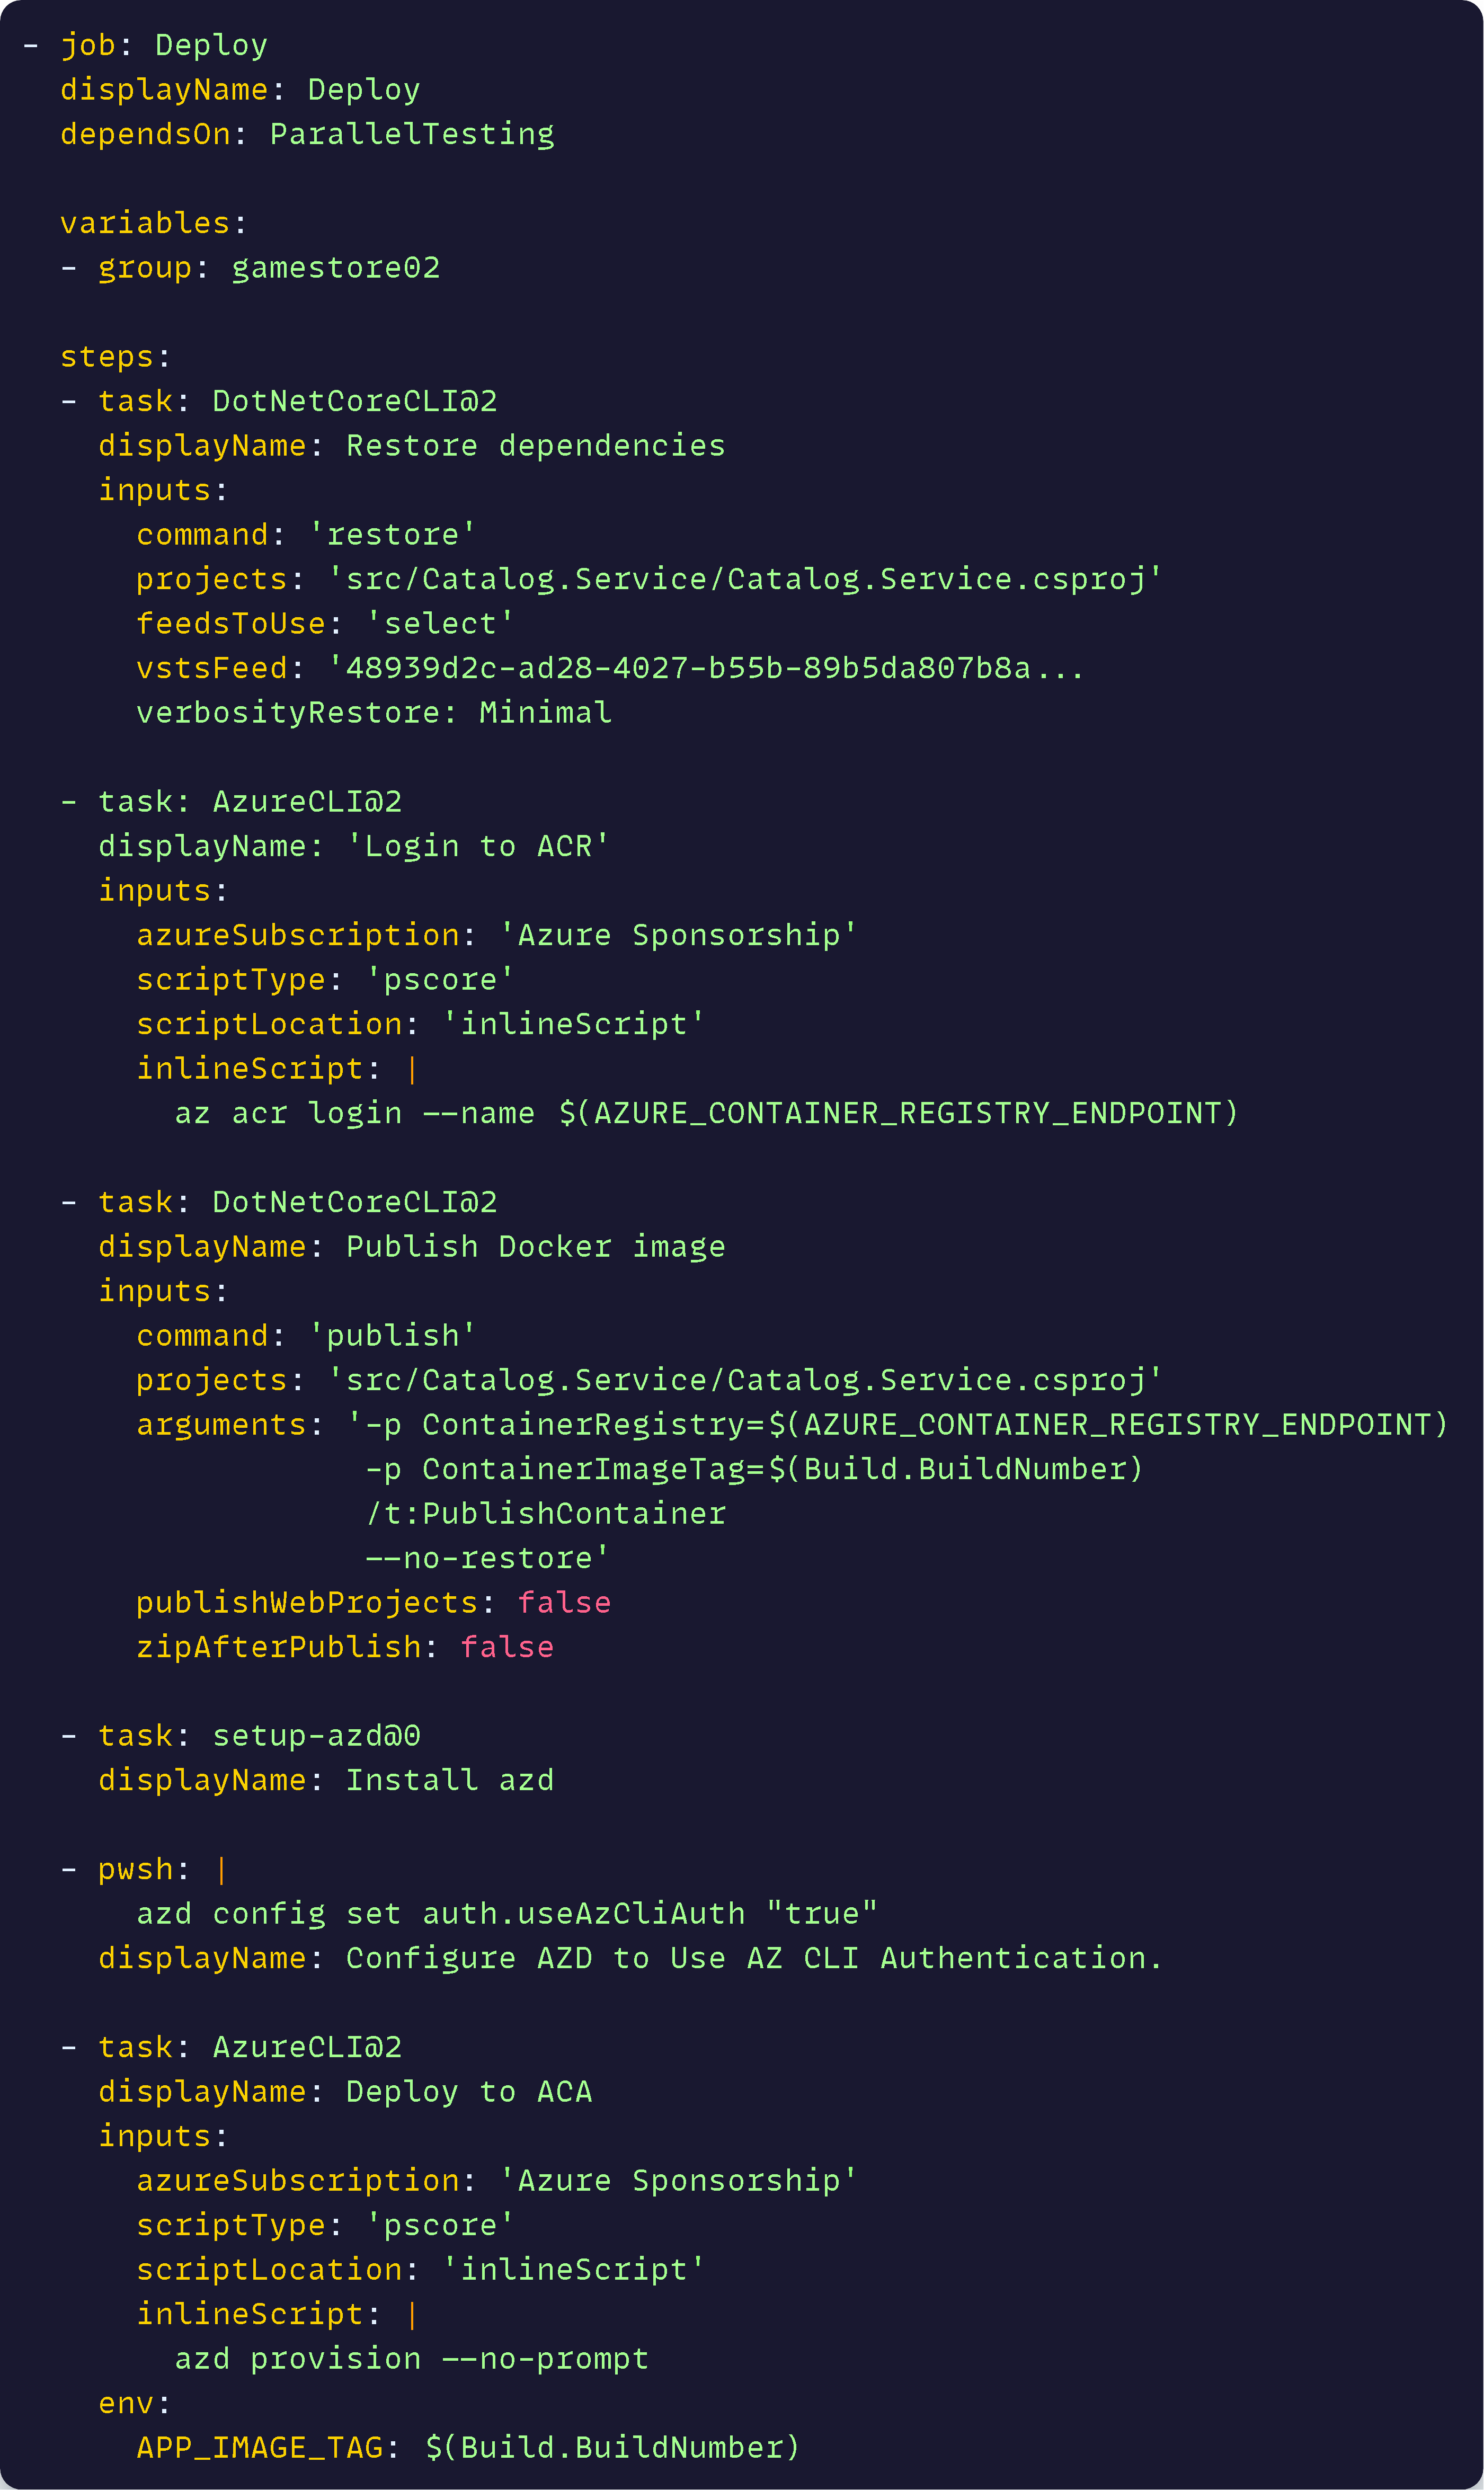
About this job:
- It also depends on tests to pass before running. Notice that this also means that jobs 3 and 4 can run in parallel as soon as tests complete. Neat!
- It uses a variable group to provide all required environment variables (More on this later)
- It authenticates with the Azure Container Registry (ACR) in our subscription using the identity of a service principal we granted access via an ADO service connection.
- Once authenticated, it builds and publishes to ACR a Docker image for the application using just dotnet publish and the native image creation capabilities introduced in .NET 7 (no dockerfile needed!)
- It installs and configures the Azure Developer CLI (azd) so it can talk to our Azure subscription.
- It provisions our application into Azure Container Apps (ACA) using azd and the just created docker image.
Last week I showed you how azd will prompt for all required environment variables needed for the deployment. But here it would seem like all we provide is the APP_IMAGE_TAG, taken from the build number, and the pipeline will certainly not prompt for anything else interactively as it does in a dev box.
Where are all the other env vars coming from?
Here:
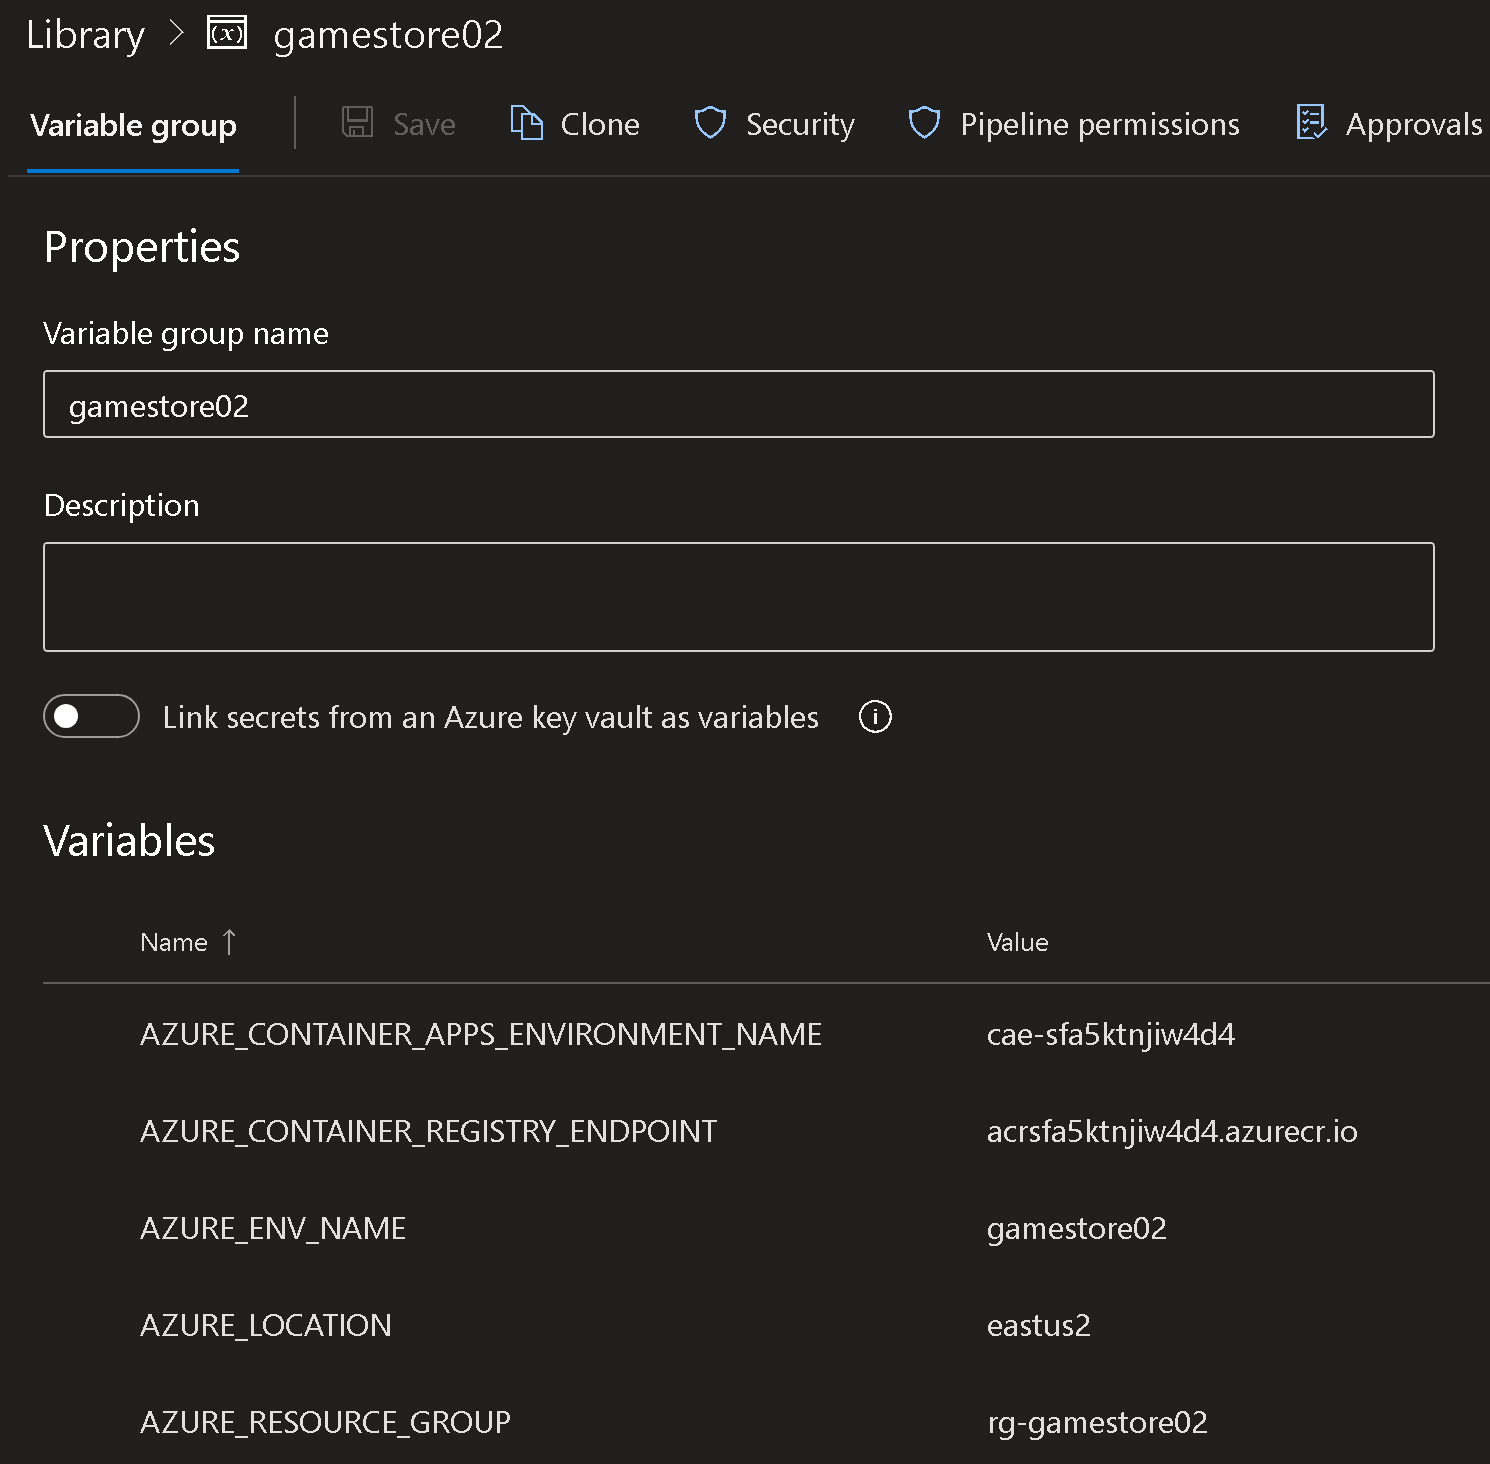
That is known as a variable group on Azure Pipelines and can include as many variables as you need. We link that gamestore02 variable group to the pipeline and all variables go as env vars to azd.
The really nice thing is that we can reuse this variable group across all pipelines, which avoids us having to repeat the same variables in multiple yaml files for all microservices.
The end result
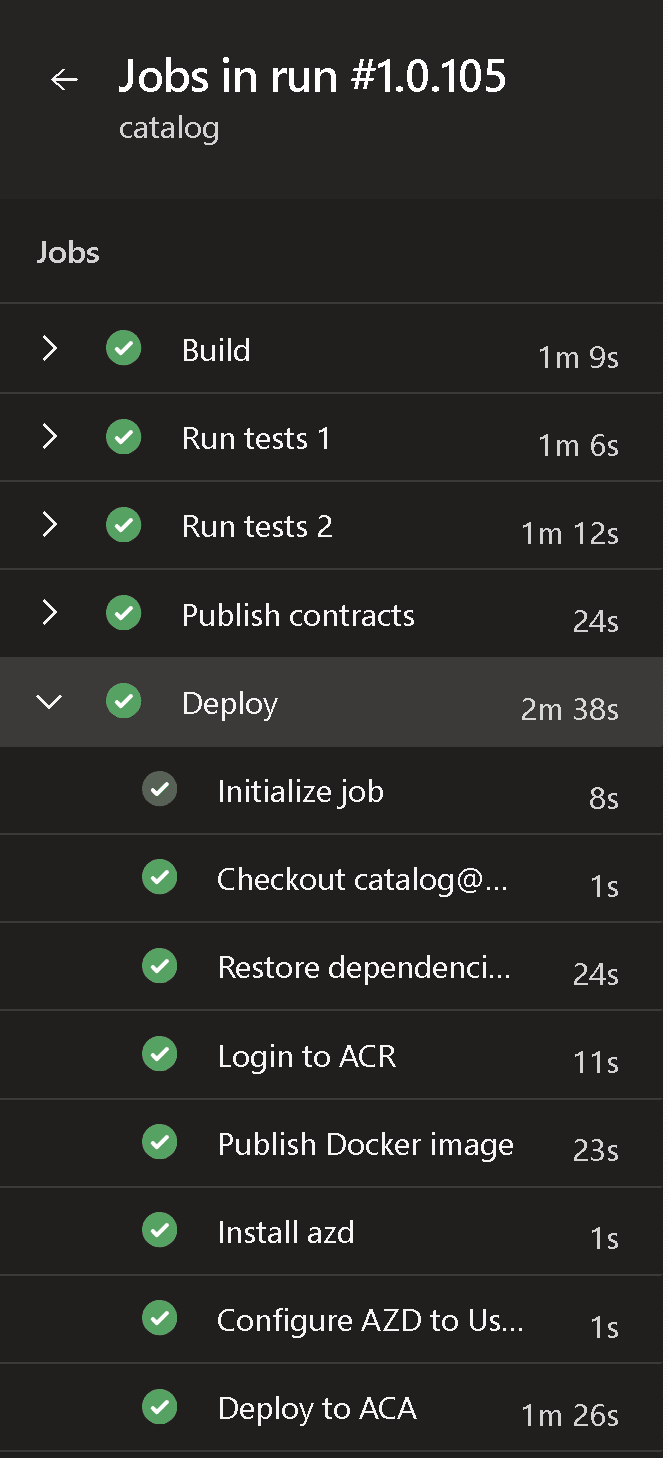
When the complete microservice deployment pipeline runs, it looks like this:
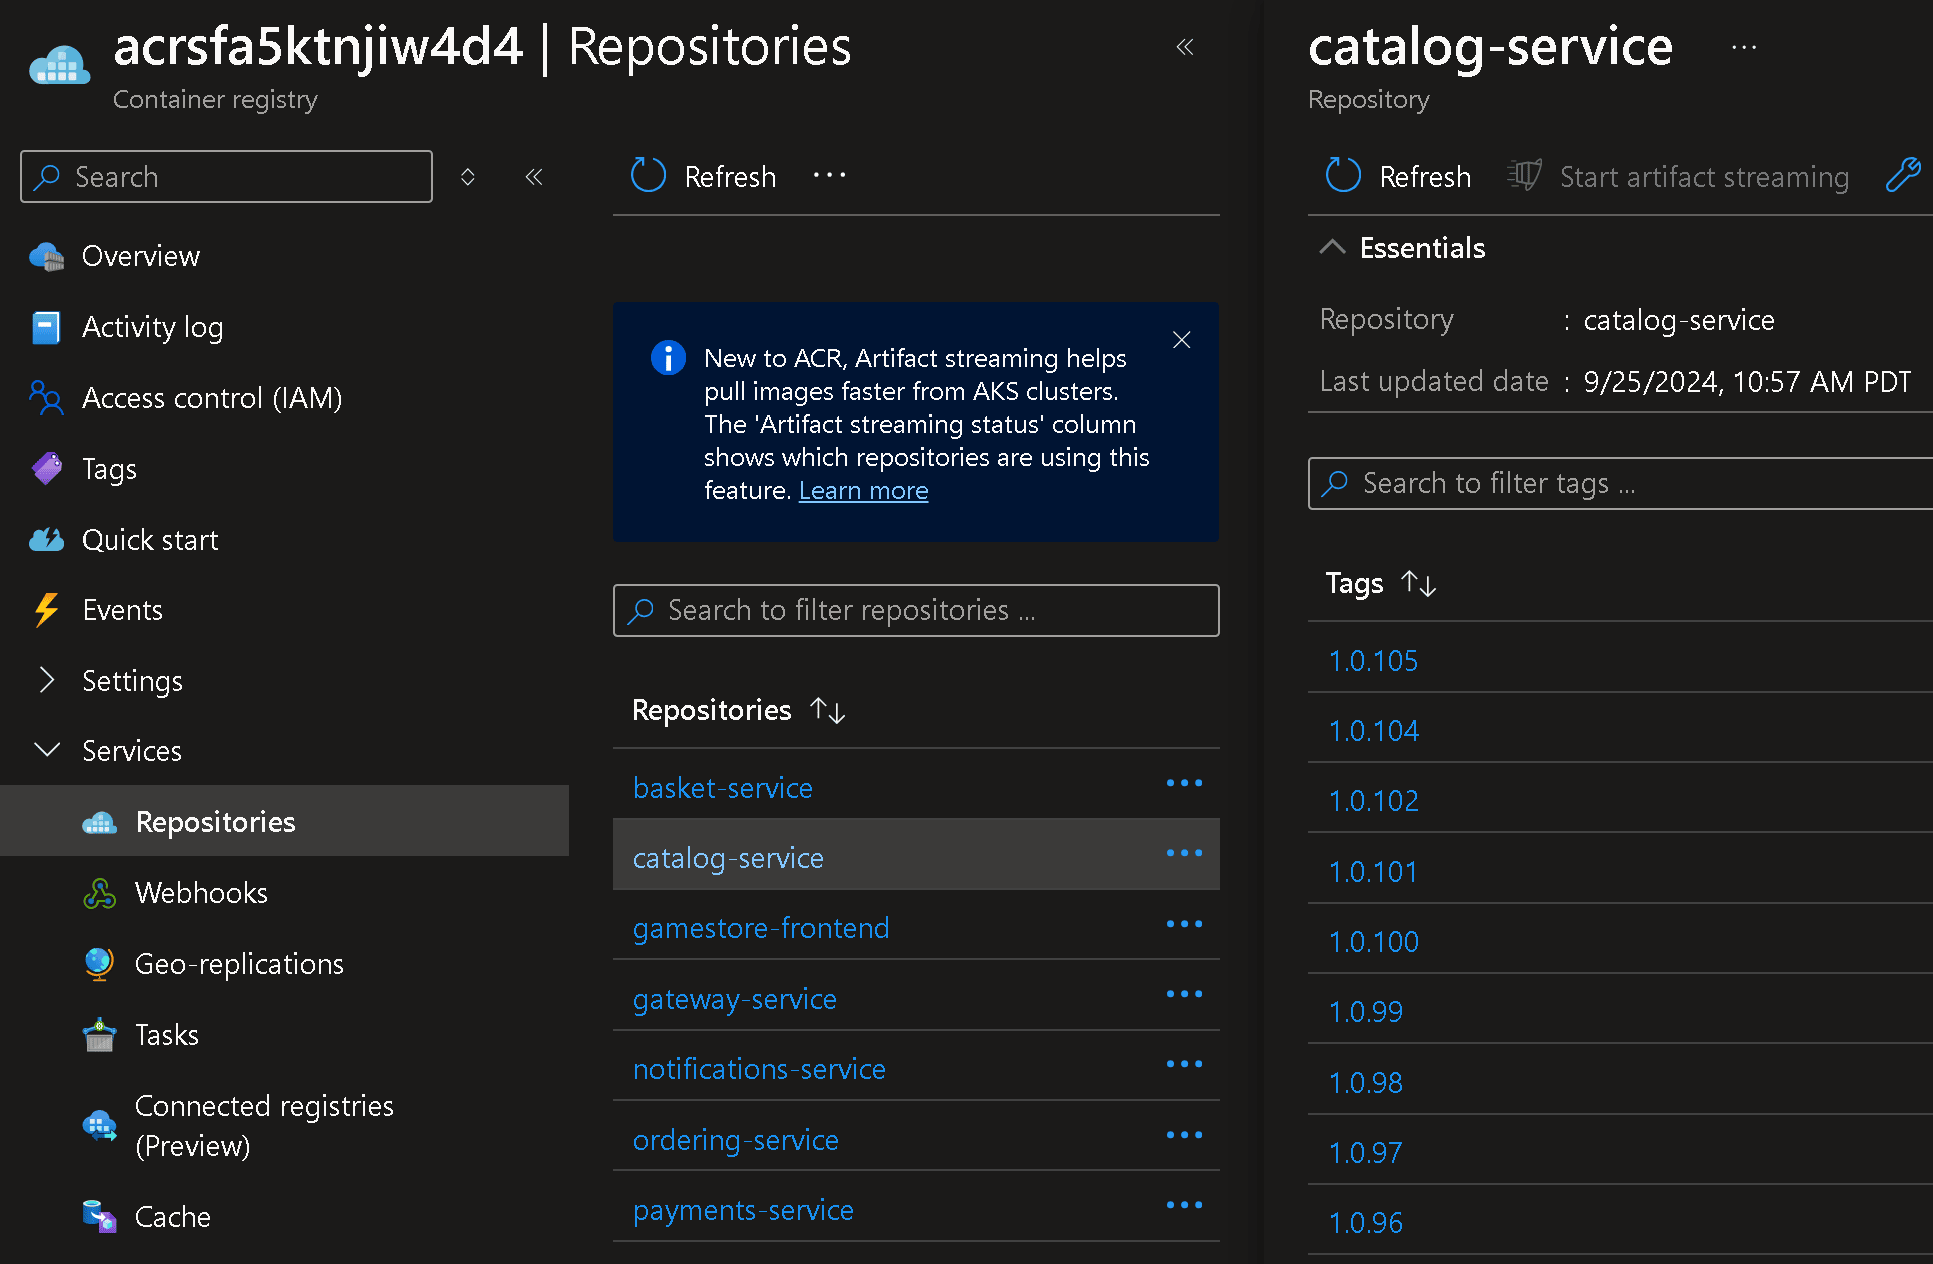
When it completes, your Docker image shows up on ACR with the correct version:
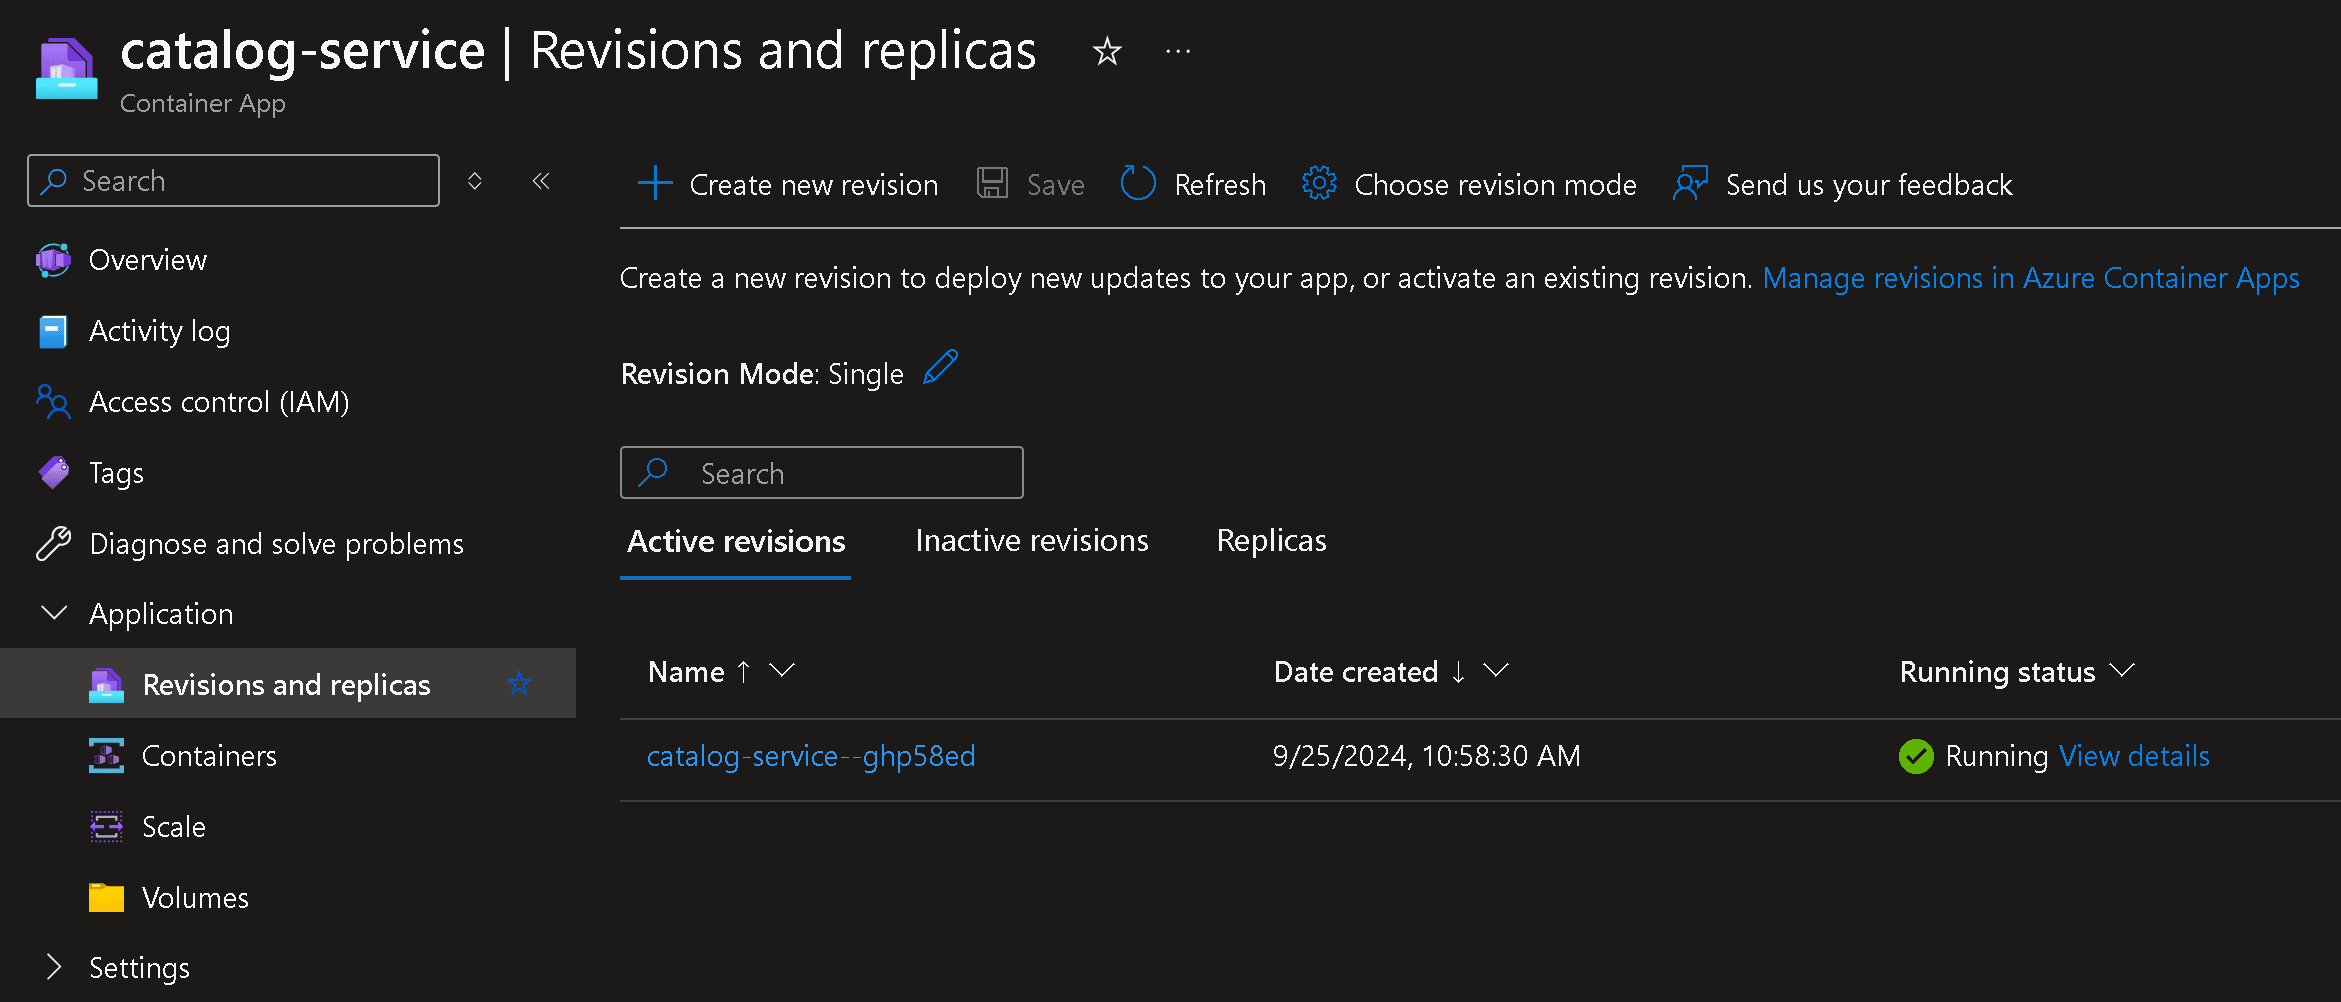
And your app is up and running in Azure Container Apps:
Next time you push even the smallest change to your remote repo, the entire automation runs, and a few mins later you are up and running in the cloud without any manual intervention.
Yes, you may want to add more safeguards to this like Test and Prod stages, approval gates, canary or blue/green deployments, and more. But what I showed you here should be a great first step.
Closing
All right, now on to the next bootcamp production phase. Let’s make this teachable, step-by-step, no hidden code, and doable even by most beginners.
Until next time!
Julio
Whenever you’re ready, there are 3 ways I can help you:
-
.NET Backend Developer Bootcamp: A complete path from ASP.NET Core fundamentals to building, containerizing, and deploying production-ready, cloud-native apps on Azure.
-
Building Microservices With .NET: Transform the way you build .NET systems at scale.
-
Get the full source code: Download the working project from this article, grab exclusive course discounts, and join a private .NET community.
