Read time: 9 minutes
In most of my projects at Microsoft, where we built large systems composed of dozens of microservices, my focus was 100% on the .NET backend, so I rarely had to think about the frontend.
However, many teams start much smaller than that and need to run both their frontend and backend together, especially during local development.
And that’s where things can get messy.
New developers need to know how to configure the frontend to talk to the backend, and how to debug each part of the stack separately.
What if you could define your entire full-stack application—backend, frontend, and the relationship between them—as a single, orchestrated system?
That’s exactly what .NET Aspire enables.
Today, I’ll show you how to use .NET Aspire to run your full-stack application, React frontend + .NET backend, as a single coordinated system that starts with a single command during local development.
Let’s dive in.
The initial setup
For this full-stack application, I’ll reuse the Game Store .NET API I built in my ASP.NET Core Full Course For Beginners, so I won’t go over that here.
And, for the React frontend, I just asked GitHub Copilot to turn the app I created in my Blazor Full Course For Beginners into a React app with Vite.
The part of the React application I find most relevant to this article is how it talks to the .NET backend, which, in Vite, starts by defining a proxy configuration in vite.config.ts:
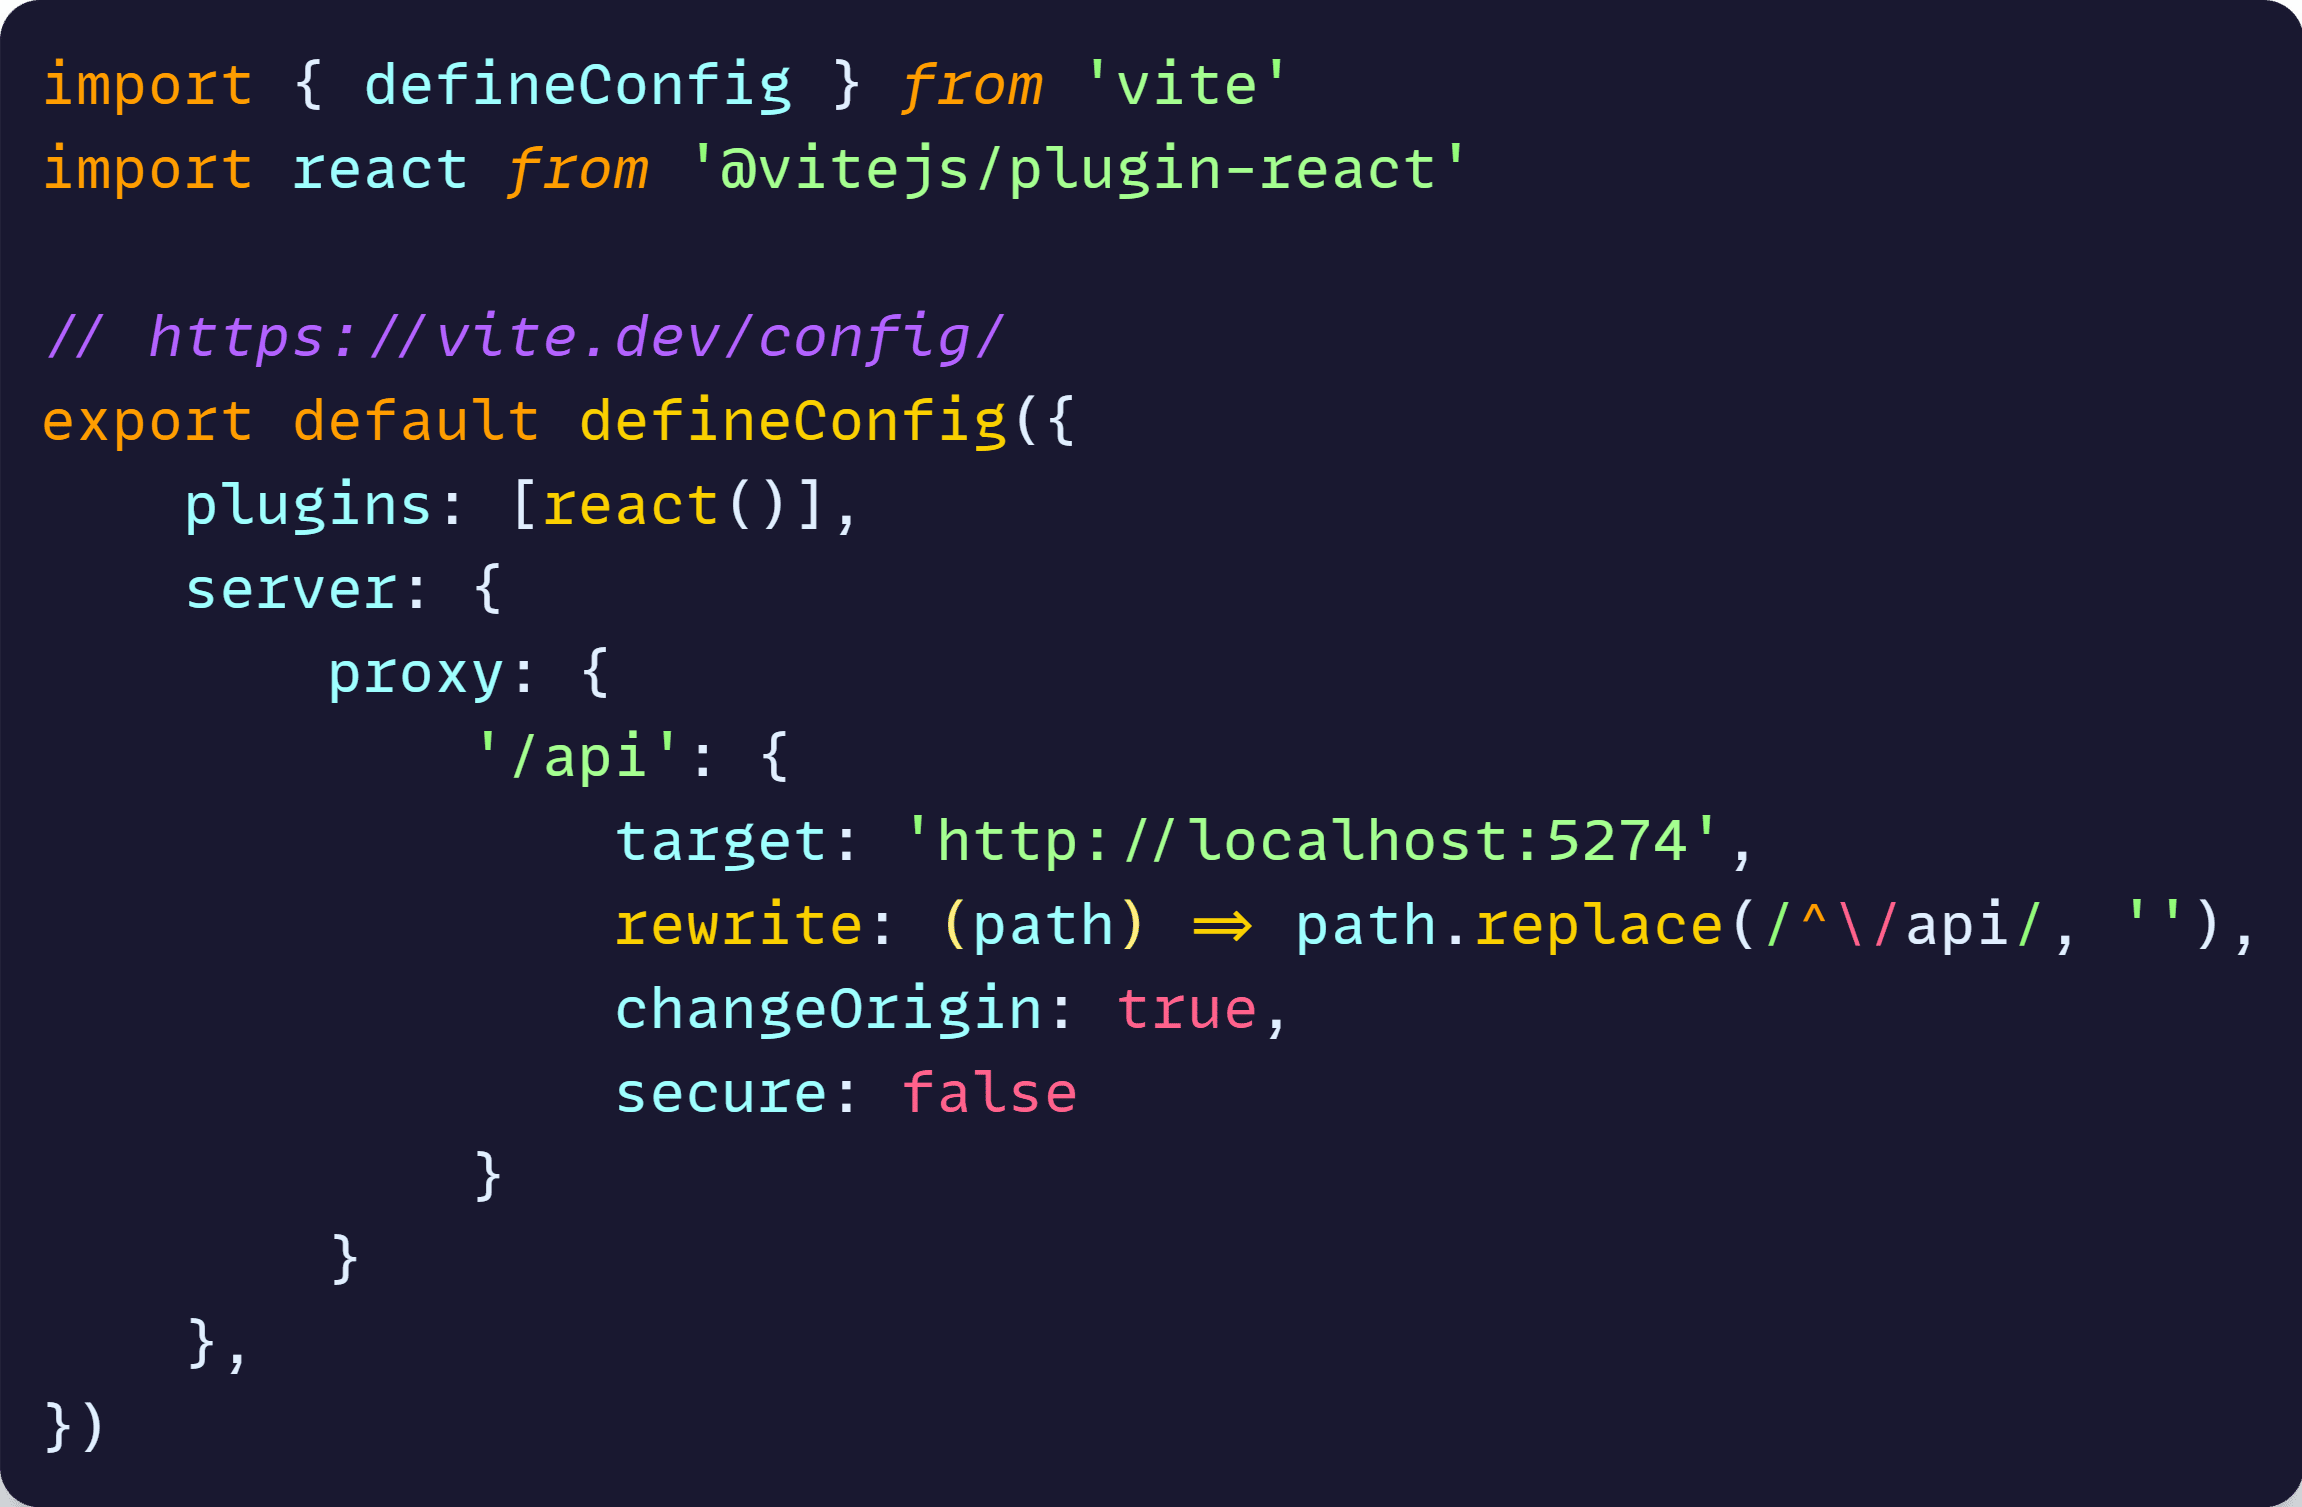
During local development, the proxy forwards all /api/* requests to localhost:5274 where the .NET backend runs.
It will also remove /api from the request path, so it matches the correct path in the backend. For instance, this request:
GET /api/games
Will be forwarded here:
GET localhost:5274/games
And then we can make calls to the backend from anywhere in the React codebase by just using that /api base path, like here:
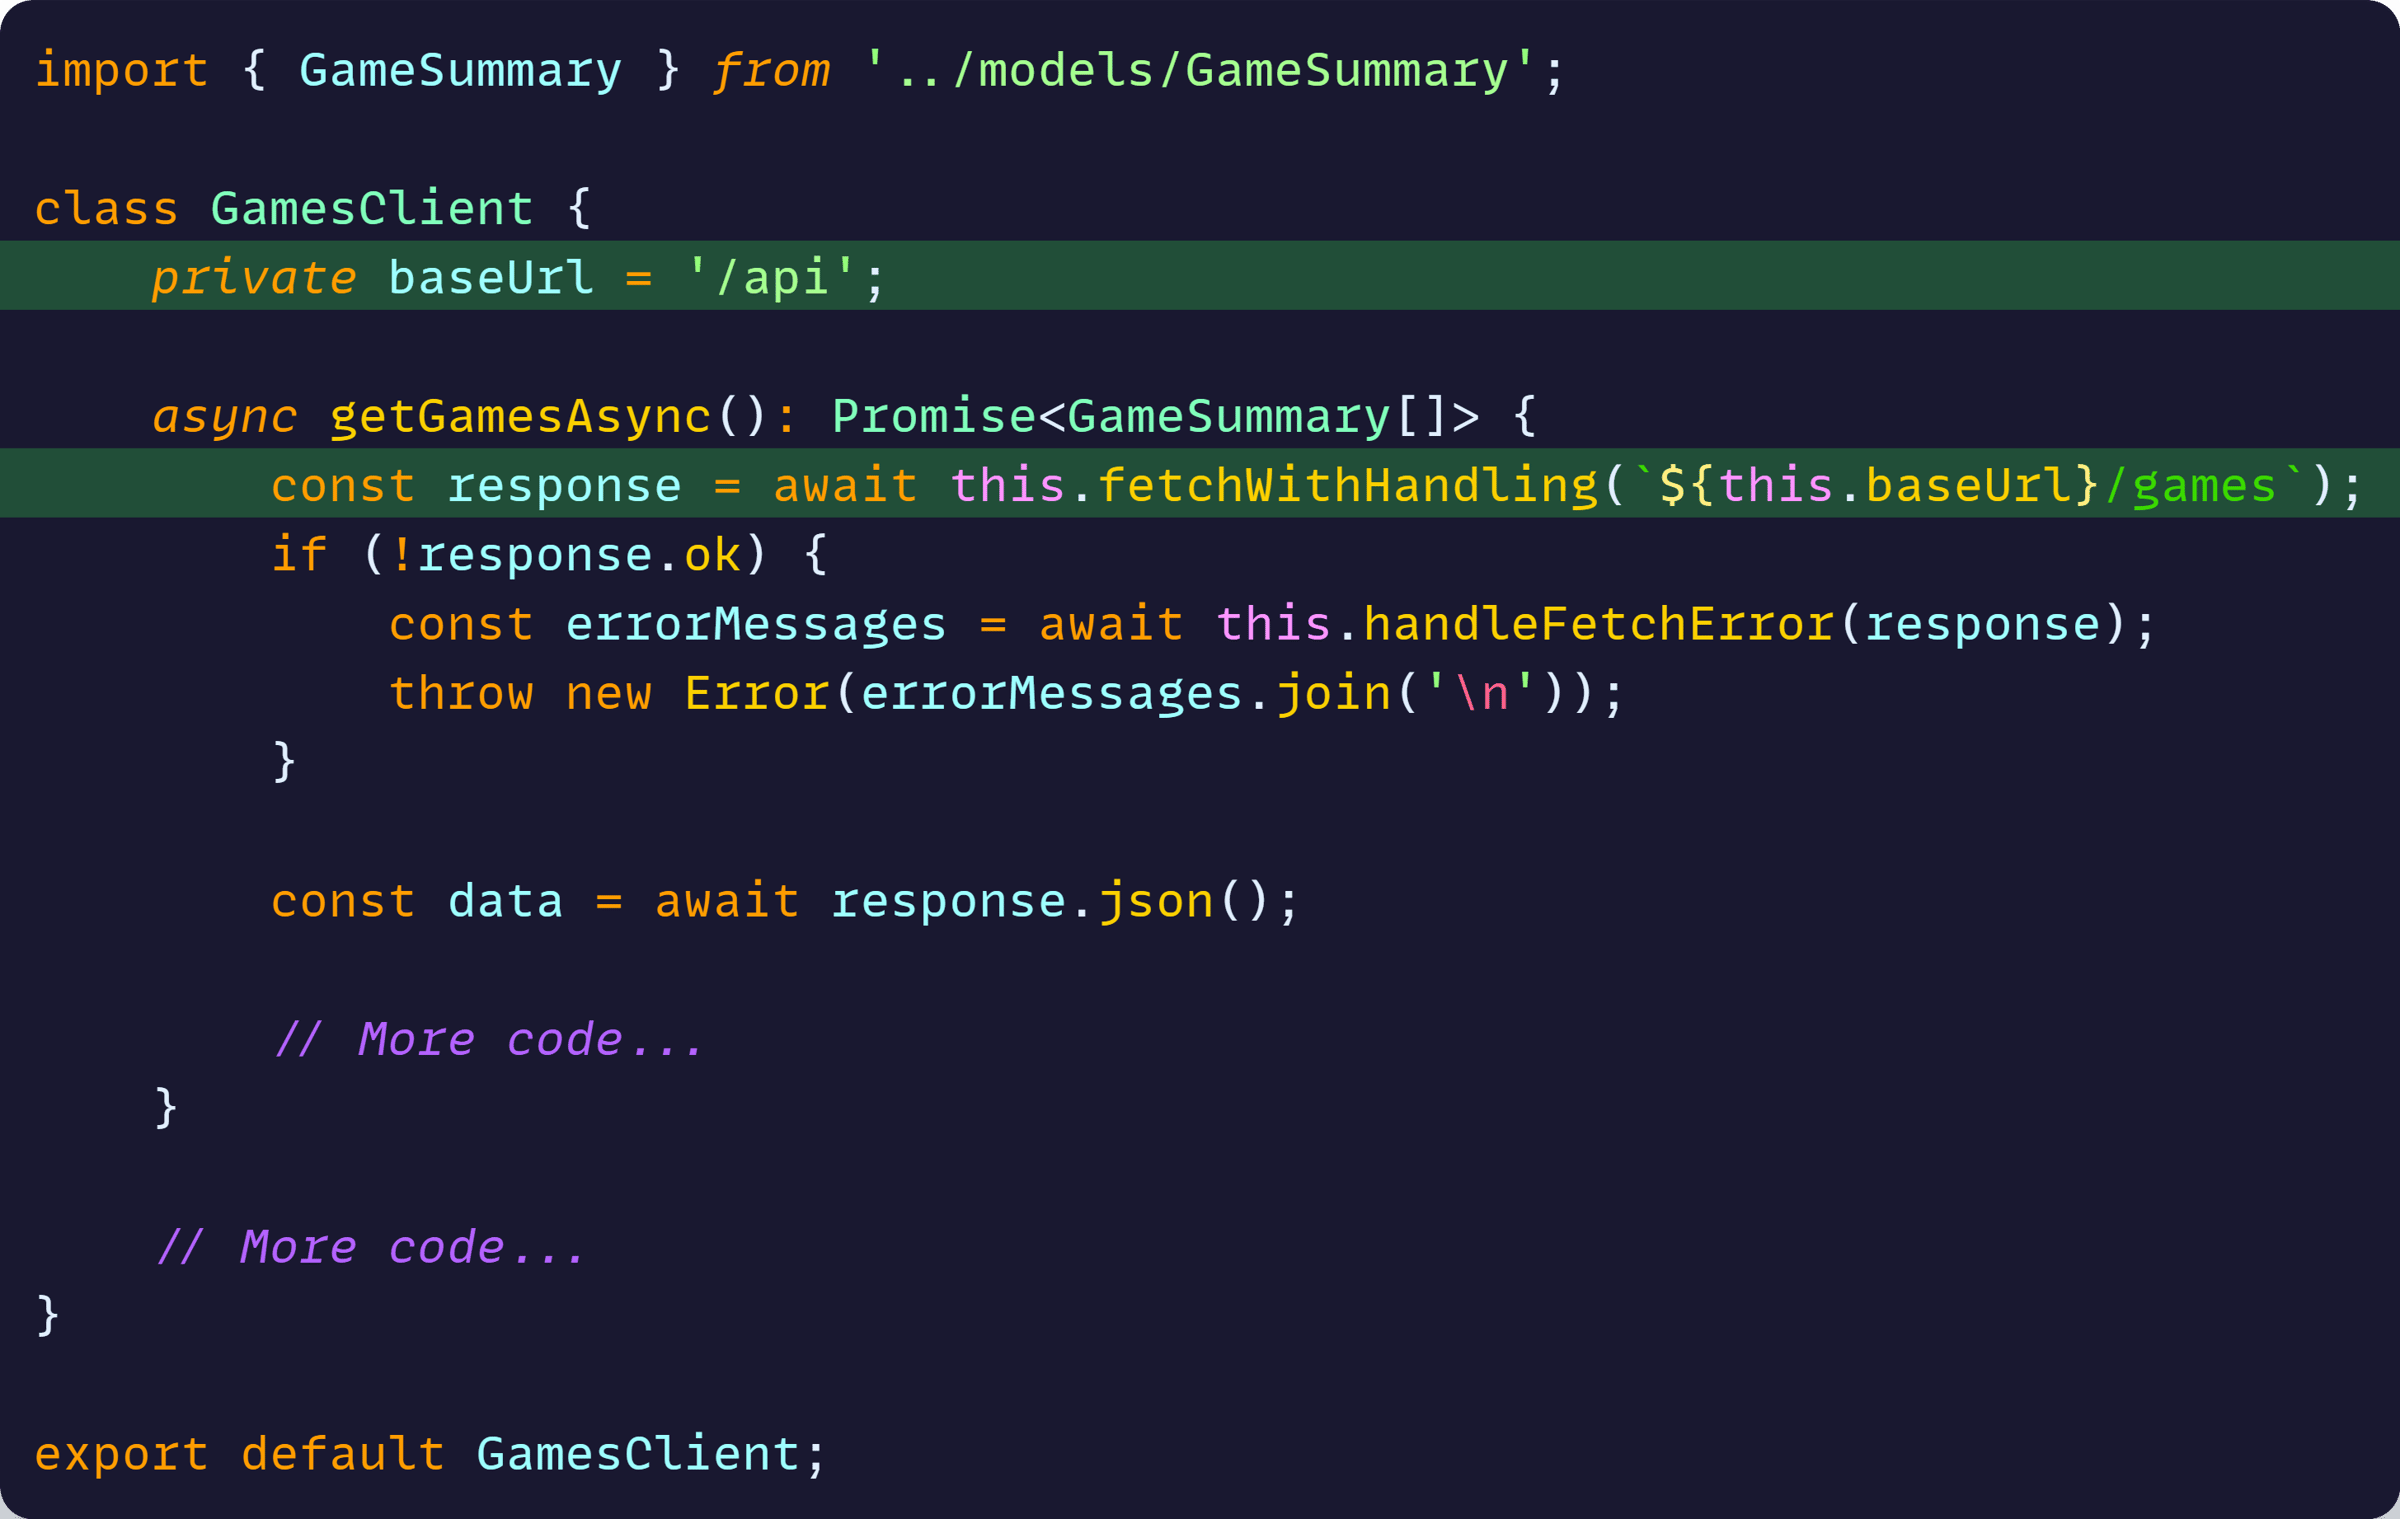
It’s a nice way to keep most of the React code base unaware of the actual location of the .NET backend.
However, there are 2 things I don’t like about this initial setup:
- I have to start the .NET backend and the React frontend apps individually every time.
- The backend URL is hardcoded in vite.config.ts, which will complicate things when deploying it outside of my box.
Let’s improve this.
Adding the Aspire AppHost
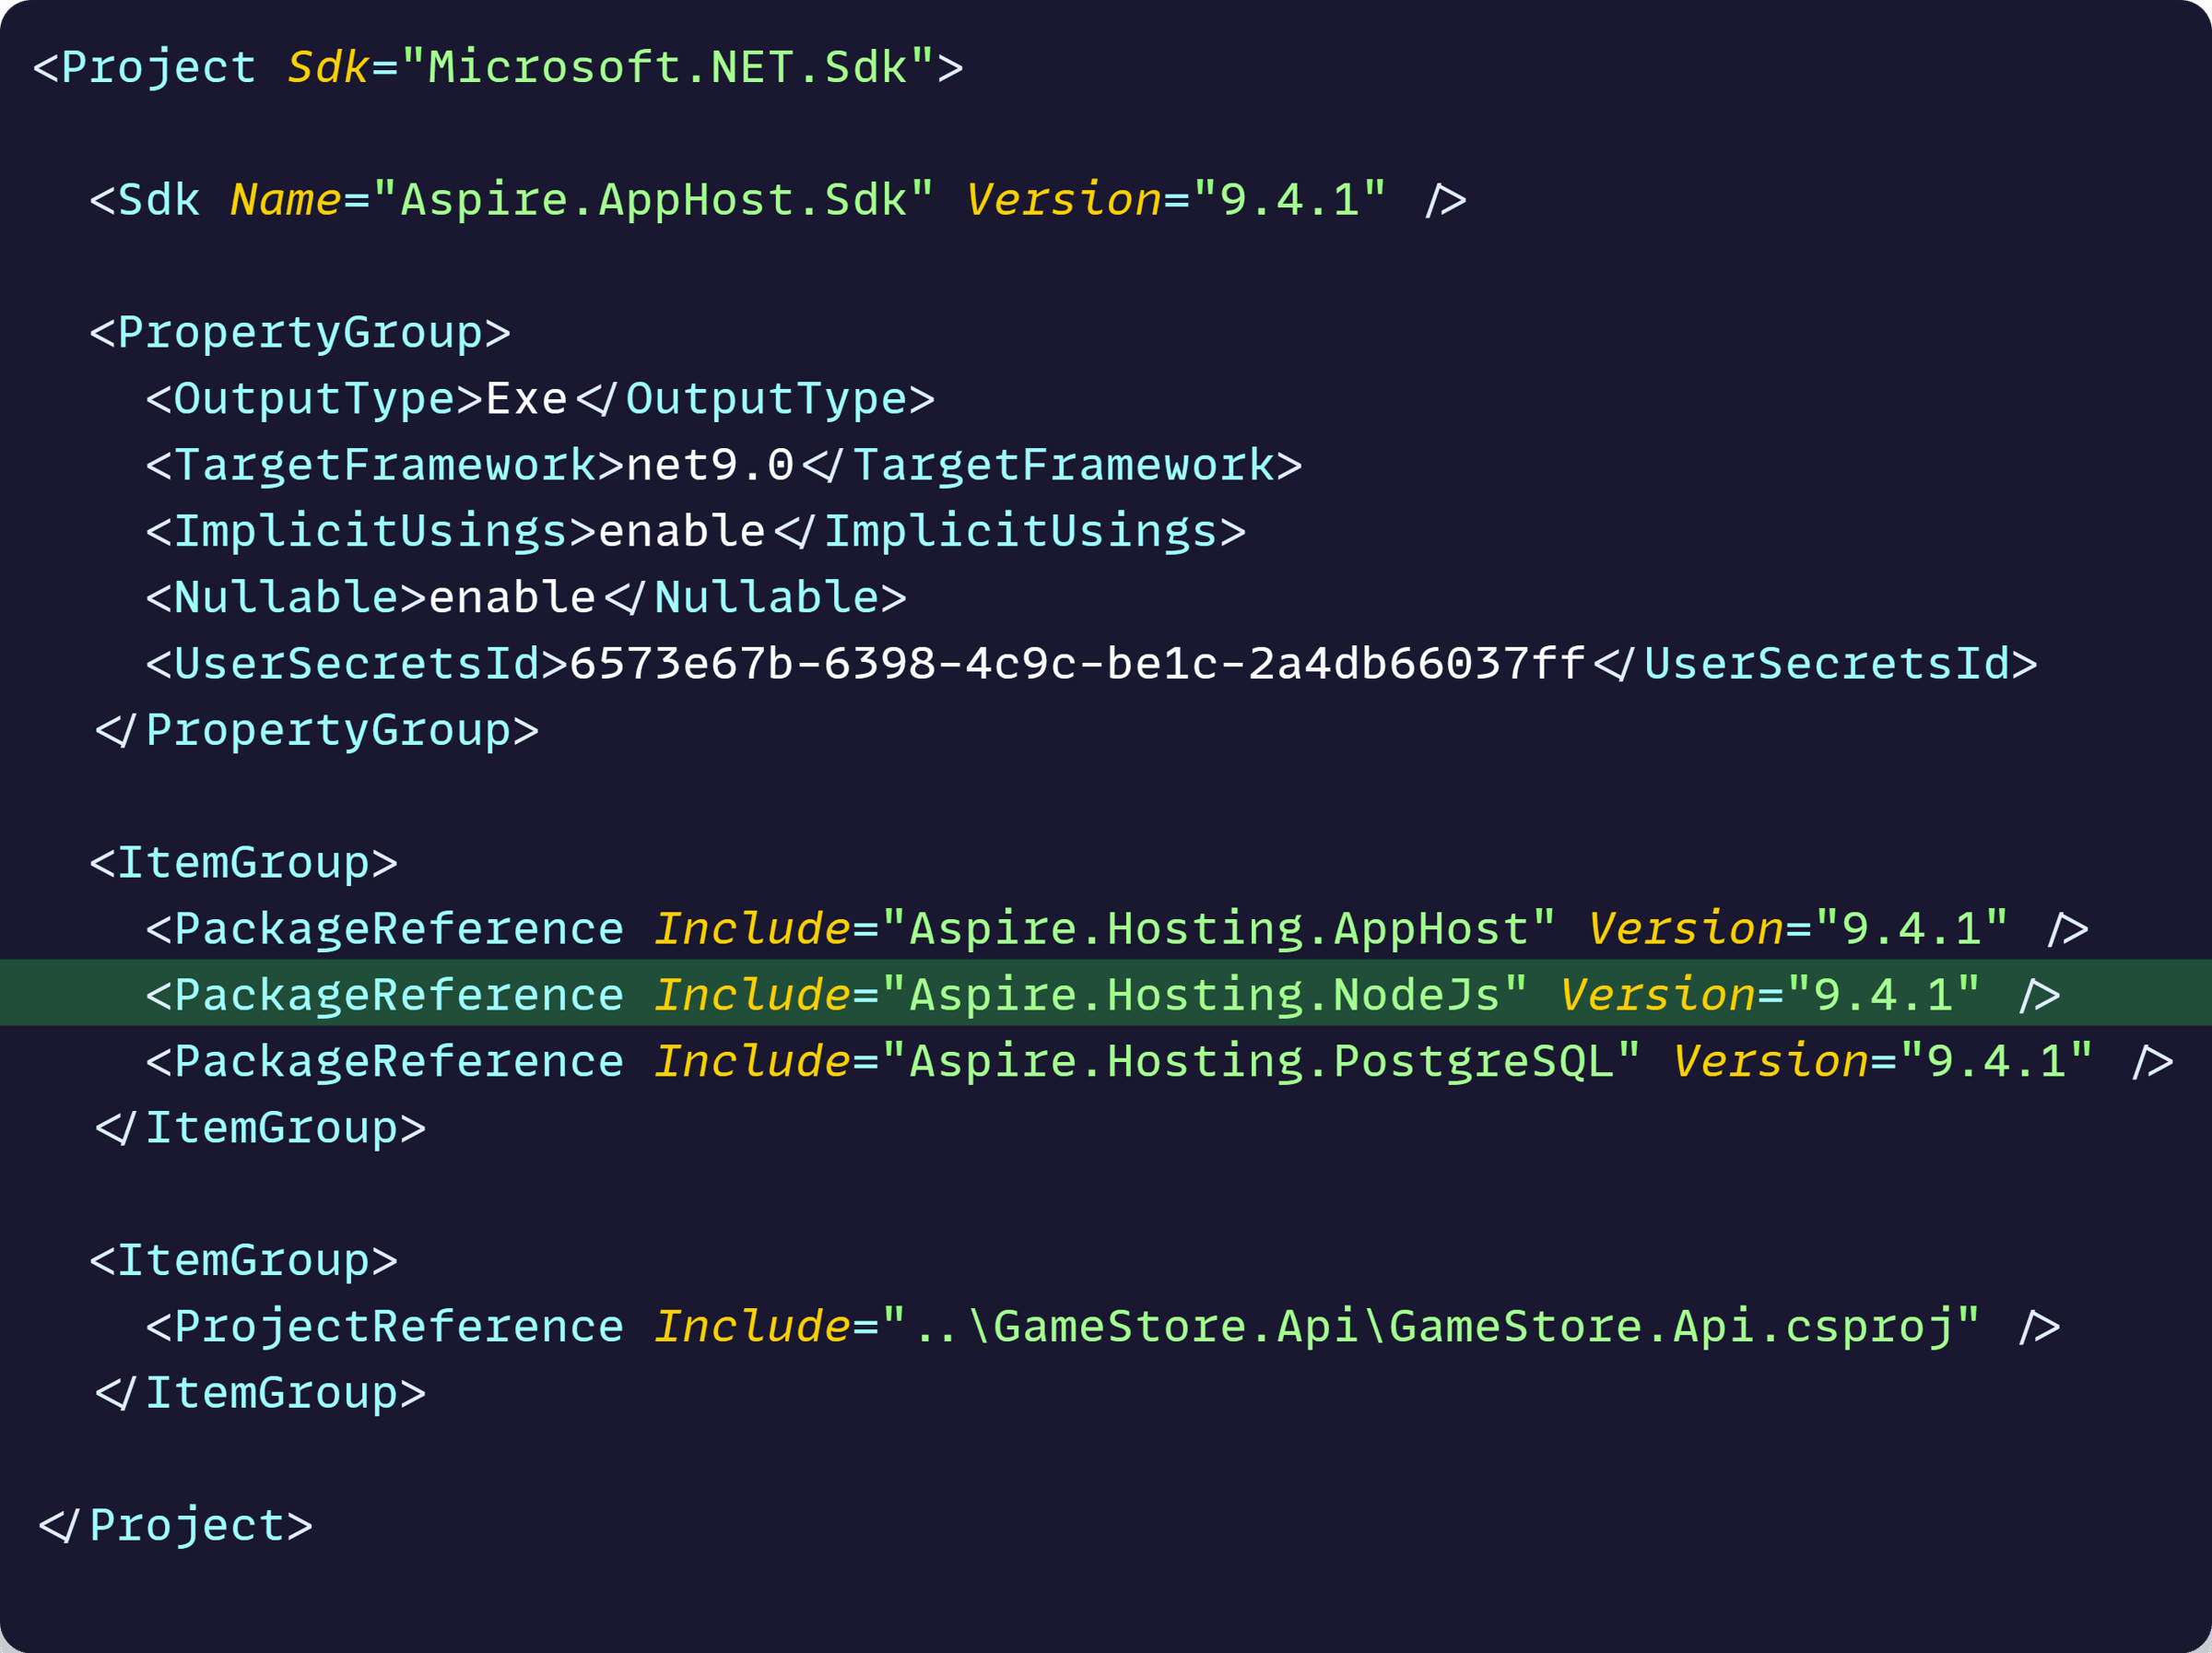
Adding an Aspire AppHost and plugging in the .NET API is the easy part, which I covered step-by-step in my .NET Aspire Tutorial, so this will be our initial AppHost.cs:
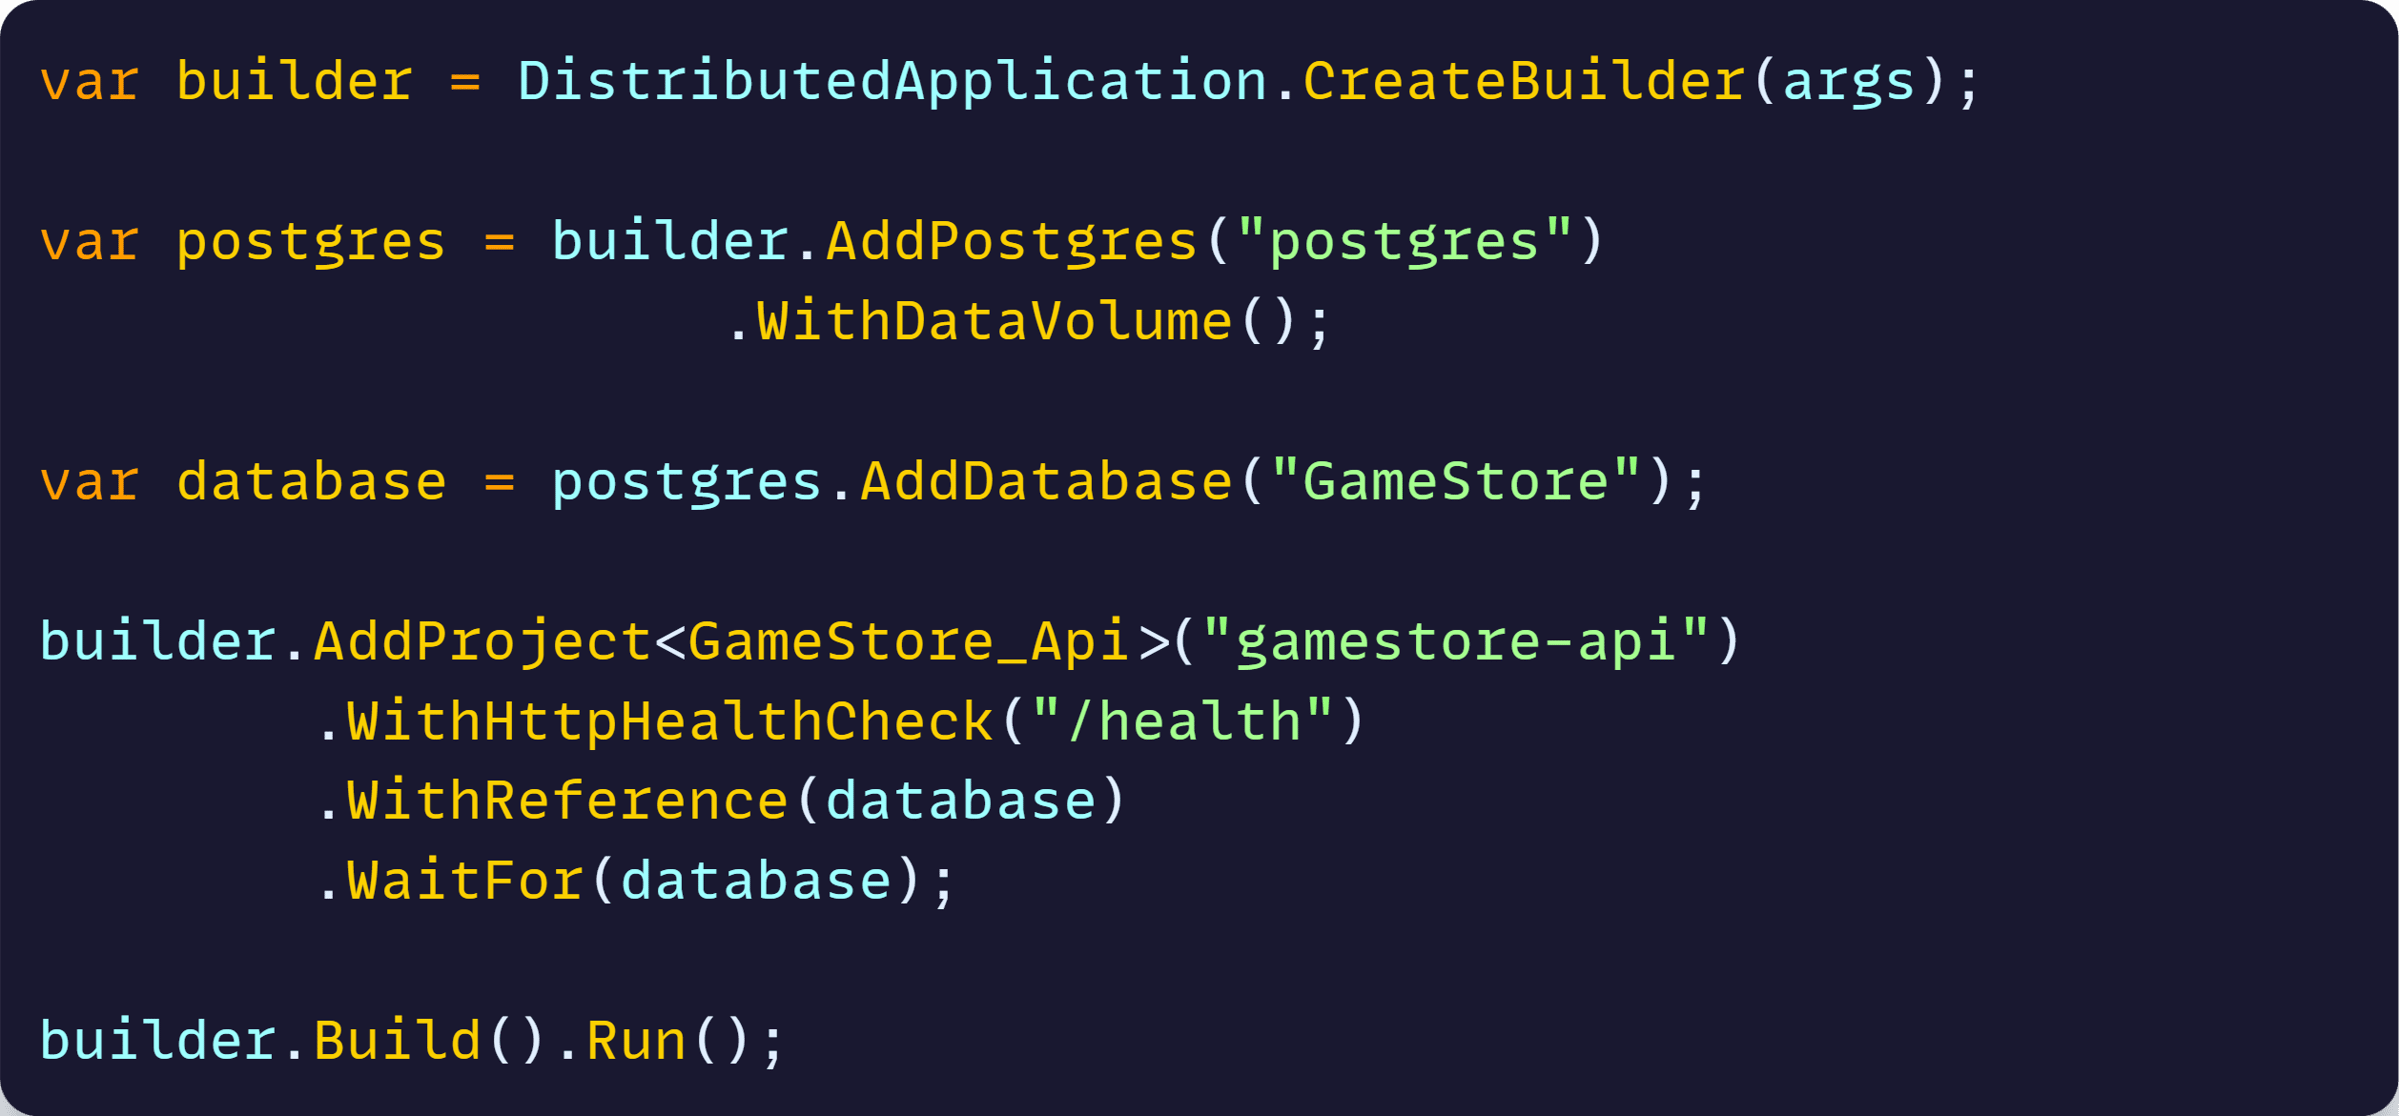
An important detail is the WithHttpHealthCheck(“/health”) call, which will ensure the backend’s health check endpoint is reporting a healthy status before letting anyone reach the backend, including the frontend.
Now, the interesting part.
Adding a React app to Aspire
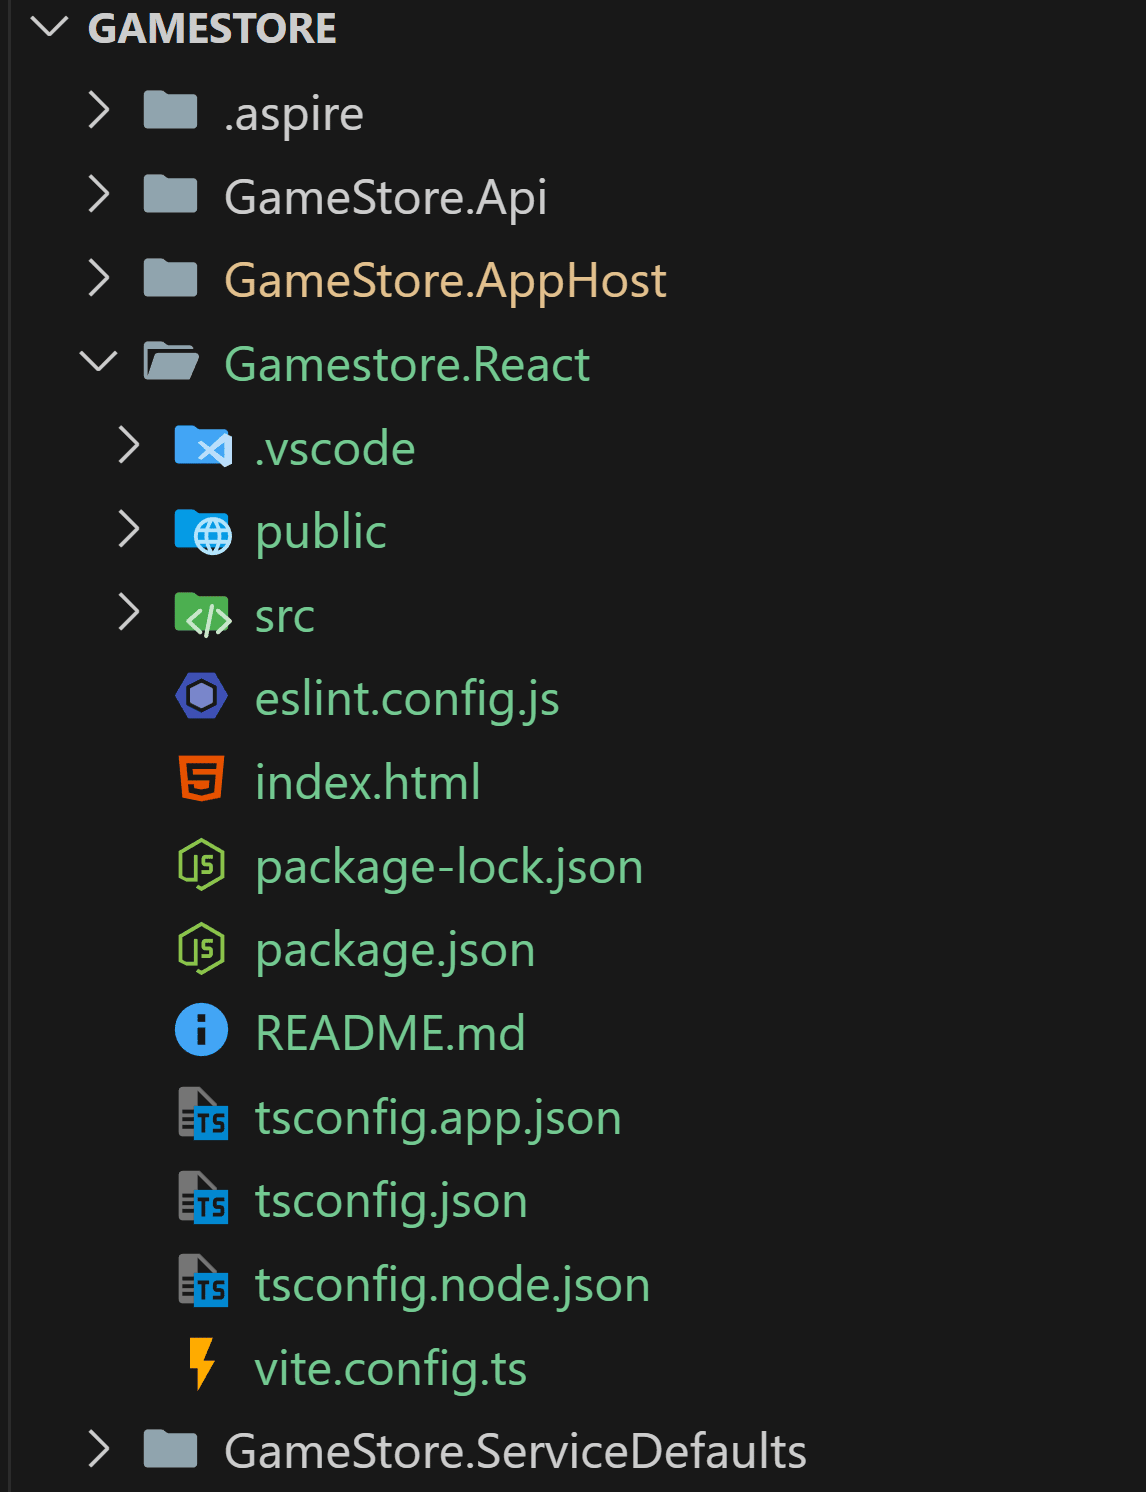
To let Aspire orchestrate our React app, let’s start by placing the React app next to our AppHost project, mainly so that the AppHost can reach it:
Then, let’s install the Aspire.Hosting.NodeJs NuGet package into the AppHost, so we get access to Aspire’s NodeJs resources and extension methods:
Then, we can modify our App Model by adding the React app as a new resource that references the API:
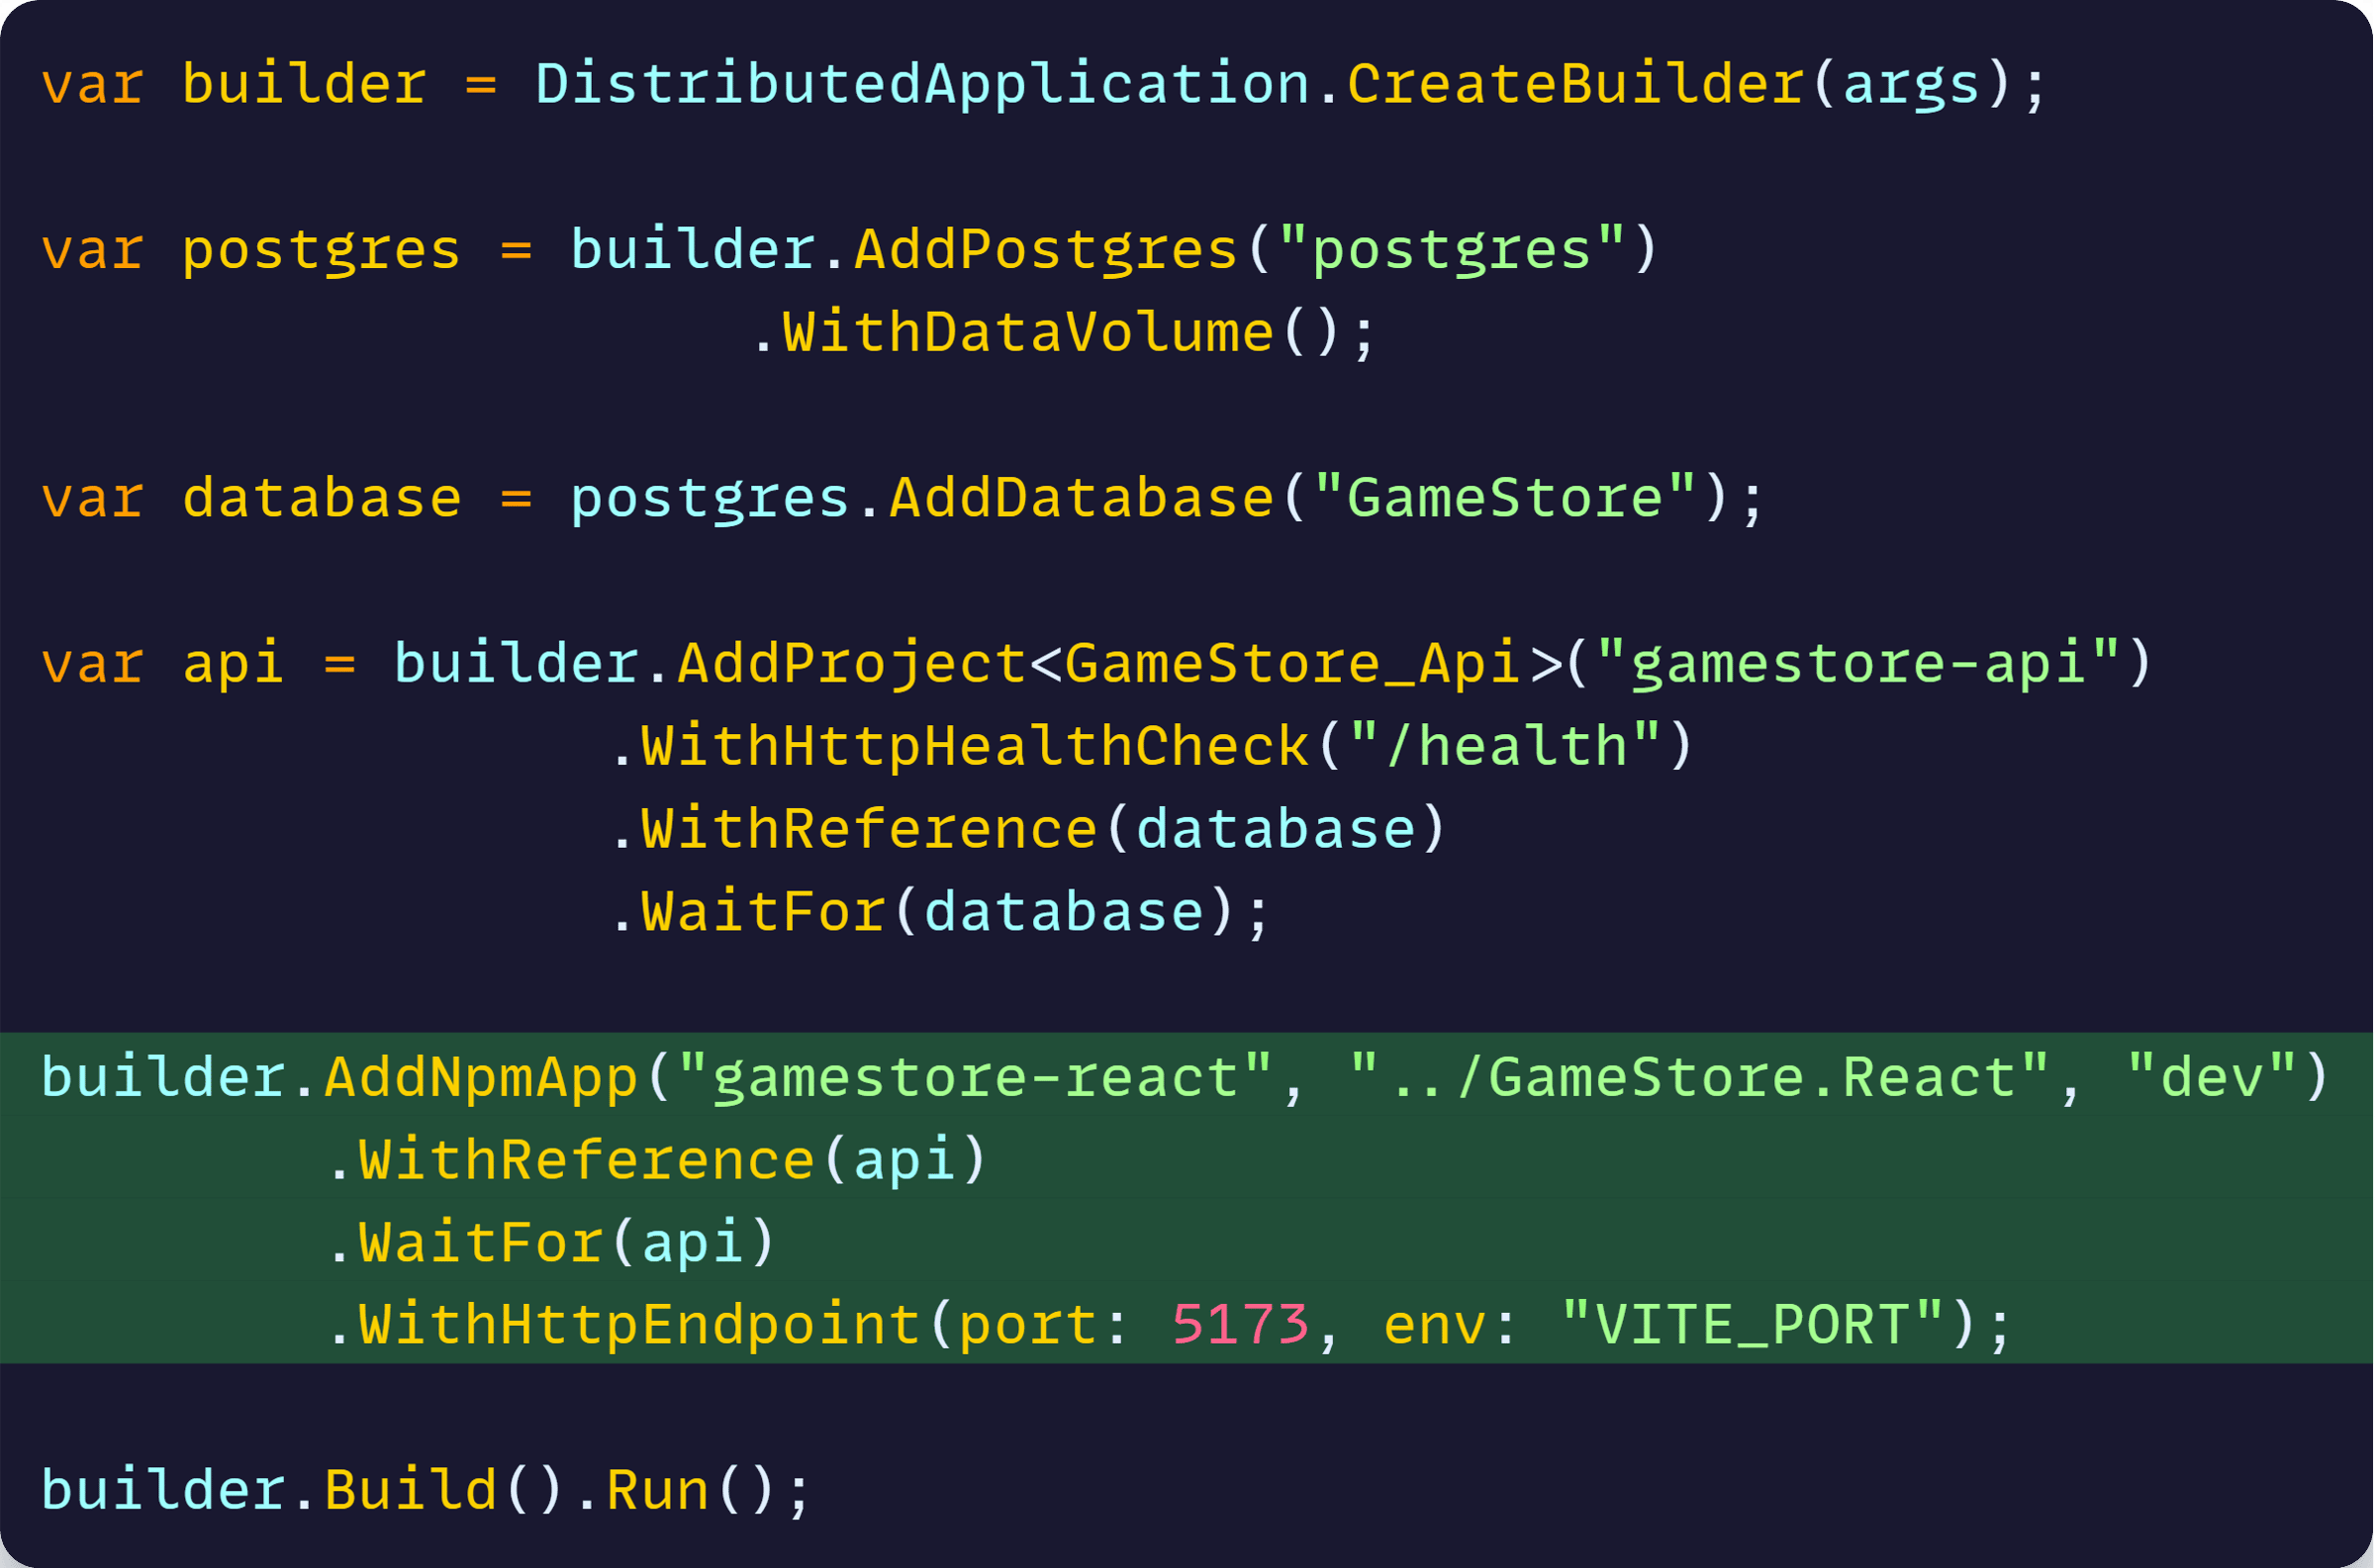
Let’s unwrap what’s going on there:
- We add the React app as a NodeApp resource by pointing to its relative path at ../GameStore.React
- We specify “dev” so that the dev script, from package.json, is used to start the application. The dev script will start Vite as configured in package.json.
- We call WithReference so that service discovery information from the API project can be injected into the React app process (more on this later)
- We call WaitFor so that the React app doesn’t start unless the API has successfully done so.
- We call WithHttpEndpoint so that we enable an HTTP endpoint for the React app in port 5173, and we set that port into the VITE_PORT env var so that Vite understands that’s the port to listen on.
That will take care of starting the React app, along with our API, by just running the Aspire app.
Problem 1 solved.
Next problem.
Adding service discovery
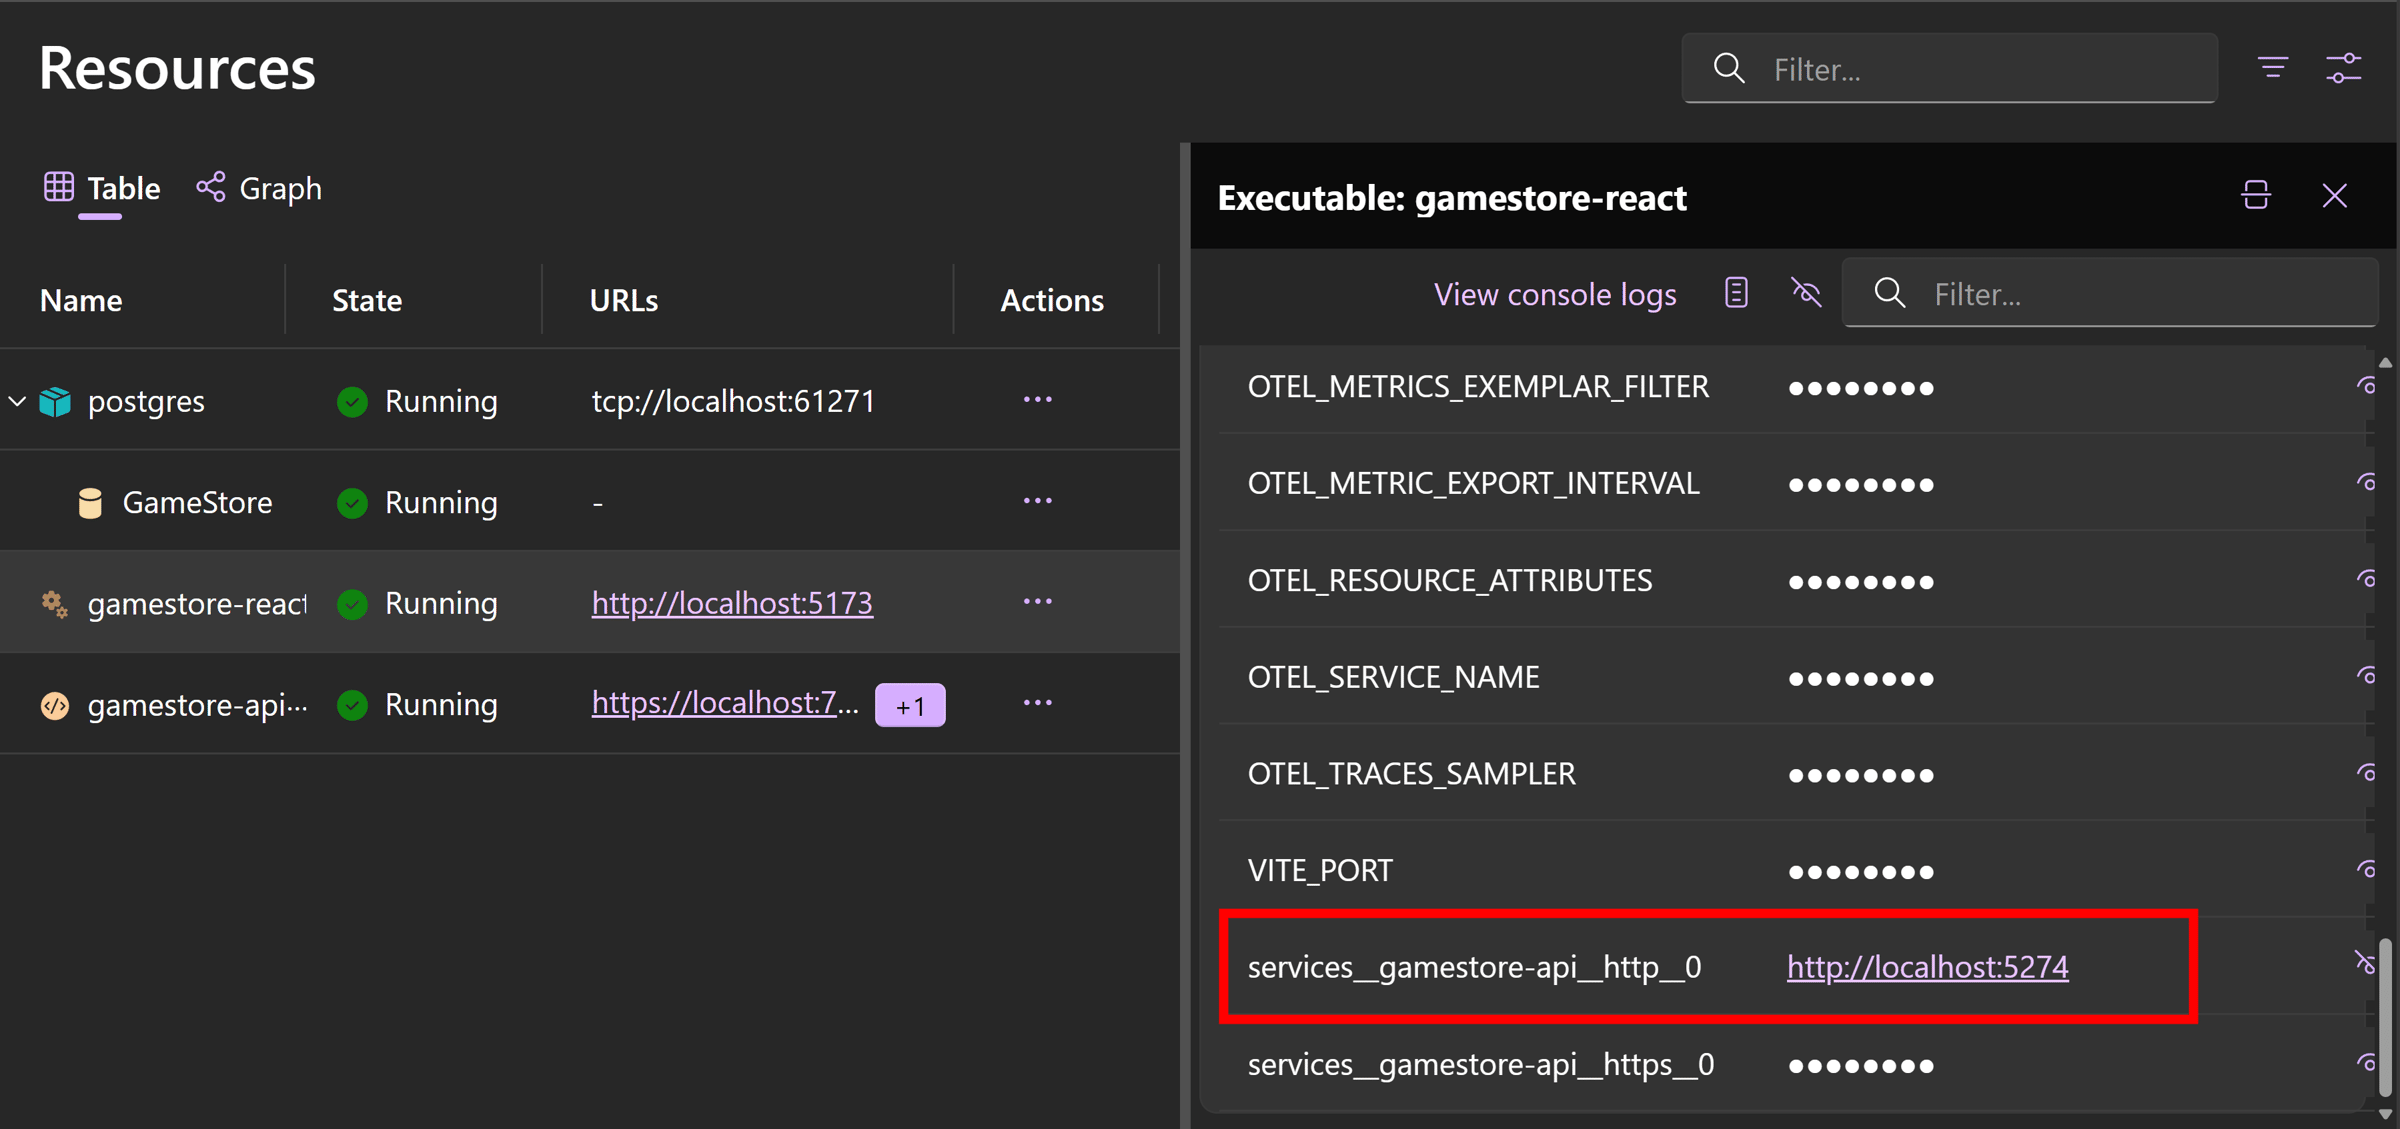
Now that the React app is referencing the API project in our app model, Aspire will enable service discovery between them.
This means that a new environment variable will be injected into the Vite process with whichever address Aspire assigned to our .NET API.
For our API, the env var will look like this:
services__gamestore-api__http__0
We can now take advantage of this, and update our vite.config.ts to read that, instead of keeping hardcoding the API URL:
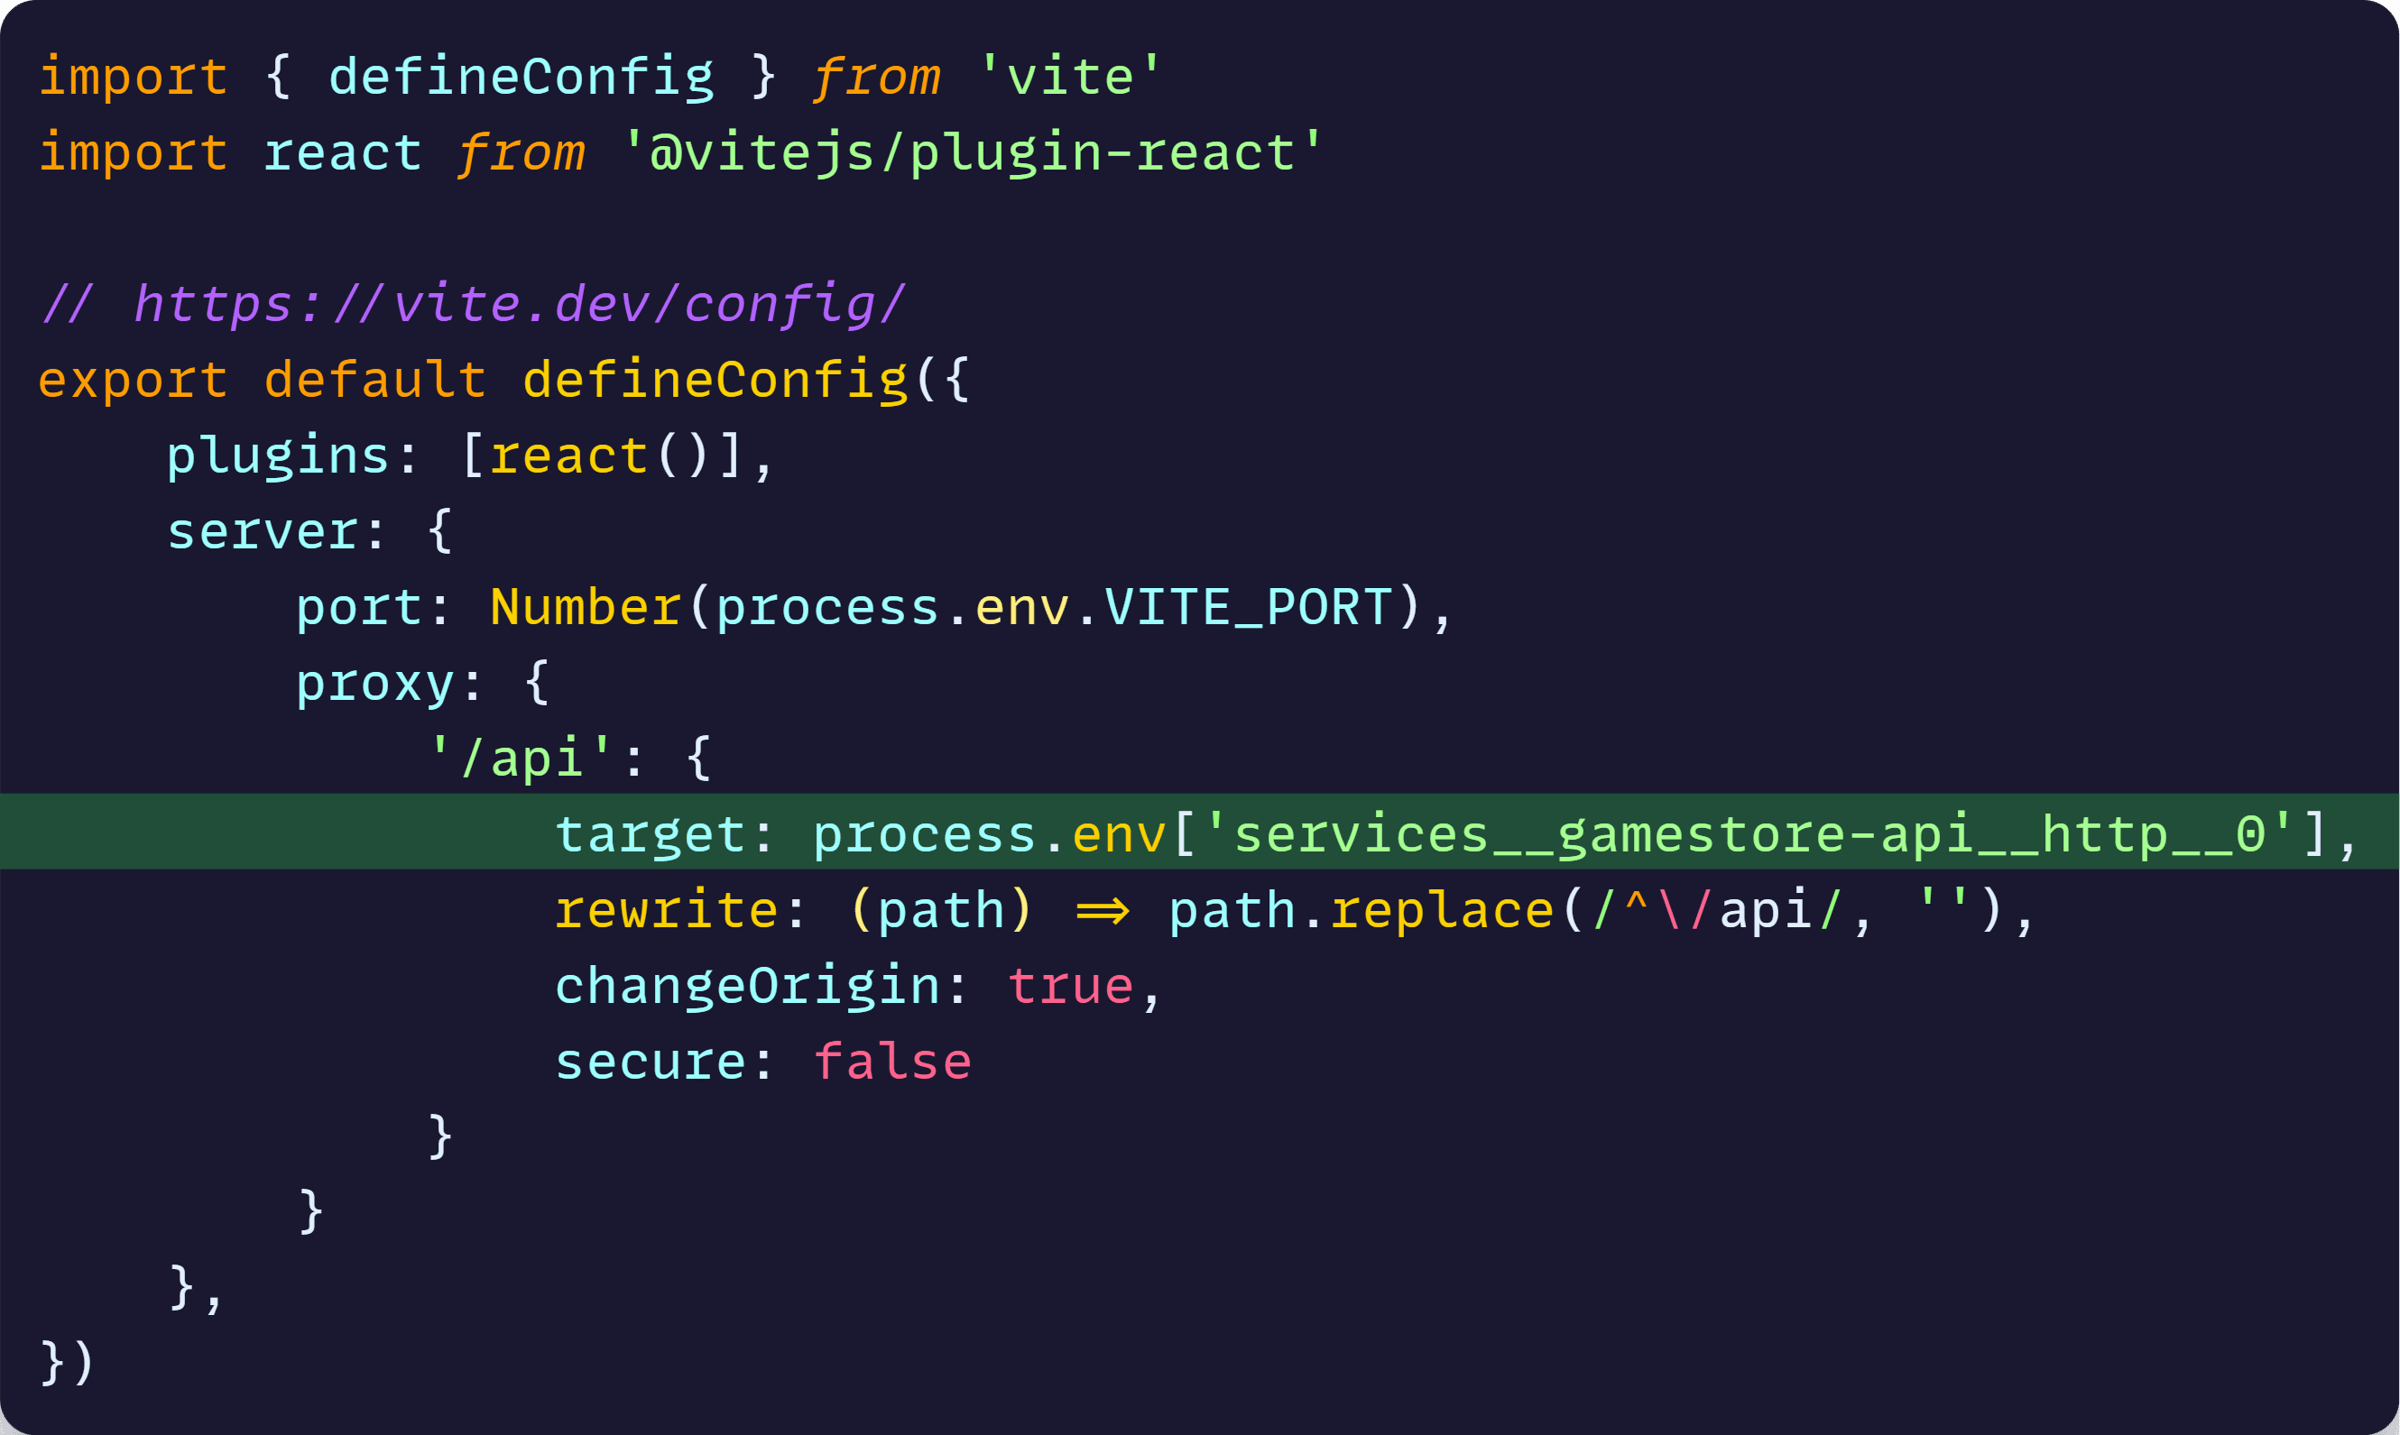
Also, notice that we are explicitly passing the VITE_PORT env var we set in AppHost to the server port here.
Now that we no longer have hardcoded backend URLs there, we are almost good to go, but there’s one more improvement to be made.
Auto-installing NPM packages
Instead of having to install the React app’s NPM packages manually, we can let that be part of the AppHost project build process by just adding a few lines to GameStore.AppHost.csproj:
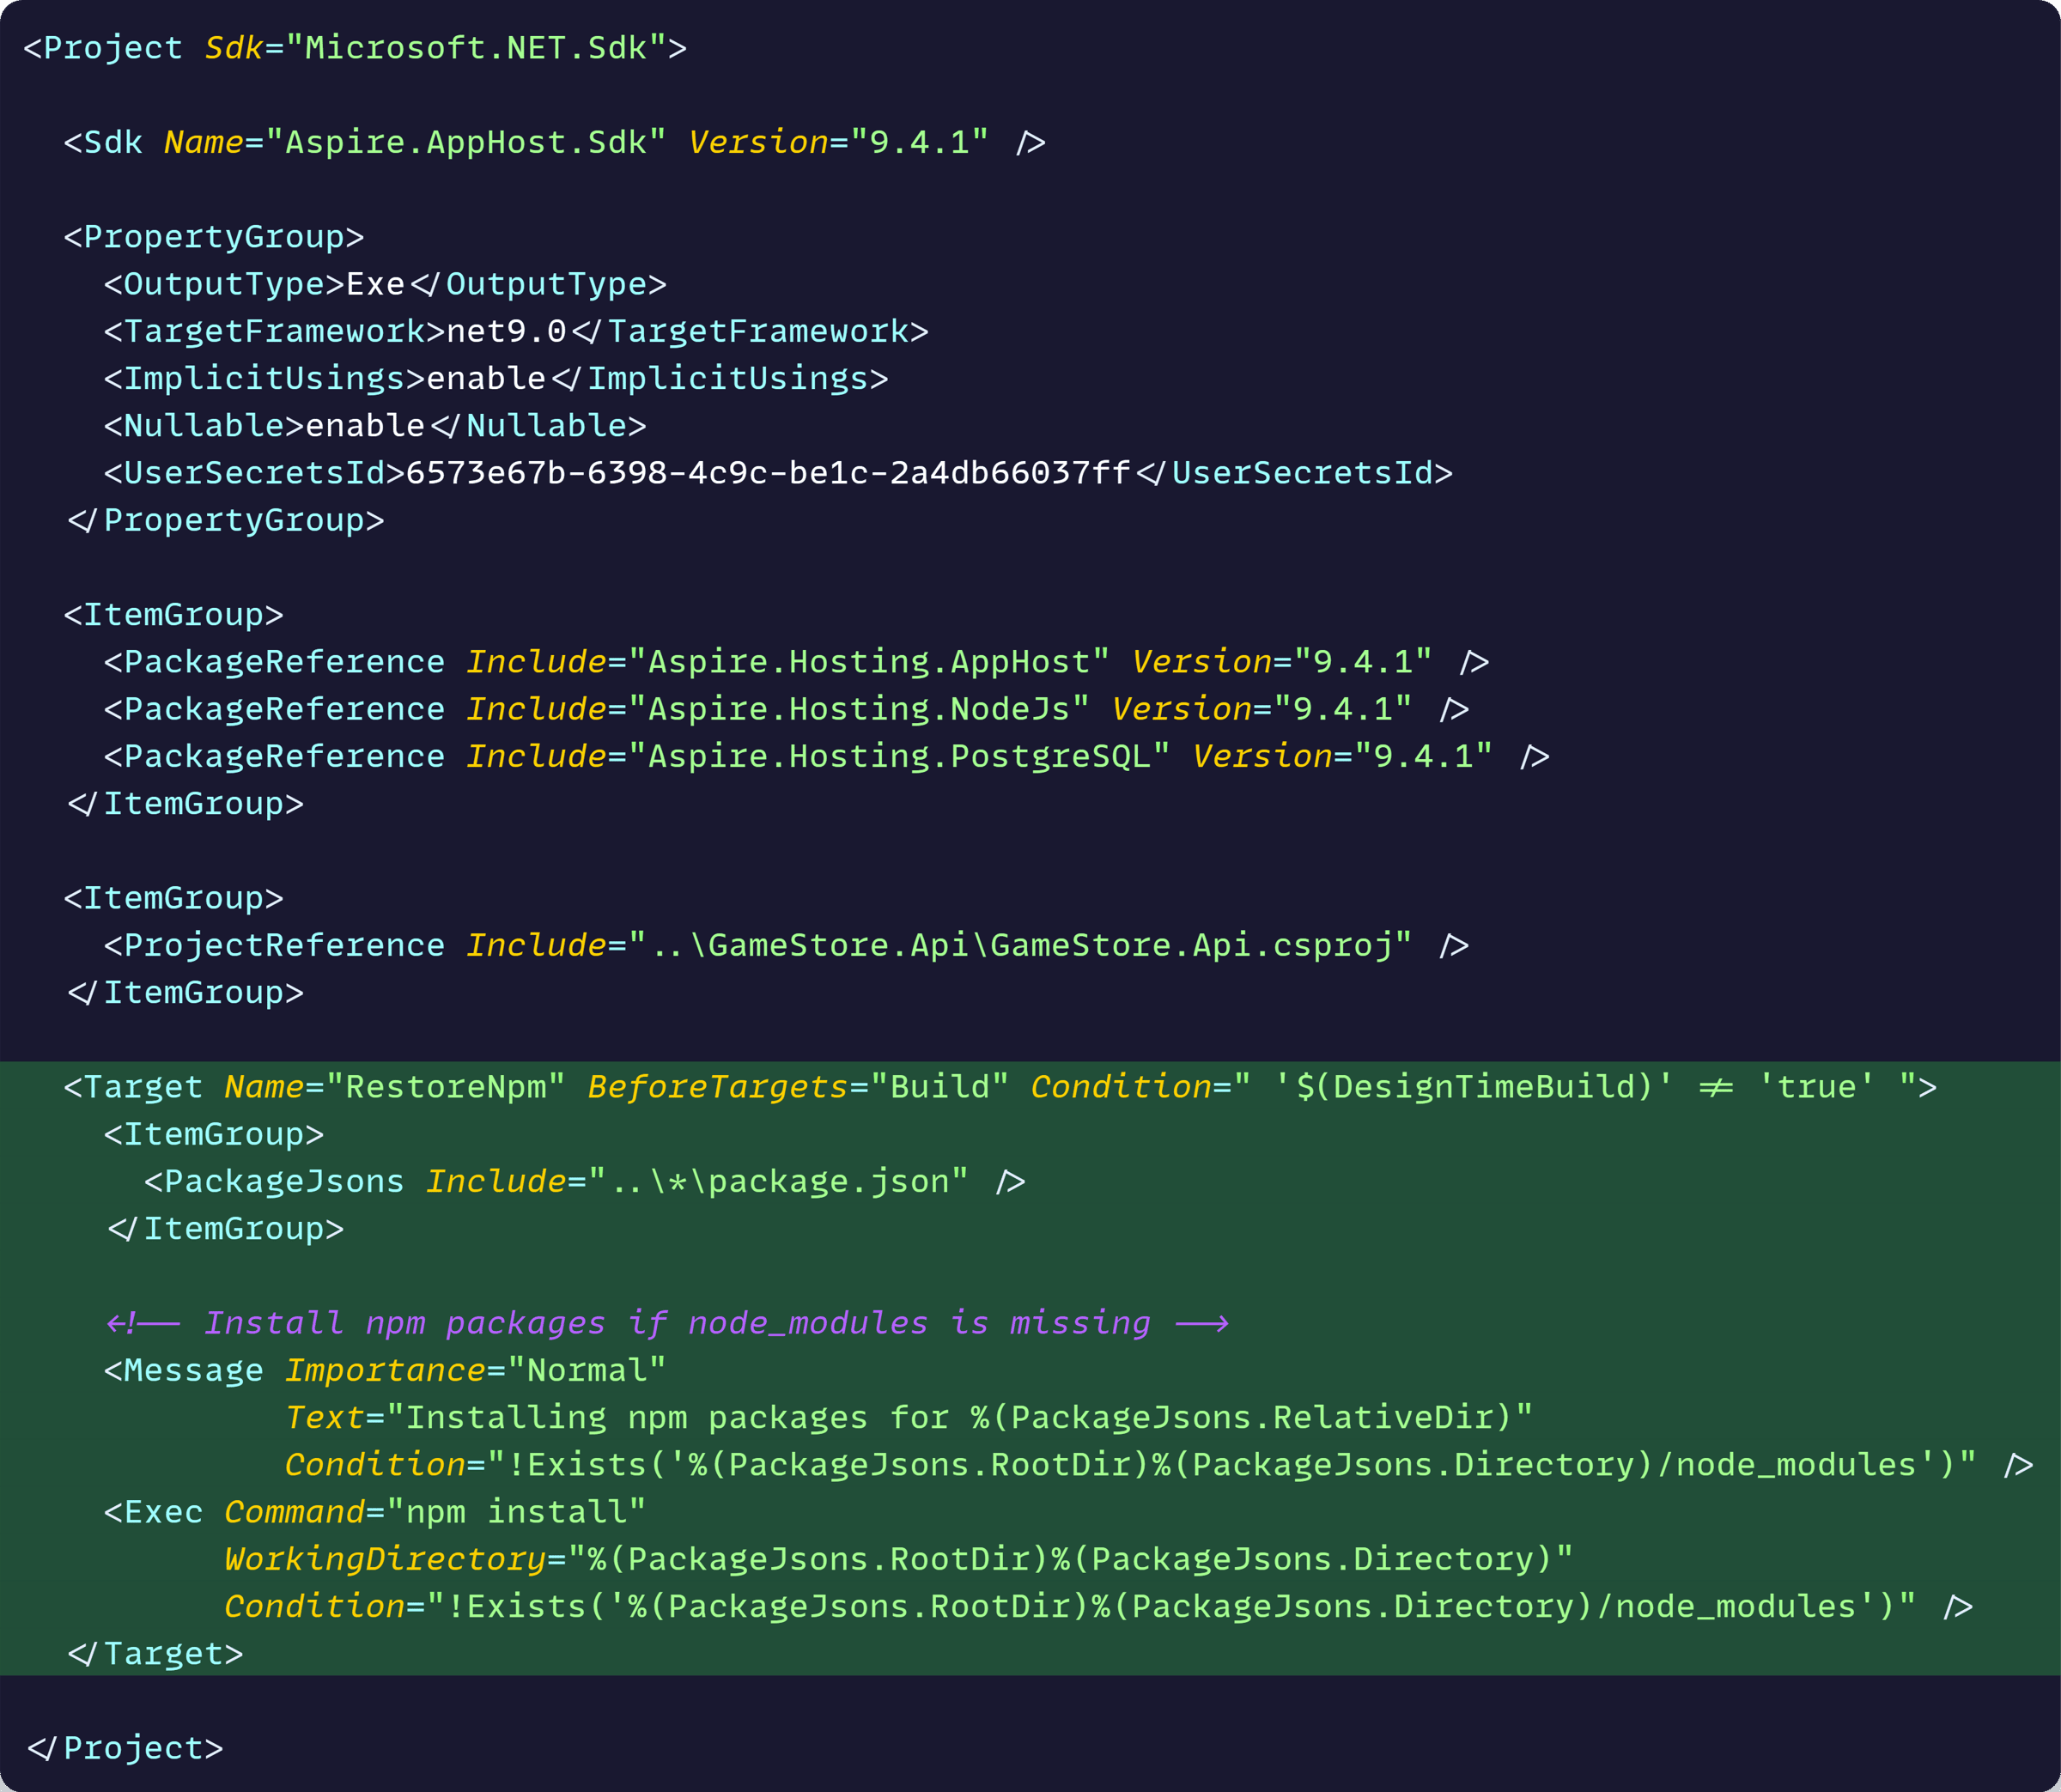
This goes along the lines of the Clone –> F5 mantra of .NET Aspire:
Anyone who clones your repo should be able to immediatelly hit F5 and get a working app without any additional configuration steps.
Now, let’s test this.
Running the Full-Stack app
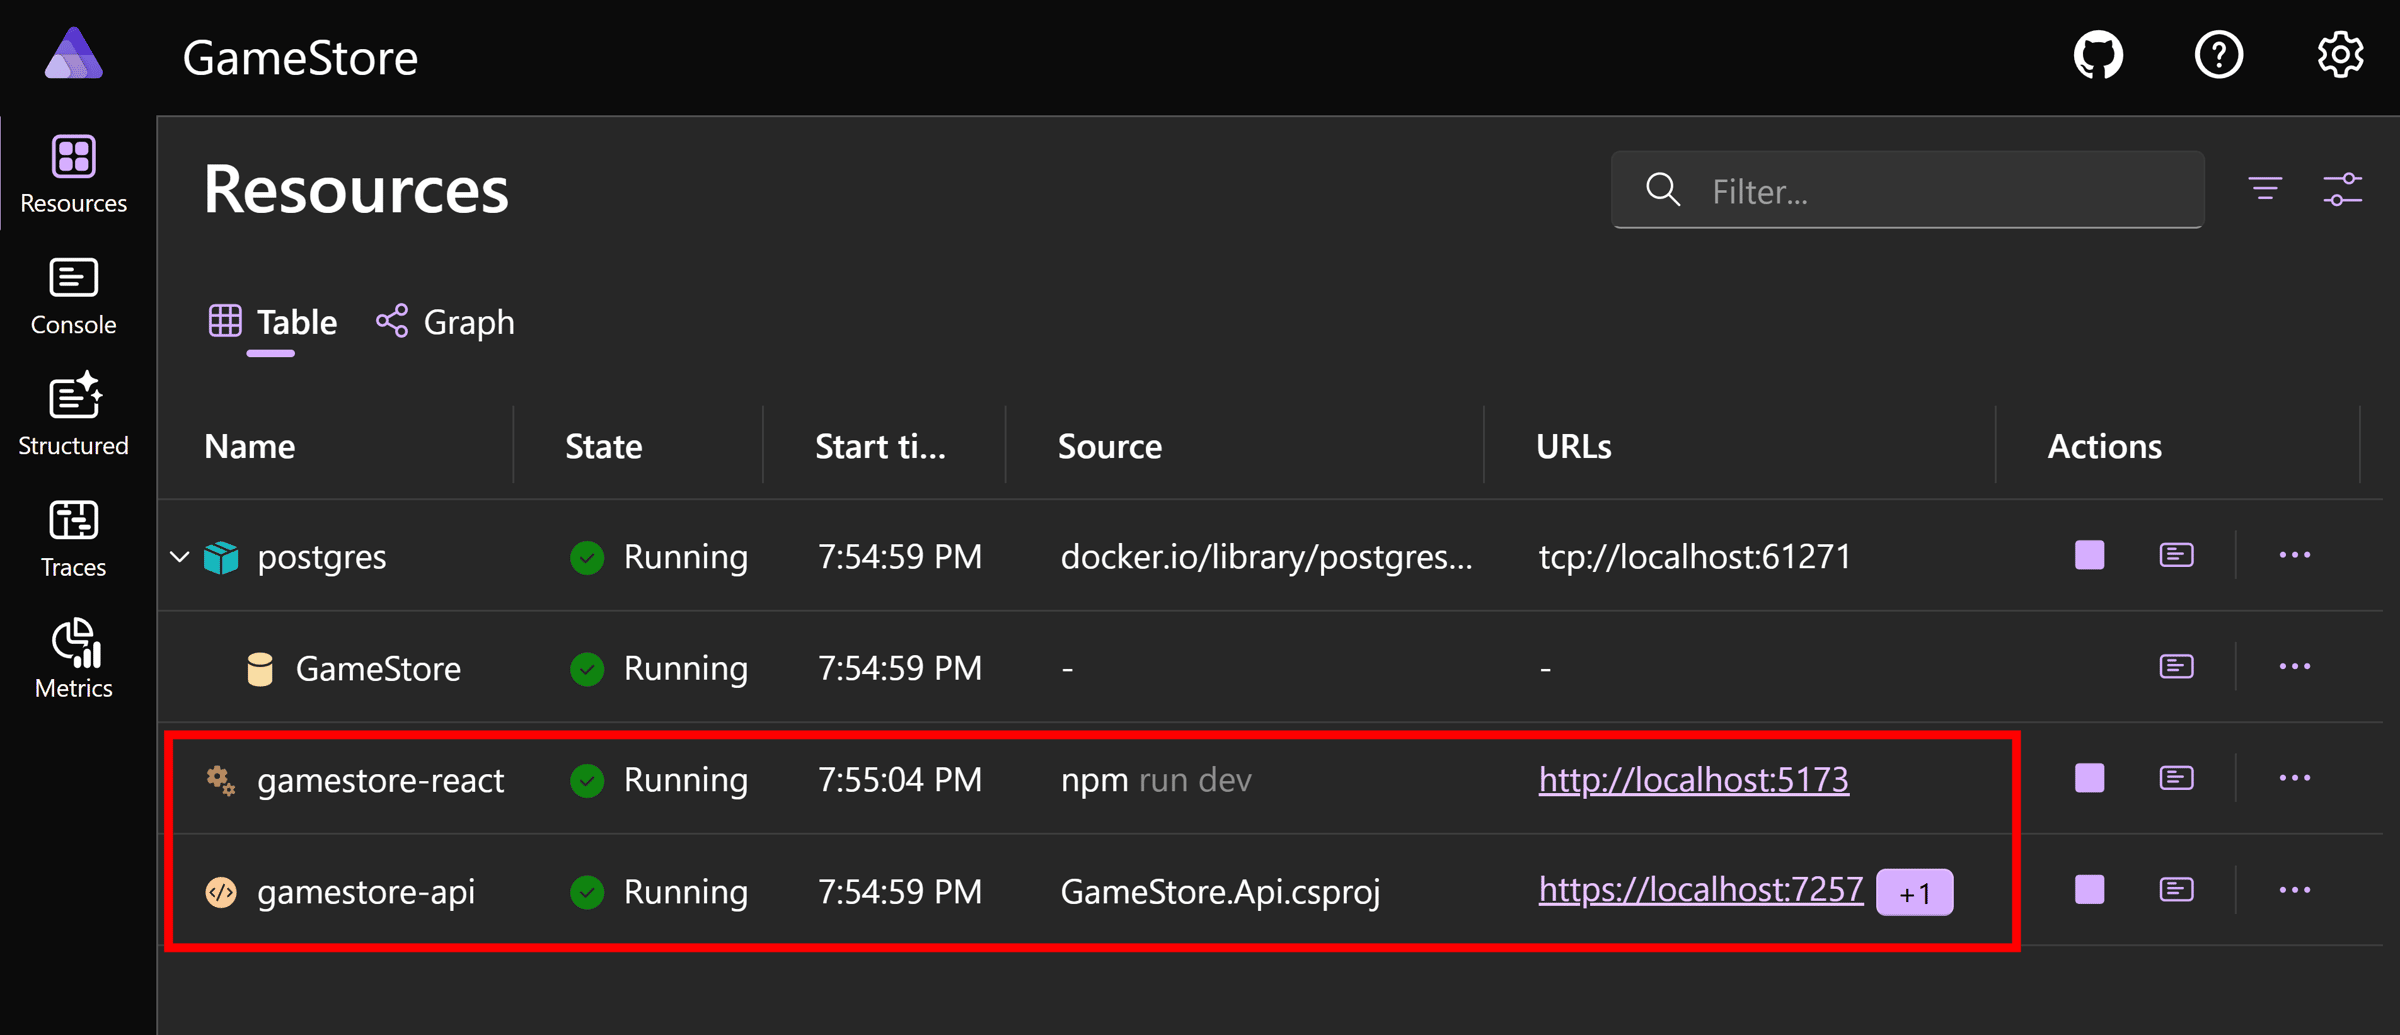
Now we just run the Aspire app via aspire run, and we can browse to the dashboard to see both our API and React apps up and running:
We can confirm that service discovery has injected the correct environment variable into the React app process:
And we can click the React app assigned endpoint to browse to the app, which should have no trouble loading data from the backend:
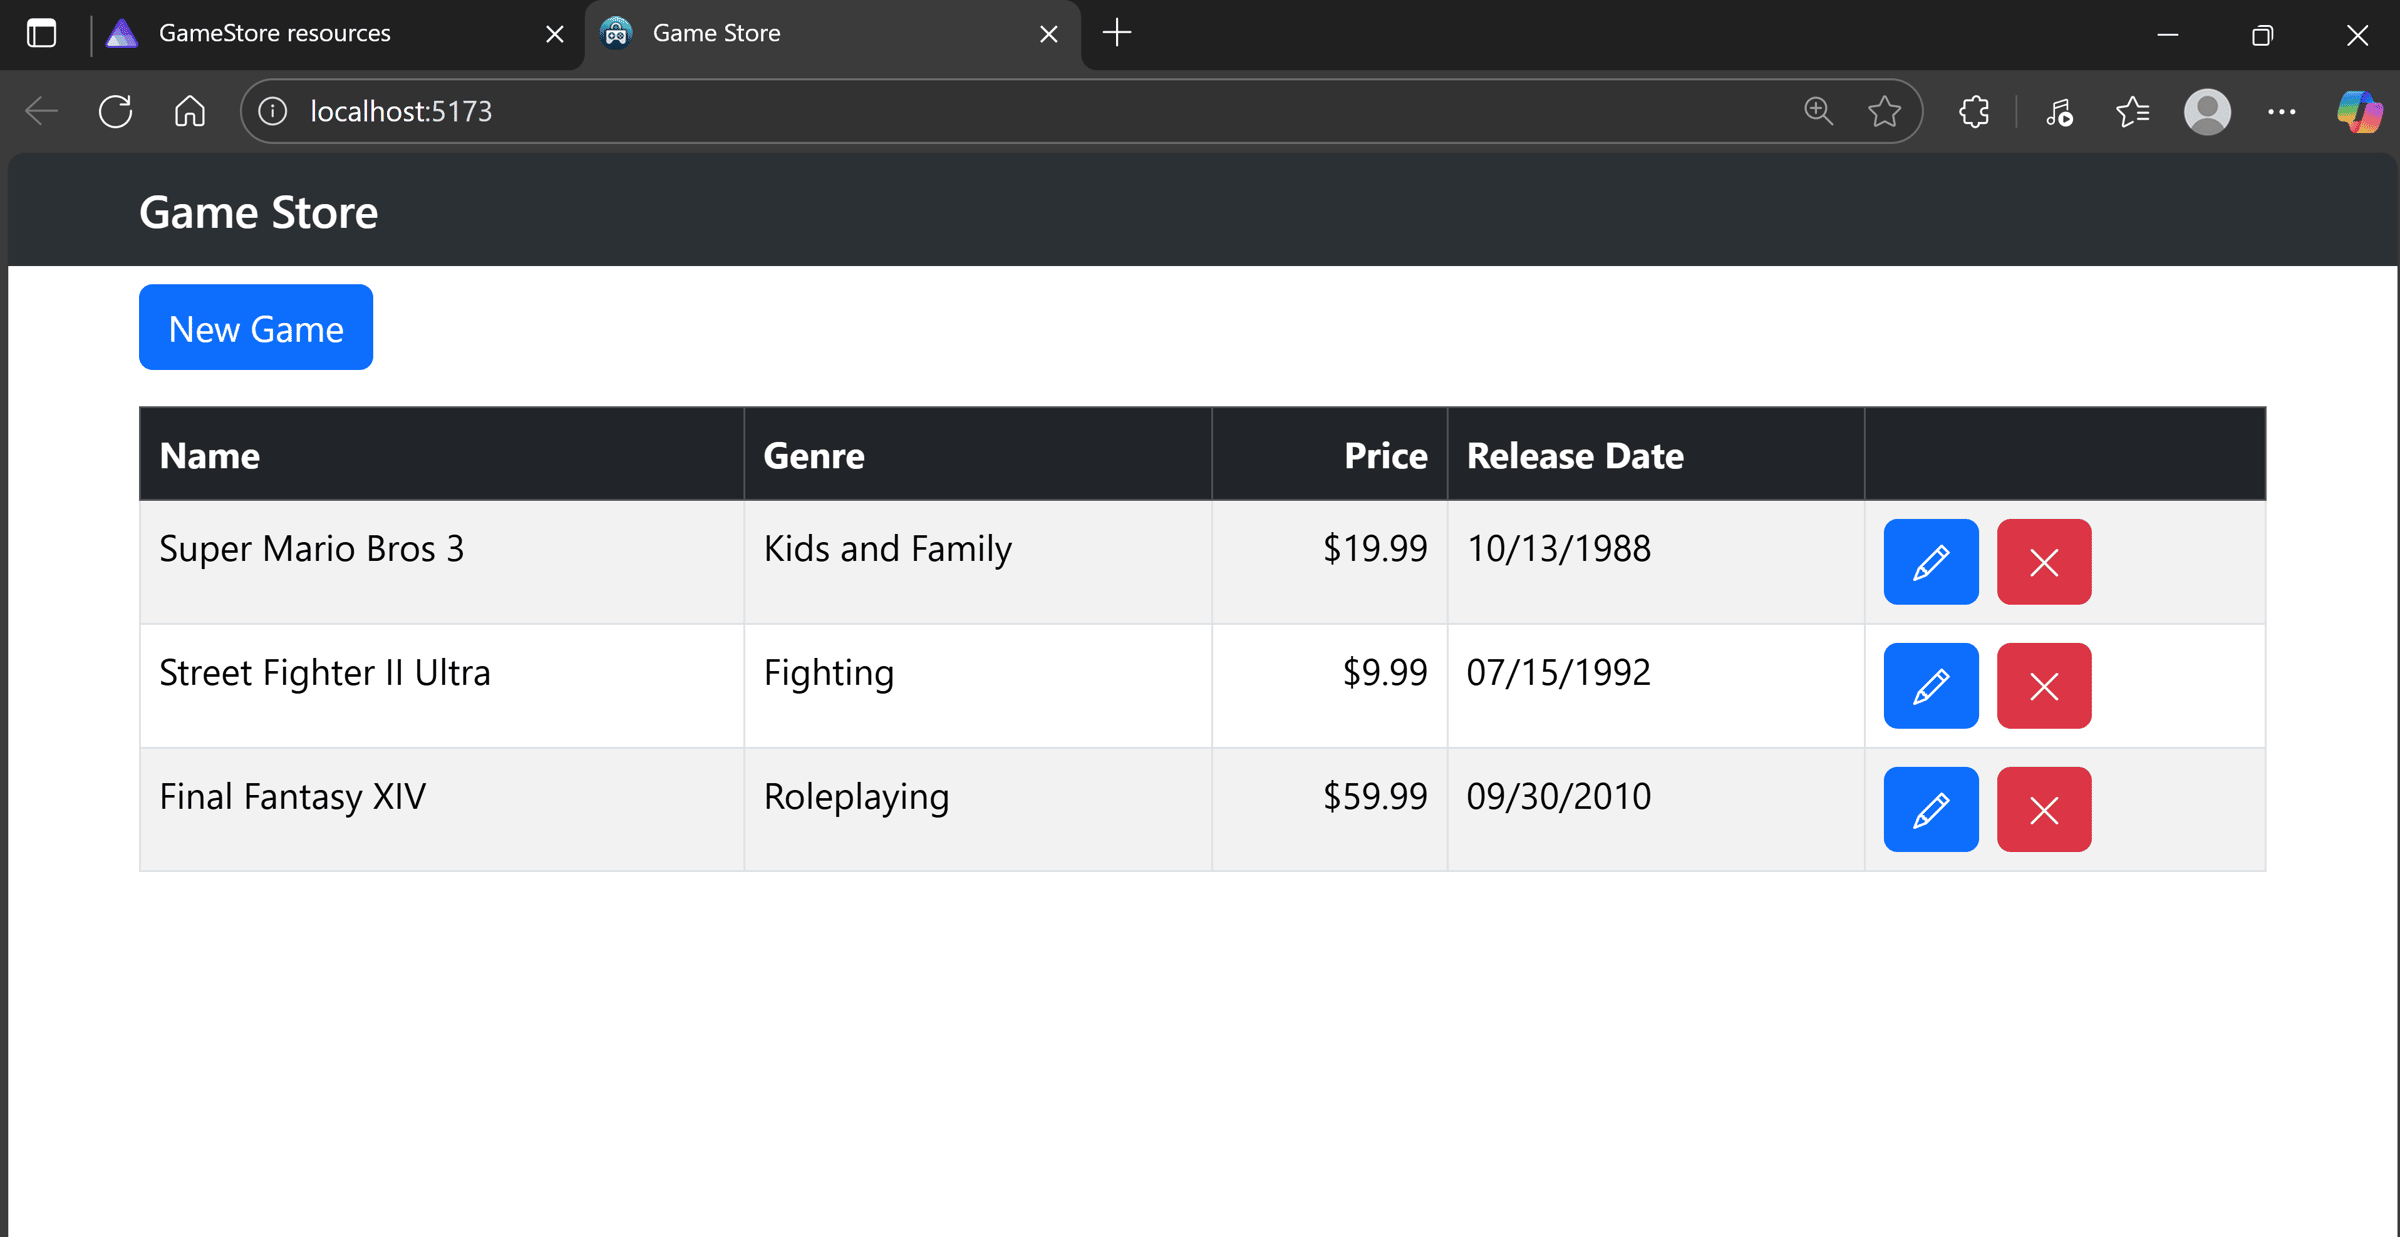
Mission accomplished!
New .NET Aspire YouTube video!
I’m trying to get back to more frequent videos for the YouTube channel, so I decided to start with a crash course for folks completely new to .NET Aspire:
In that video, I take the same .NET API developed in my ASP.NET Core Full Course For Beginners and turn it into a production-ready app powered by .NET Aspire.
Check it out!
Wrapping Up
This is what full-stack development should look like.
No more onboarding nightmares where new developers spend their first day just trying to get everything running.
With .NET Aspire, your React frontend and .NET backend work together as a unified system.
The “clone and F5” experience isn’t just a nice-to-have—it’s essential for productive teams.
When your development environment setup becomes invisible, your team can focus on what actually matters: building features that customers love.
P.S. If you want to see this approach scaled up to a real-world e-commerce system—complete with Keycloak and Entra ID authentication, and production Azure deployment—check out my Containers & Aspire course.
Whenever you’re ready, here’s how I can help:
The .NET Developer Bootcamp: A complete path from ASP.NET Core fundamentals to building, containerizing, and deploying production-ready, cloud-native apps on Azure.
