Read time: 6 minutes
Working with webhooks is not my favorite task, especially when you need extra tooling for your regular dev loop.
This is the case with Stripe webhooks, which work great until you forget to start your Stripe CLI process to listen for events and forward them to your .NET webhook endpoint.
What if your Stripe CLI could start automatically alongside your .NET API as a single coordinated system?
That’s exactly what .NET Aspire makes possible.
Today, I’ll show you how to add the Stripe CLI to your Aspire application model, so your webhook testing becomes as simple as hitting F5.
Let’s dive in.
Implementing a Stripe webhook
A Stripe webhook is an HTTP endpoint in your .NET API that receives POST requests from Stripe whenever important payment events occur, like when a customer makes a purchase or cancels a subscription.
Here’s a simple implementation:
app.MapPost("/payments/stripe-webhook", async (
    HttpContext context,
    IOptions<StripeOptions> options,
    ILoggerFactory loggerFactory) =>
    {
        var logger = loggerFactory.CreateLogger("Payments");

        var jsonBody = await new StreamReader(context.Request.Body)
                                .ReadToEndAsync();
        var signature = context.Request.Headers["Stripe-Signature"];

        var stripeEvent = EventUtility.ConstructEvent(
                                            jsonBody,
                                            signature,
                                            options.Value.EndpointSecret);

        if (stripeEvent.Type == EventTypes.PaymentIntentSucceeded)
        {
            logger.LogInformation("Payment succeeded!");

            // Continue with order fulfillment...
        }

        return Results.Ok();
    });
To handle the webhook call, we read the request body as JSON, deserialize it as a Stripe event, and then continue with some relevant logic depending on the event type.
I won’t get into the webhook logic here, but instead want to focus on how to test it during local development.
After all, the webhook call is initiated by Stripe, usually after a customer makes a purchase in our checkout page, but we don’t want to deploy this to prod and wait for a real purchase to see if it works.
Fortunately, this is what the Stripe CLI is designed for.
Listening to Stripe events locally
You can use the Stripe CLI to perform all sorts of commands that interact with your Stripe account, including listening for webhook events and even triggering those events for testing.
After installing the CLI (there are many options for every OS), you can watch and forward webhook events to your box by using this command:
stripe listen --forward-to http://localhost:5082/payments/stripe-webhook
> Ready! You are using Stripe API Version [2025-07-30.basil]. Your webhook signing secret is
    whsec_5d68702f31cffdcbe70df90eb1ae3151c9103d9b24170f4681a3f04892afefb9 (^C to quit)
Since I have my local server running in localhost:5082 and my endpoint is defined in the /payments/stripe-webhook path, all Stripe events should be routed there.
But how do you trigger the event? Just one more Stripe CLI command:
stripe trigger payment_intent.succeeded
And we can confirm the event was received by our .NET API by looking at its logs:
info: Microsoft.Hosting.Lifetime[14]
      Now listening on: http://localhost:5082
info: Microsoft.Hosting.Lifetime[0]
      Application started. Press Ctrl+C to shut down.
info: Microsoft.Hosting.Lifetime[0]
      Hosting environment: Development
info: Microsoft.Hosting.Lifetime[0]
      Content root path: D:\projects\newsletter-9-06-25\src\GameStore.Api
info: Payments[0]
      Payment succeeded!
Great, that’s working.
However, it bothers me that I have to run the stripe listen CLI command, along with my .NET API, every time I want to test my webhooks.
Let’s improve this with .NET Aspire.
Adding the Stripe CLI to Aspire’s app model
Instead of treating my .NET API and the Stripe CLI as completely separate processes, you can easily make them both part of the same application model with .NET Aspire.
Here’s how my initial AppHost.cs file looked just to run my API with the relevant secrets required to integrate with Stripe services (if you are new to .NET Aspire, check my beginner tutorial here):
var builder = DistributedApplication.CreateBuilder(args);

var stripeApiKey = builder.AddParameter("StripeApiKey", secret: true);
var stripePublishableKey = builder.AddParameter("StripePublishableKey", secret: true);
var stripeEndpointSecret = builder.AddParameter("StripeEndpointSecret", secret: true);

var api = builder.AddProject<GameStore_Api>("gamestore-api");

api.WithEnvironment("Stripe__SecretKey", stripeApiKey)
    .WithEnvironment("Stripe__PublishableKey", stripePublishableKey)
    .WithEnvironment("Stripe__EndpointSecret", stripeEndpointSecret);

builder.Build().Run();
Since there’s already a container image available to run the Stripe CLI via Docker, we can easily introduce the CLI to the app model with a couple of lines:
var builder = DistributedApplication.CreateBuilder(args);

var stripeApiKey = builder.AddParameter("StripeApiKey", secret: true);
var stripePublishableKey = builder.AddParameter("StripePublishableKey", secret: true);
var stripeEndpointSecret = builder.AddParameter("StripeEndpointSecret", secret: true);

var api = builder.AddProject<GameStore_Api>("gamestore-api");

var stripeCli = builder.AddContainer("stripeCli", "stripe/stripe-cli")
                       .WithEnvironment("STRIPE_API_KEY", stripeApiKey);

api.WithEnvironment("Stripe__SecretKey", stripeApiKey)
    .WithEnvironment("Stripe__PublishableKey", stripePublishableKey)
    .WithEnvironment("Stripe__EndpointSecret", stripeEndpointSecret);

builder.Build().Run();
However, that’s not enough, since we also need to tell the CLI how to listen to and forward events to our API, as we did in the command line before.
To enable that, we can create a reference expression to capture the exact endpoint assigned to our API by .NET Aspire and then pass it as the –forward-to argument to the Stripe CLI container:
var builder = DistributedApplication.CreateBuilder(args);

var stripeApiKey = builder.AddParameter("StripeApiKey", secret: true);
var stripePublishableKey = builder.AddParameter("StripePublishableKey", secret: true);
var stripeEndpointSecret = builder.AddParameter("StripeEndpointSecret", secret: true);

var api = builder.AddProject<GameStore_Api>("gamestore-api");

var forwardExpr = ReferenceExpression.Create(
                    $"{api.GetEndpoint("http")}/payments/stripe-webhook");

var stripeCli = builder.AddContainer("stripeCli", "stripe/stripe-cli")
                       .WithEnvironment("STRIPE_API_KEY", stripeApiKey)
                       .WithArgs("listen", "--forward-to", forwardExpr);

api.WithEnvironment("Stripe__SecretKey", stripeApiKey)
    .WithEnvironment("Stripe__PublishableKey", stripePublishableKey)
    .WithEnvironment("Stripe__EndpointSecret", stripeEndpointSecret);

builder.Build().Run();
Remember that it is essential to use a reference expression here so that the final full URL is resolved only after .NET Aspire assigns the endpoint at runtime.
Now, let’s try it out.
Trying out the improved dev loop
Now, let’s start our Aspire AppHost and confirm the Stripe CLI is listed as one of our resources:
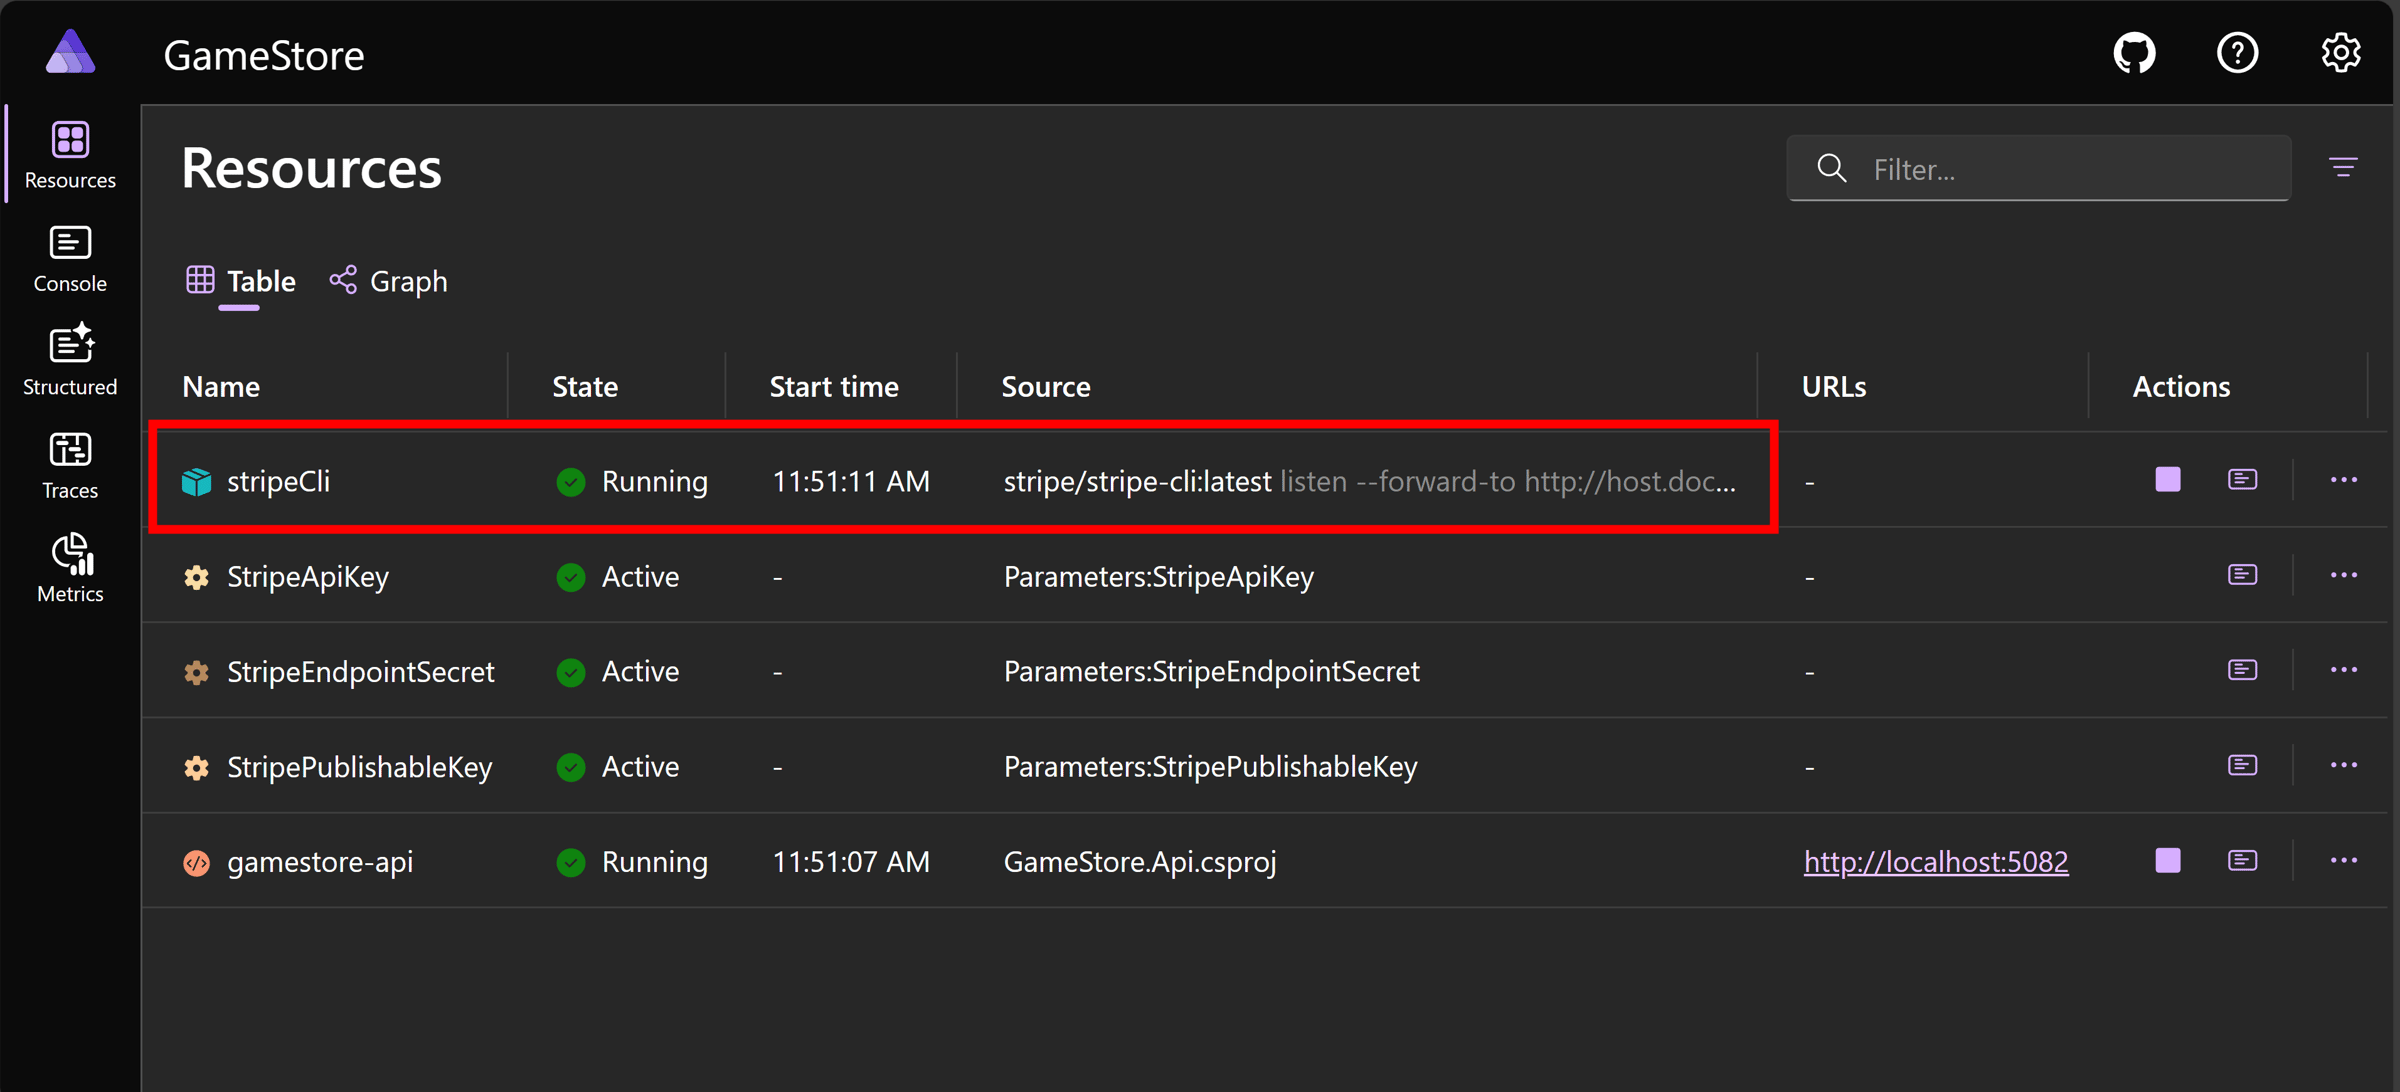
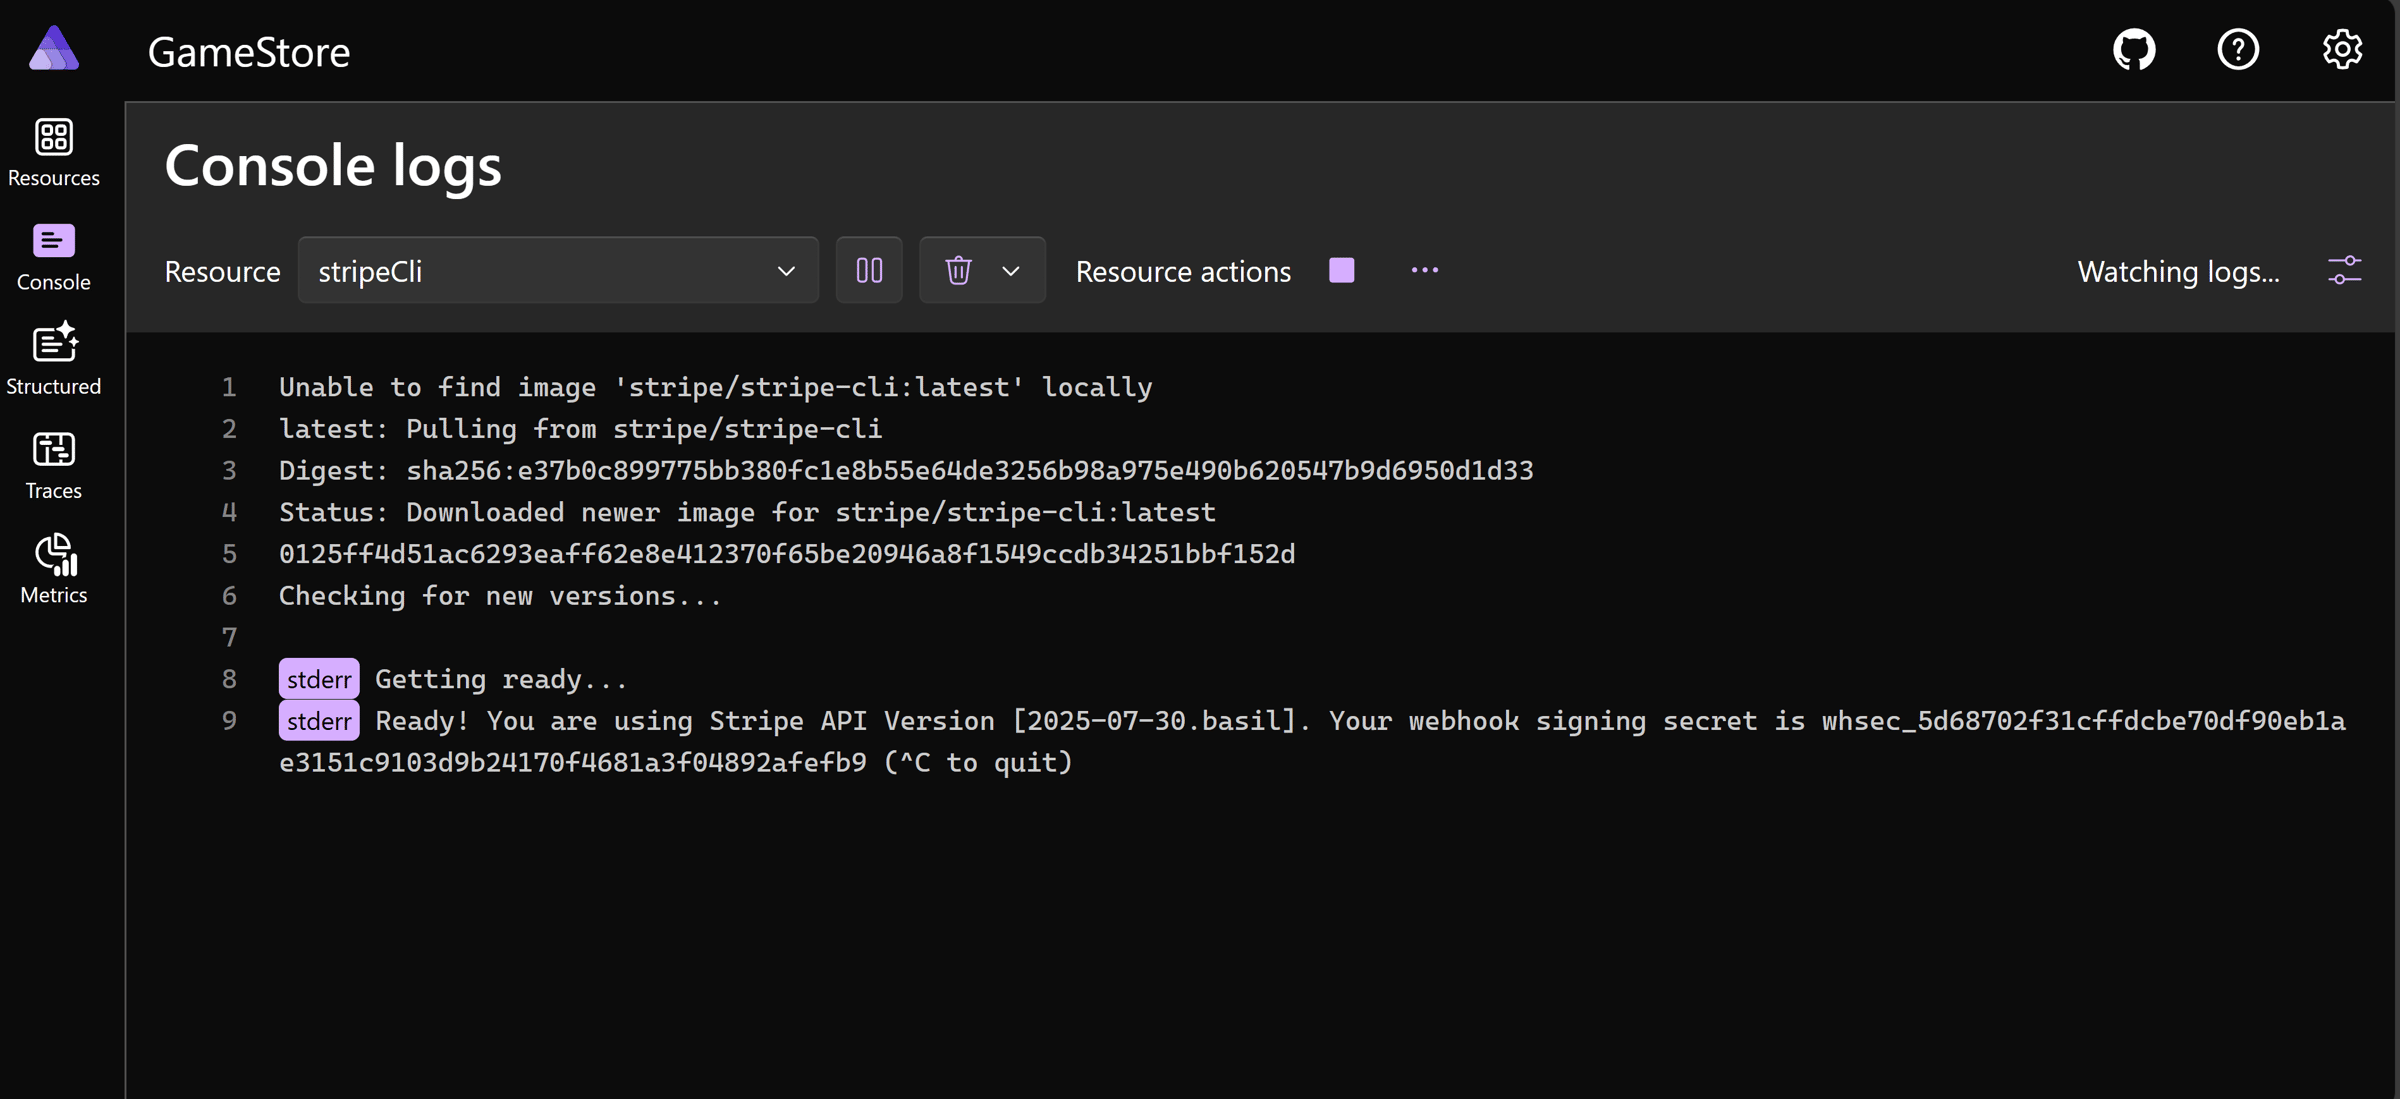
Let’s look at the CLI container logs to confirm it started successfully:
And, finally, let’s trigger a payment_intent.succeeded event (still from the VS Code terminal), and confirm our webhook was able to receive it:
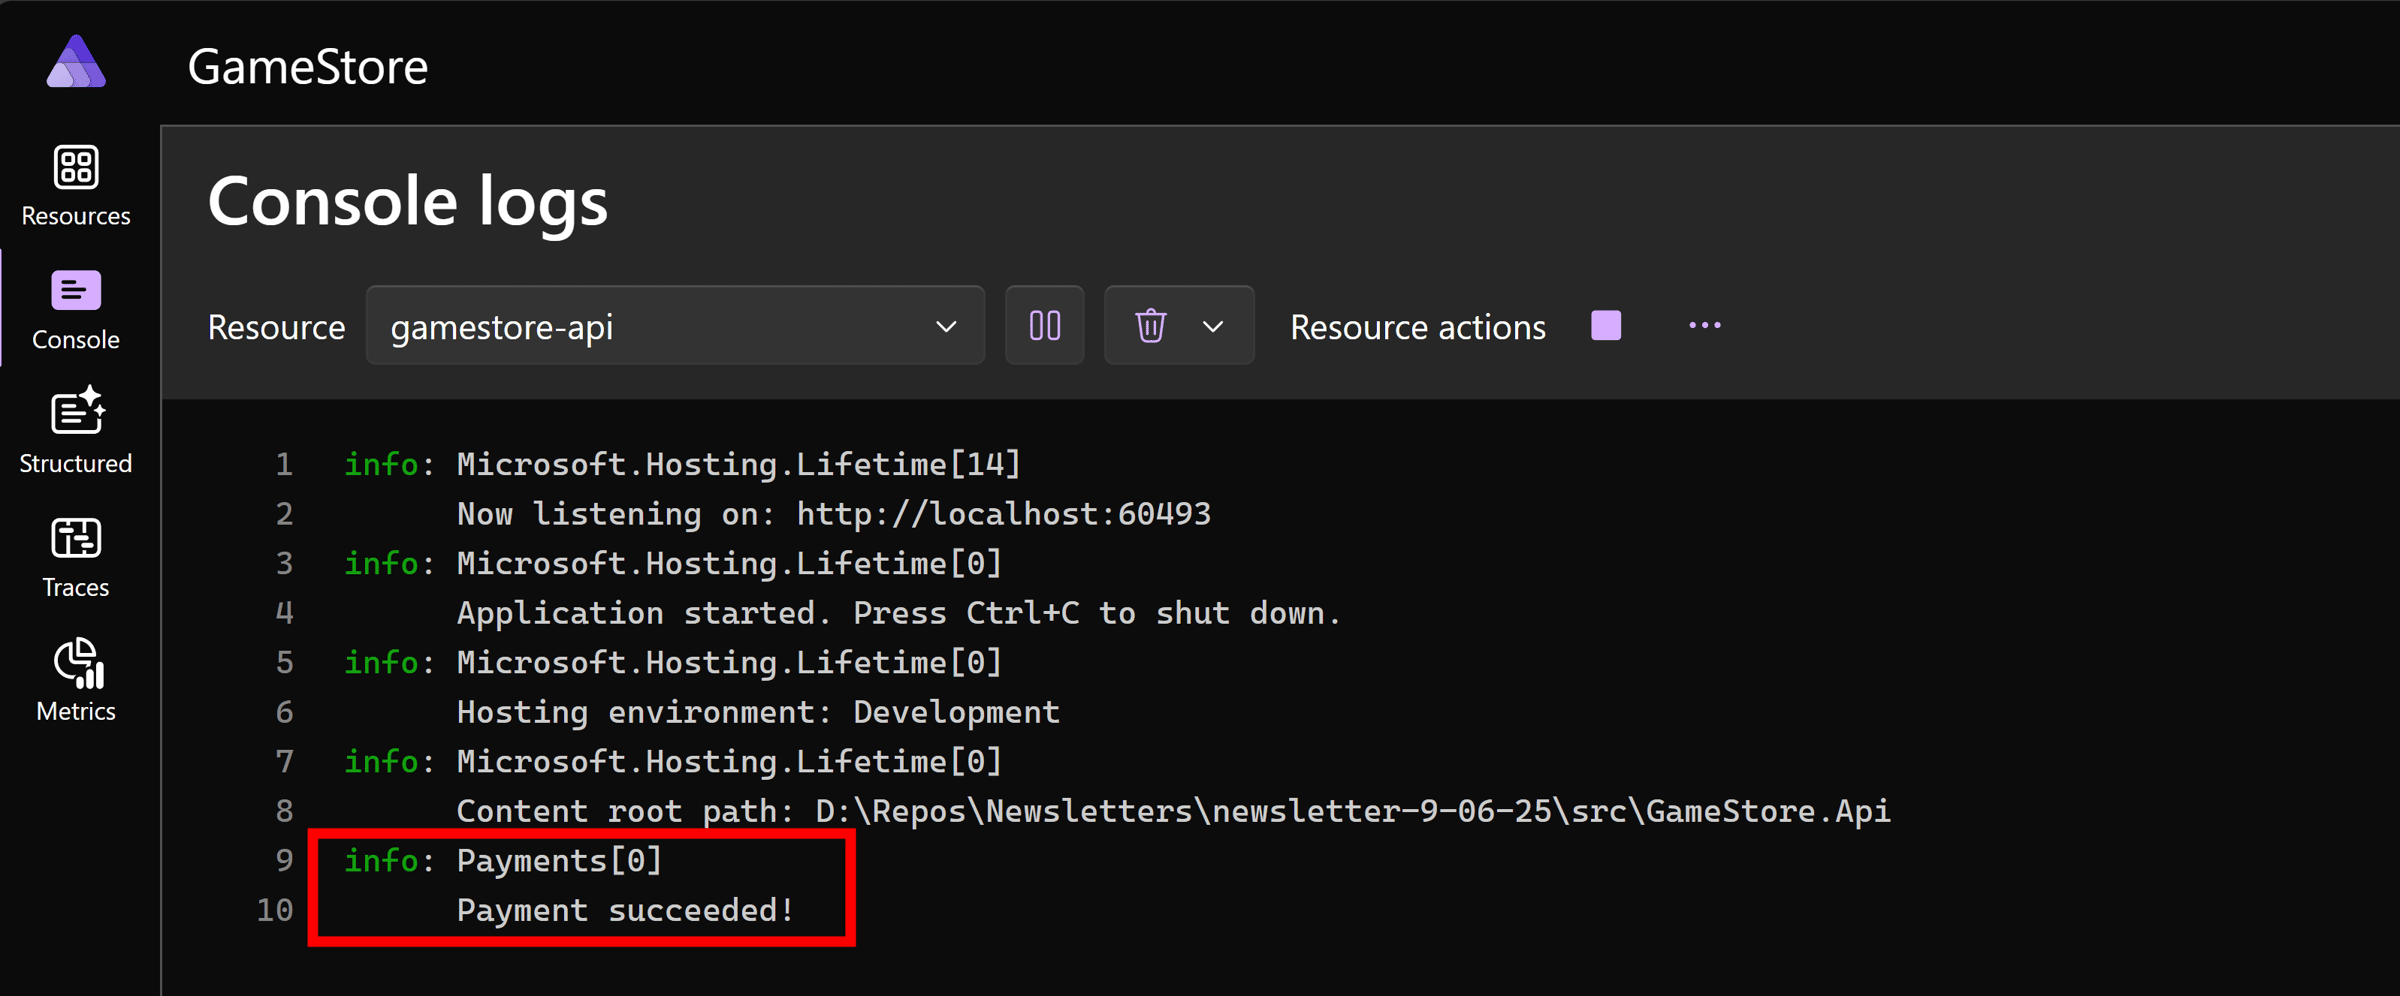
The Big Win: from now on, all we do is run the Aspire application, and our API is ready to listen for Stripe events. No need for extra stripe listen calls to complete the setup.
Mission accomplished!
Wrapping Up
Development environments shouldn’t require a checklist. Nobody has time for that.
Instead of dealing with dev environment setup every day, just hit F5, everything starts together, and you are ready to work on your webhook logic, which is what really matters.
A small dev improvement that will pay off over and over again, not just for you but for your entire team.
And that’s it for today.
See you next Saturday.
Whenever you’re ready, here’s how I can help:
The .NET Developer Bootcamp: A complete path from ASP.NET Core fundamentals to building, containerizing, and deploying production-ready, cloud-native apps on Azure.
