Read time: 11 minutes
The .NET Saturday is brought to you by:
In a previous newsletter, I showed you how to test your Stripe webhooks by introducing the Stripe CLI into your Aspire application model.
But what if you wanted to test scenarios that require having Stripe, Twilio, GitHub, or any other external service, talk directly to your local webhook from the public Internet with no CLI in the middle?
Aspire already orchestrates your databases, queues, and services. What if it could also handle exposing your local endpoints to the internet?
That’s exactly what Dev Tunnels does, and Aspire has native support for this.
Today, I’ll show you how to add Dev Tunnels to your Aspire application model, so testing webhooks becomes as simple as hitting F5.
Let’s dive in.
What is a dev tunnel?
A dev tunnel is a way to expose your local development server to the internet without deploying anything.
Your machine opens a connection to a cloud server, and when someone visits your public URL, their request gets serialized and forwarded through that connection to your localhost.
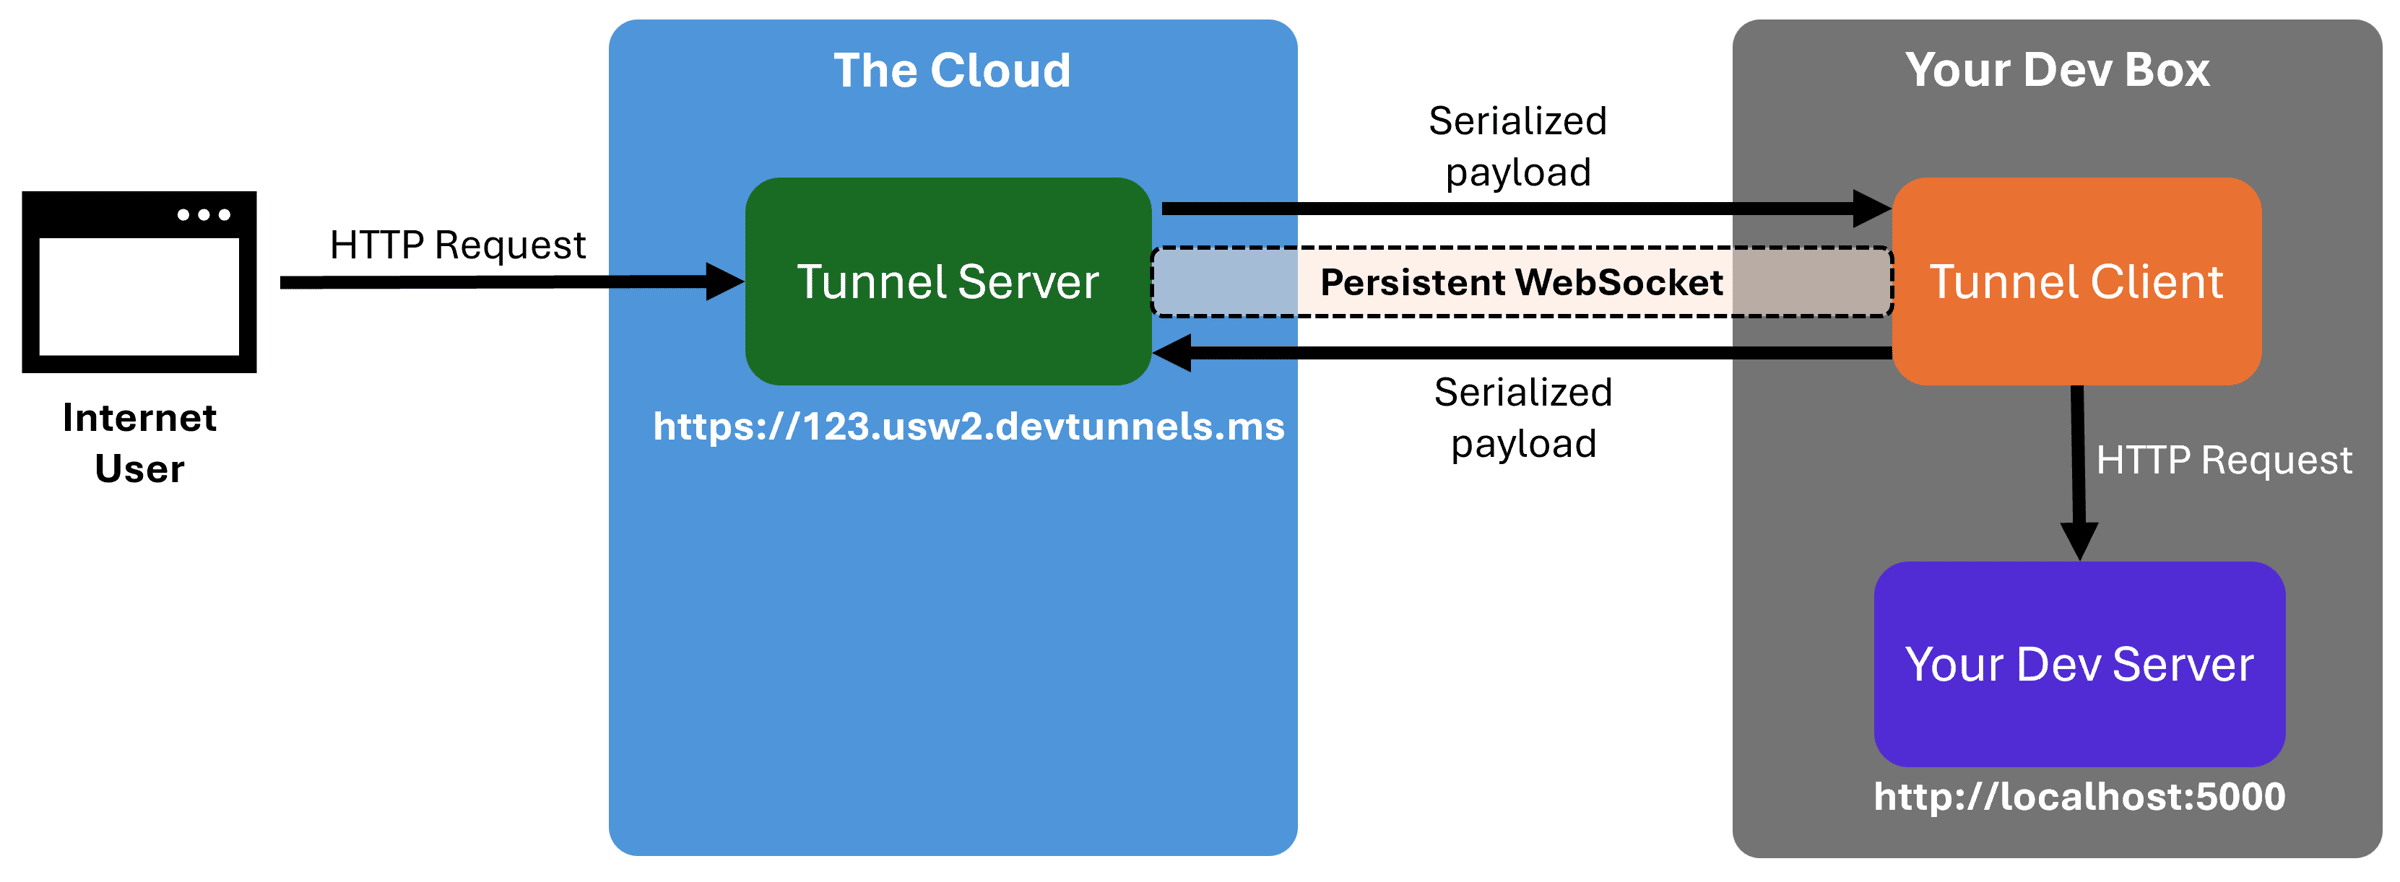
It’s basically reverse networking. Instead of the internet trying to reach you (which your firewall blocks), you reach out first and keep a pipe open for traffic to flow through.
Super convenient for demos, webhook testing, and checking your work on mobile, but anyone with the URL can access your local machine, so treat those links like passwords.
Now, let’s see a practical use case of this cool tech.
An idempotent Stripe webhook
Here’s our Stripe webhook, which is ready to receive calls from the Stripe service when payment-related events occur (like when a customer pays for an order with their credit card):
app.MapPost("stripe-webhook", async (
    HttpContext context,
    IOptions<StripeOptions> options,
    ILoggerFactory loggerFactory,
    PaymentService paymentService) =>
    {
        var logger = loggerFactory.CreateLogger("Payments");

        var jsonBody = await new StreamReader(context.Request.Body)
                                        .ReadToEndAsync();
        var signature = context.Request.Headers["Stripe-Signature"];

        var stripeEvent = EventUtility.ConstructEvent(
                                            jsonBody,
                                            signature,
                                            options.Value.EndpointSecret);

        if (stripeEvent.Type == EventTypes.PaymentIntentSucceeded)
        {
            var paymentIntent = stripeEvent.Data.Object as PaymentIntent;

            logger.LogInformation("Payment succeeded for payment {PaymentId}",
                                        paymentIntent!.Id);

            // Should not process same payment multiple times
            paymentService.ProcessPayment(paymentIntent!.Id);
        }

        return Results.Ok();
    });
After deserializing the event and confirming the event type, we call the ProcessPayment method in our custom Payment Service with our payment ID.
What exactly ProcessPayment does is not very relevant. What matters is that the call should be idempotent (more on idempotency here), meaning that it should not process the same payment multiple times.
Stripe will retry calling our webhook if, for any reason, we don’t return a successful response, so multiple calls to ProcessPayment for the same payment are a real possibility.
But how do we verify our webhook is ready for those retries, ideally in our local dev box, when only Stripe can invoke it?
Installing the dev tunnels CLI
To be fair, you can listen for events and forward them to your local webhook using the Stripe CLI, as I covered here. You could even resend events using the CLI, which would help us verify the retries.
But today I want to explore the dev tunnels approach since it lets you test this in a way much similar to what will happen in a Production deployment.
Now, there are multiple dev tunnel tools available, with ngrok and Cloudflare being popular ones, but here I’ll use Microsoft Dev Tunnels, which is supported natively by Aspire.
Unfortunately, there is no Docker image for this tool, so we need to install it manually. On Windows, you can do this via WinGet (there are macOS and Linux options too):
winget install Microsoft.devtunnel
You could now start your application and configure the dev tunnels CLI to stand up a public endpoint that points to it. But, with Aspire, there’s a better way.
Adding a dev tunnel to your App Model
Dev tunnels can participate in your Aspire app model as any other resource. So start by installing the Aspire.Hosting.DevTunnels hosting integration into your AppHost project:
dotnet add package Aspire.Hosting.DevTunnels --prerelease
Next, add the tunnel to AppHost.cs:
var builder = DistributedApplication.CreateBuilder(args);

var stripeApiKey = builder.AddParameter("StripeApiKey", secret: true);
var stripeEndpointSecret = builder.AddParameter("StripeEndpointSecret", secret: true);

var api = builder.AddProject<GameStore_Api>("gamestore-api")
                 .WithEnvironment("Stripe__SecretKey", stripeApiKey)
                 .WithEnvironment("Stripe__EndpointSecret", stripeEndpointSecret);

builder.AddDevTunnel("tunnel")
       .WithReference(api)
       .WithAnonymousAccess();

builder.Build().Run();
The really cool thing here is that the .WithReference(api) call is all you need to do to connect the tunnel to your API endpoint, so it becomes reachable via the tunnel’s public endpoint.
Also, we allow anonymous access because we can’t ask Stripe to send us any sort of authorization header.
Now, run your AppHost and take a look at the Aspire dashboard:
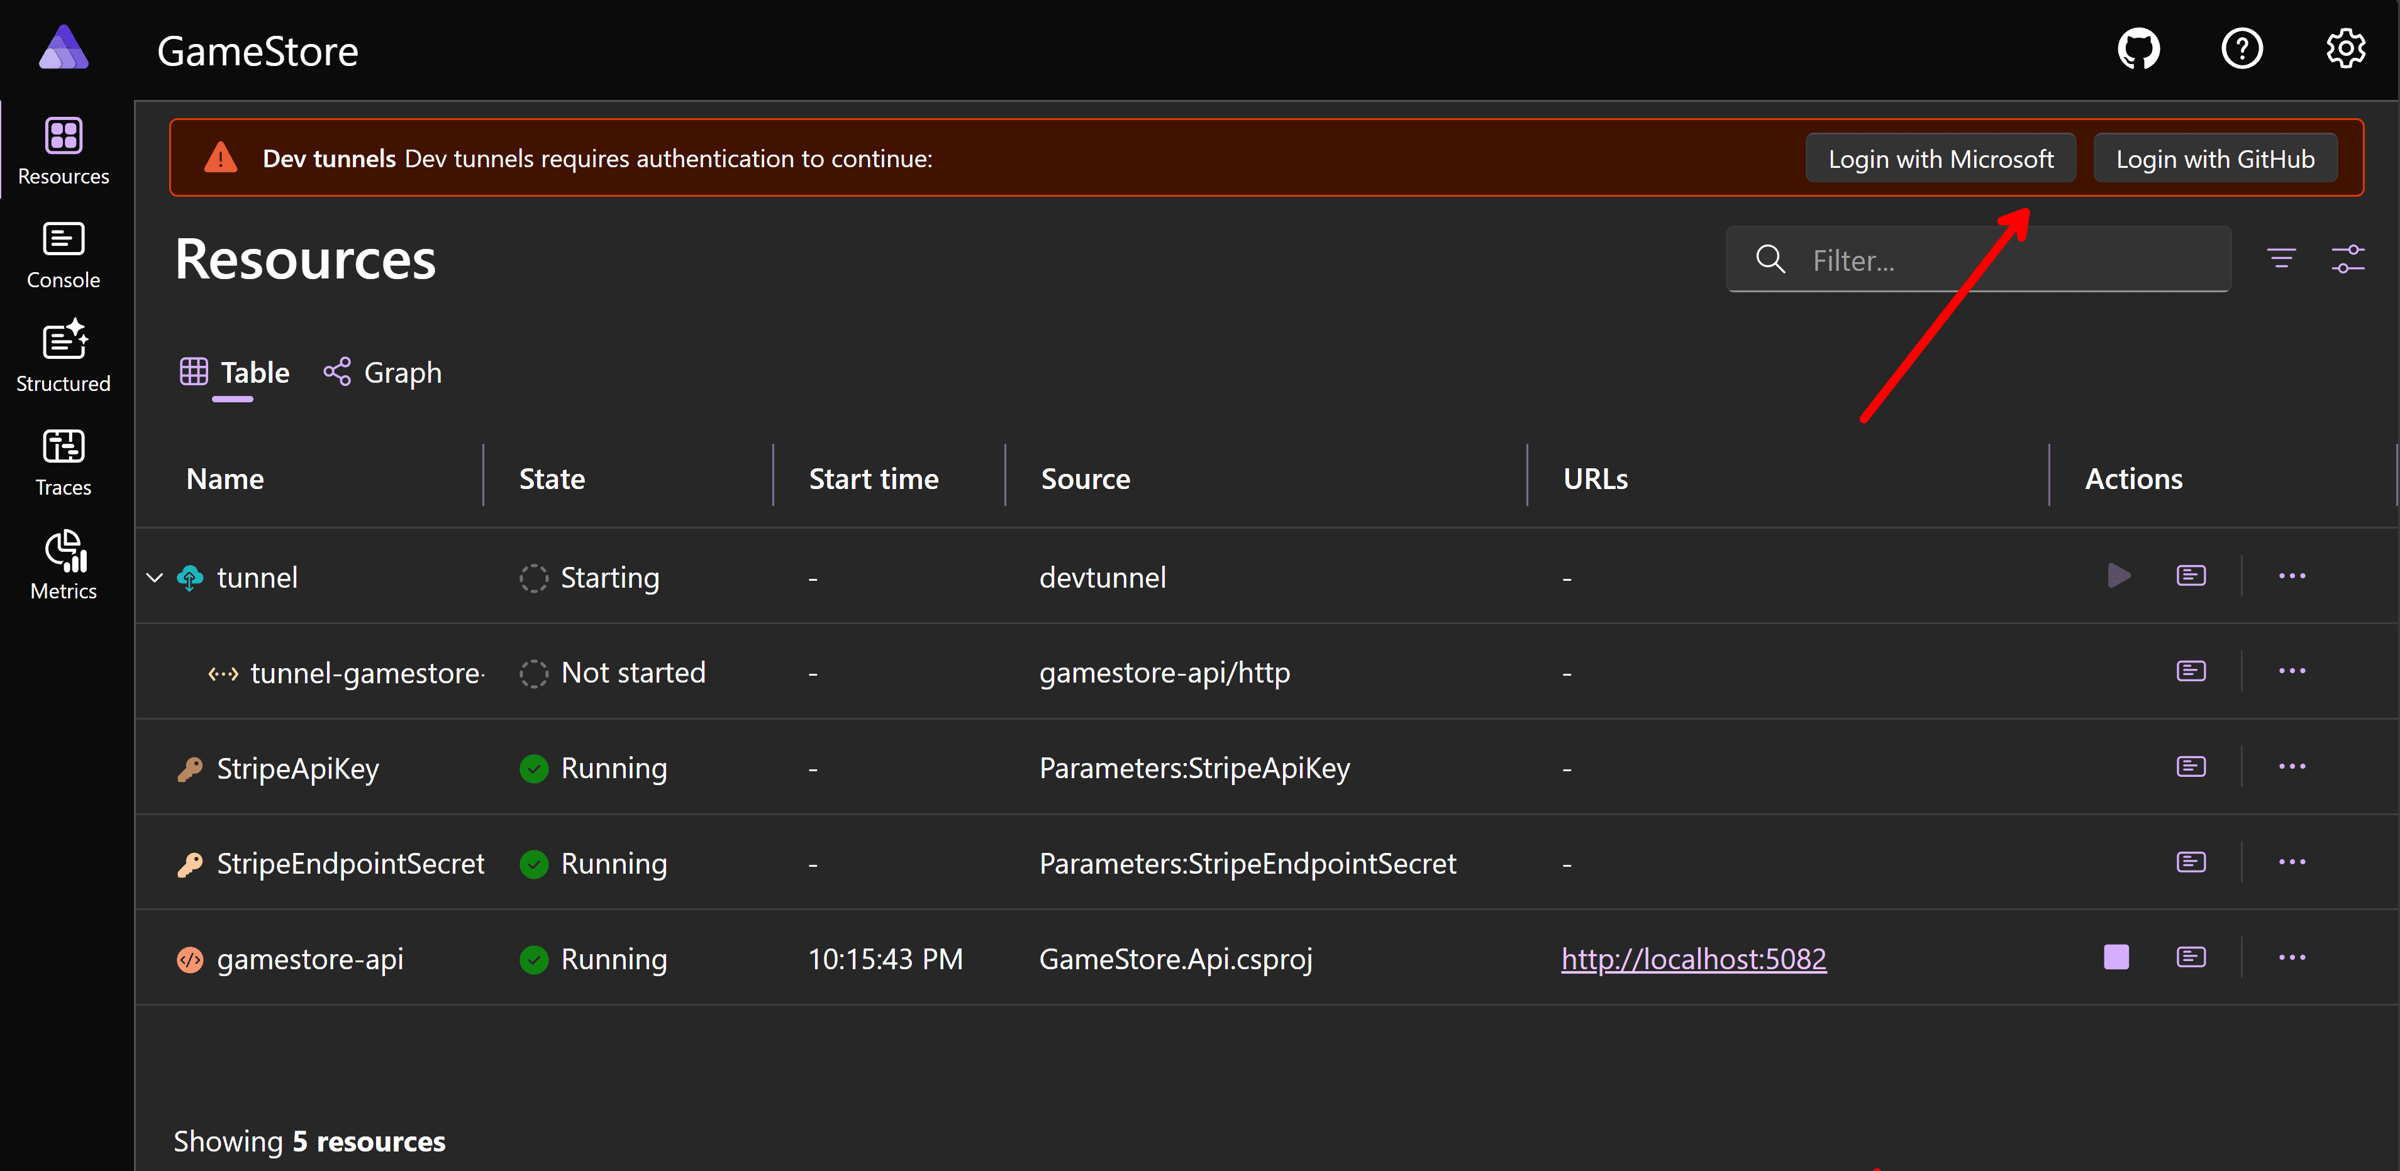
Dev tunnels don’t support hosting tunnels anonymously, so you’ll need to log in with your Microsoft or GitHub account.
After that, your tunnel will be ready, and you can see your tunnel URL right in your Aspire Dashboard:
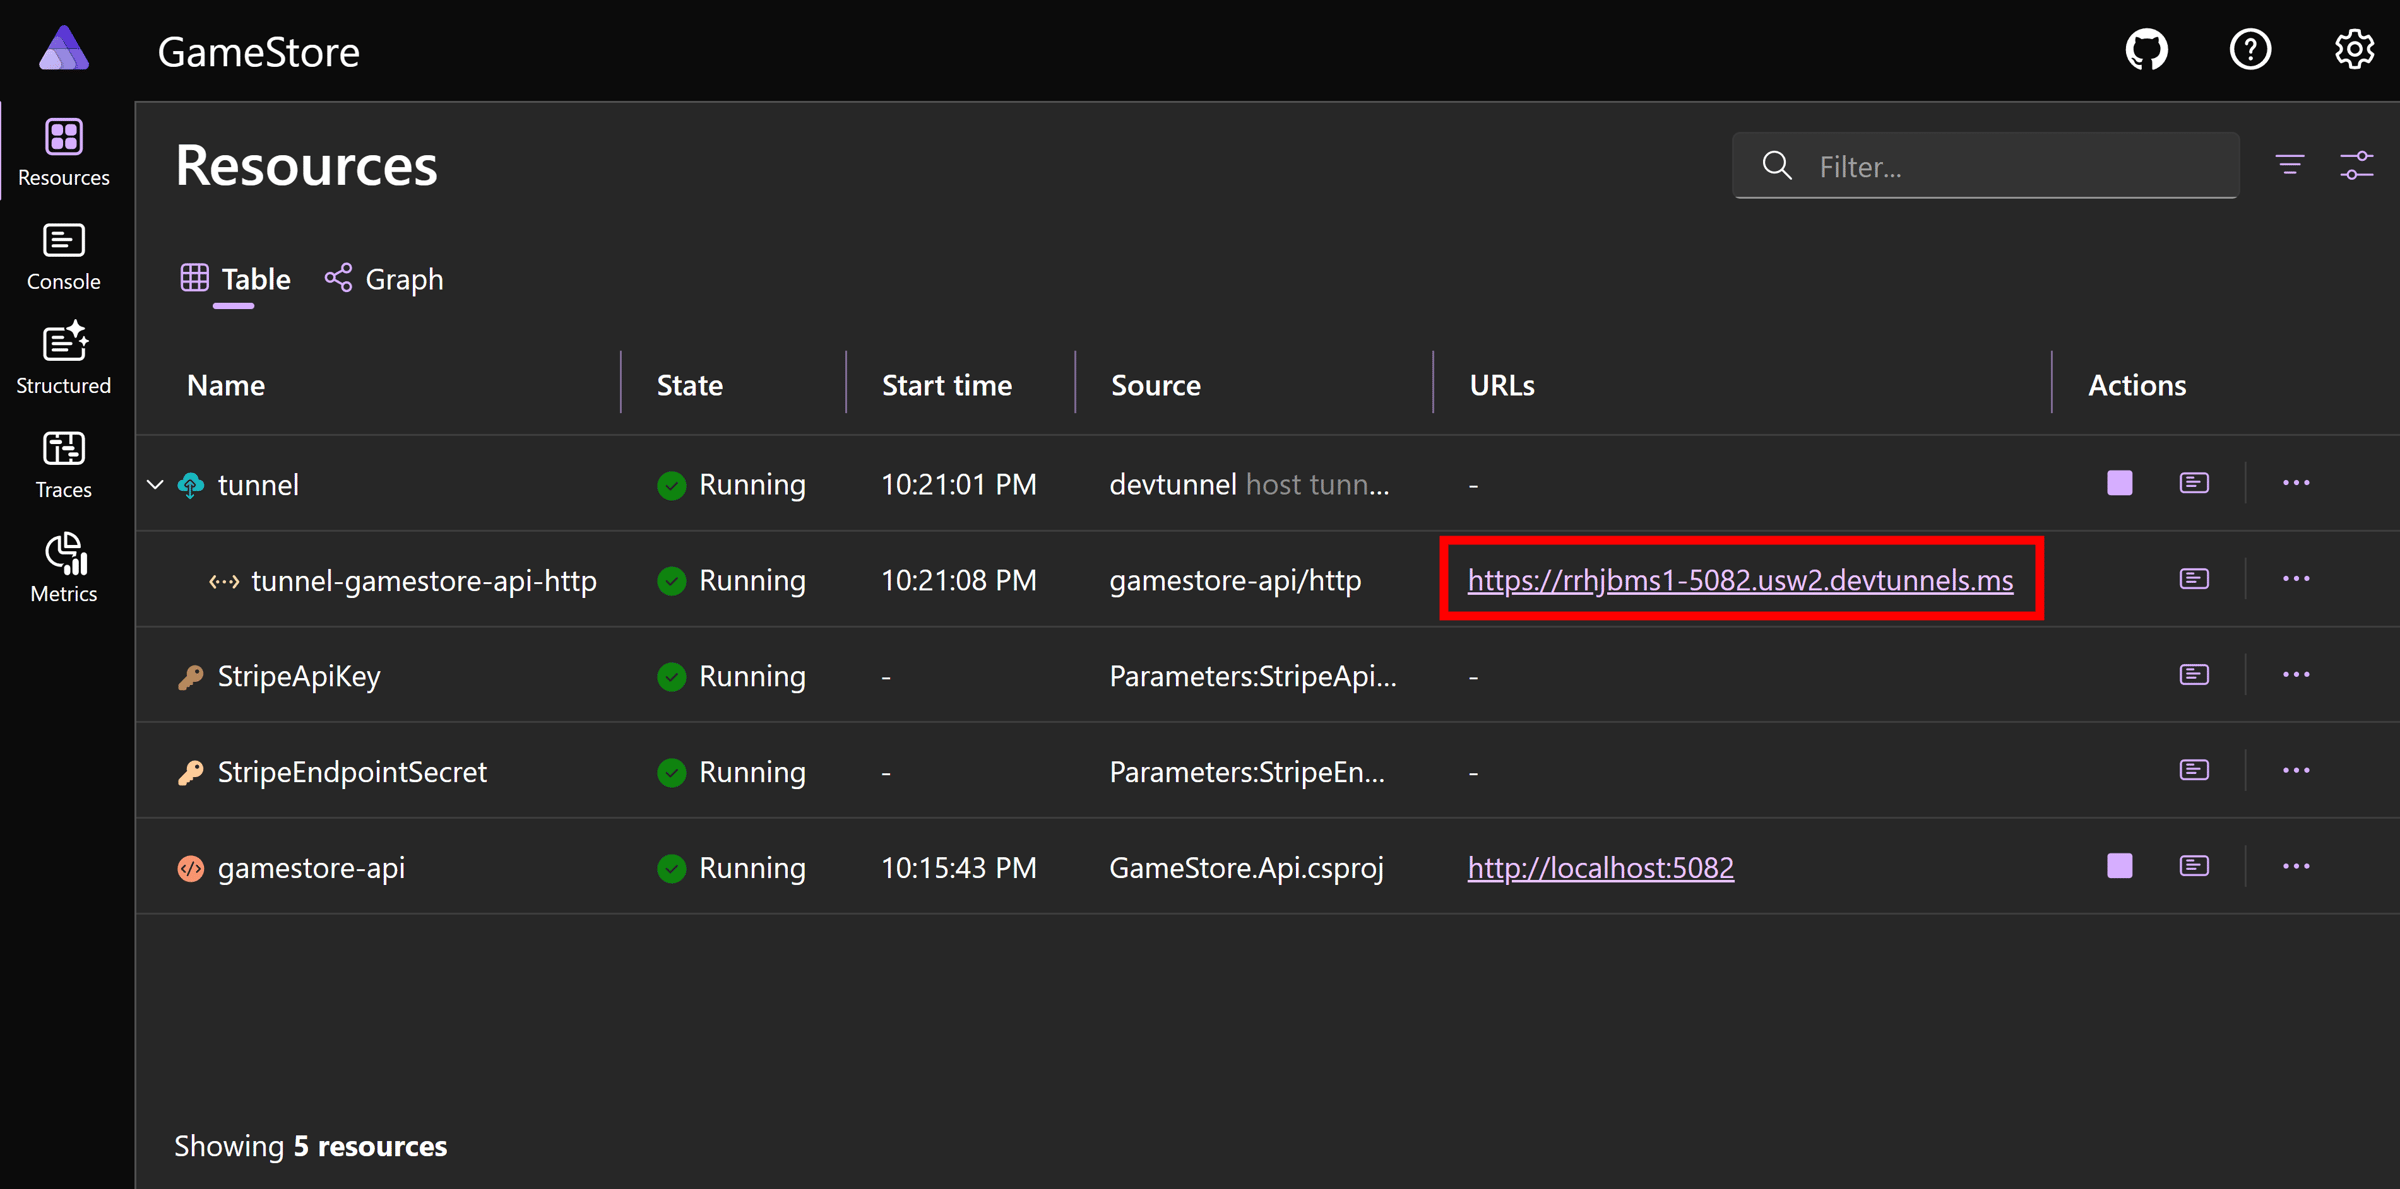
That URL allows anyone on the Internet (including Stripe) to reach our local web server.
Now, let’s use it.
Using the dev tunnel as a Stripe event destination
The Stripe Workbench makes it pretty easy to add webhook endpoints as destinations for all payment-related events.
Here I am adding our dev tunnel as an event destination
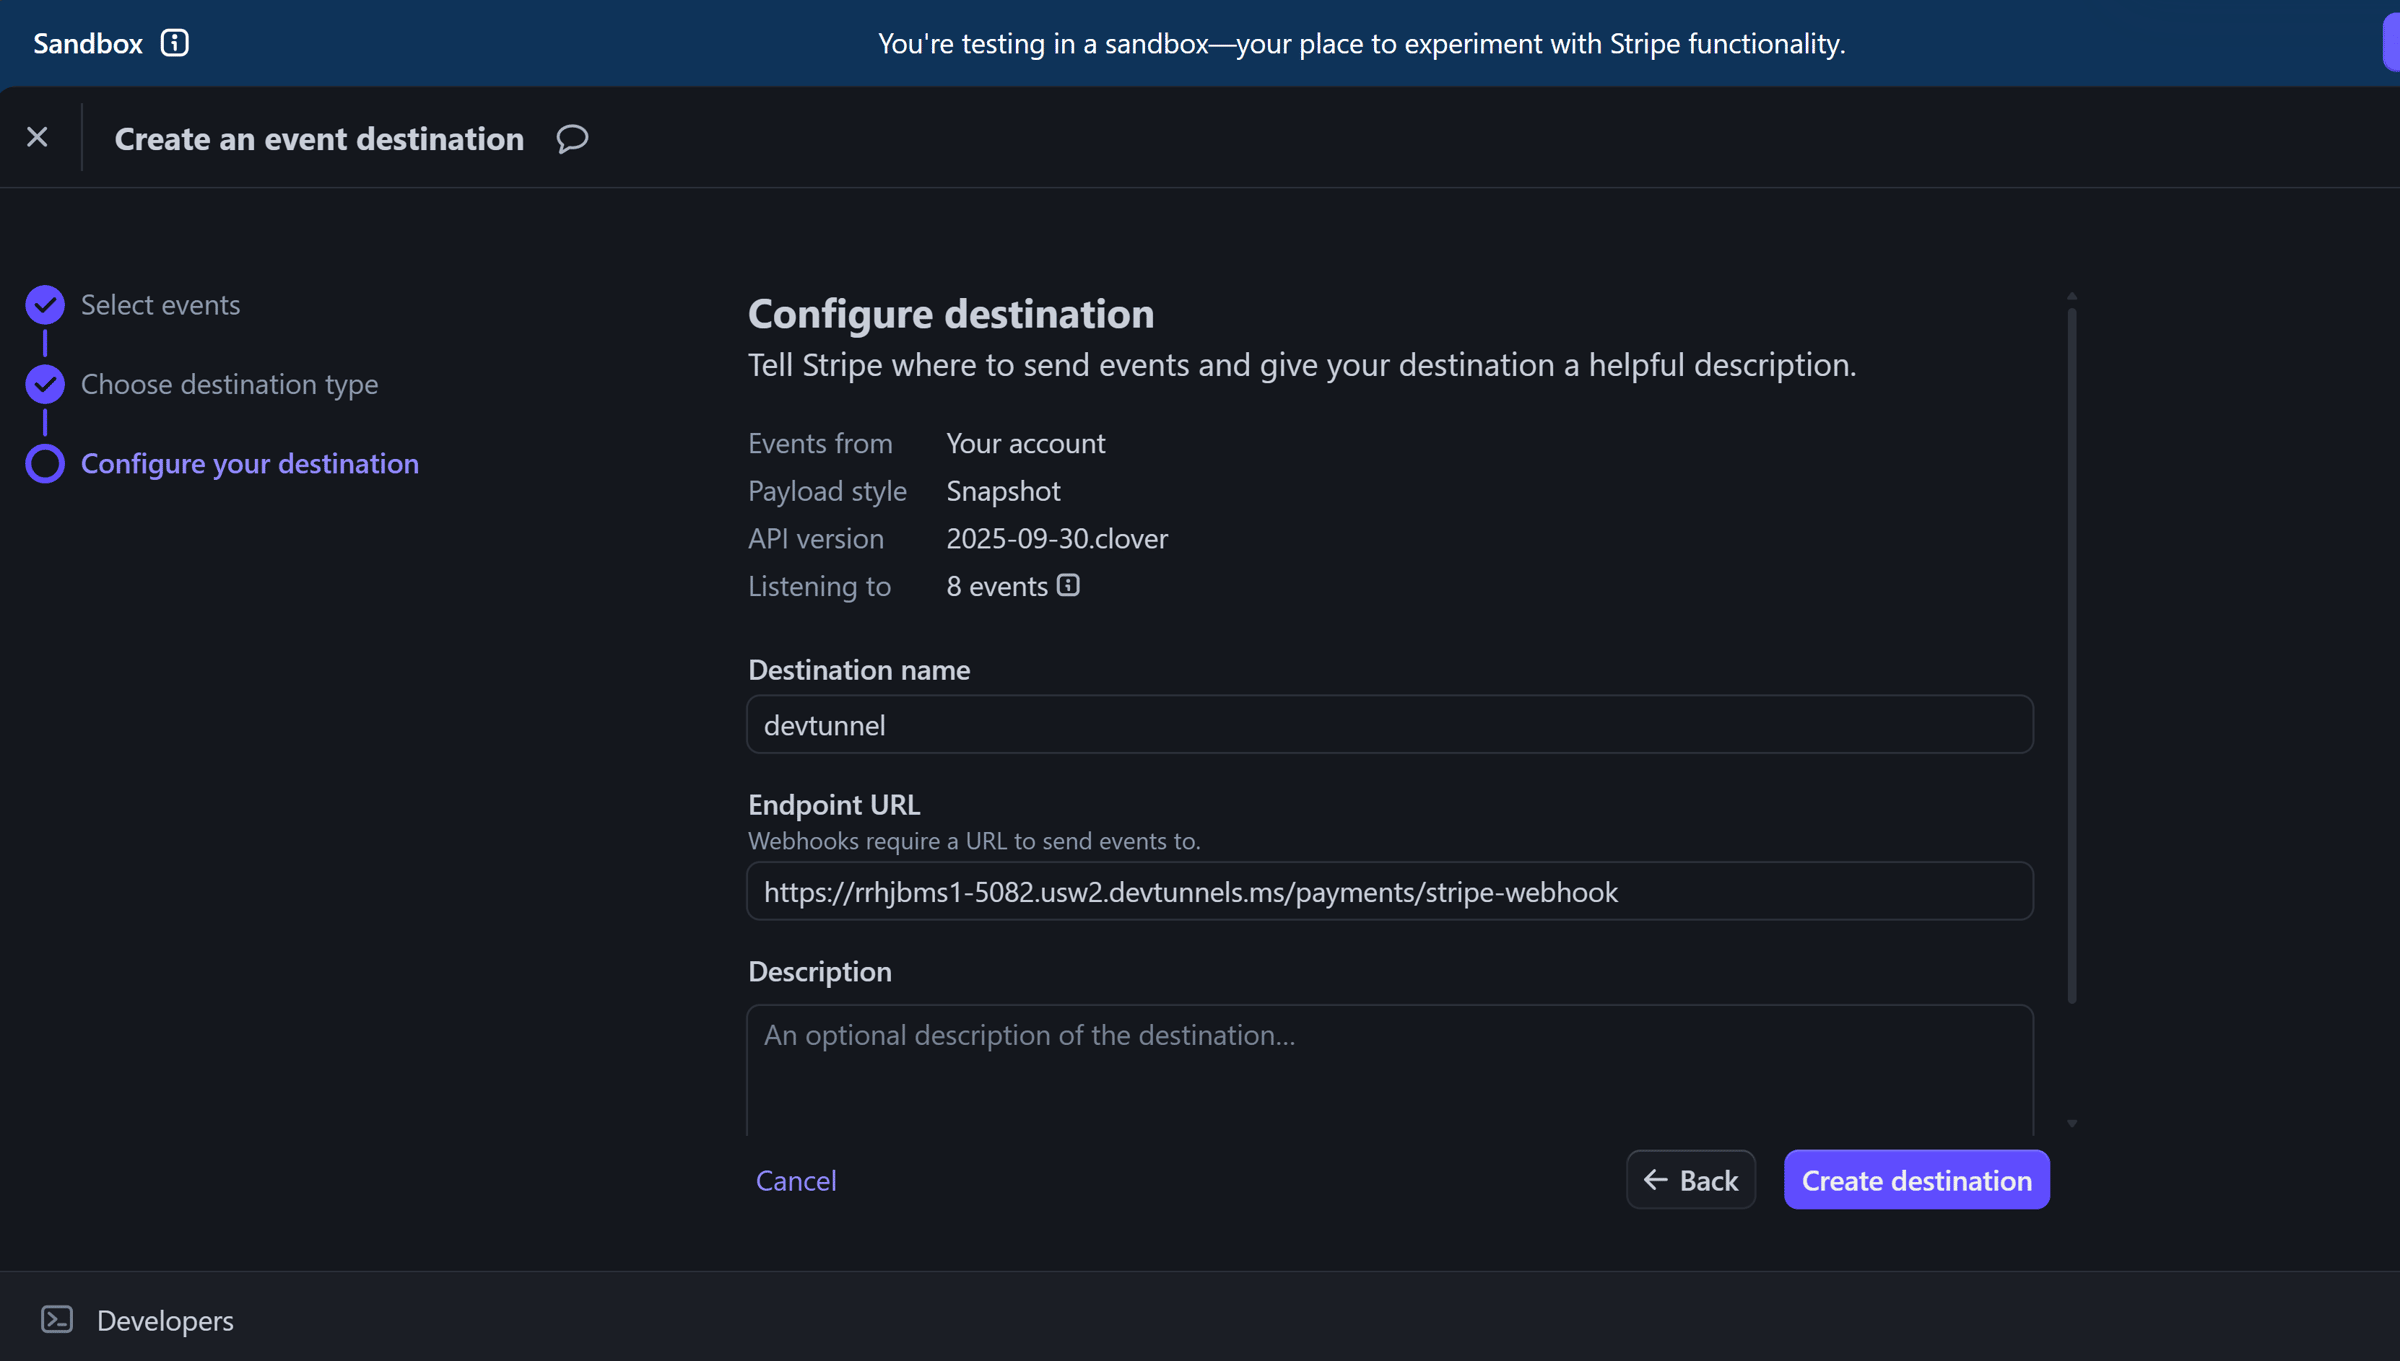
The event destination will get assigned a signing secret:
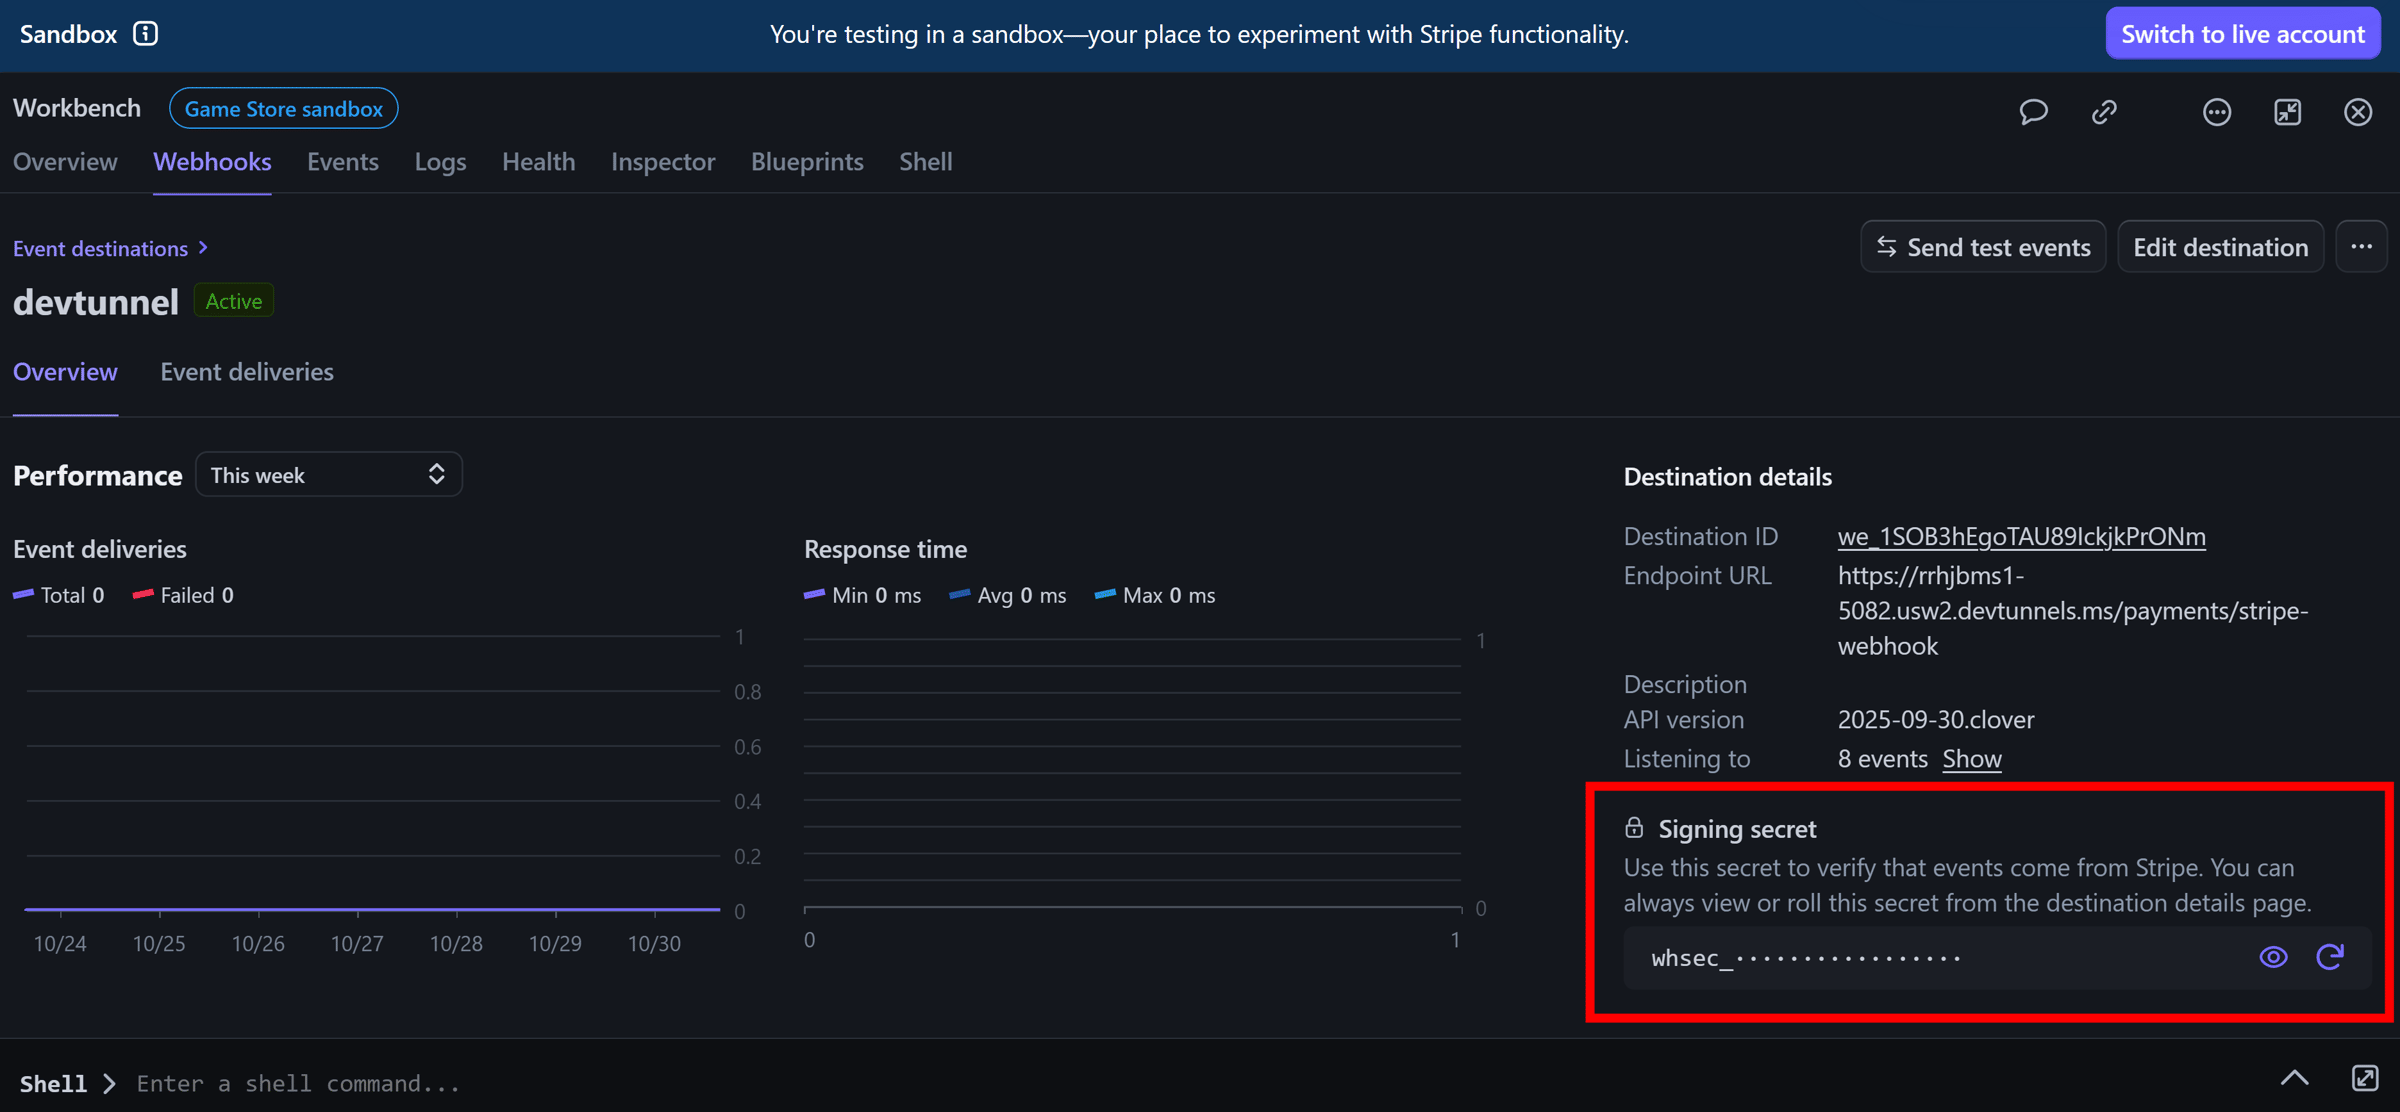
We’ll need to configure that signing secret as the value for our StripeEndpointSecret in our AppHost:
dotnet user-secrets set Parameters:StripeEndpointSecret whsec_ziGHK...
After restarting our AppHost with the new endpoint secret, we can start sending events from Stripe either by making payments in our frontend or by triggering them with the Stripe CLI:
stripe trigger payment_intent.succeeded
Looking at our API logs in the Aspire dashboard, we’ll confirm the event arrived:
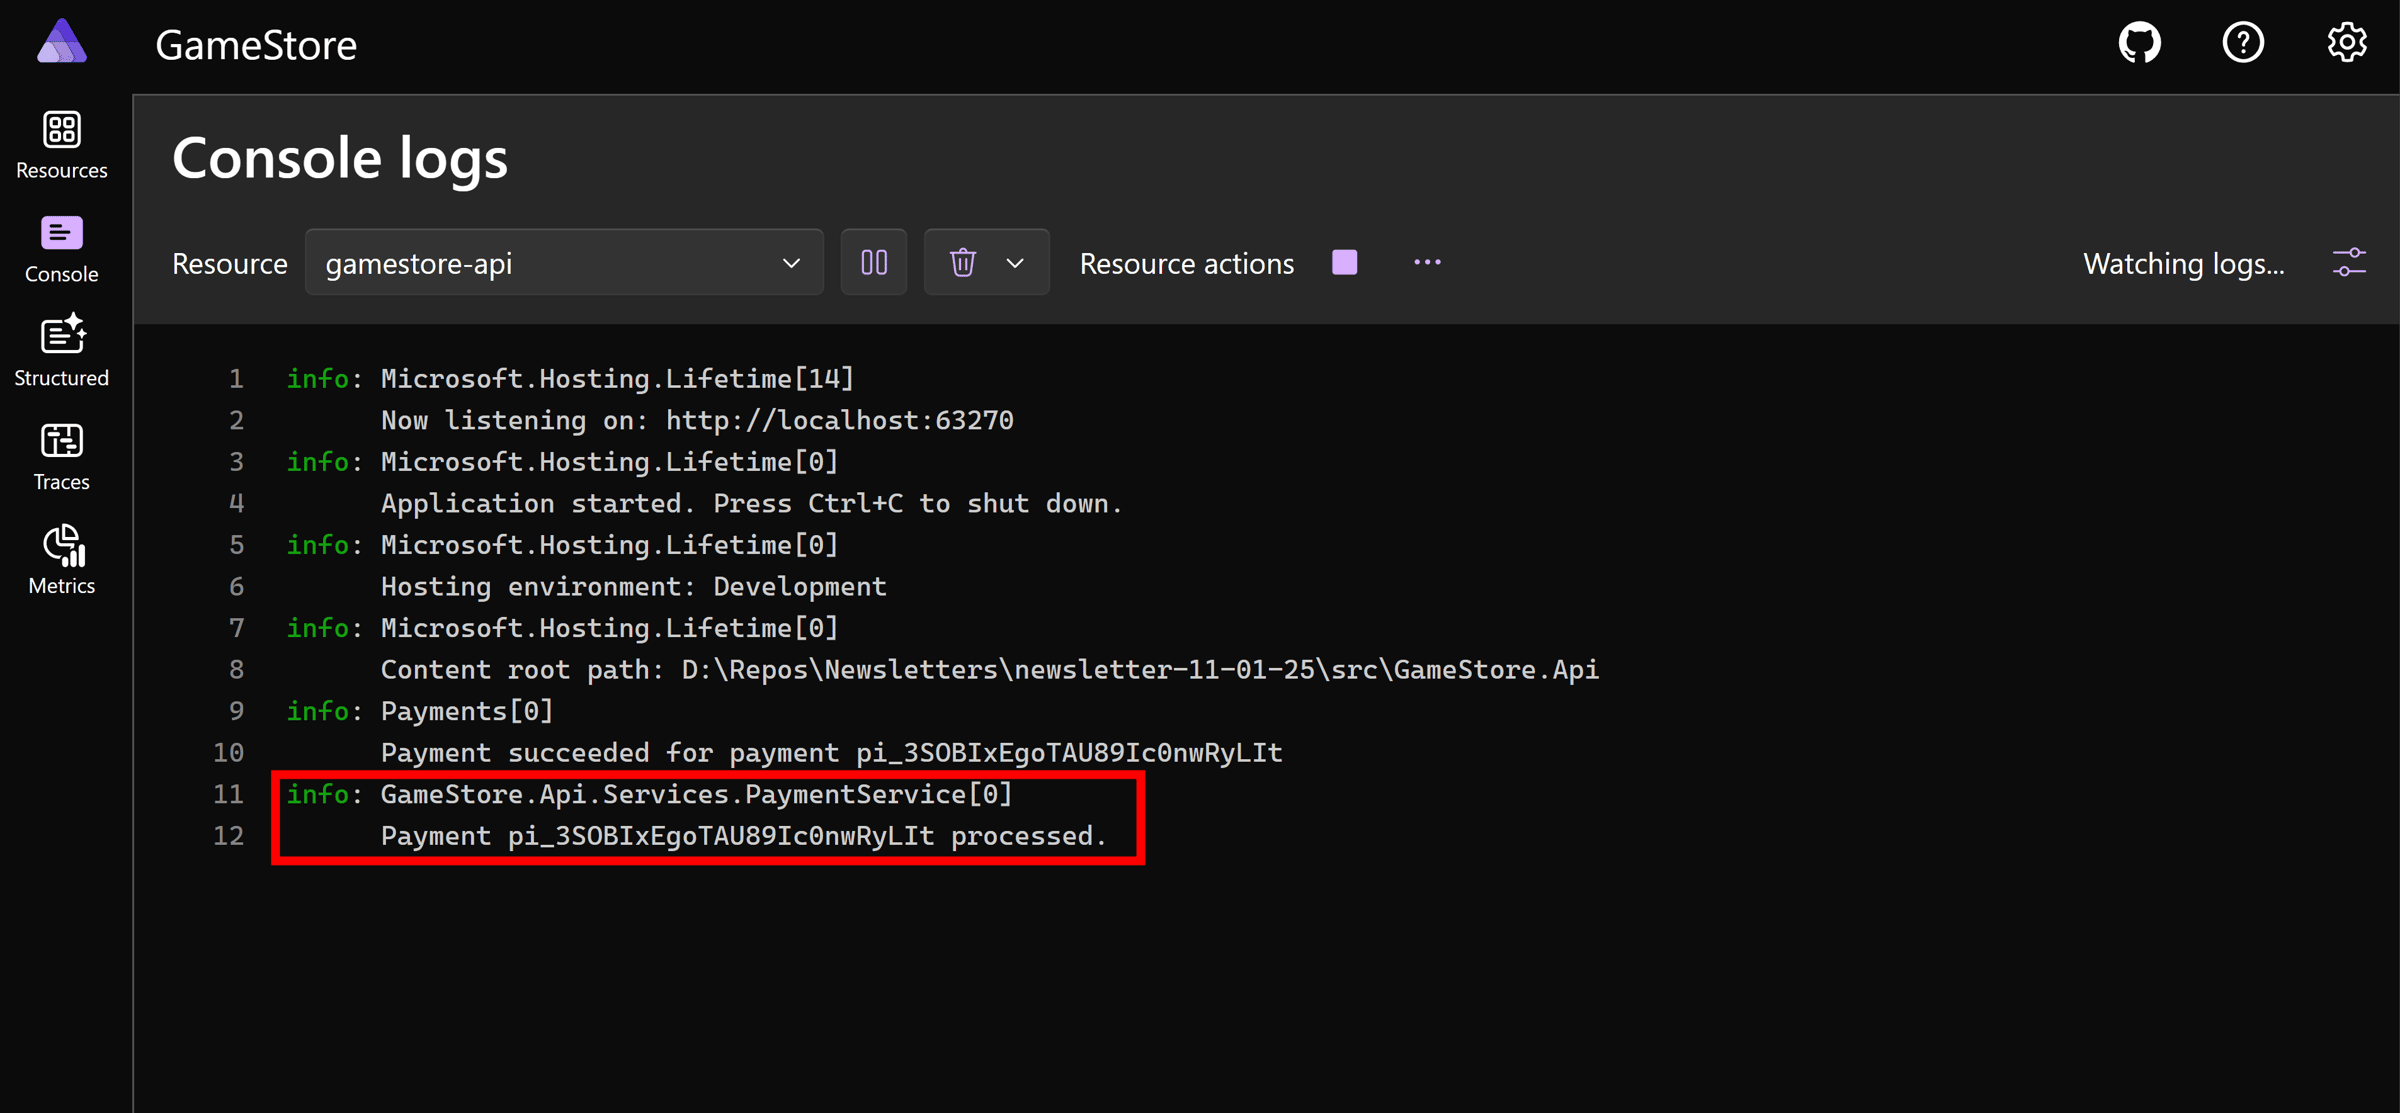
Great! Stripe is indeed able to reach our local webhook via the Dev Tunnel.
But what we really wanted to verify is the retry behavior. And, for this, we can use the Stripe Workbench to resend the event that we just triggered:
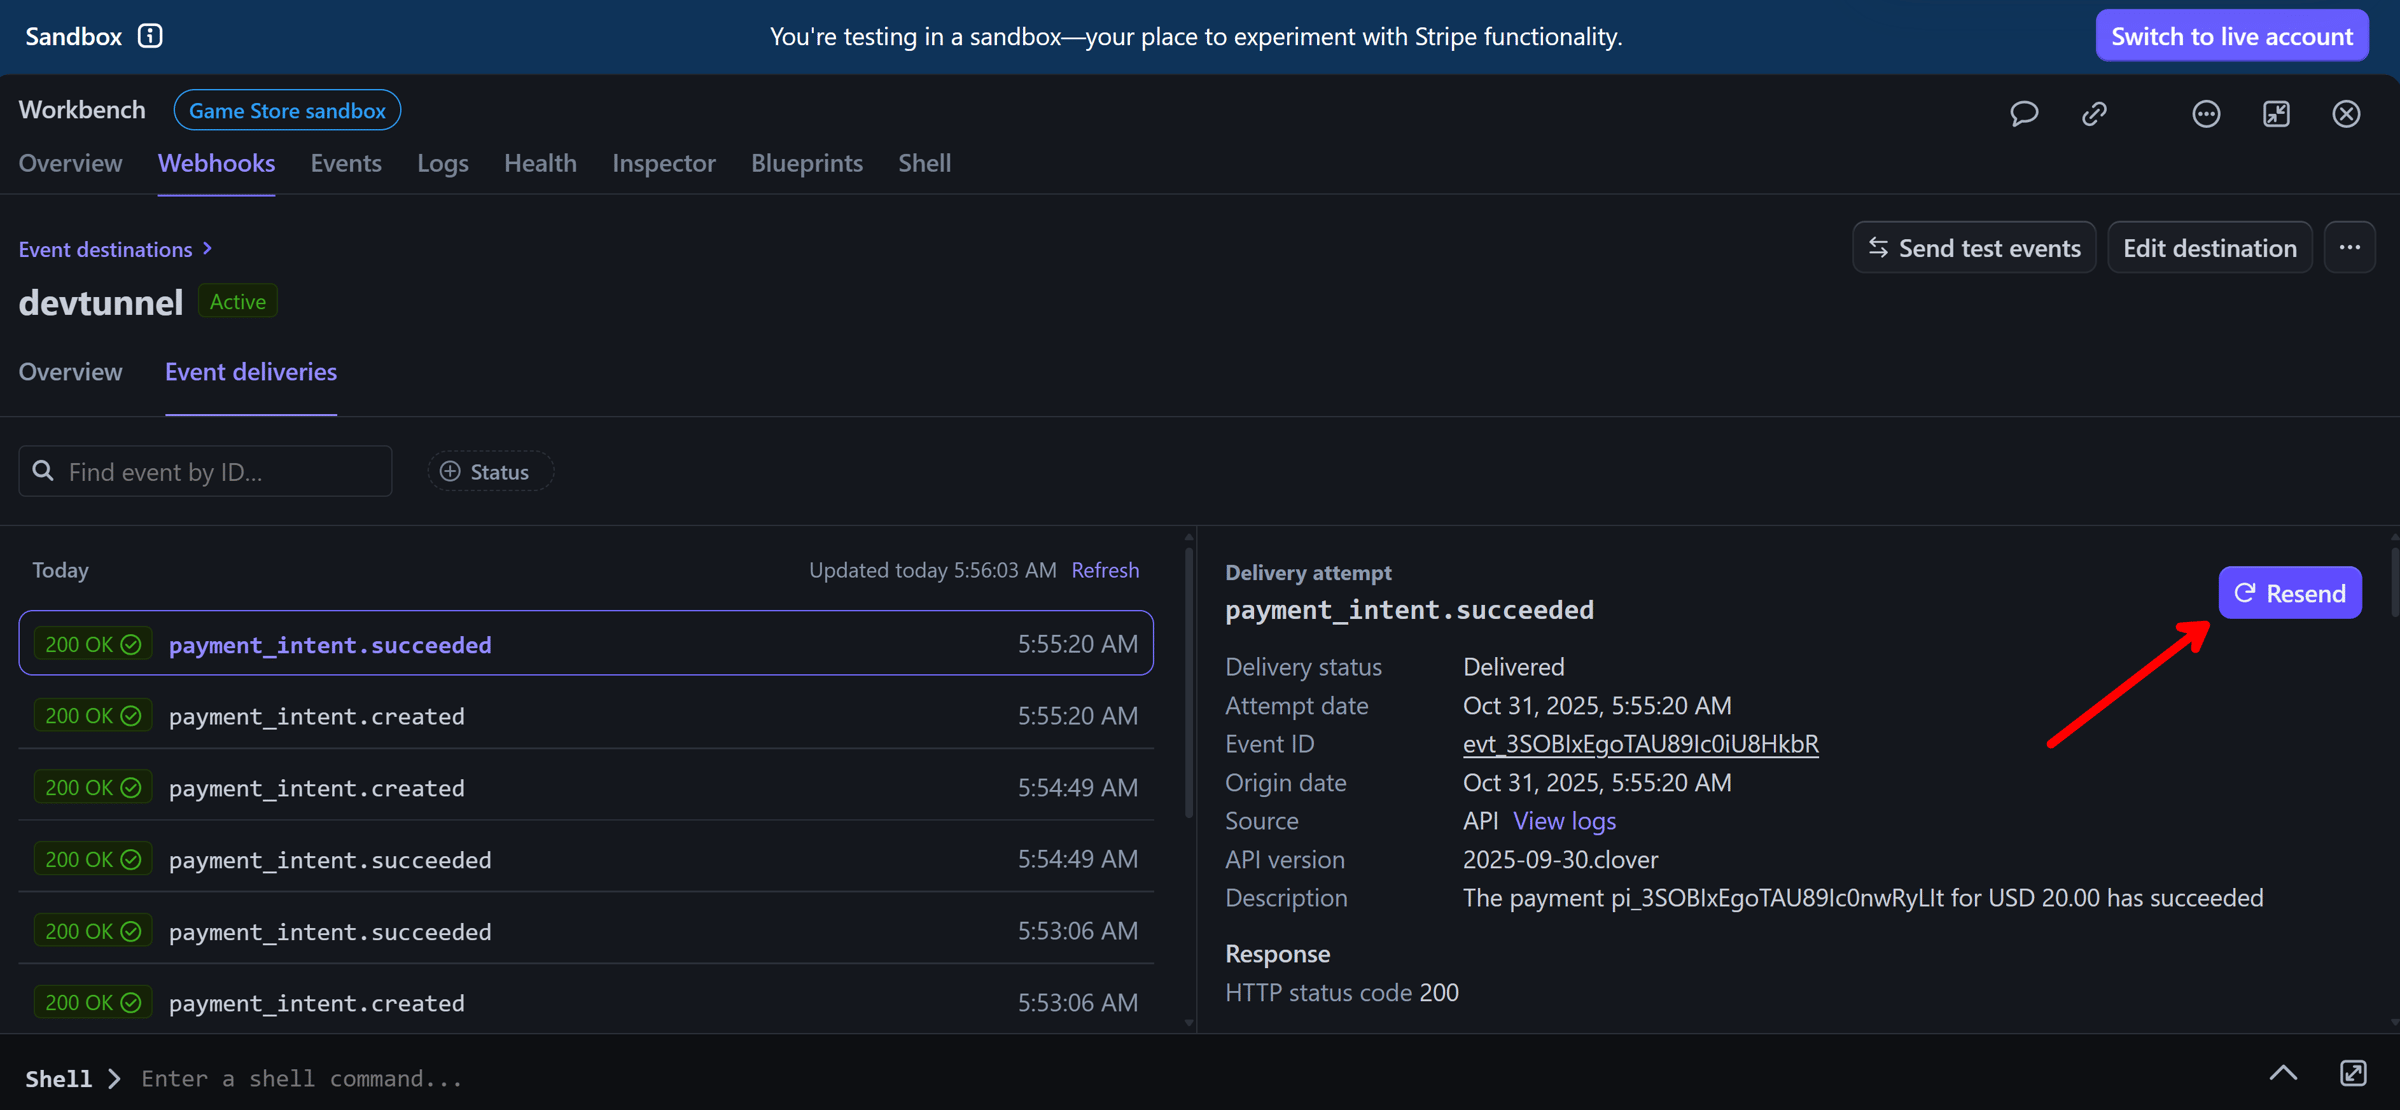
The event will go through the Dev Tunnel again, and our API will receive it. Will it reprocess the payment?
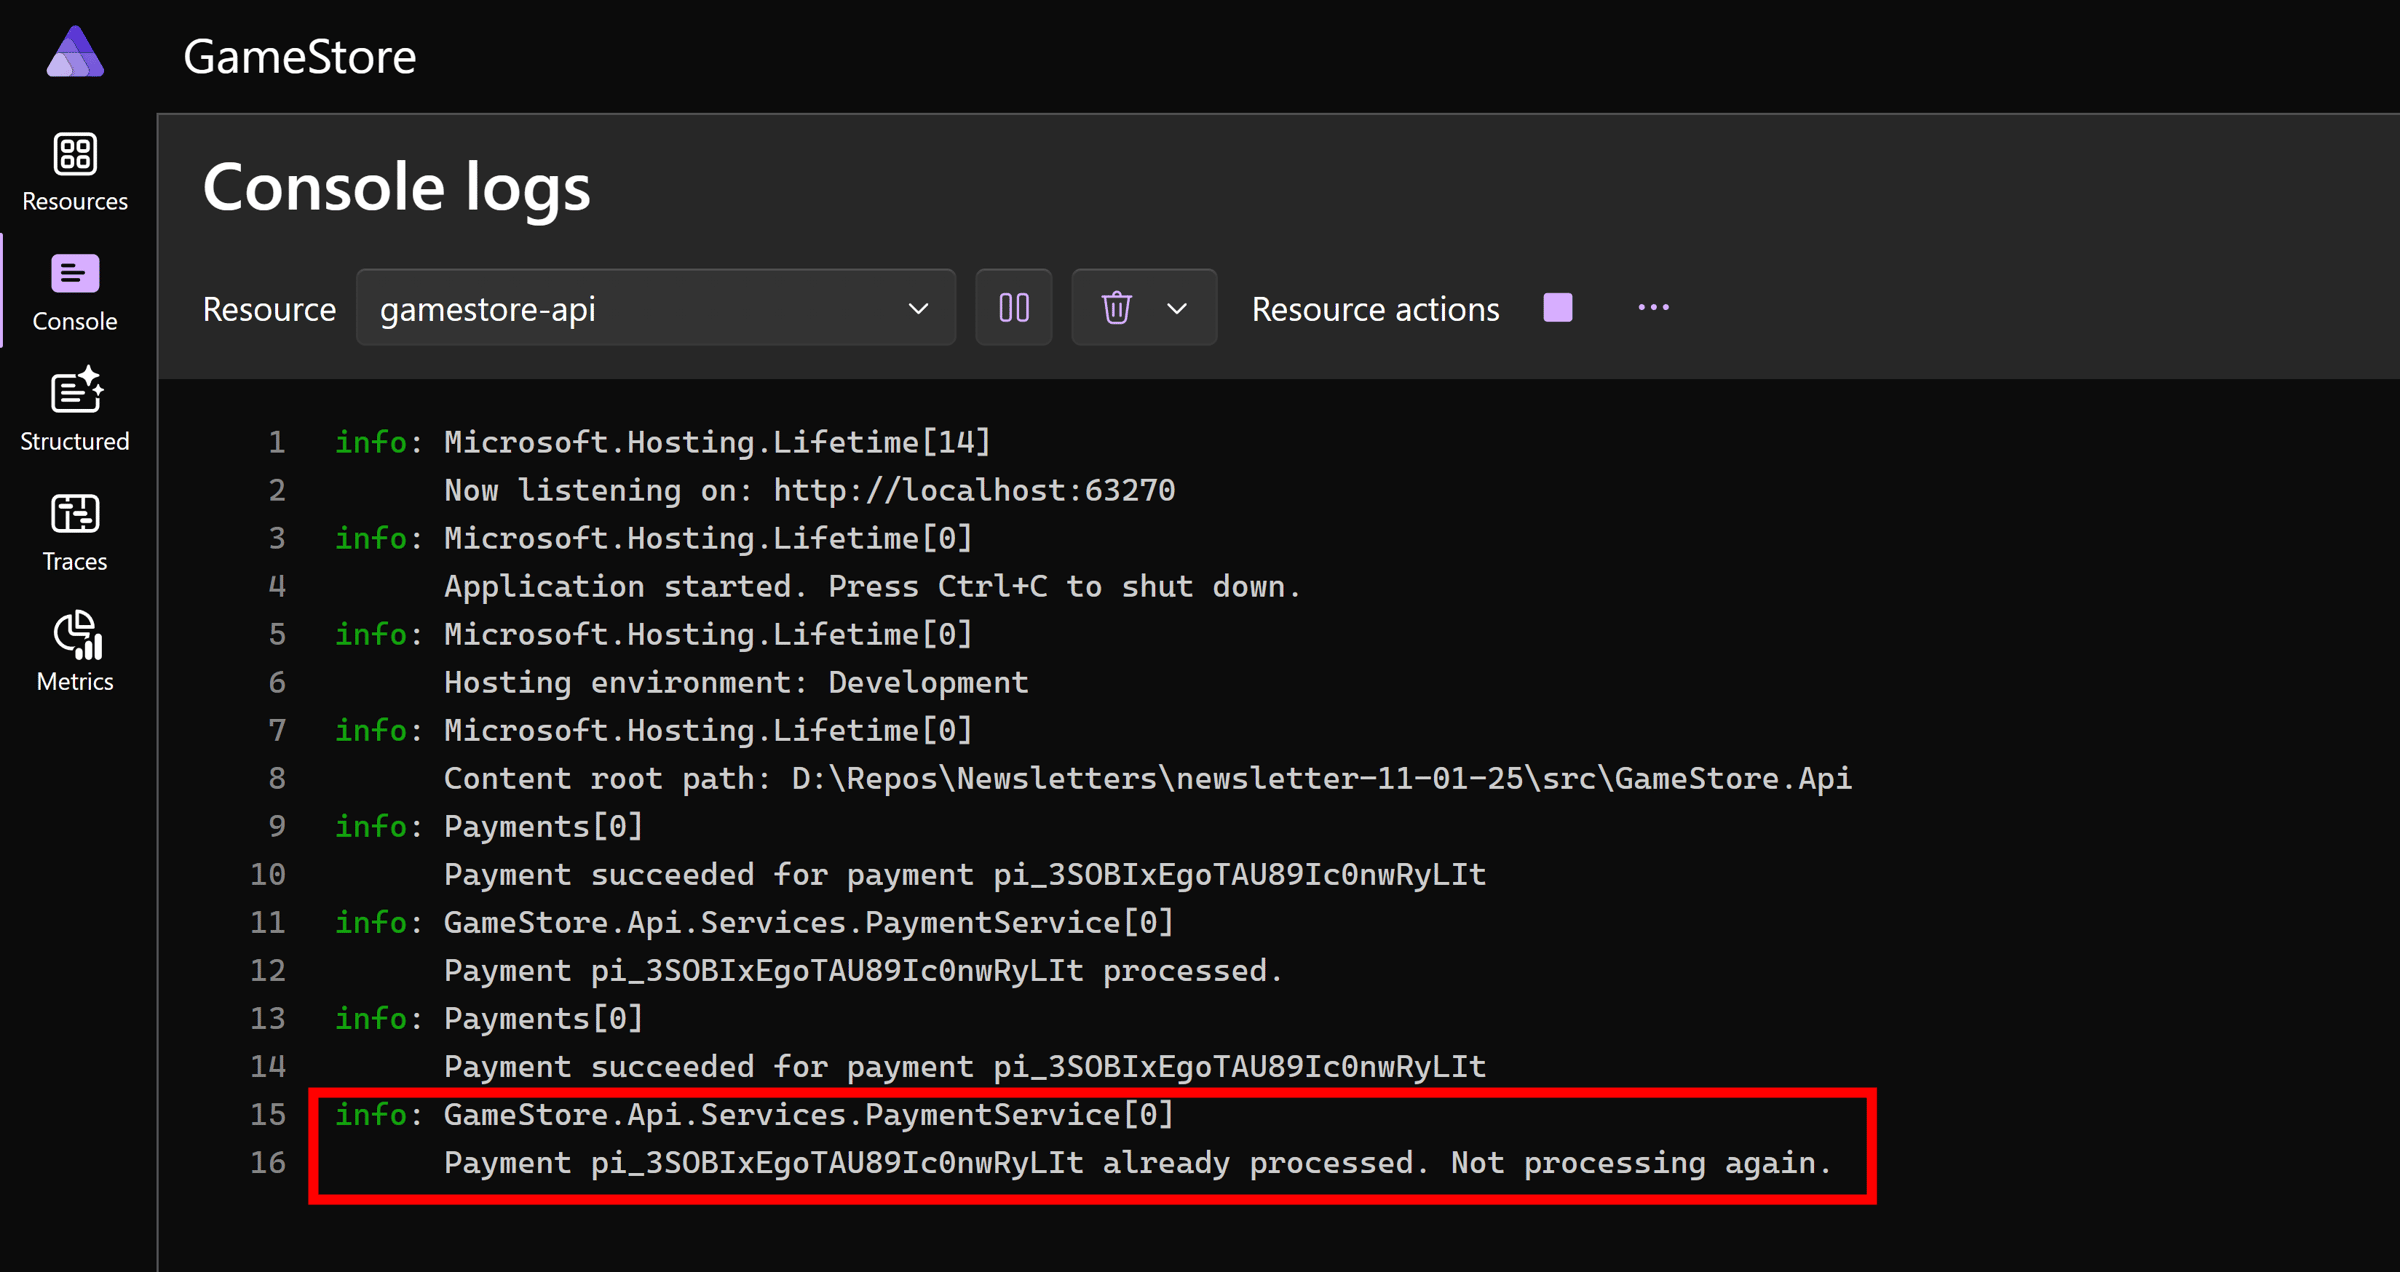
It did not. We have confirmed our implementation is indeed idempotent, so it will not reprocess the same payment a second time.
Mission accomplished!
Wrapping Up
Webhook development shouldn’t require juggling multiple service-specific CLIs and remembering which ports to forward where.
Dev Tunnels gives you one solution that works for everything. Add it to your Aspire application model once, and every external service can reach your local API.
The best development tools are the ones you forget are there.
This is how you build systems that scale: not by collecting more tools, but by using the right ones that solve entire categories of problems.
And that’s it for today.
See you next Saturday.
P.S. My Payments, Queues & Workers course covers the complete Stripe integration story, from webhook handling and idempotency to running payment systems in production.
Whenever you’re ready, there are 3 ways I can help you:
-
.NET Backend Developer Bootcamp: A complete path from ASP.NET Core fundamentals to building, containerizing, and deploying production-ready, cloud-native apps on Azure.
-
Building Microservices With .NET: Transform the way you build .NET systems at scale.
-
Get the full source code: Download the working project from this article, grab exclusive course discounts, and join a private .NET community.
