Read time: 11 minutes
Wow, getting the Game Store web application deployed to Azure via Azure DevOps was one of the most challenging things I’ve done so far as part of the .NET Developer Bootcamp project. But, somehow it all worked out, and the end result is really nice.
The complexity came from me trying to fit both the Azure infra deployment and the CI/CD process into the .NET Aspire model, which is only poorly supported at this time.
But, having worked on dozens of Azure deployments and CI/CD pipelines in the past, and following first principles, I was able to get this done in a simpler way, while still achieving the nice automation you are after with a good CI/CD process.
Let’s dive in.
What is a CI/CD pipeline?
CI/CD stands for Continuous Integration/Continuous Deployment. These two terms are defined as follows:
- Continuous Integration (CI): A software engineering practice where developers regularly merge their code changes into a central repository, after which automated builds and tests are run.
- Continuous Deployment (CD): A software engineering practice in which code changes are delivered frequently through automated deployments.
When you combine these two practices, you get a CI/CD pipeline, which might look like this:

So, when a dev pushes code to a remote repo, an automated process where the code is built, tested, and deployed kicks in.
In our specific case, we want to use Azure Pipelines (part of Azure DevOps) to automatically do these steps after every push to our remote repo:
- Build the app
- Run integration tests
- Build the Docker image
- Push the Docker image to Azure Container Registry
- Deploy the Docker image as a container to Azure Container Apps
Now, we want to enable this automation for each of our microservices repos, which normally is fairly straightforward. However, things get complicated if you have been using the .NET Aspire application model.
.NET Aspire is not for multi-repo
.NET Aspire encourages you to mix both your infrastructure services and your .NET applications into a single model, which lives in a single monolithic repo.
This looks nice, works great in demos, and impresses most folks as long as you have everything in a single repository. The problem is that you don’t build large distributed systems at scale from a single repository.
Why? Because if you are dealing with a large project that involves 30+ devs, you want to have every 1 or 2 devs work on their own microservice, from their own repo, with their own CI/CD pipeline, so that they can add features and fix bugs fast. More on that here.
To understand how .NET Aspire does not work for a multi-repo-based system, take a look at this small example:

That is the simplified AppHost model for a system that involves 2 microservices that need to talk via Azure Service Bus. At first glance, it looks pretty, but when you try to go into a multi-repo setting, you realize these:
- Your AppHost project, which lives in its own repo, can’t reference microservices that live in other repos. So, the AddProject API won’t just work.
- When the Catalog microservice team makes a change in their repo, they want to get their stuff deployed from that repo. .NET Aspire would force them to come back to the .NET Aspire repo, somehow deal with the .AddProject problem, and deploy instead from there.
- When an infra change happens, you don’t necessarily want to also deploy your microservices, and when a single microservice changes, you certainly don’t want to also provision infra.
For local development, I worked around the AddProject API problem by adding virtual solution folders to my Aspire solution that include projects from other repos (conveniently cloned next to my aspire repo). Ugly, but OK for local dev.
But, for Azure deployments that we want to perform via a CI/CD pipeline, that is a no-go.
And we have even more problems.
Poor Azure support in .NET Aspire
Aspire includes multiple integrations for several Azure services, like the one I showed you above for Azure Service Bus. Those work great, as long as you don’t need to customize anything in your deployed Azure resources.
But let’s say you want to change 1 property in an Azure Storage Account. I tried to do that, but after an hour I could not figure out a way. Only after engaging the .NET Aspire team I learned this is the way:

Which I think works, but is so weird and undiscoverable. And on top of that is an experimental API that will change soon.
I ran into things like this for several of the Azure resources I wanted to use, and wasted tons of time trying to make it work. Hopefully, the upcoming Azure API will make it better.
But I eventually got tired of the limitations and decided to do things in a different way.
Use Aspire only for infra deployment via Bicep
If there is 1 thing I have to thank the .NET Aspire team is for teaching me so much about Bicep. By doing azd infra synth in your Aspire app, it will spit out all the Bicep it generates and uses behind the scenes, and that you can customize as needed.
So what I did is move all Azure resources into Bicep files, which is not that hard after doing the first one:
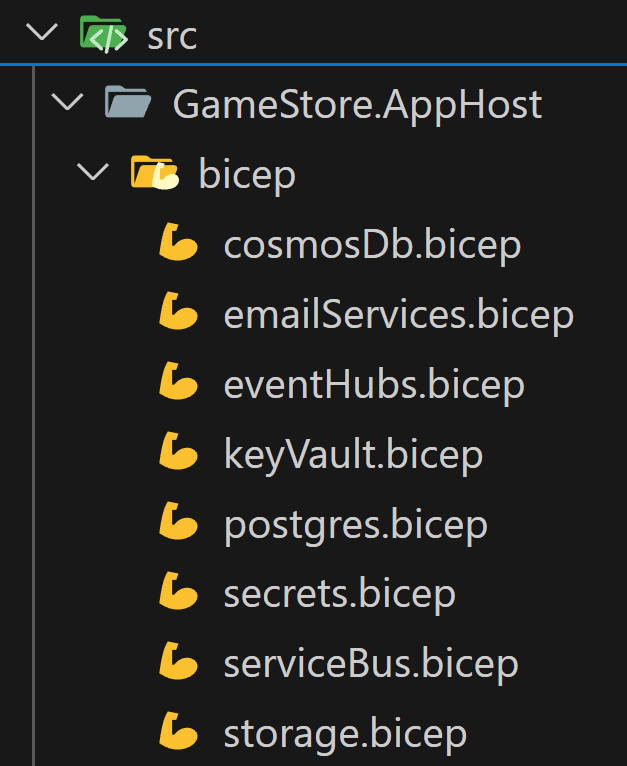
Which allows me to define every Azure resource exactly as I need it for my system. And then I compose my Aspire app of those Bicep resources:

Plus, we also remove all the actual .NET microservices from that app model, leaving only the Azure resources.
After doing that, one call to azd provision will get all the Azure infrastructure services deployed to Azure.
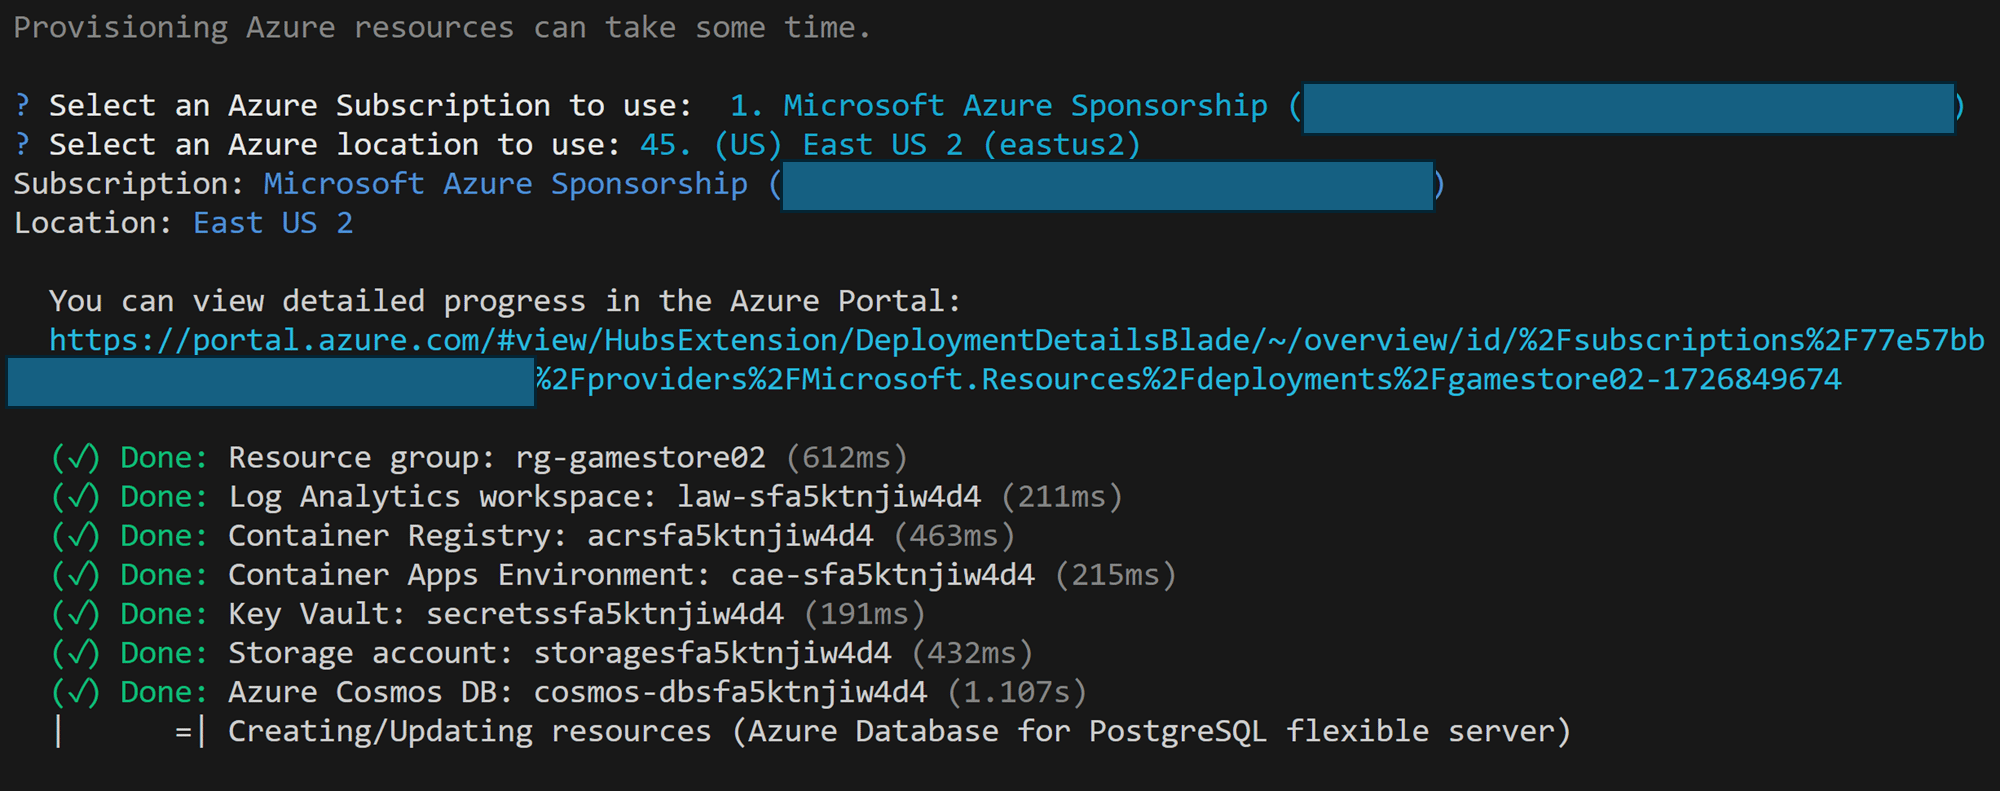
But, what to do about the microservices? Well, first we need to figure out how they will connect to the Azure resources, now that they are no longer part of Aspire’s app model.
Storing all connection info in Key Vault
Once I moved everything into full Bicep I also unlocked the ability to store secrets on Key Vault using the ideal naming convention for .NET applications.
For instance, to connect to Event Hubs via the Kafka protocol, you need to provide a series of parameters, including what they call the SaslPassword, which translates to the Event Hubs connection string.
Because I’m using Bicep I can do this:
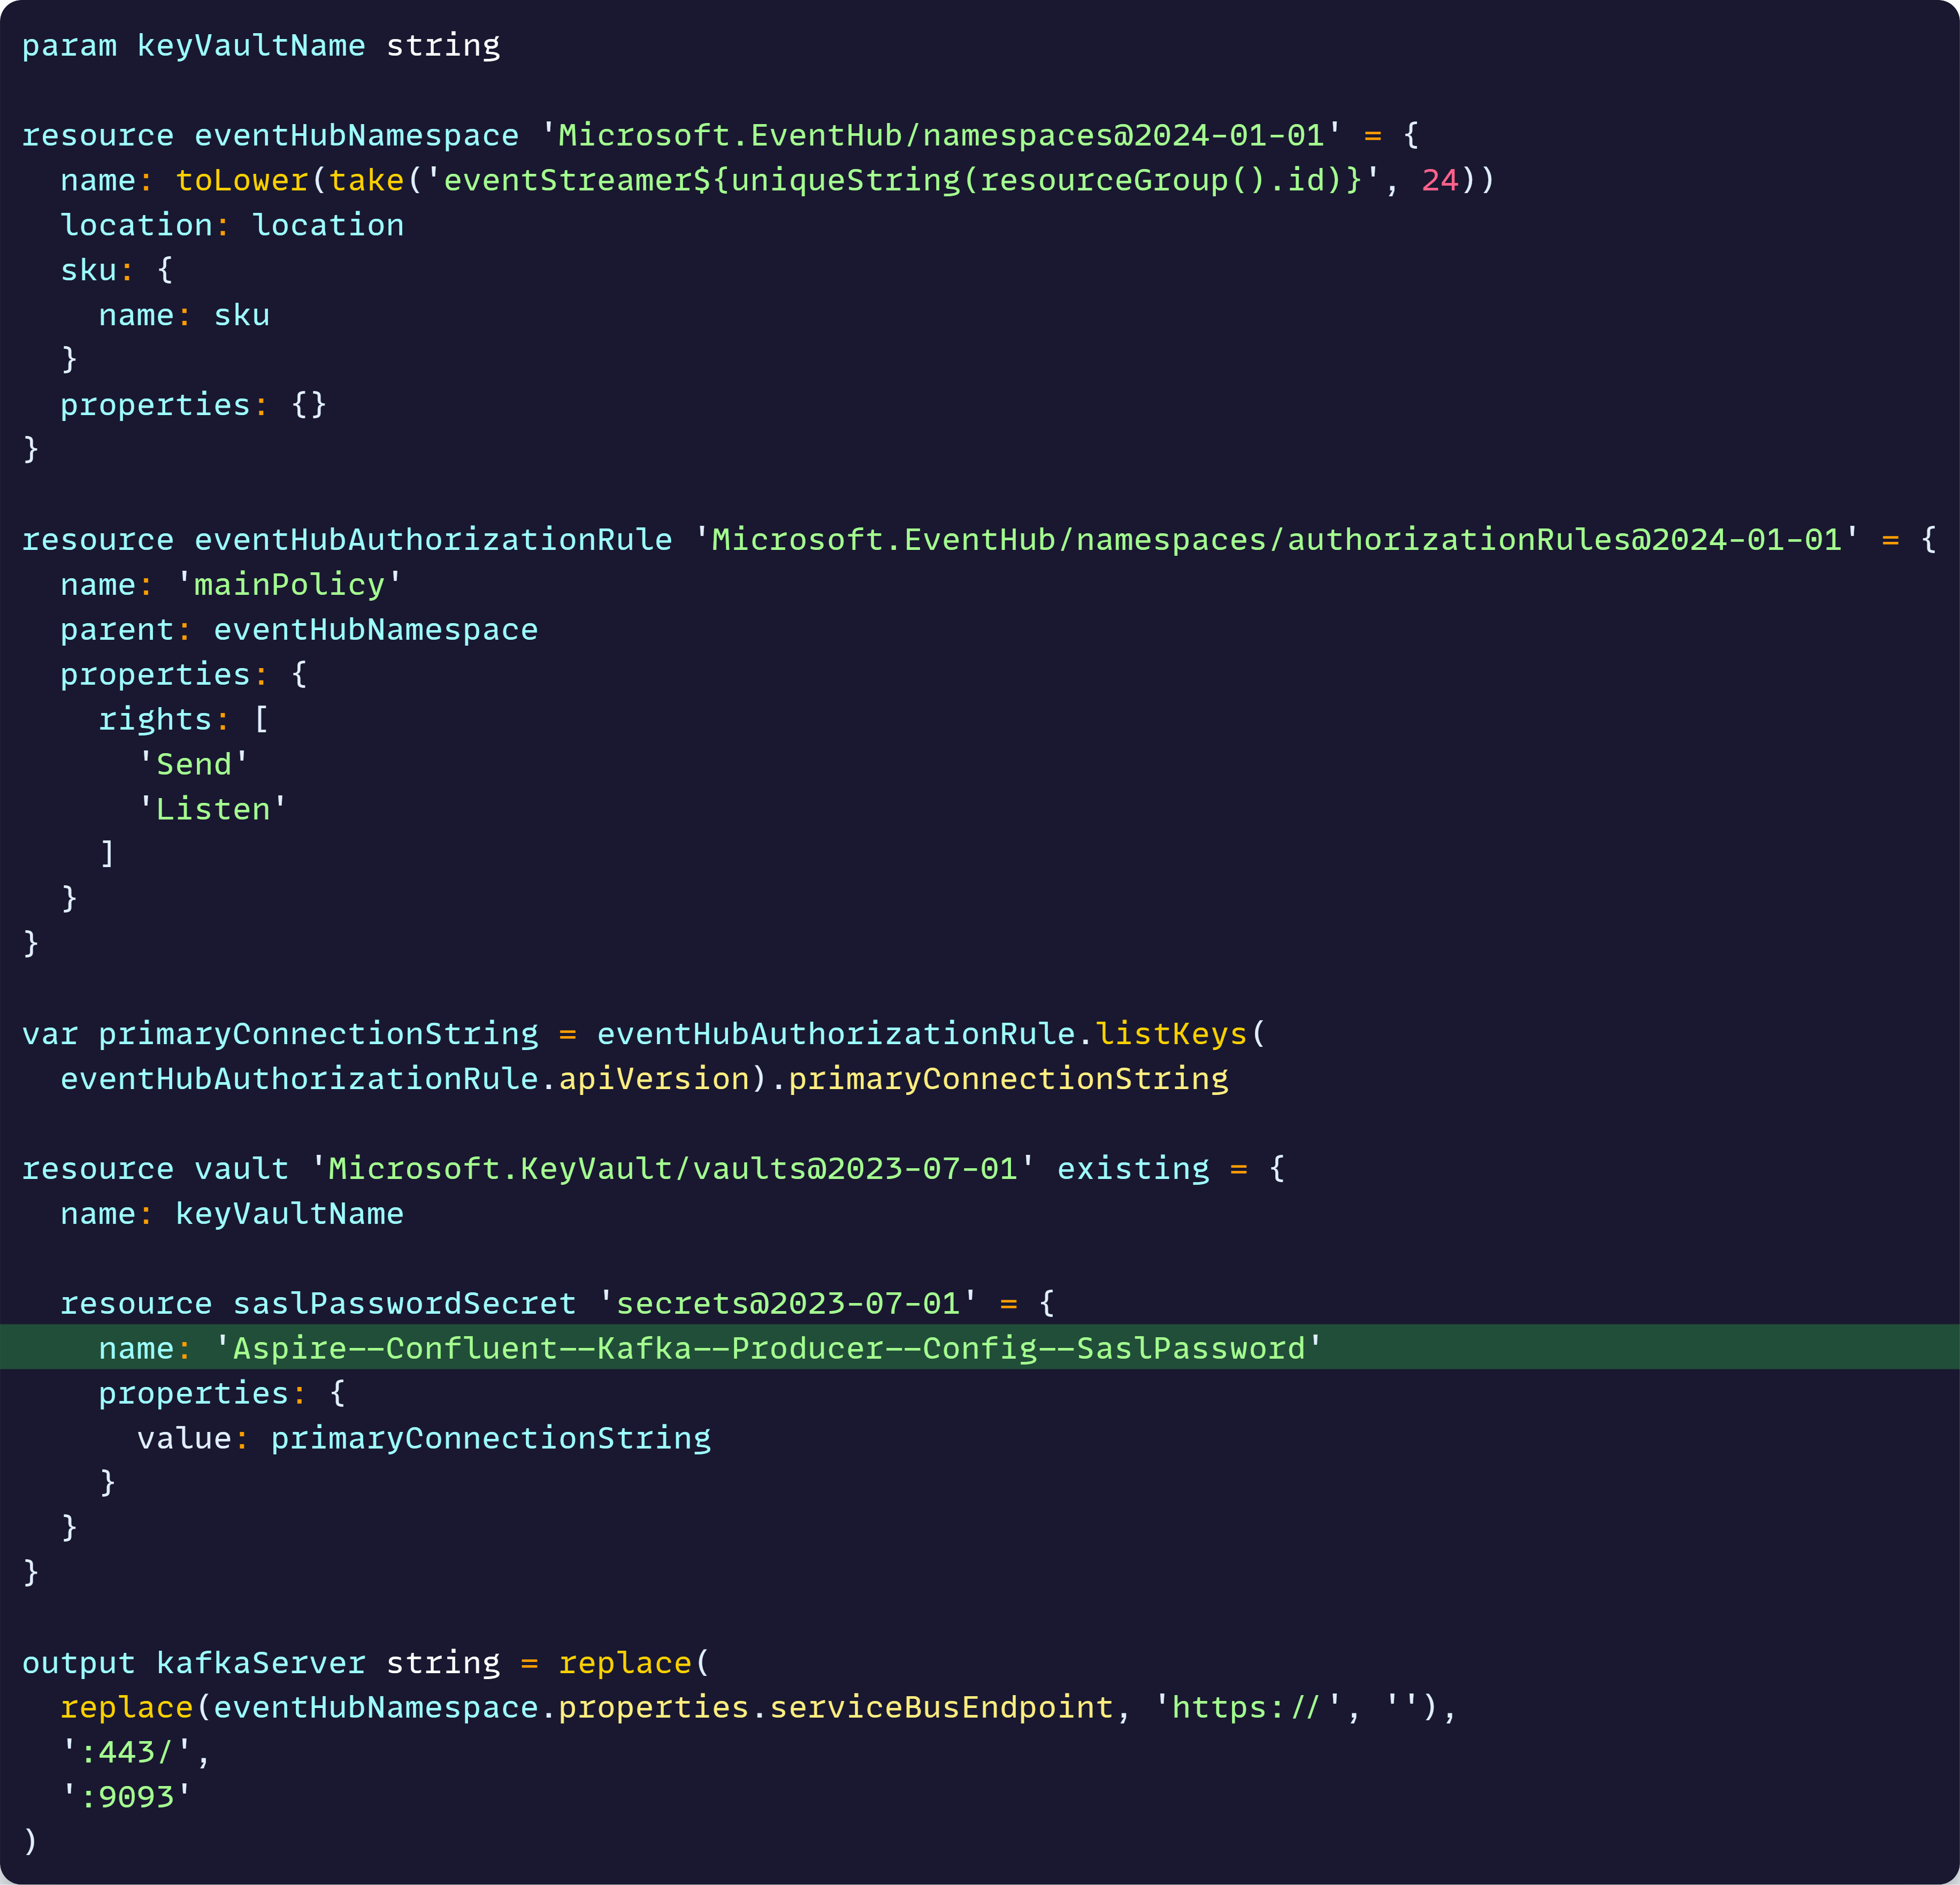
Notice how this Bicep file not only defines my Event Hubs namespace, but also stores the connection string into a Key Vault secret using a format that can be easily understood by my .NET applications (via the Azure Key Vault configuration provider).
After provisioning, my Key Vault has secrets for every single connection string and secret that any of my microservices might need:
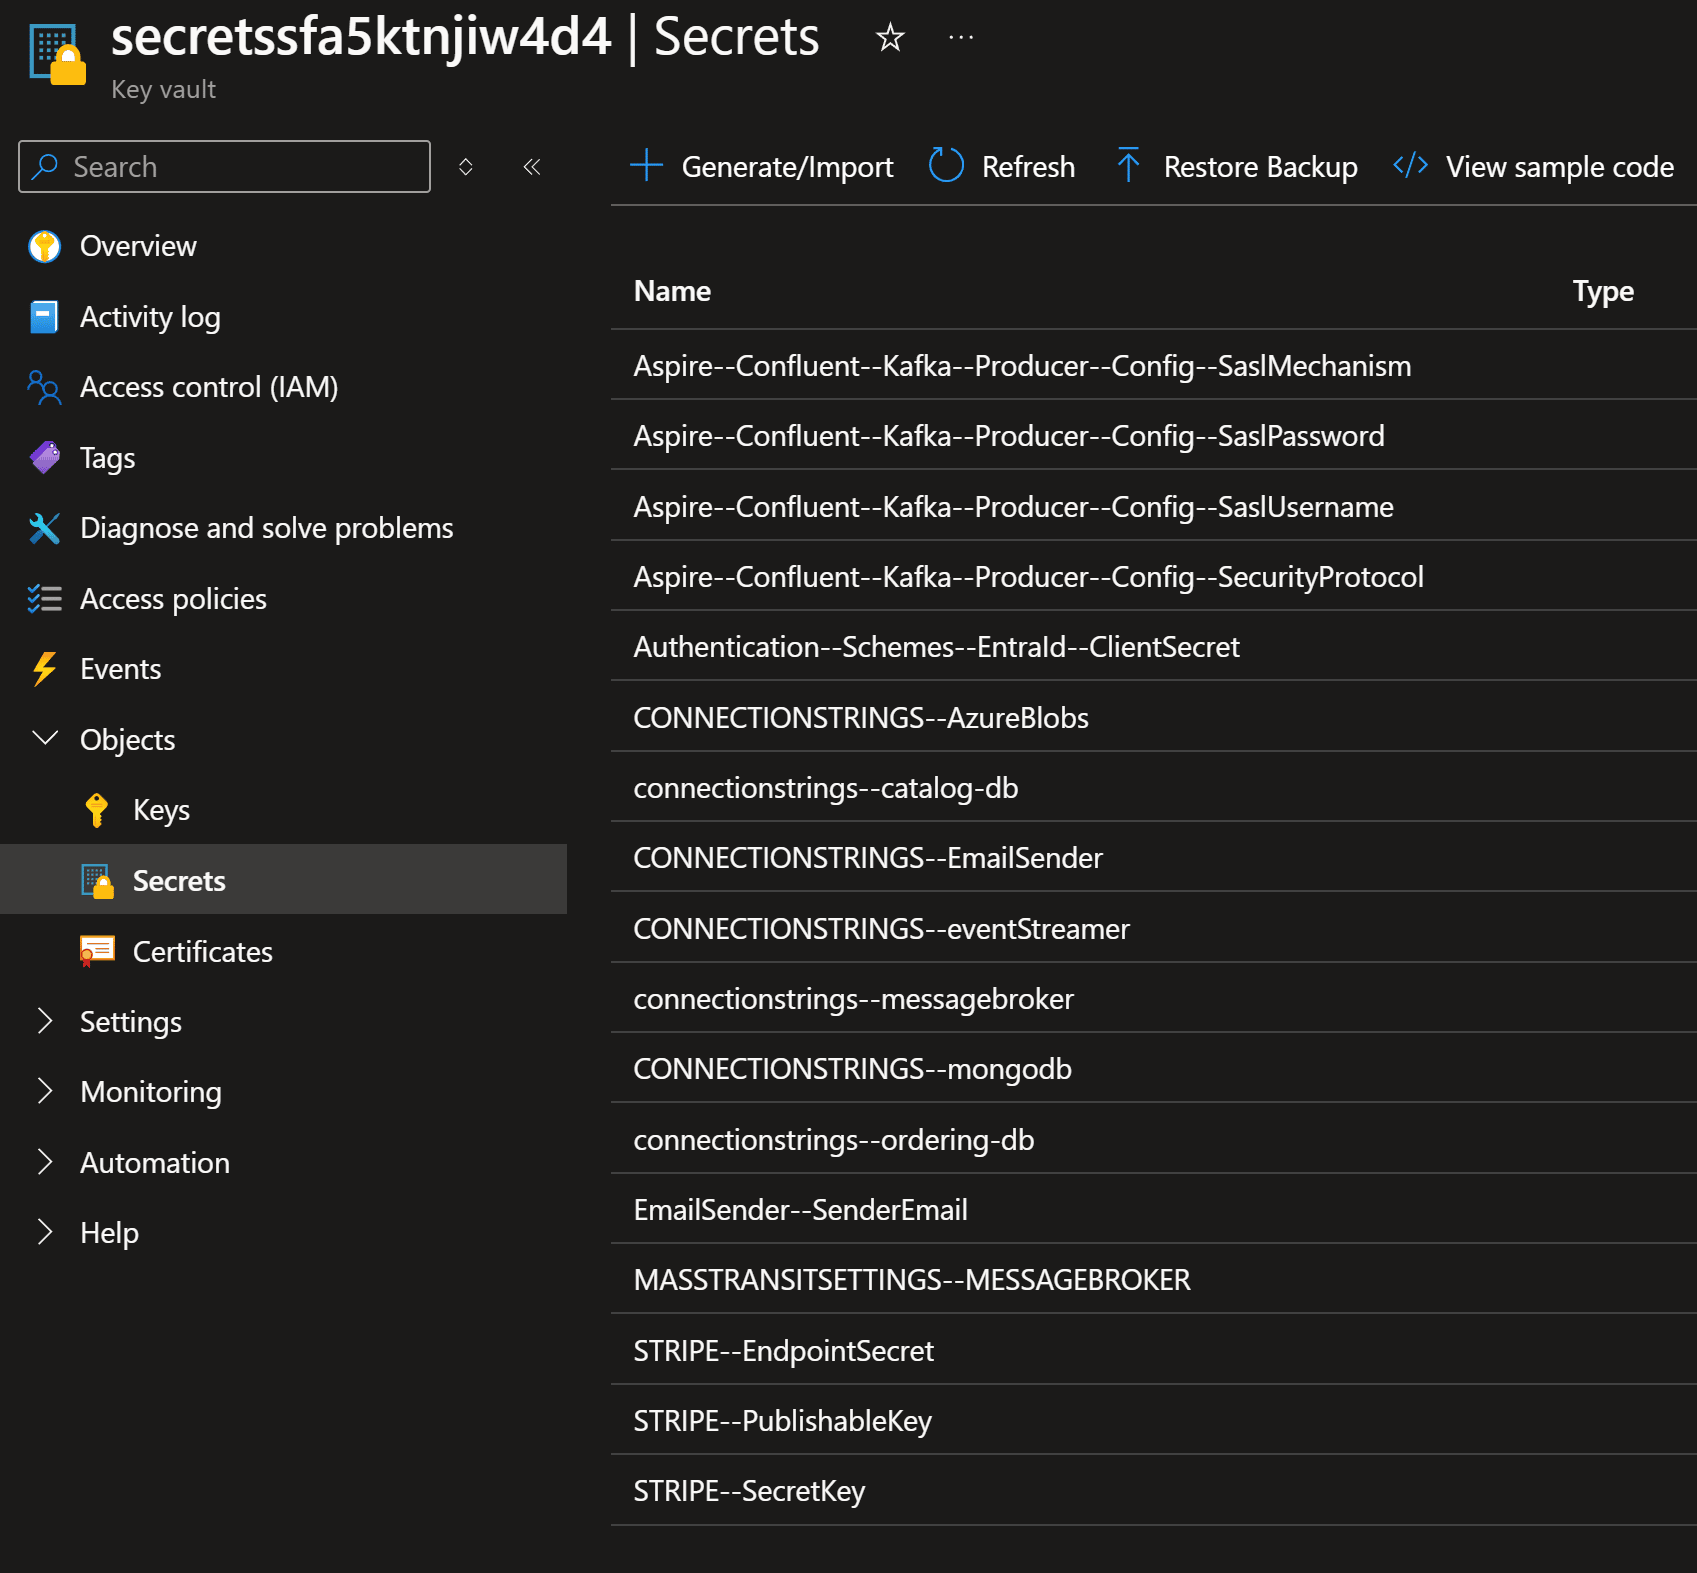
How can my .NET microservices take advantage of those?
Using the Azure Key Vault configuration provider
The Key Vault configuration provider is a small .NET library that acts as another configuration source for your .NET applications, so that you can use your Key Vault secrets in place of your normal configuration.
For instance, during local development, each microservice defines all the connection strings in appsettings.json, like this:

But if you have a secret named exactly connectionstrings–catalog-db in your Key Vault, it can replace the current value you can see there, because it follows the expected configuration hierarchy.
As you saw, we are already following the convention in our Key Vault, so all that’s missing is adding the Key Vault configuration provider.
Here’s where .NET Aspire actually helps, since its Key Vault integration will use that configuration provider behind the scenes.
So, all you do is add your vault URI and your managed identity client id to your appsettings.json like this:
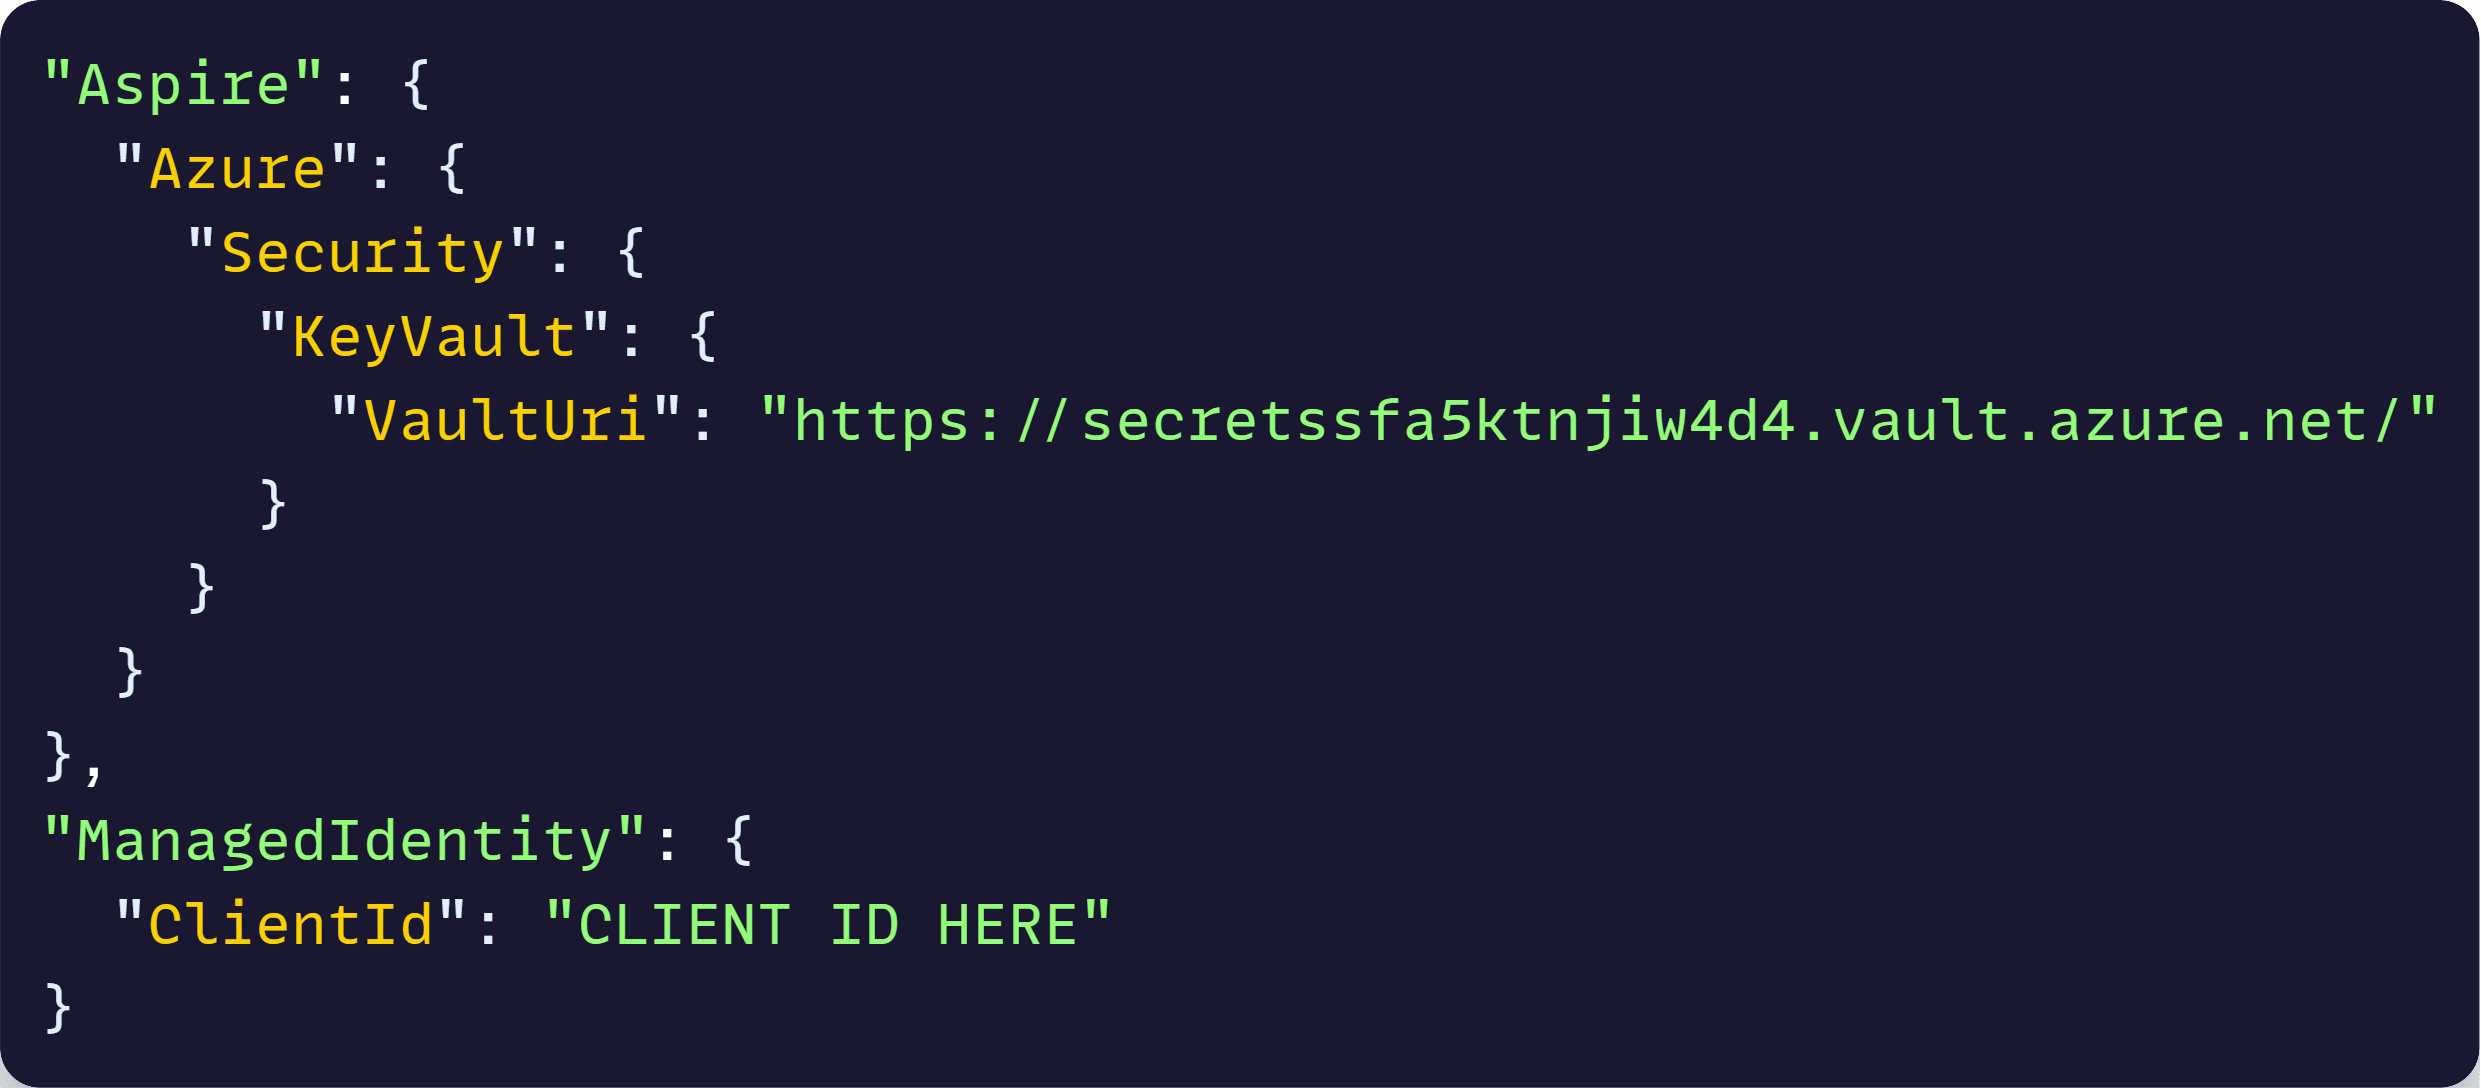
And then, after installing the Aspire.Azure.Security.KeyVault NuGet package, we can add this to Program.cs:

With that, when your microservice boots in the cloud, it will connect to the specified Key Vault and populate all configuration values from the secrets populated during infra provisioning.
Also, notice the use of managed identities there. That clientId identifies all our microservices in Azure, and the associated managed identity has been granted reader access to the vault secrets.
Now, how do we go about deploying one of these microservices from their own repo?
Microservice deployment via AZD
.NET Aspire apps are deployed via the Azure Developer CLI (azd). But, what you might have not realized yet (I just did!) is that you can use azd all by itself, without involving any Aspire integration.
This works really nice for our microservices since we want to deploy them to Azure Container Apps, and azd is pretty much designed with this scenario in mind.
So, all you do is run the azd init command in your microservice repo, and you’ll end up with a few new files:
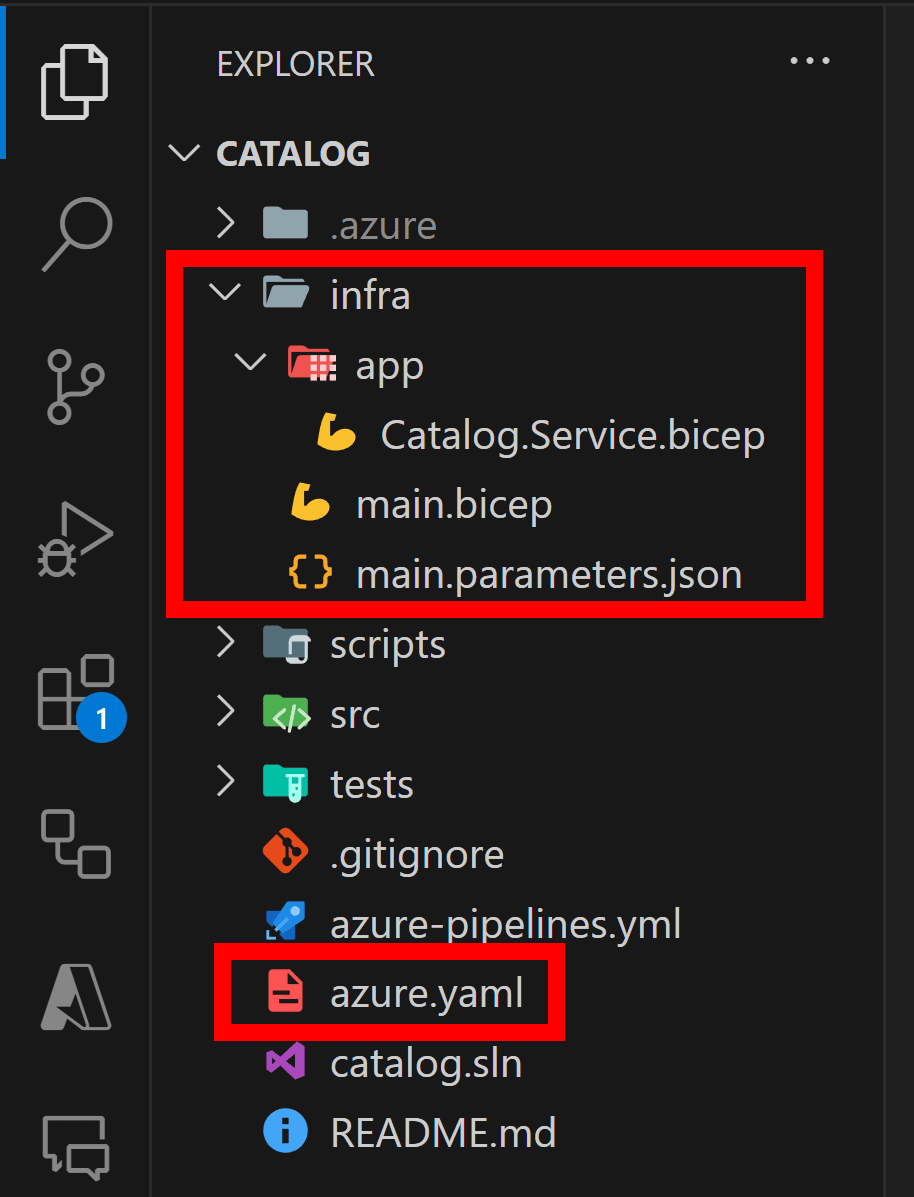
Catalog.Service.bicep there describes exactly how to deploy the microservice as an Azure Container App, main.bicep is the entry point to the Bicep deployment and main.parameters.json definese the parameters needed for the deployment.
The really nice thing about azd (which plain Bicep deployments can’t do) is use environment variables directly in the parameters file, like this:
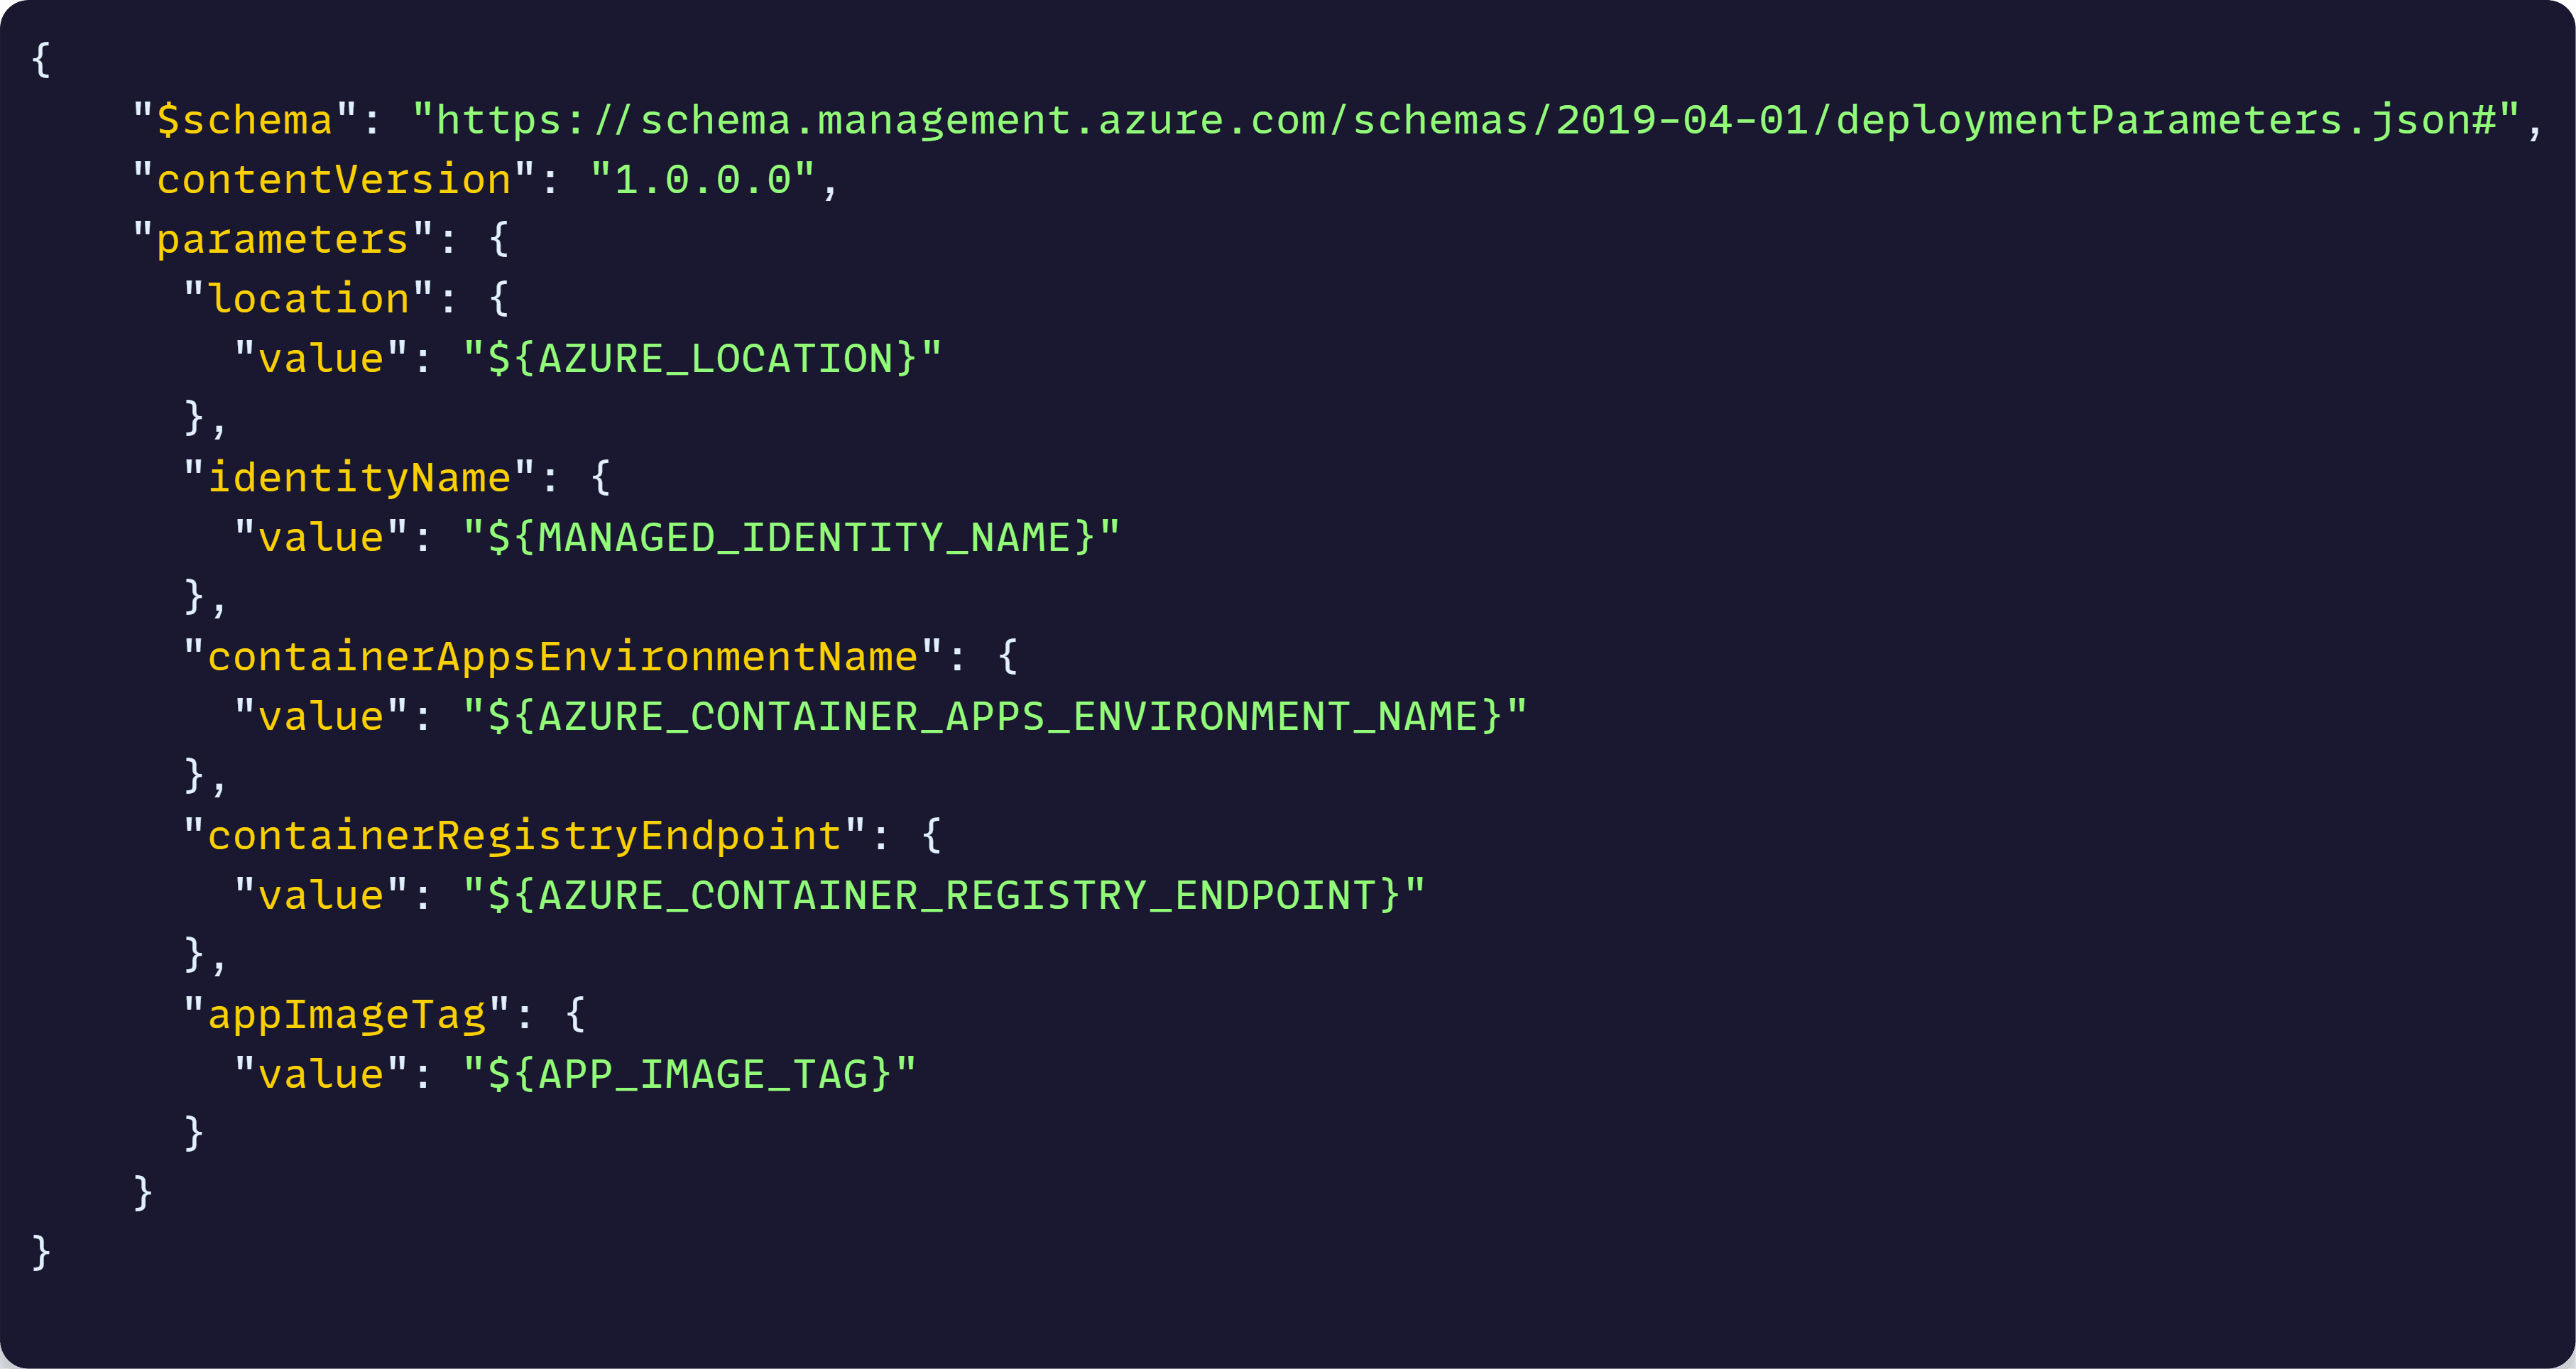
The values are environment variables that you can pass from whichever terminal or command line you’d like to use, which is going to be key to our Azure Pipelines deployment later.
To kick off the deployment all you do is, again, run azd provision:
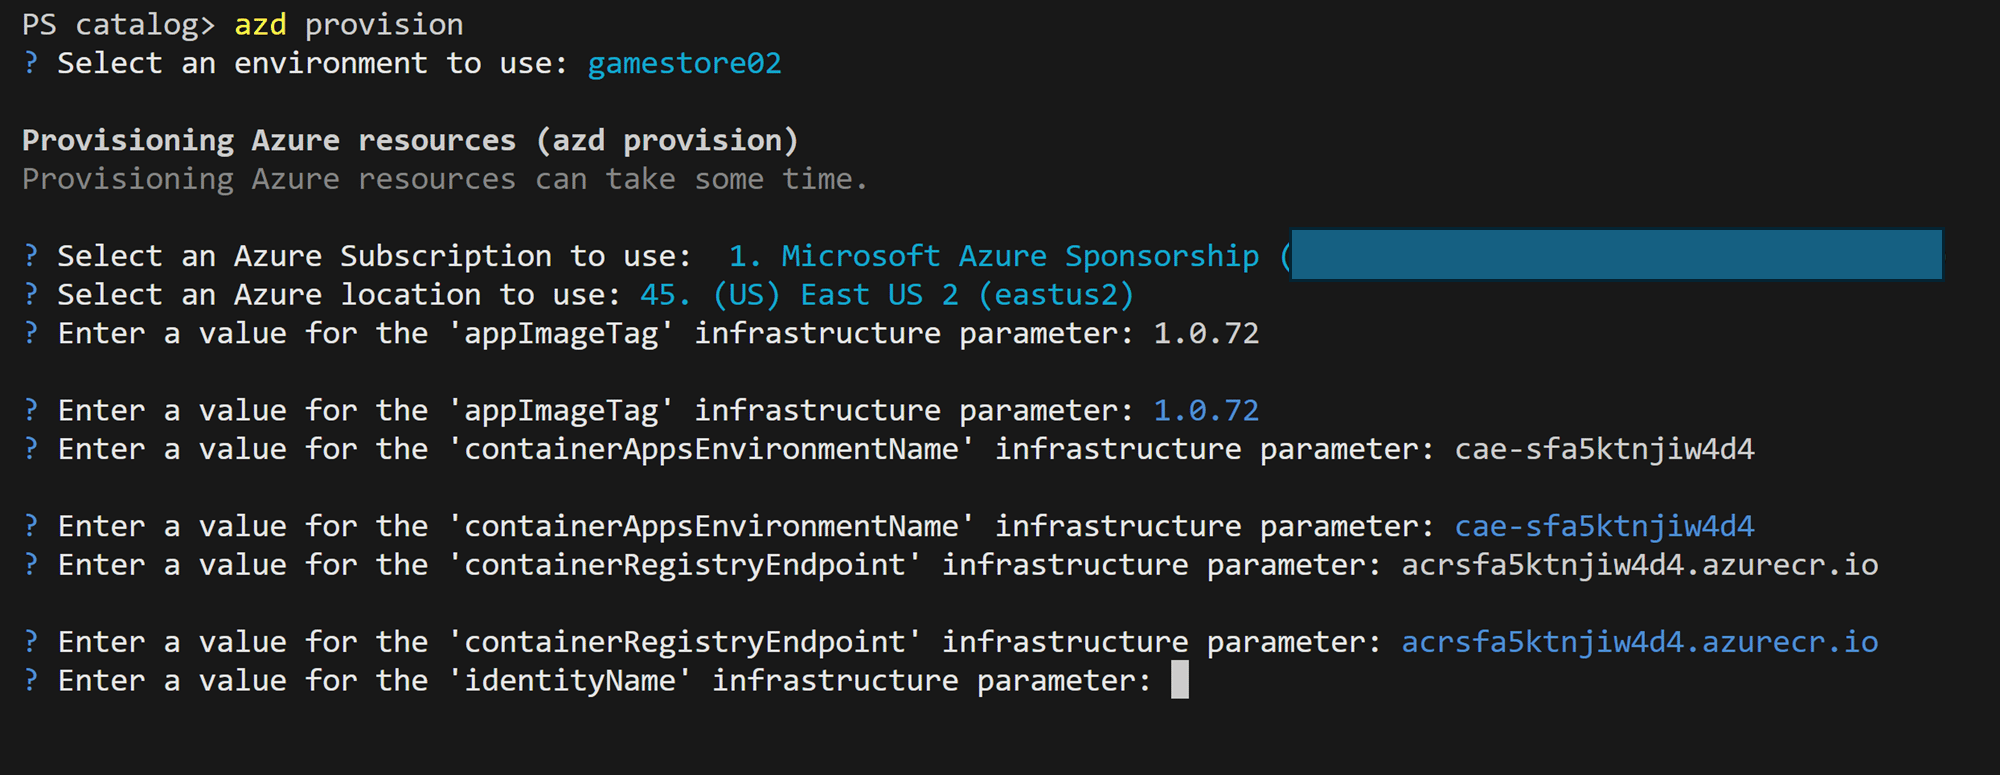
In your dev box, it will notice the parameters and env vars we have defined and will prompt you for each one, after which the actual deployment will start. In Azure Pipelines, we’ll just provide the env vars directly, and no prompting will happen.
Closing
Well, once again, this newsletter got longer than expected, so we’ll continue on the next one with the steps needed to hook up our microservice deployment to Azure Pipelines.
Until next time!
Julio
Whenever you’re ready, there are 3 ways I can help you:
-
.NET Backend Developer Bootcamp: A complete path from ASP.NET Core fundamentals to building, containerizing, and deploying production-ready, cloud-native apps on Azure.
-
Building Microservices With .NET: Transform the way you build .NET systems at scale.
-
Get the full source code: Download the working project from this article, grab exclusive course discounts, and join a private .NET community.
