Read time: 6 minutes
Testing Stripe webhooks requires constantly switching between your Aspire dashboard and terminal commands, breaking your development flow every time you need to trigger a payment.
Last week, I showed you how to build a custom .NET Aspire hosting integration for the Stripe CLI, turning messy infrastructure code into a clean, reusable API.
But there’s still one piece of friction left: you’re still opening terminals to trigger successful payments via the Stripe CLI every time you want to test your webhook logic.
What if you could eliminate those context switches entirely? What if triggering successful payments was just another button in your Aspire dashboard, right alongside your other resource commands?
Today, I’ll show you how to add a custom command to your Aspire dashboard that triggers successful payments with one click. No more terminals. No extra tooling.
Let’s dive in.
Simulating a successful payment
As I covered in this previous article, you can easily simulate a successful payment using the Stripe CLI and the trigger command:
stripe trigger payment_intent.succeeded
However, that’s not the only way to do it. You can also use the Stripe .NET client and a little bit of C# for this.
Start by installing the latest Stripe.net NuGet package, which in this case I’ll add to my StripeCLI.Hosting project, where my StripeCLI Aspire resource is defined:
<Project Sdk="Microsoft.NET.Sdk">

  <PropertyGroup>
    <TargetFramework>net9.0</TargetFramework>
    <ImplicitUsings>enable</ImplicitUsings>
    <Nullable>enable</Nullable>
  </PropertyGroup>

  <ItemGroup>
    <PackageReference Include="Aspire.Hosting" Version="9.4.2" />
    <PackageReference Include="Stripe.net" Version="48.5.0" />
  </ItemGroup>

</Project>
Now, let’s update our StripeCliResourceBuilderExtensions by adding a new method that will trigger the successful payment via the PaymentIntents object:
private static async Task<ExecuteCommandResult> OnRunTriggerPaymentCommandAsync(
    IResourceBuilder<StripeCliResource> builder)
{
    try
    {
        var apiKey = await builder.Resource.ApiKey.GetValueAsync(
            CancellationToken.None);
        var client = new StripeClient(apiKey);

        var options = new PaymentIntentCreateOptions
        {
            Amount = 100,
            Currency = "usd",
            PaymentMethod = "pm_card_visa",
            Confirm = true,
            ReturnUrl = "https://example.com/return"
        };

        client.V1.PaymentIntents.Create(options);

        return CommandResults.Success();
    }
    catch (Exception ex)
    {
        return CommandResults.Failure(ex.Message);
    }
}
A few things about this method:
- It returns a
Task<ExecuteCommandResult>object so that we can report the success or failure result of the command execution. - It retrieves the API key, needed to connect to your Stripe account, from the ApiKey property on our StripeCLI resource.
- It uses pm_card_visa as the payment method so that Stripe treats this as test code, as opposed to a real credit card transaction.
- We do Confirm = true so that this payment is confirmed immediately, as opposed to waiting for customer input.
- The ReturnUrl parameter is where Stripe would redirect the customer after payment, but here is just a placeholder to satisfy the requirement of this API.
Next, let’s define the command that will invoke this logic.
Adding a custom trigger payment command
Adding custom commands to your Aspire application model is pretty straightforward. Here we define it as an extension to our IResourceBuilder<StripeCliResource>:
public static IResourceBuilder<StripeCliResource> WithTriggerPaymentCommand(
    this IResourceBuilder<StripeCliResource> builder)
{
    var commandOptions = new CommandOptions
    {
        IconName = "Payment",
        IconVariant = IconVariant.Filled,
        IsHighlighted = true,
        Description = "Trigger a test payment using Stripe API",
    };

    builder.WithCommand(
        name: "trigger-payment",
        displayName: "Trigger Payment",
        executeCommand: context => OnRunTriggerPaymentCommandAsync(builder),
        commandOptions: commandOptions);

    return builder;
}
As you can see, we start by defining a CommandOptions object with the visual characteristics of our command.
Then we use that, plus our OnRunTriggerPaymentCommandAsync method, for the WithCommand call, which adds the new command to the application model.
That command is functional, but let’s add one more thing.
Updating the command state
It’s a good practice not to let a command be enabled until its parent resource reports a healthy status.
In our case, it makes sense to do this since we don’t want to start triggering payments until the Stripe CLI has successfully started listening for events from our Stripe account.
Let’s start by adding a new simple method to update the command state based on the resource health status:
private static ResourceCommandState OnUpdateResourceState(
    UpdateCommandStateContext context)
{
    return context.ResourceSnapshot.HealthStatus is HealthStatus.Healthy
        ? ResourceCommandState.Enabled
        : ResourceCommandState.Disabled;
}
And then assign it as a callback to our command options:
public static IResourceBuilder<StripeCliResource> WithTriggerPaymentCommand(
        this IResourceBuilder<StripeCliResource> builder)
{
    var commandOptions = new CommandOptions
    {
        IconName = "Payment",
        IconVariant = IconVariant.Filled,
        IsHighlighted = true,
        Description = "Trigger a test payment using Stripe API",
        UpdateState = OnUpdateResourceState
    };

    builder.WithCommand(
        name: "trigger-payment",
        displayName: "Trigger Payment",
        executeCommand: context => OnRunTriggerPaymentCommandAsync(builder),
        commandOptions: commandOptions);

    return builder;
}
Our custom command is ready. Now, let’s use it.
Using the Trigger Payment command
Expanding from what we did last week, all we need to do to enable the new custom command is add one line:
var stripeCli = builder.AddStripeCli("stripeCli", stripeApiKey)
                       .WithWebhookEventListener(forwardExpr, stripeEndpointSecret)
                       .WithPublishableKey(stripePublishableKey)
                       .WithTriggerPaymentCommand();
Now, let’s start the Aspire application and browse to the dashboard, where we should immediately see the new command:
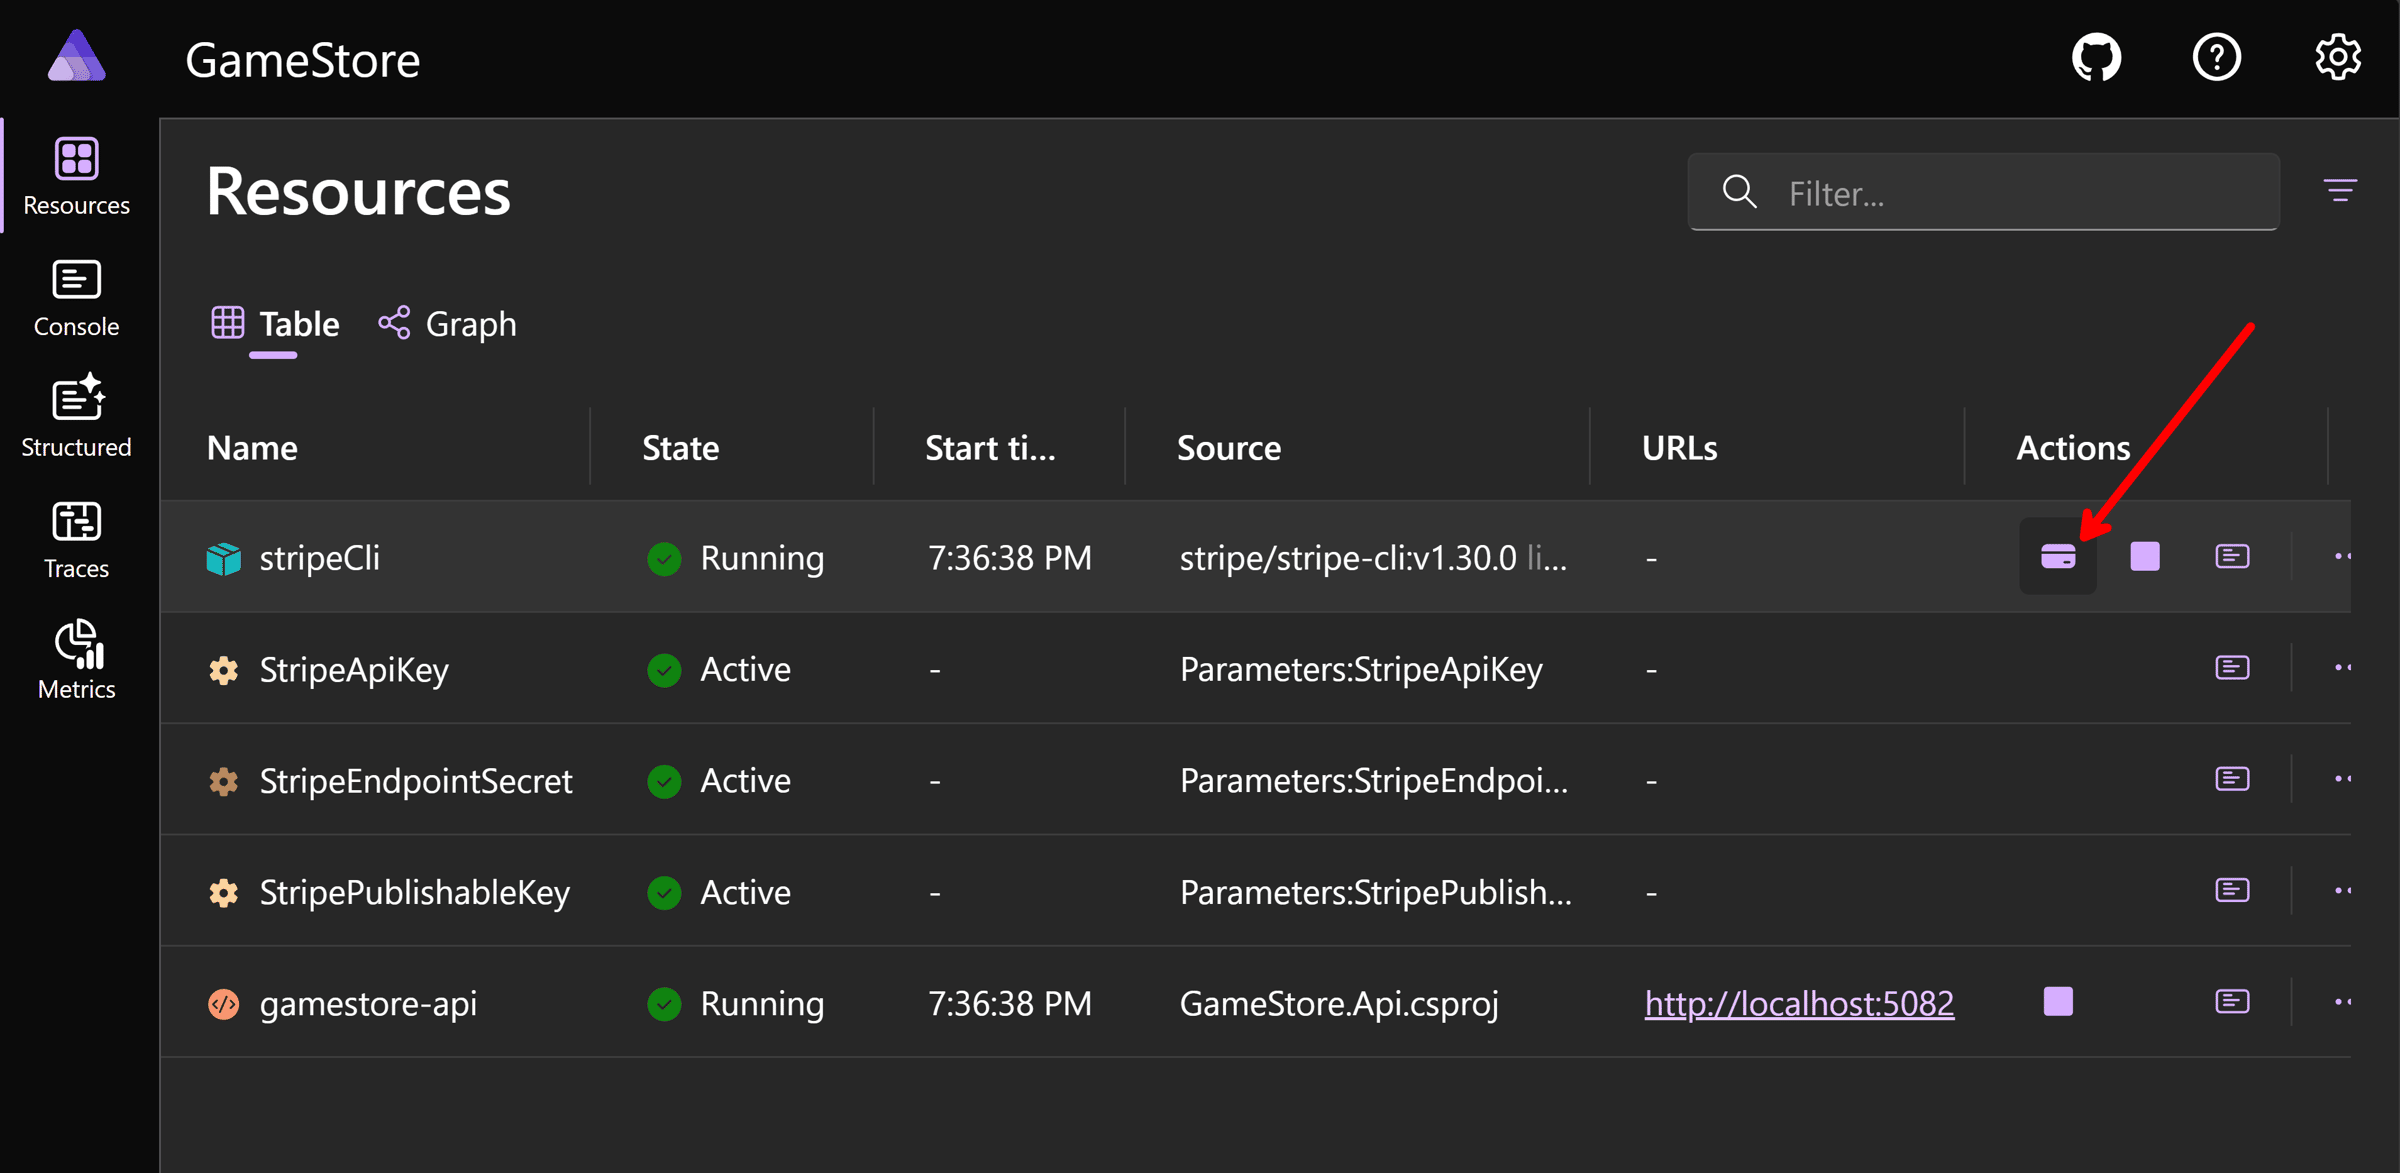
After clicking it, we can confirm the command was executed by taking a quick look at the Stripe CLI logs:
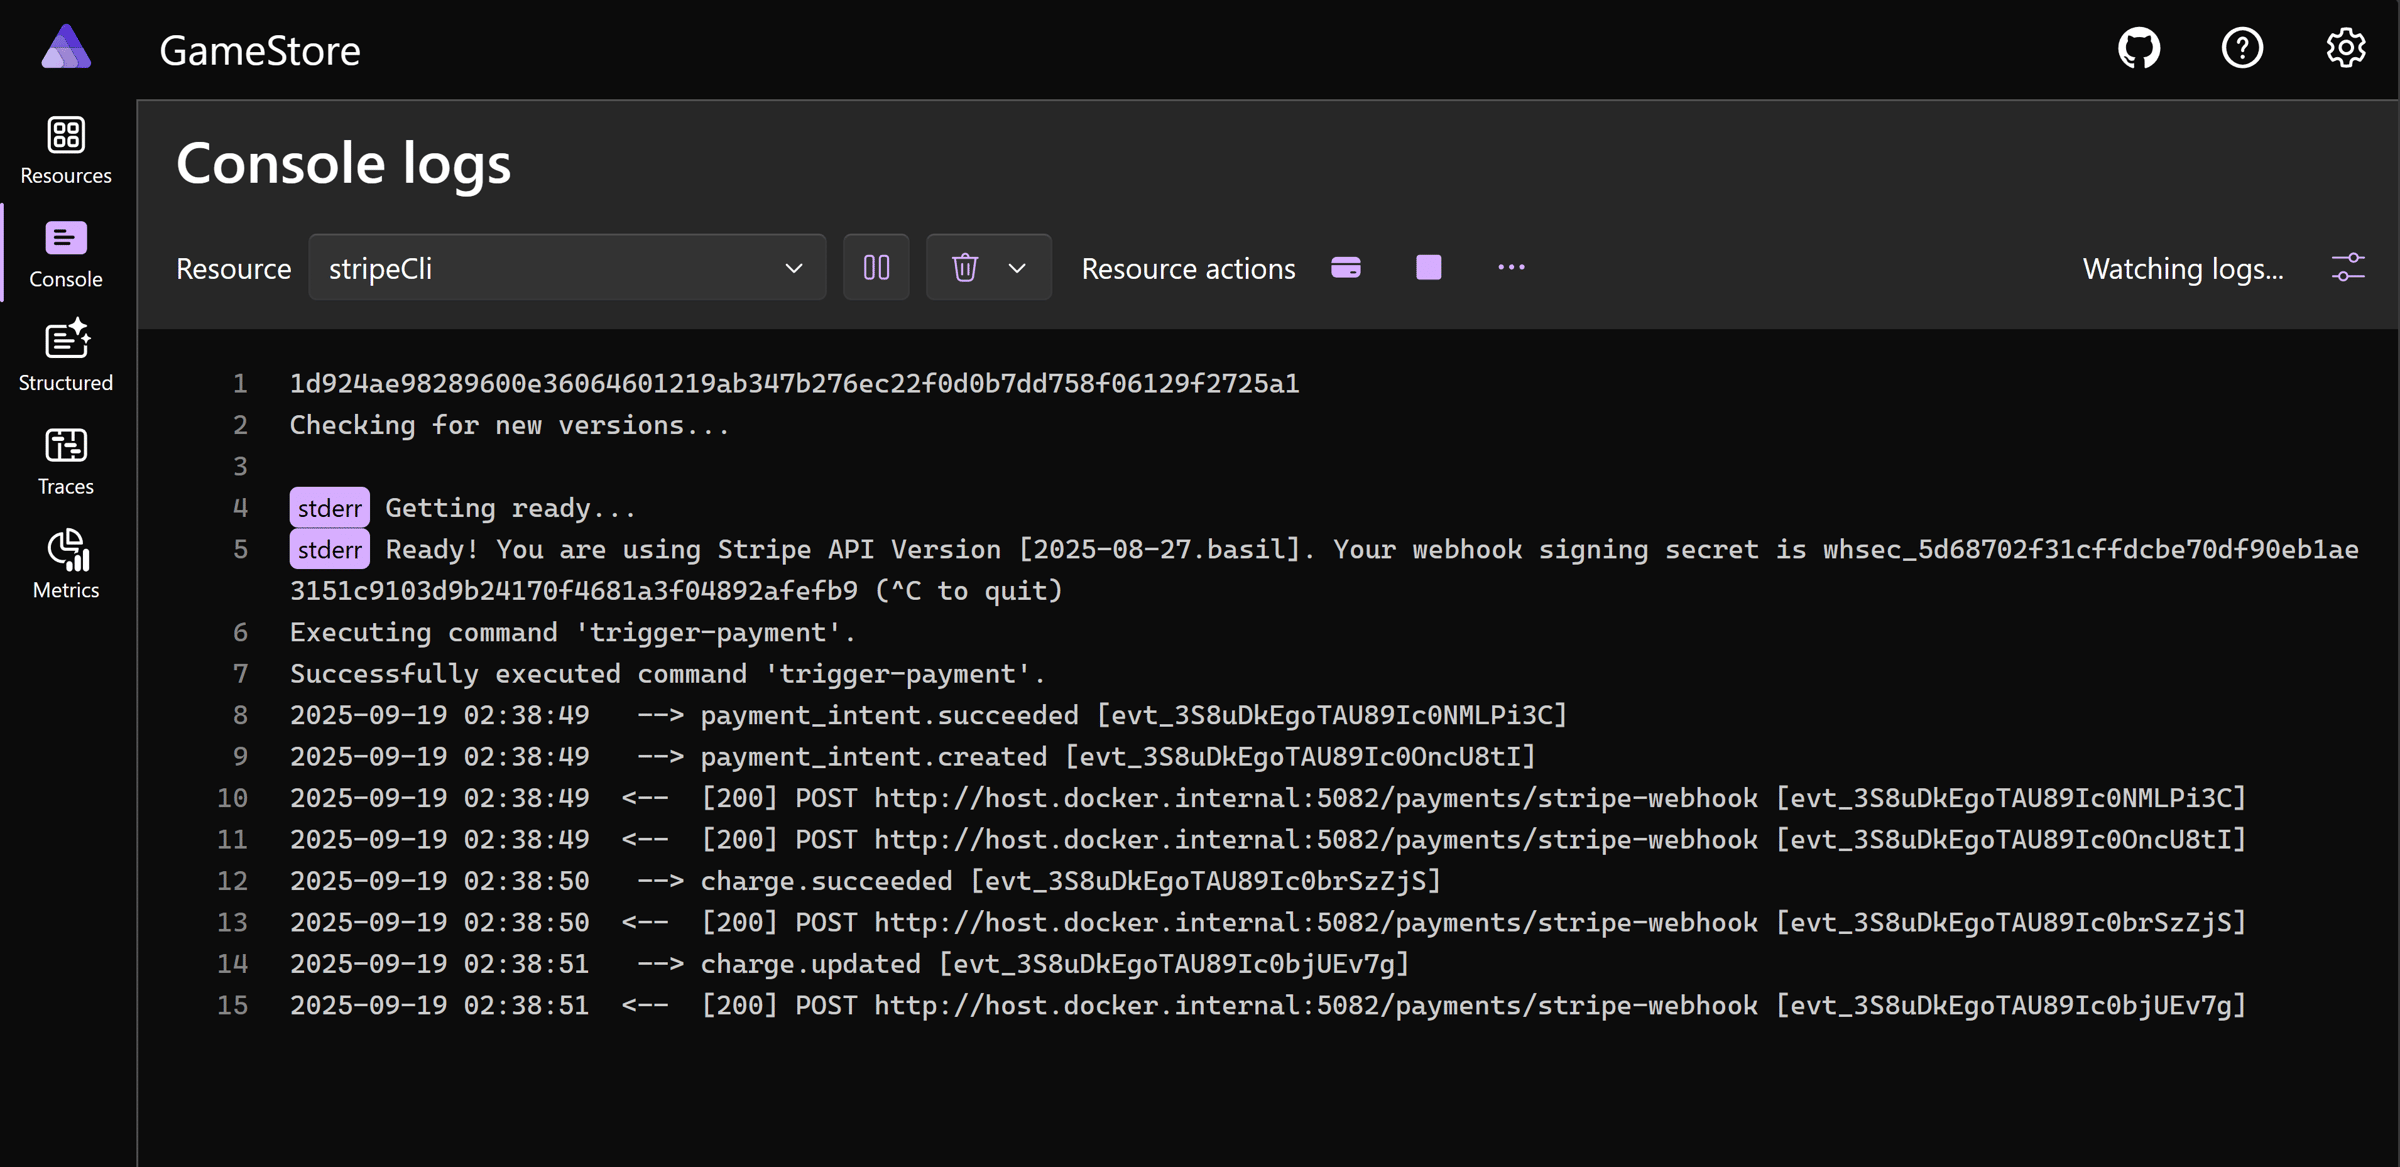
The CLI reports that it called our webhook and that the webhook responded with a 200 OK to all calls, including the one for our payment_intent.succeeded event.
Mission accomplished!
Wrapping Up
Context switching kills momentum. Every time you jump from your Aspire dashboard to a terminal to trigger a test payment, you’re breaking the mental model of your system.
Custom commands fix this by bringing everything into the same visual space. Your entire payment flow now happens in one unified view.
The best development experiences don’t feel like using tools - they just work.
And that’s it for today.
See you next Saturday.
Whenever you’re ready, here’s how I can help:
The .NET Developer Bootcamp: A complete path from ASP.NET Core fundamentals to building, containerizing, and deploying production-ready, cloud-native apps on Azure.
