Read time: 15 minutes
In one of my recent newsletters, I claimed OpenID Connect (OIDC) is the right way to configure authentication and authorization for your ASP.NET Core apps. No need to reinvent the wheel.
However, ASP.NET Core does not include a built-in OIDC server, so you are on your own trying to figure out what to use out of dozens of possible free, paid, local, or hosted options.
If you deploy your apps to Azure, a great option is Microsoft Entra ID, which I covered here. But, for local development, I find that to be overkill.
You should be able to run one command in your box and have everything needed to test your app with all the OIDC goodness without ever having to leave your box or pay for cloud services.
So today I’ll show you how to secure your ASP.NET Core Apps with OIDC and Keycloak, from scratch.
Let’s dive in.
What is Keycloak?
Keycloak is an open-source identity and access management (IAM) tool that helps secure applications and services.

I love to use it primarily for local development because:
- It’s easy to run it locally using nothing more than Docker.
- It has no cloud dependencies, making it fast and free from cloud-related costs.
- It has a simple web admin UI for managing users, roles, clients, scopes, and many other things.
- It is free and open-source, so you can go straight to the source if needed.
- It is OpenID Connect certified, so it must support all the OIDC goodness.
Now let’s see how to configure it for local development.
Video Walkthrough
If you prefer a visual guide, here’s a video tutorial covering everything related to the Keycloak setup and the ASP.NET Core back-end configuration:
Step 1: Run Keycloak via Docker
Make sure you have already installed and started Docker Desktop in your box, and then create a docker-compose.yml file somewhere in your repo with these contents:
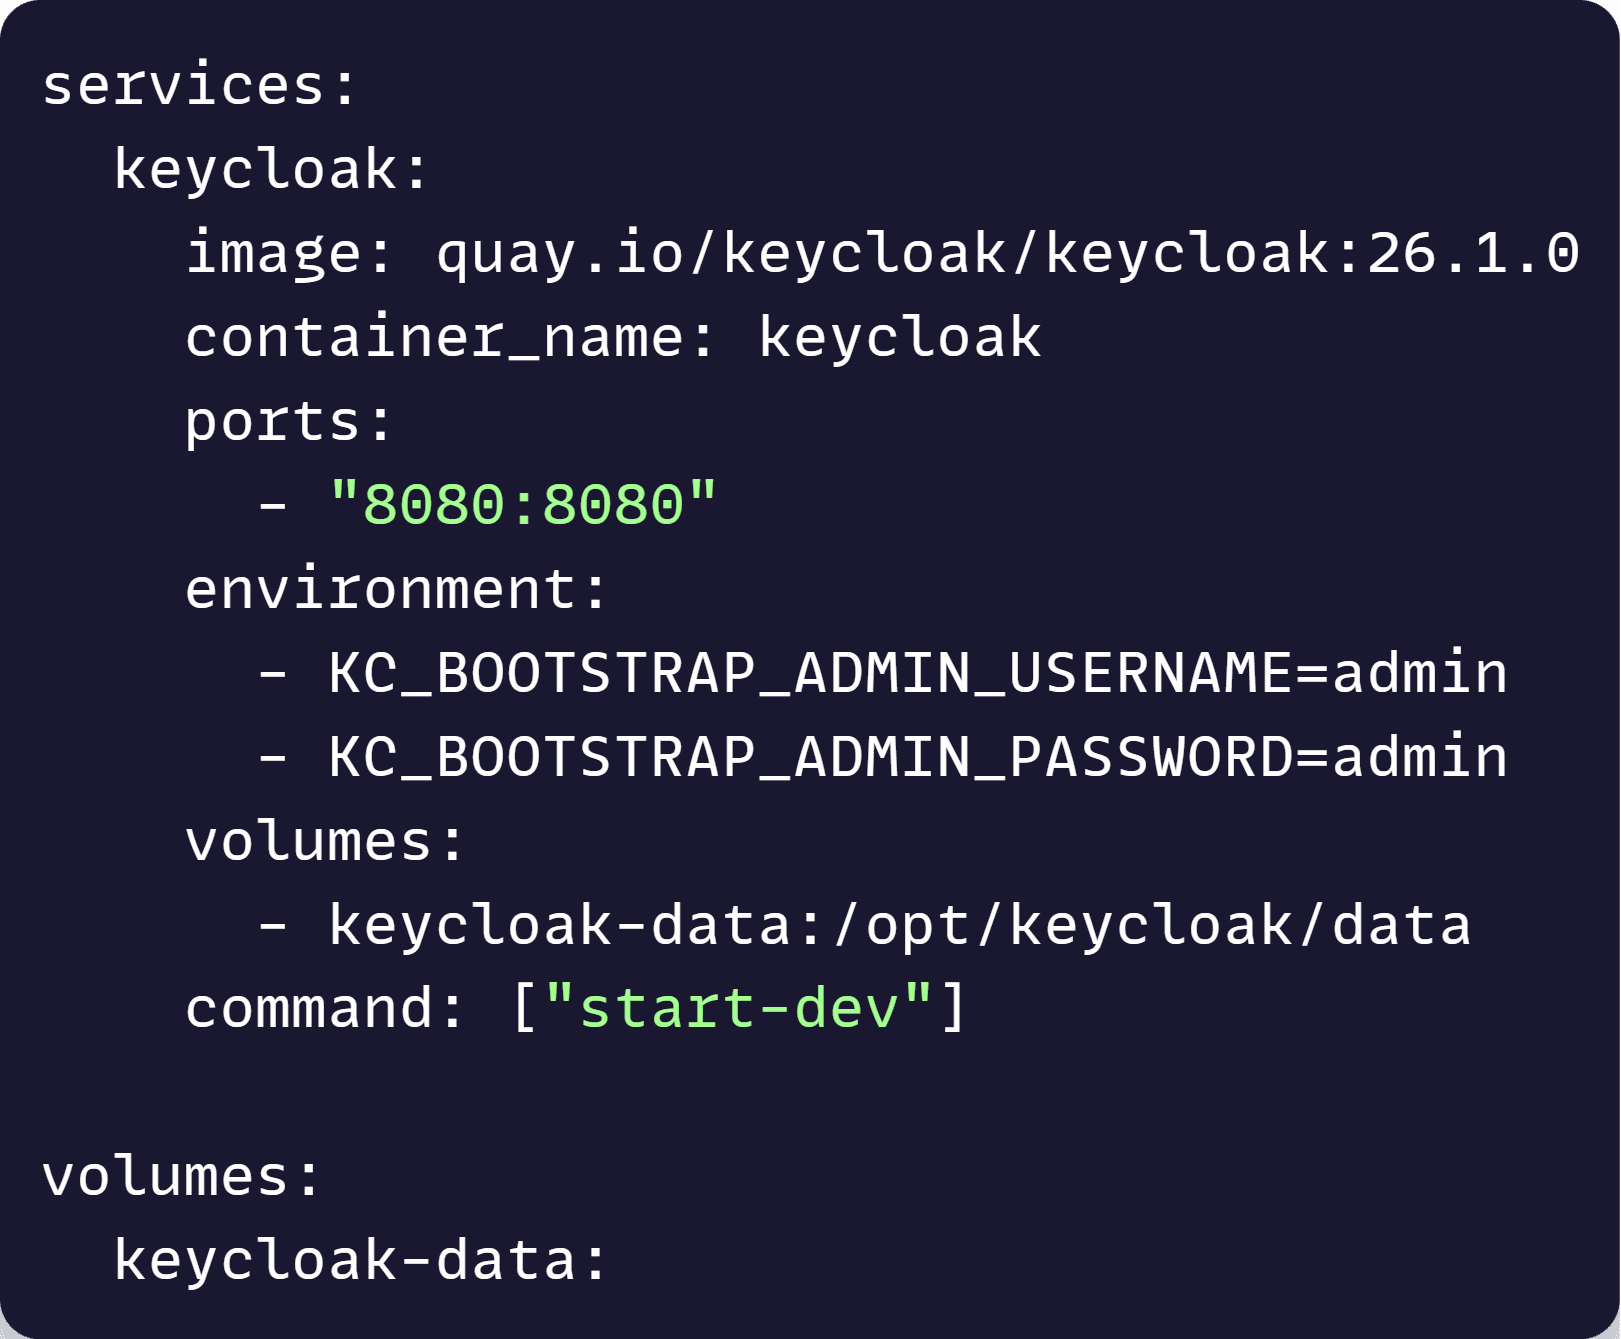
That configures the container to run Keycloak version 26.1, exposing its admin portal on port 8080, using admin for user and password, and with a volume to not lose our settings when stopping the container.
We also configure it to run in dev mode (start-dev), which avoids a few restrictions that should be enforced in Production only.
Open a terminal wherever you saved this file and run this:

Now open your browser and navigate to this page:

Sign in with admin for user and password and you’ll land on Keycloak’s home page:
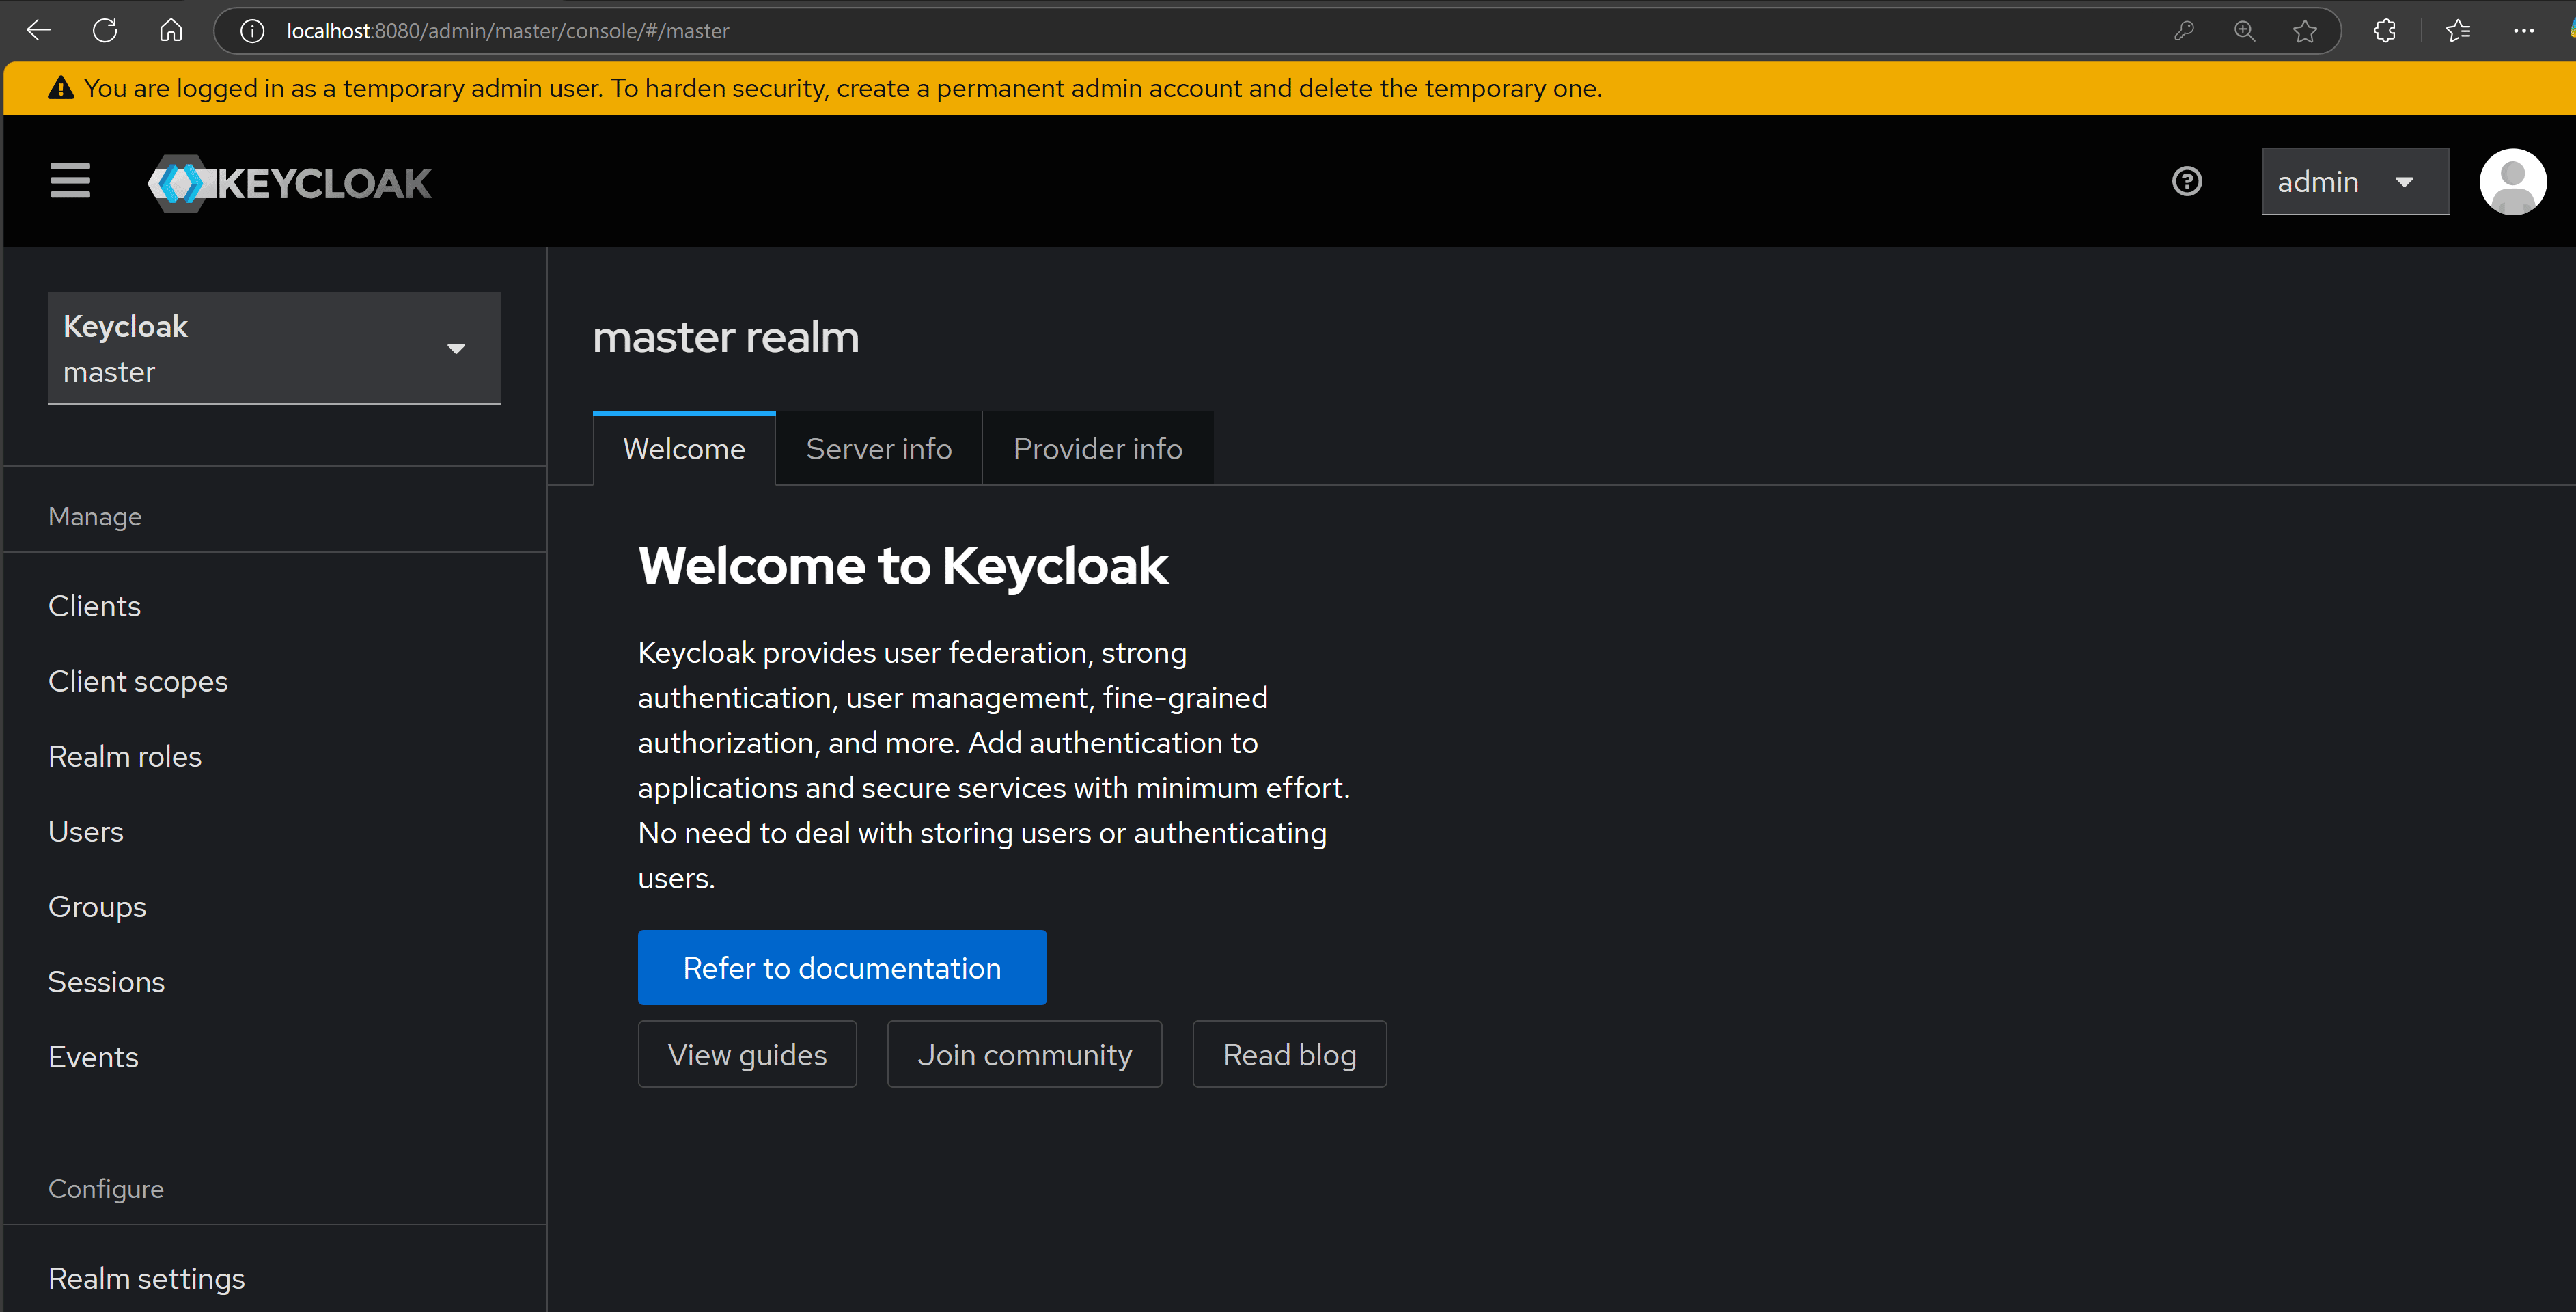
Now let’s configure the realm.
Step 2: Create the realm
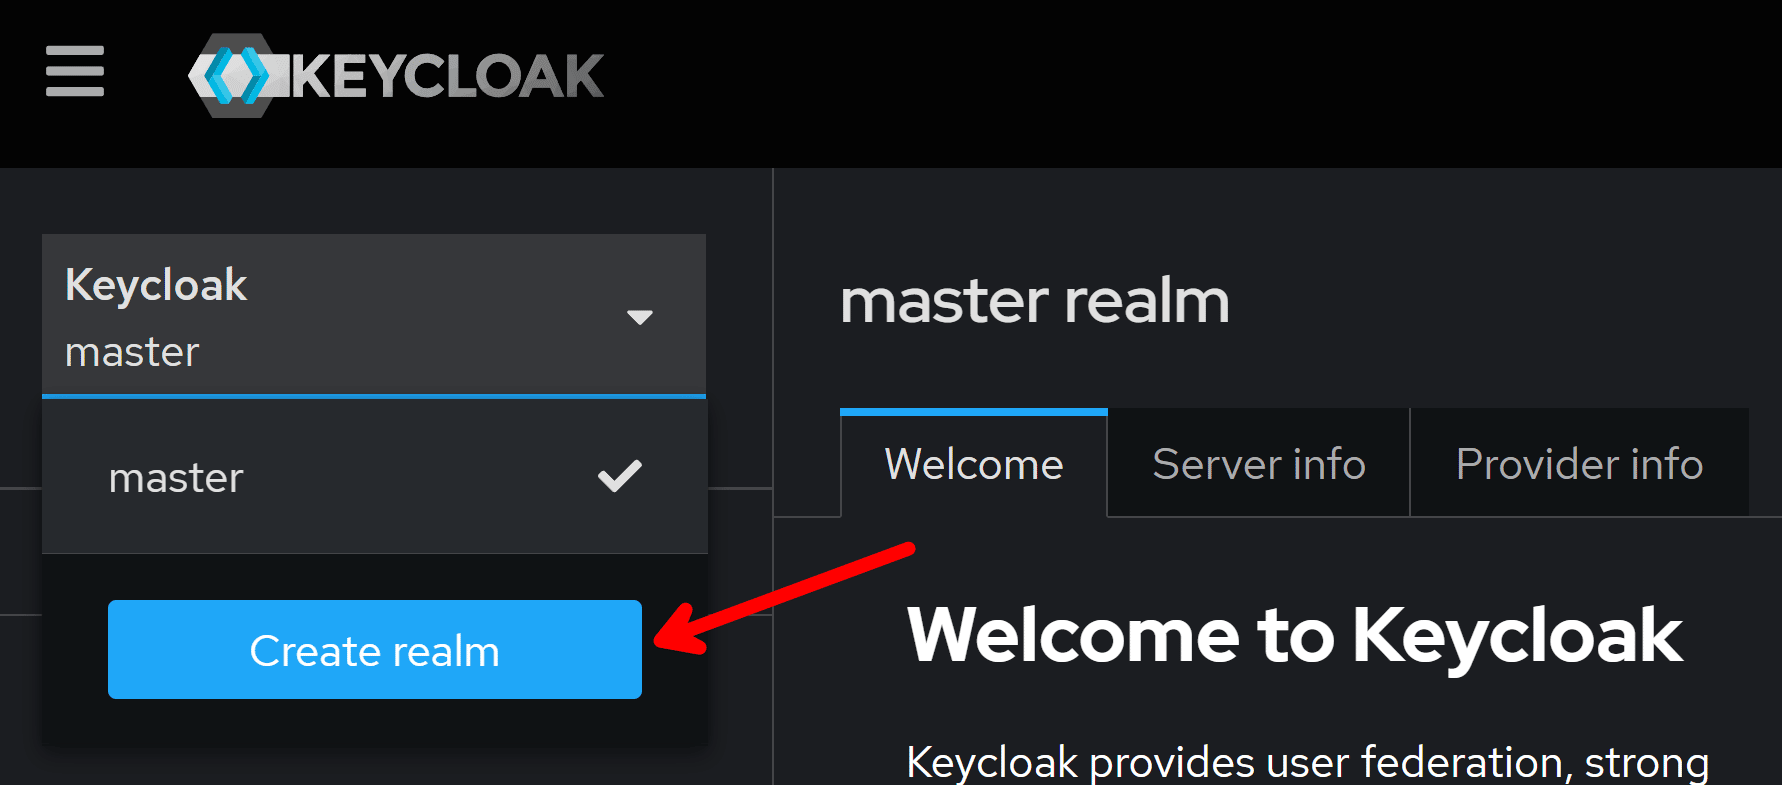
A Keycloak Realm is a logical space for managing users, roles, groups, and authentication configurations within a Keycloak instance.
You can create one by clicking on Create realm in the realm drop-down:
In the next screen enter a realm name that matches what your app is about and hit Create:
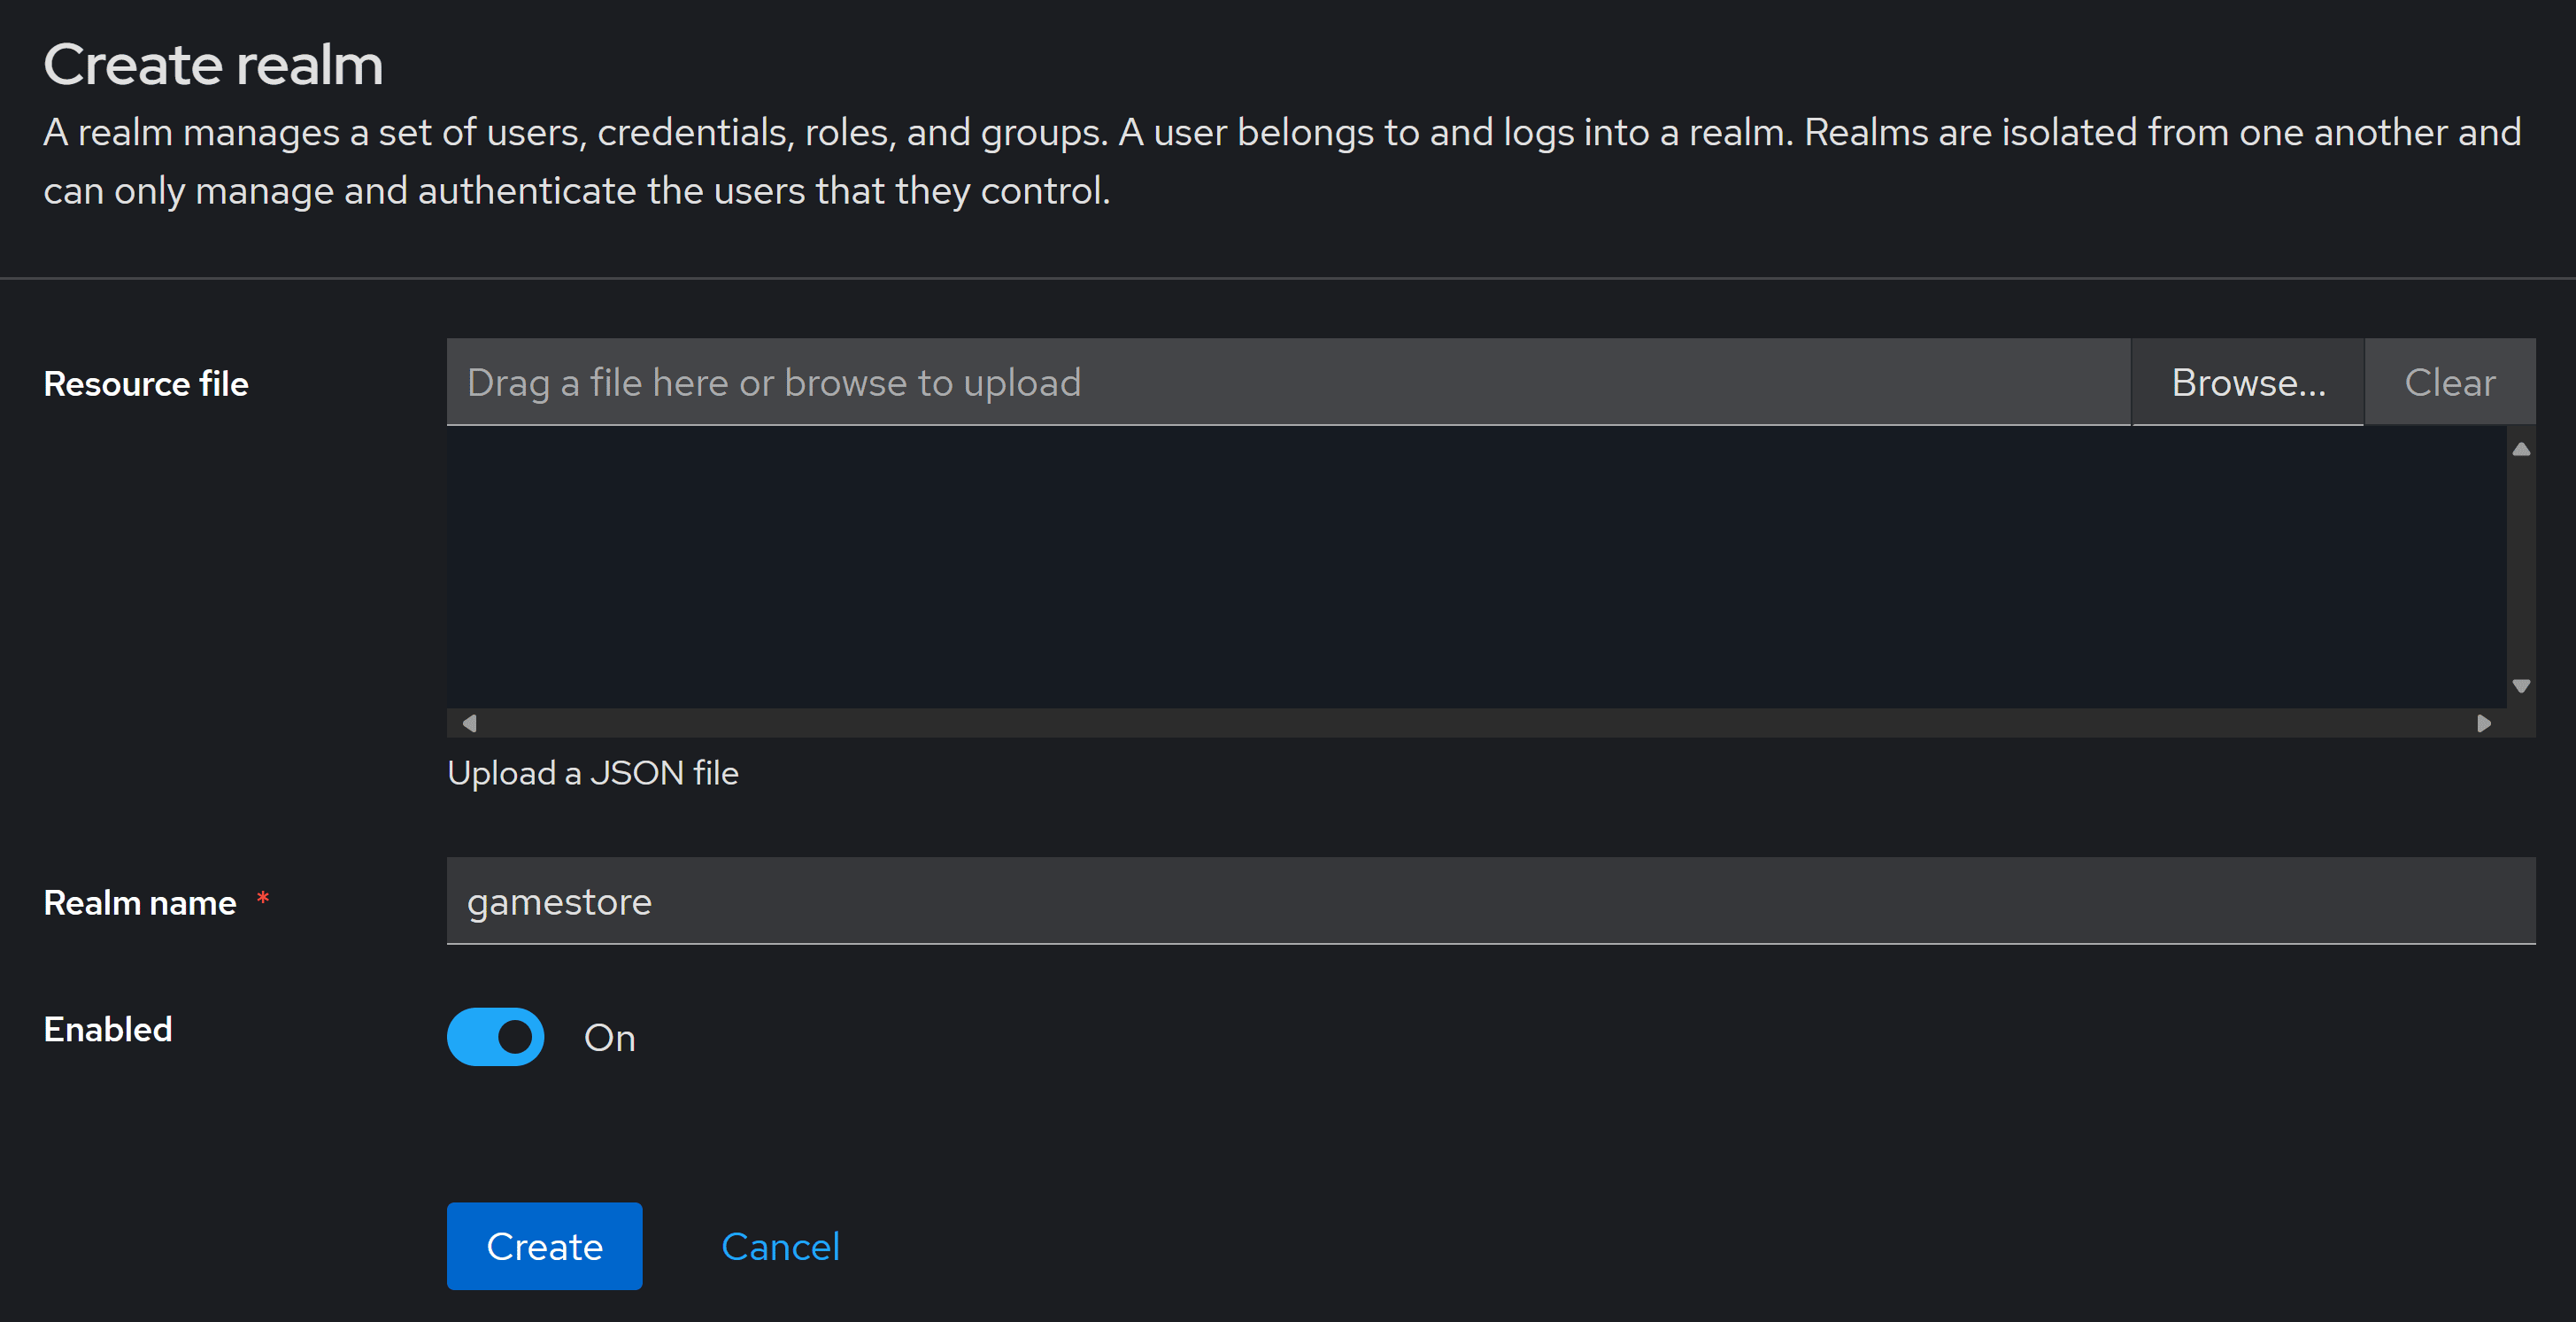
The realm for our Game Store app is ready. Next, let’s add a user.
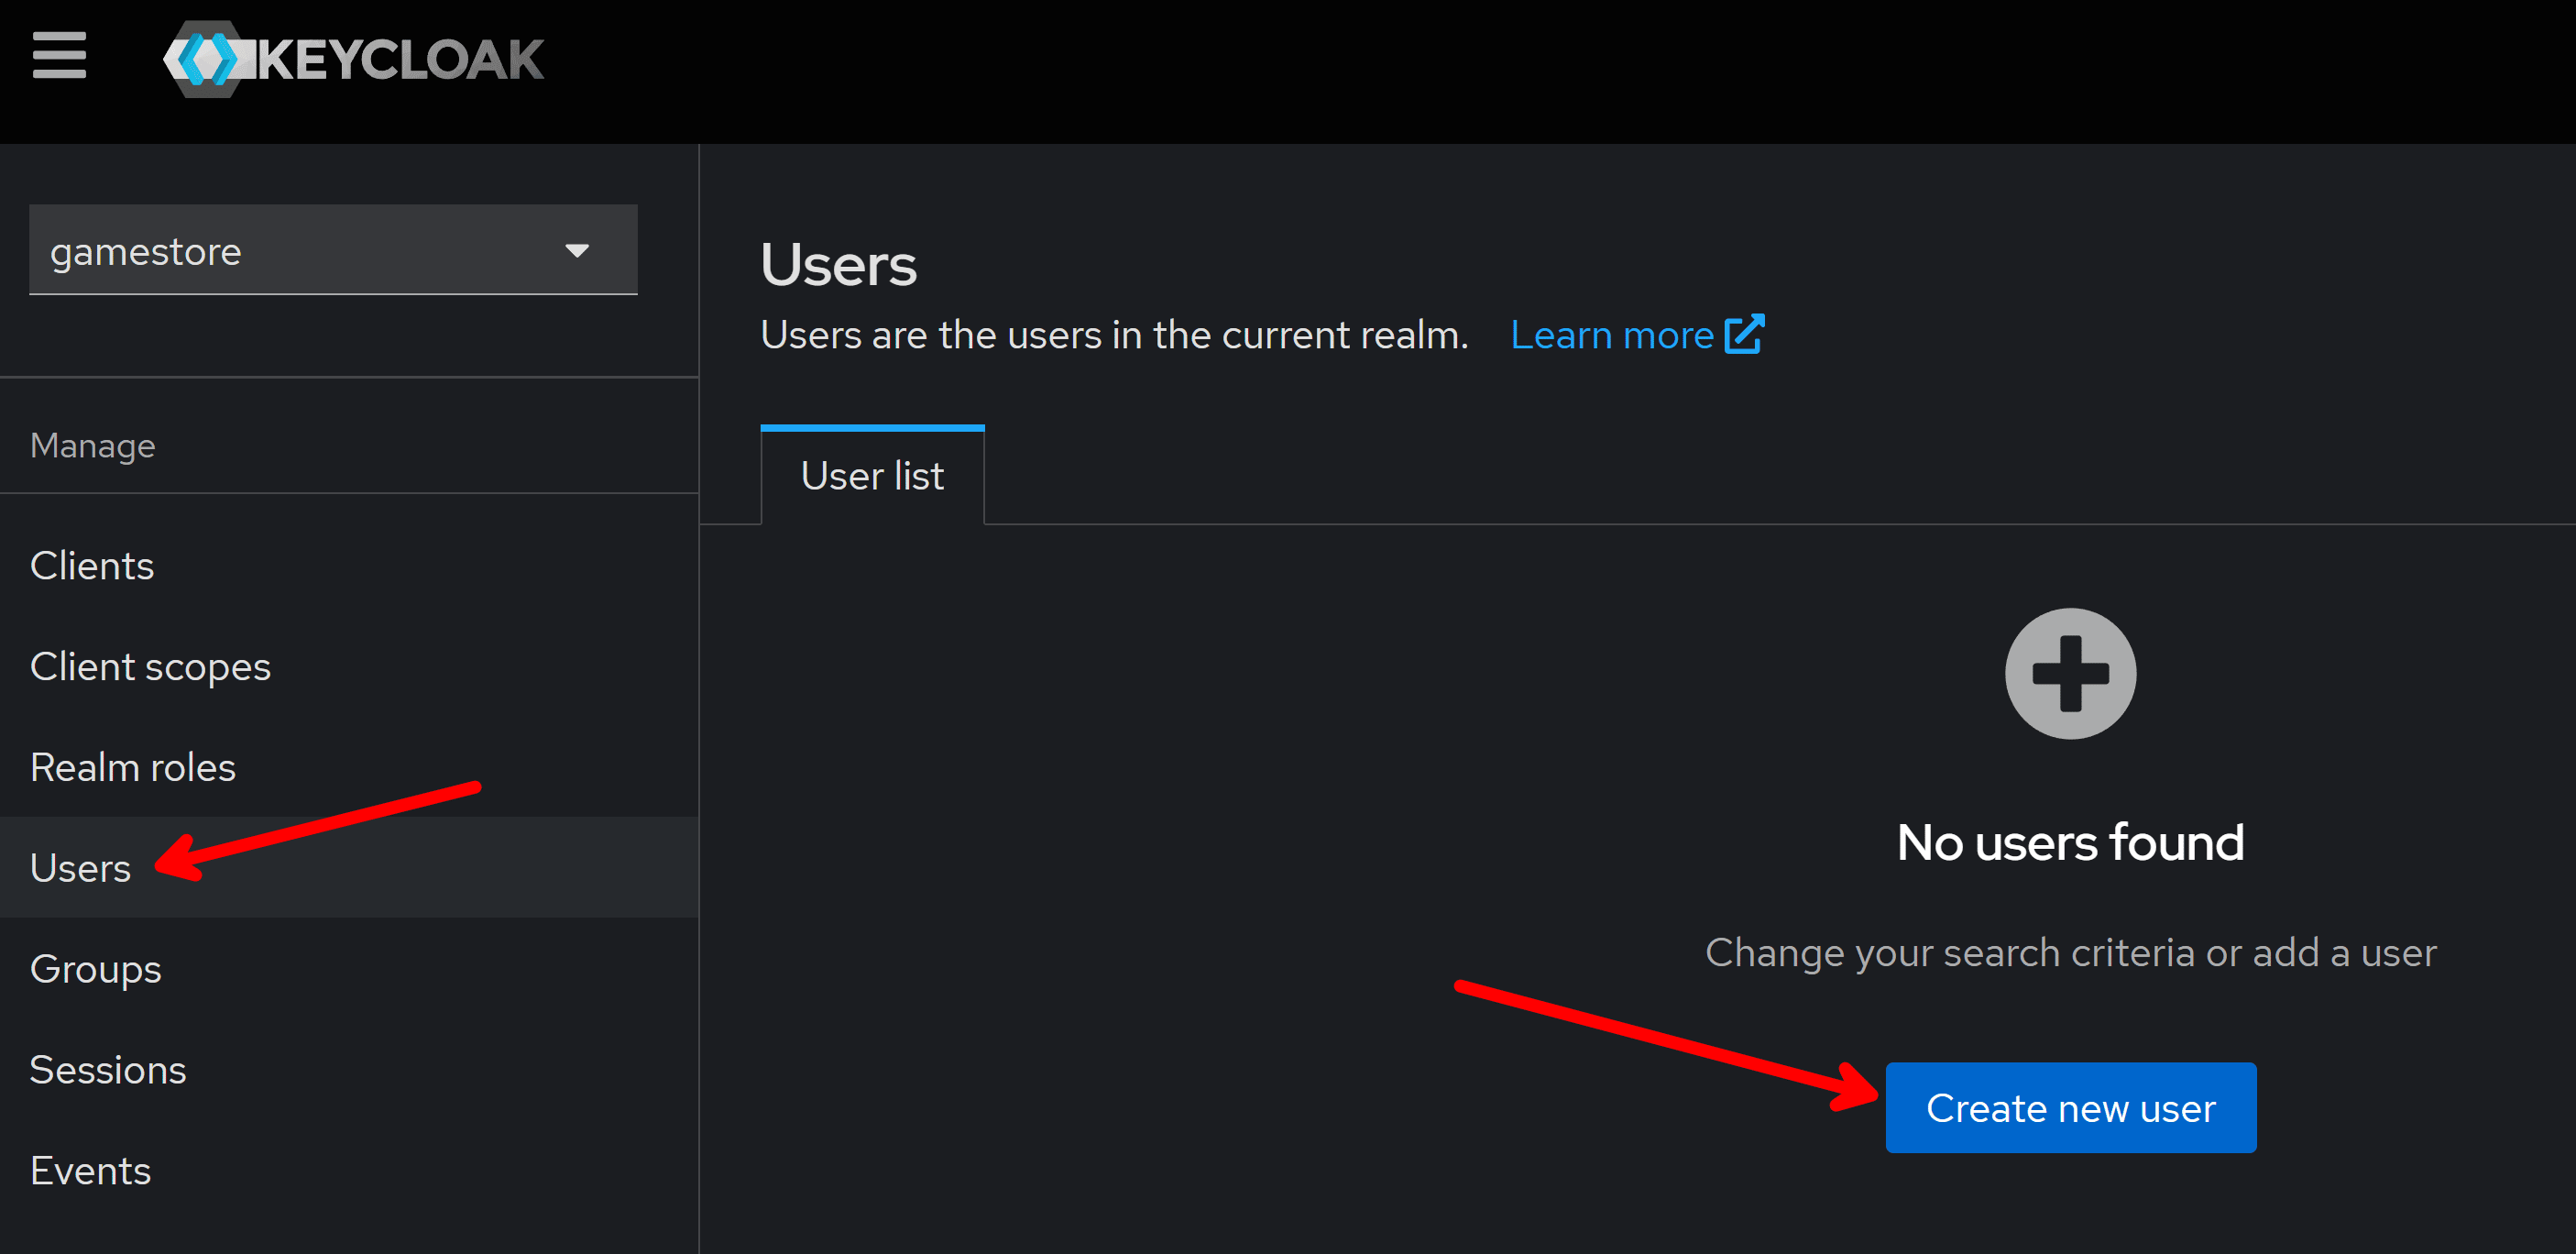
Step 3: Add a user
User management is very straightforward in Keycloak. Just head to the Users section and click Create new user:
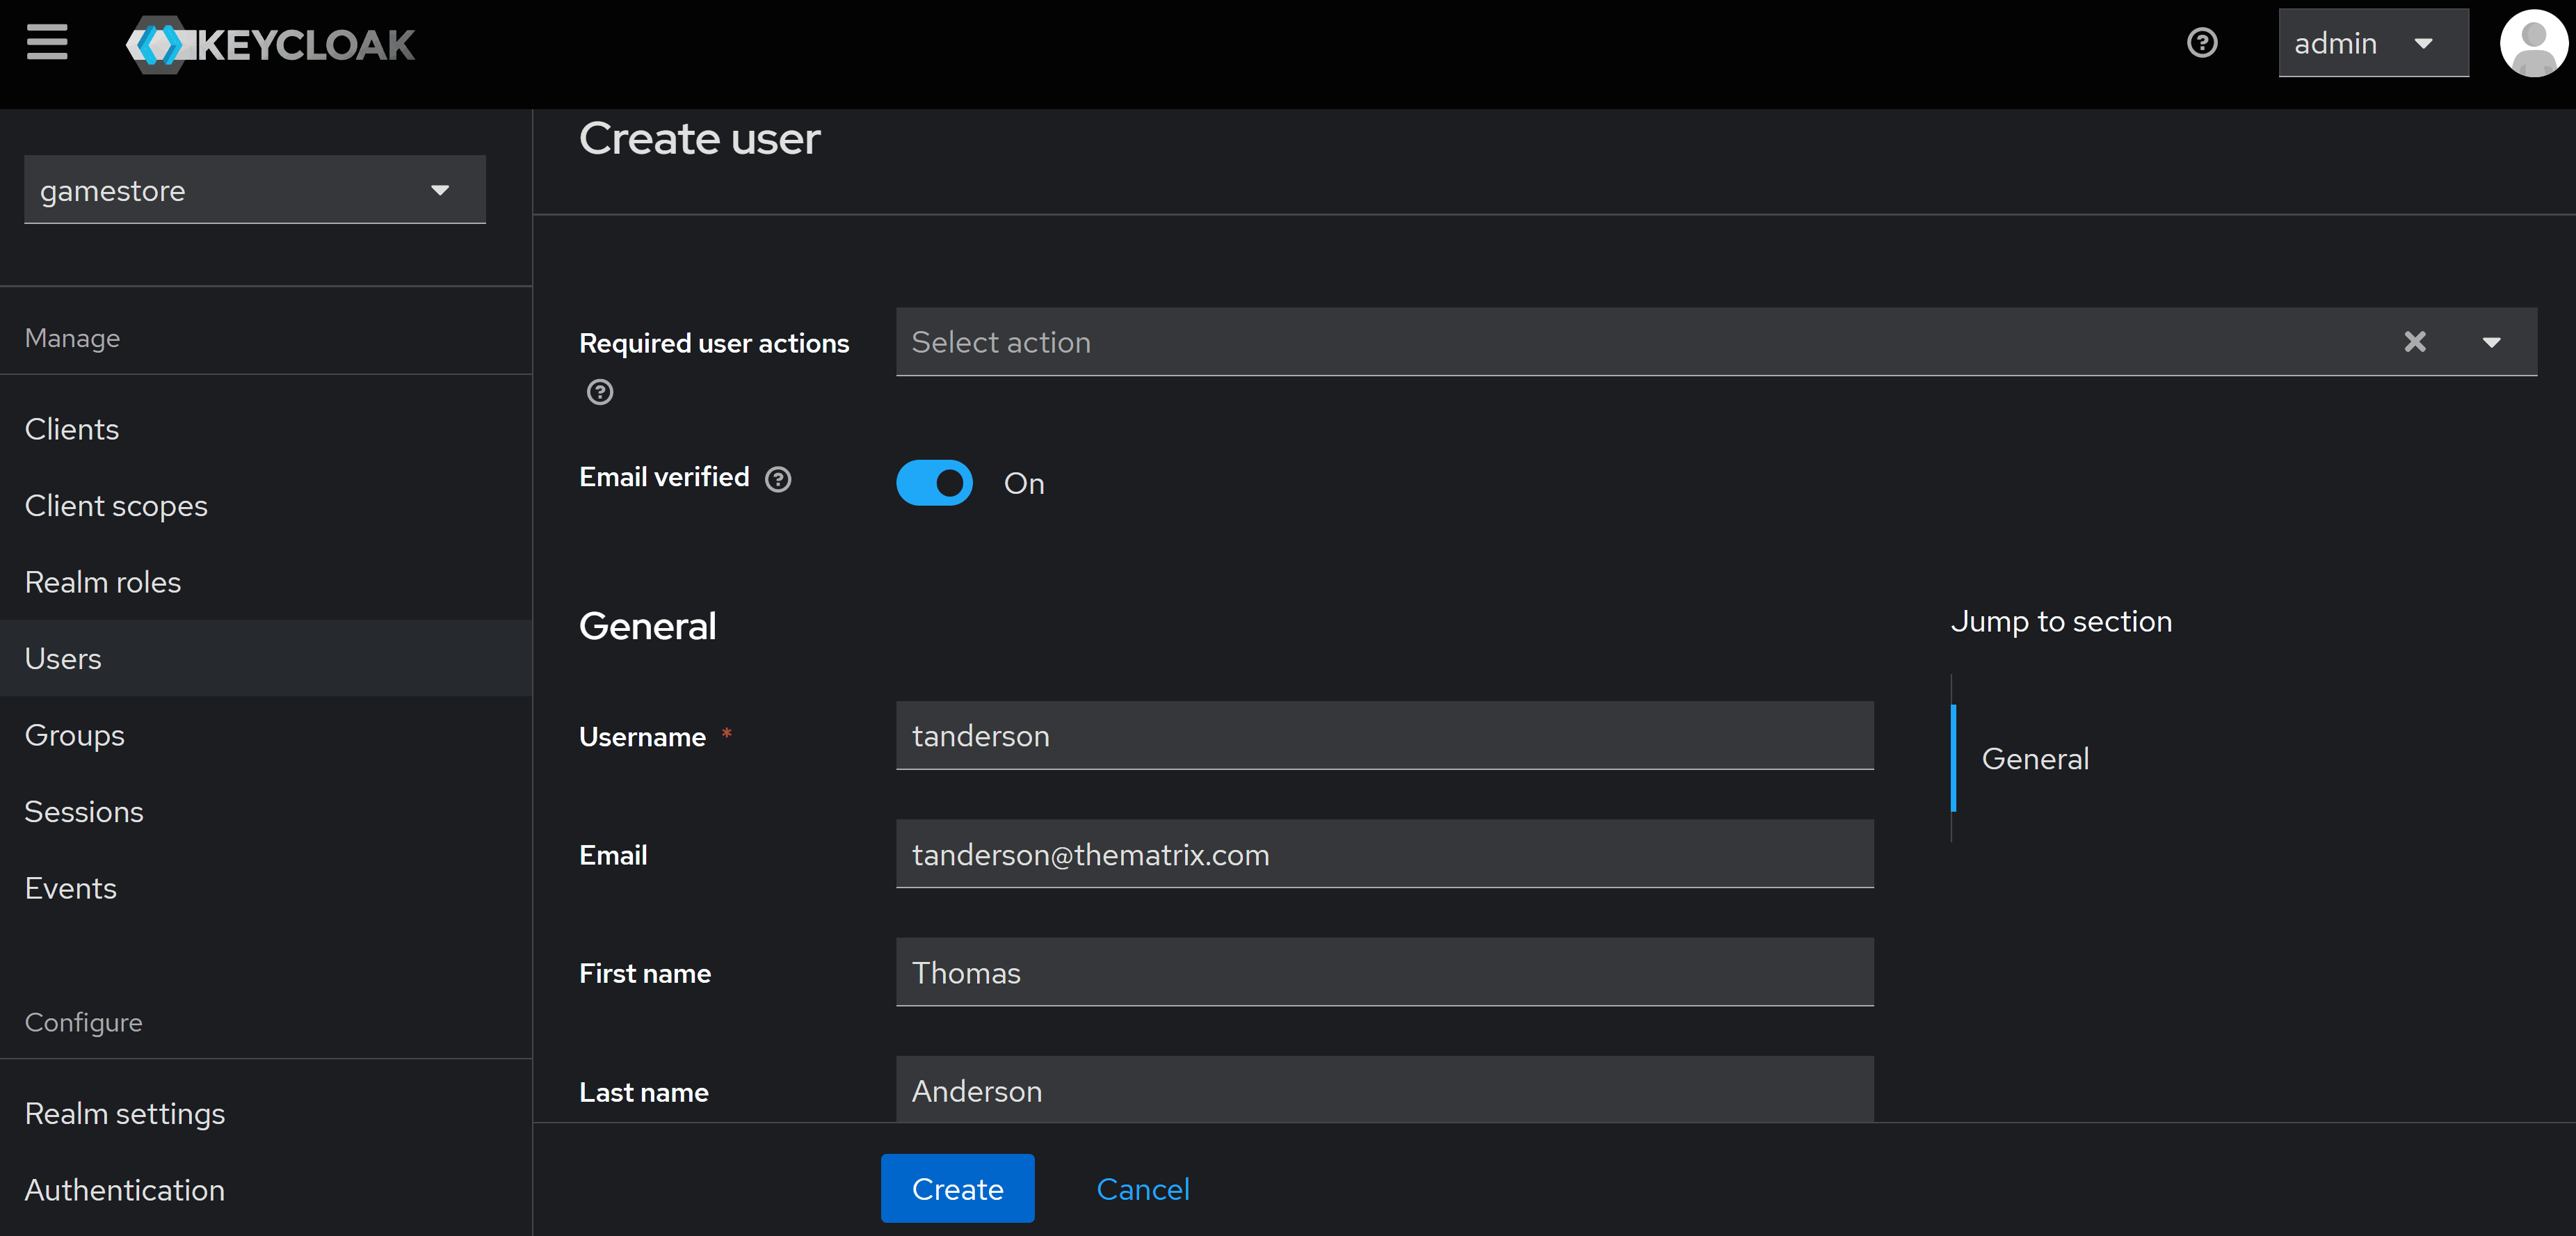
In the next screen, enter your user details, turn on Emal verified (to keep things simple), and hit Create:
Here you also want to set a password for your user, so next click on the Credentials tab and click on Set password:

Any password will do, since this is for local dev. Also, no need to make it temporary.
Next, let’s register our first client.
Step 4: Register the back-end
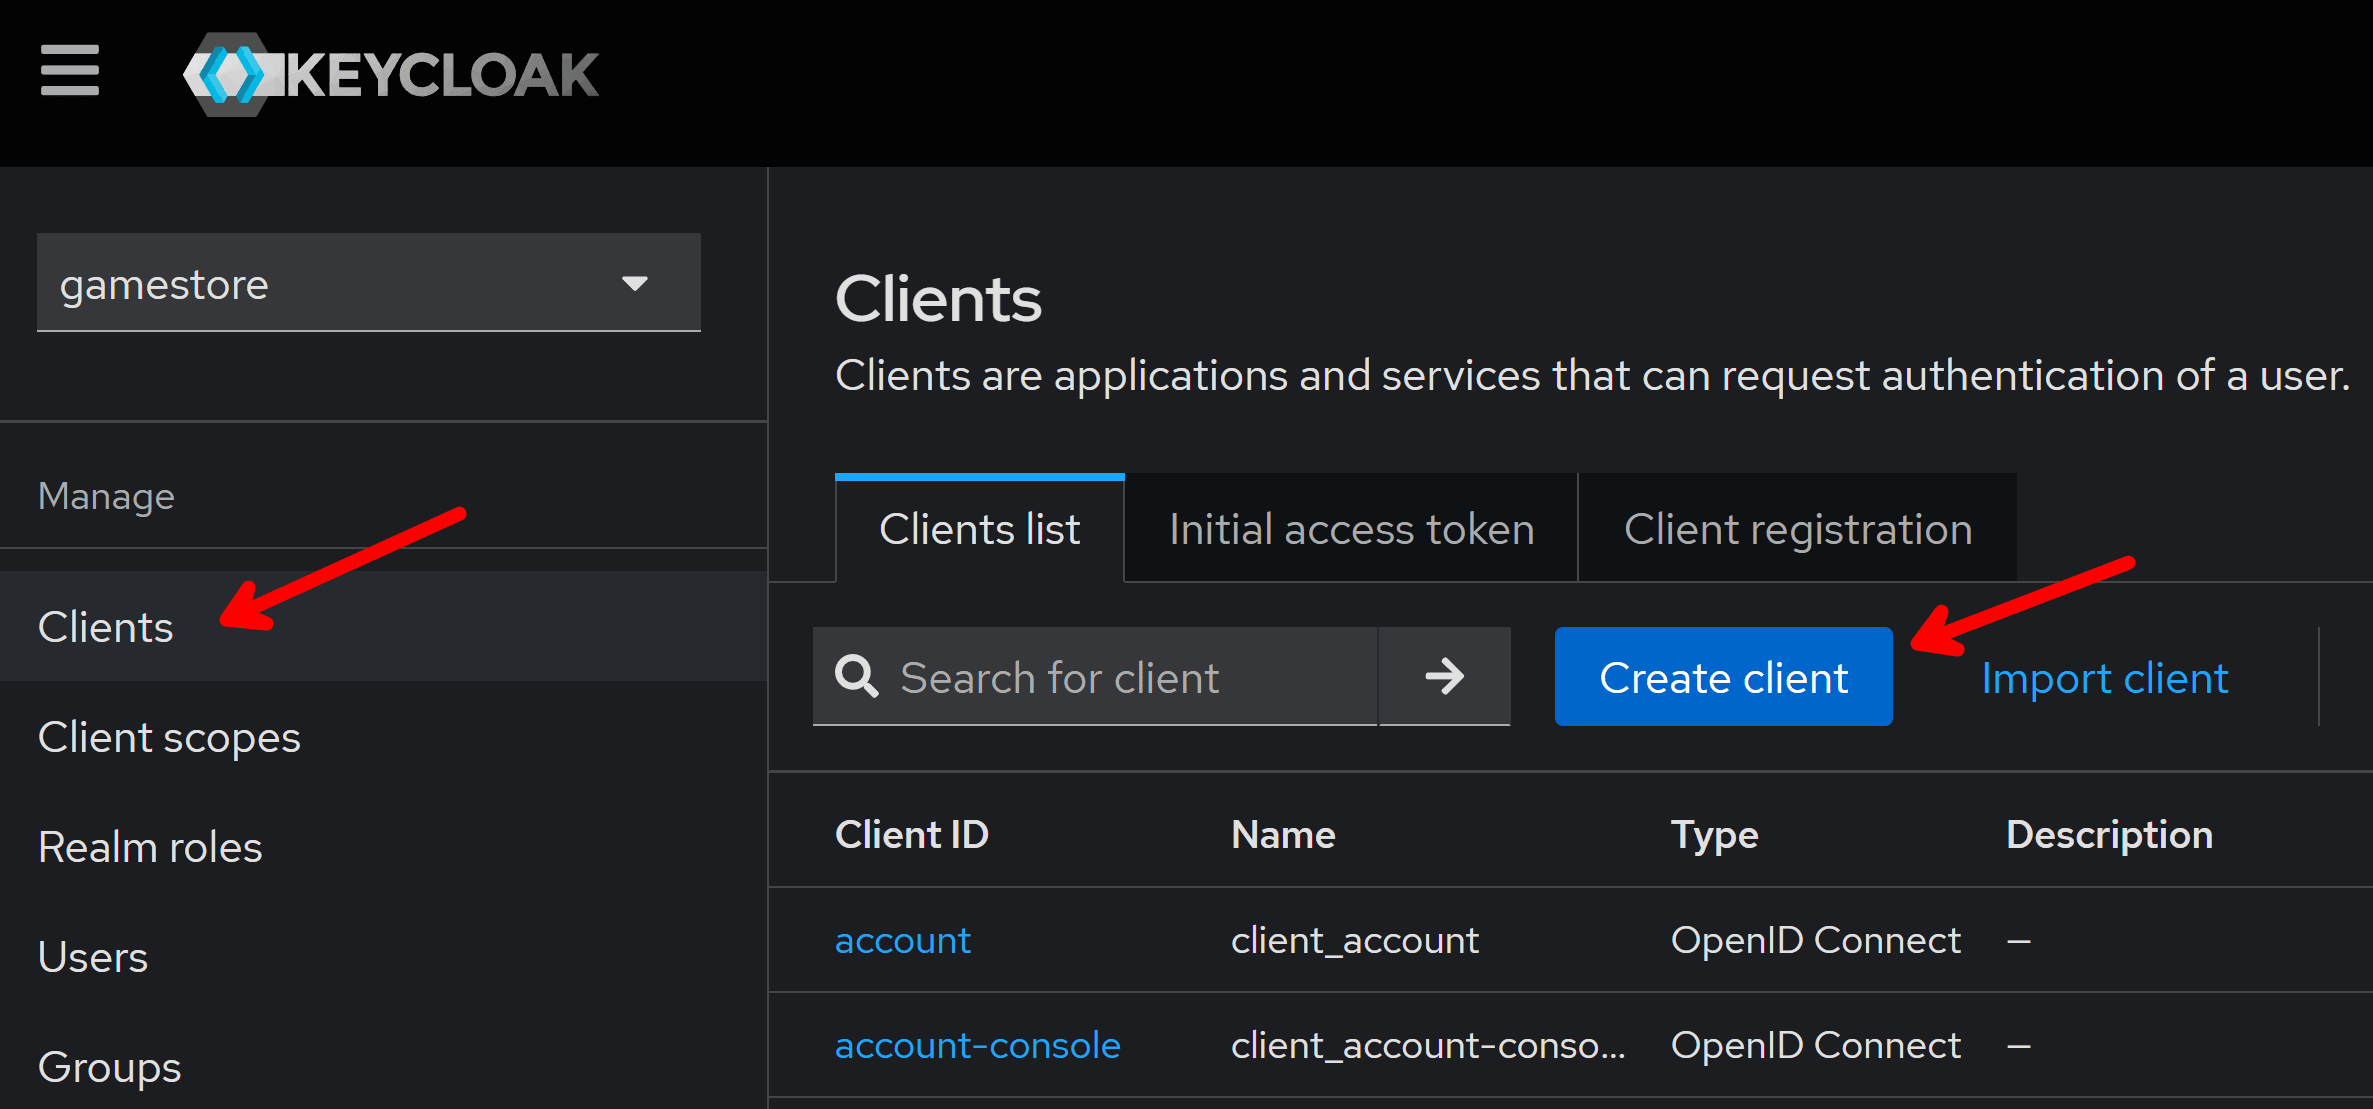
The access tokens generated by Keycloak to authorize requests to our back-end API must include the correct audience. That’s how our back-end can confirm the token is intended for it.
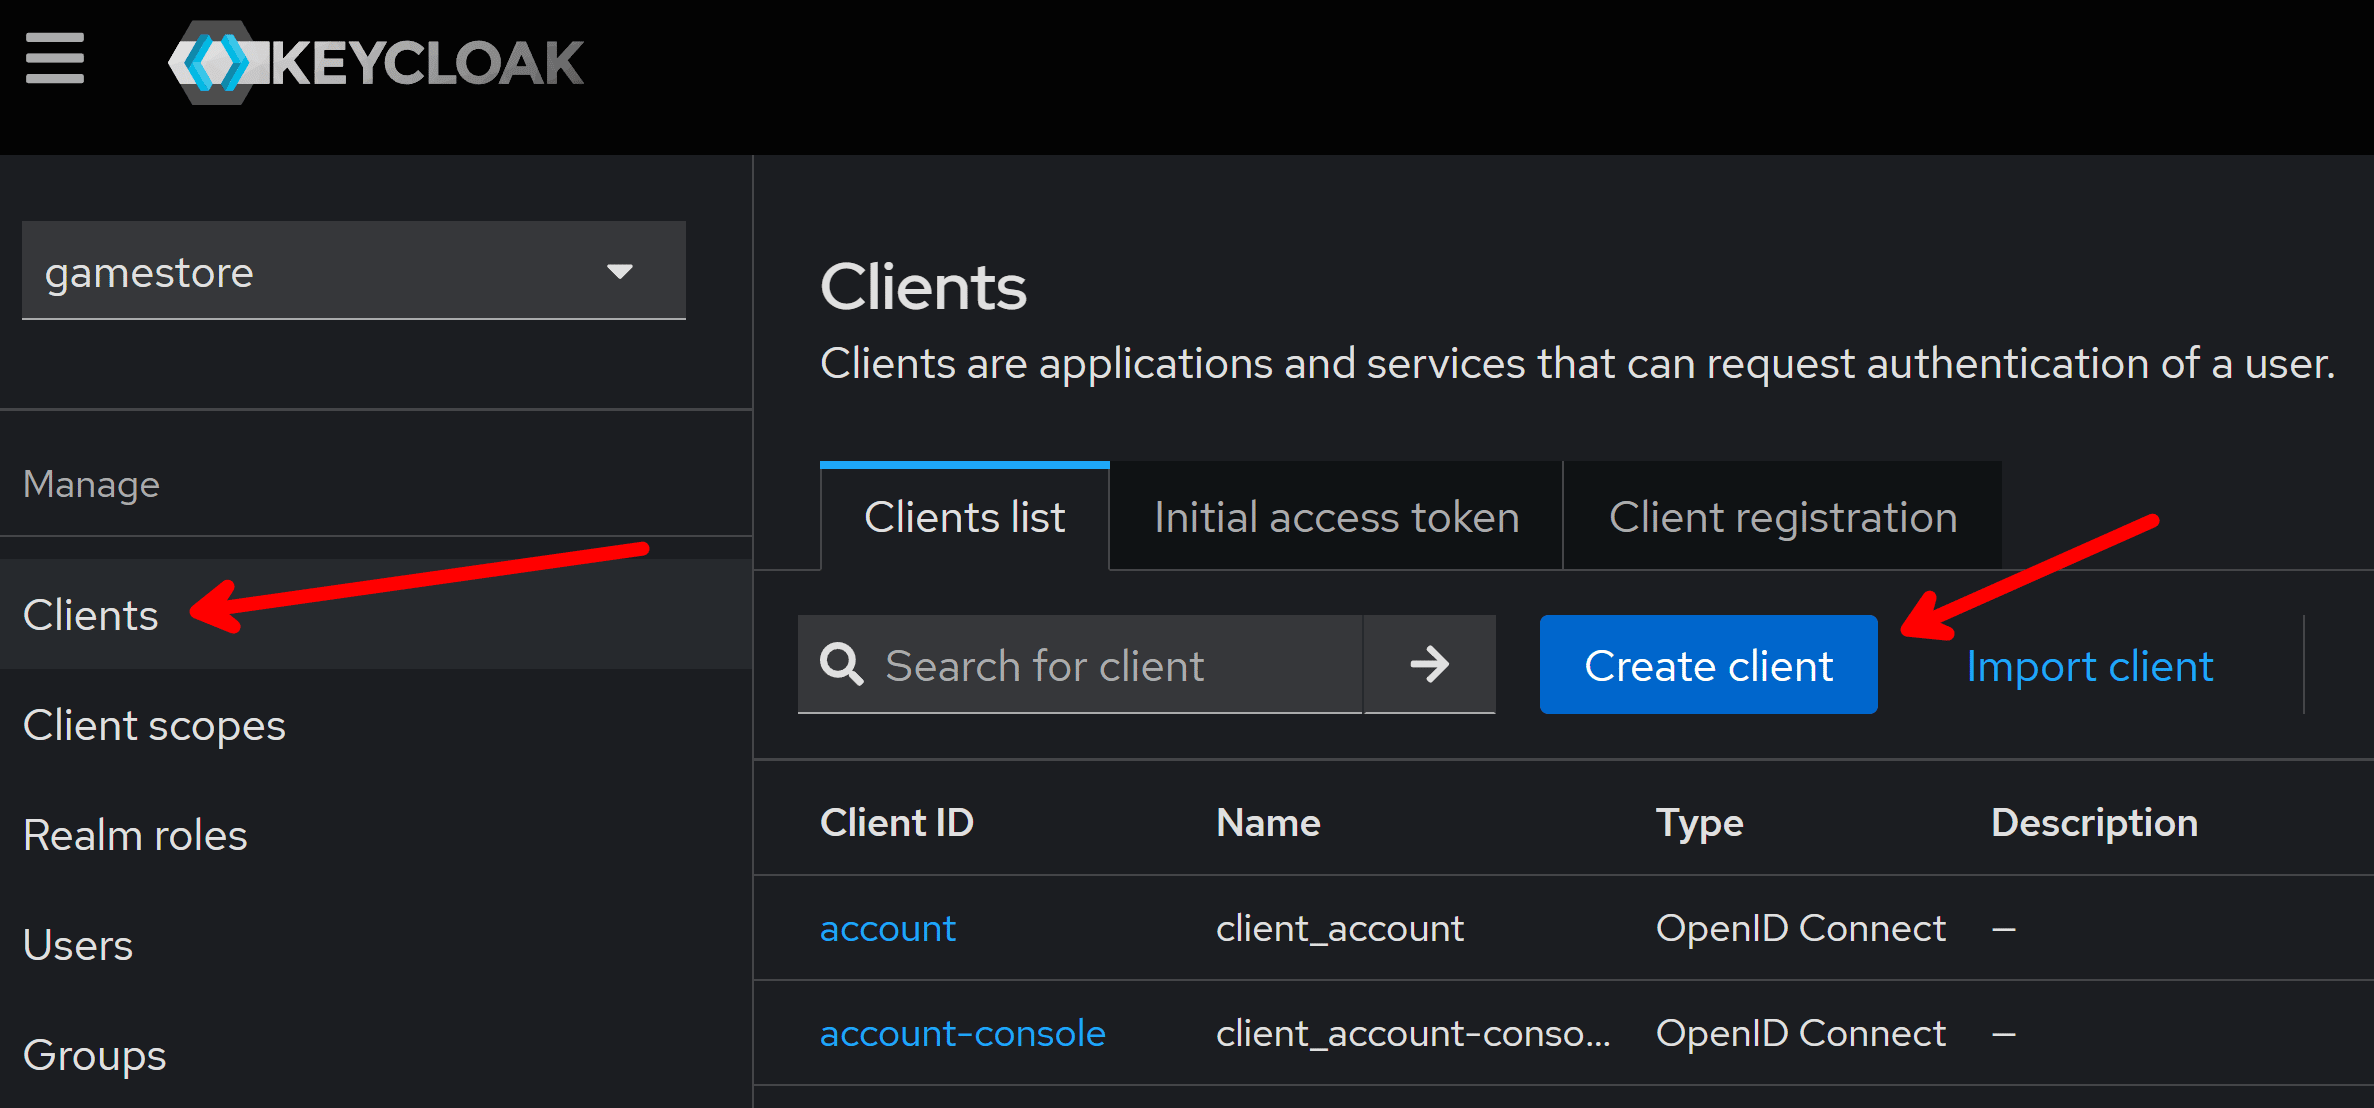
And, for that, we’ll need to register our back-end as a client in Keycloak, which you can do by going to the Client tab and then clicking on Create client:
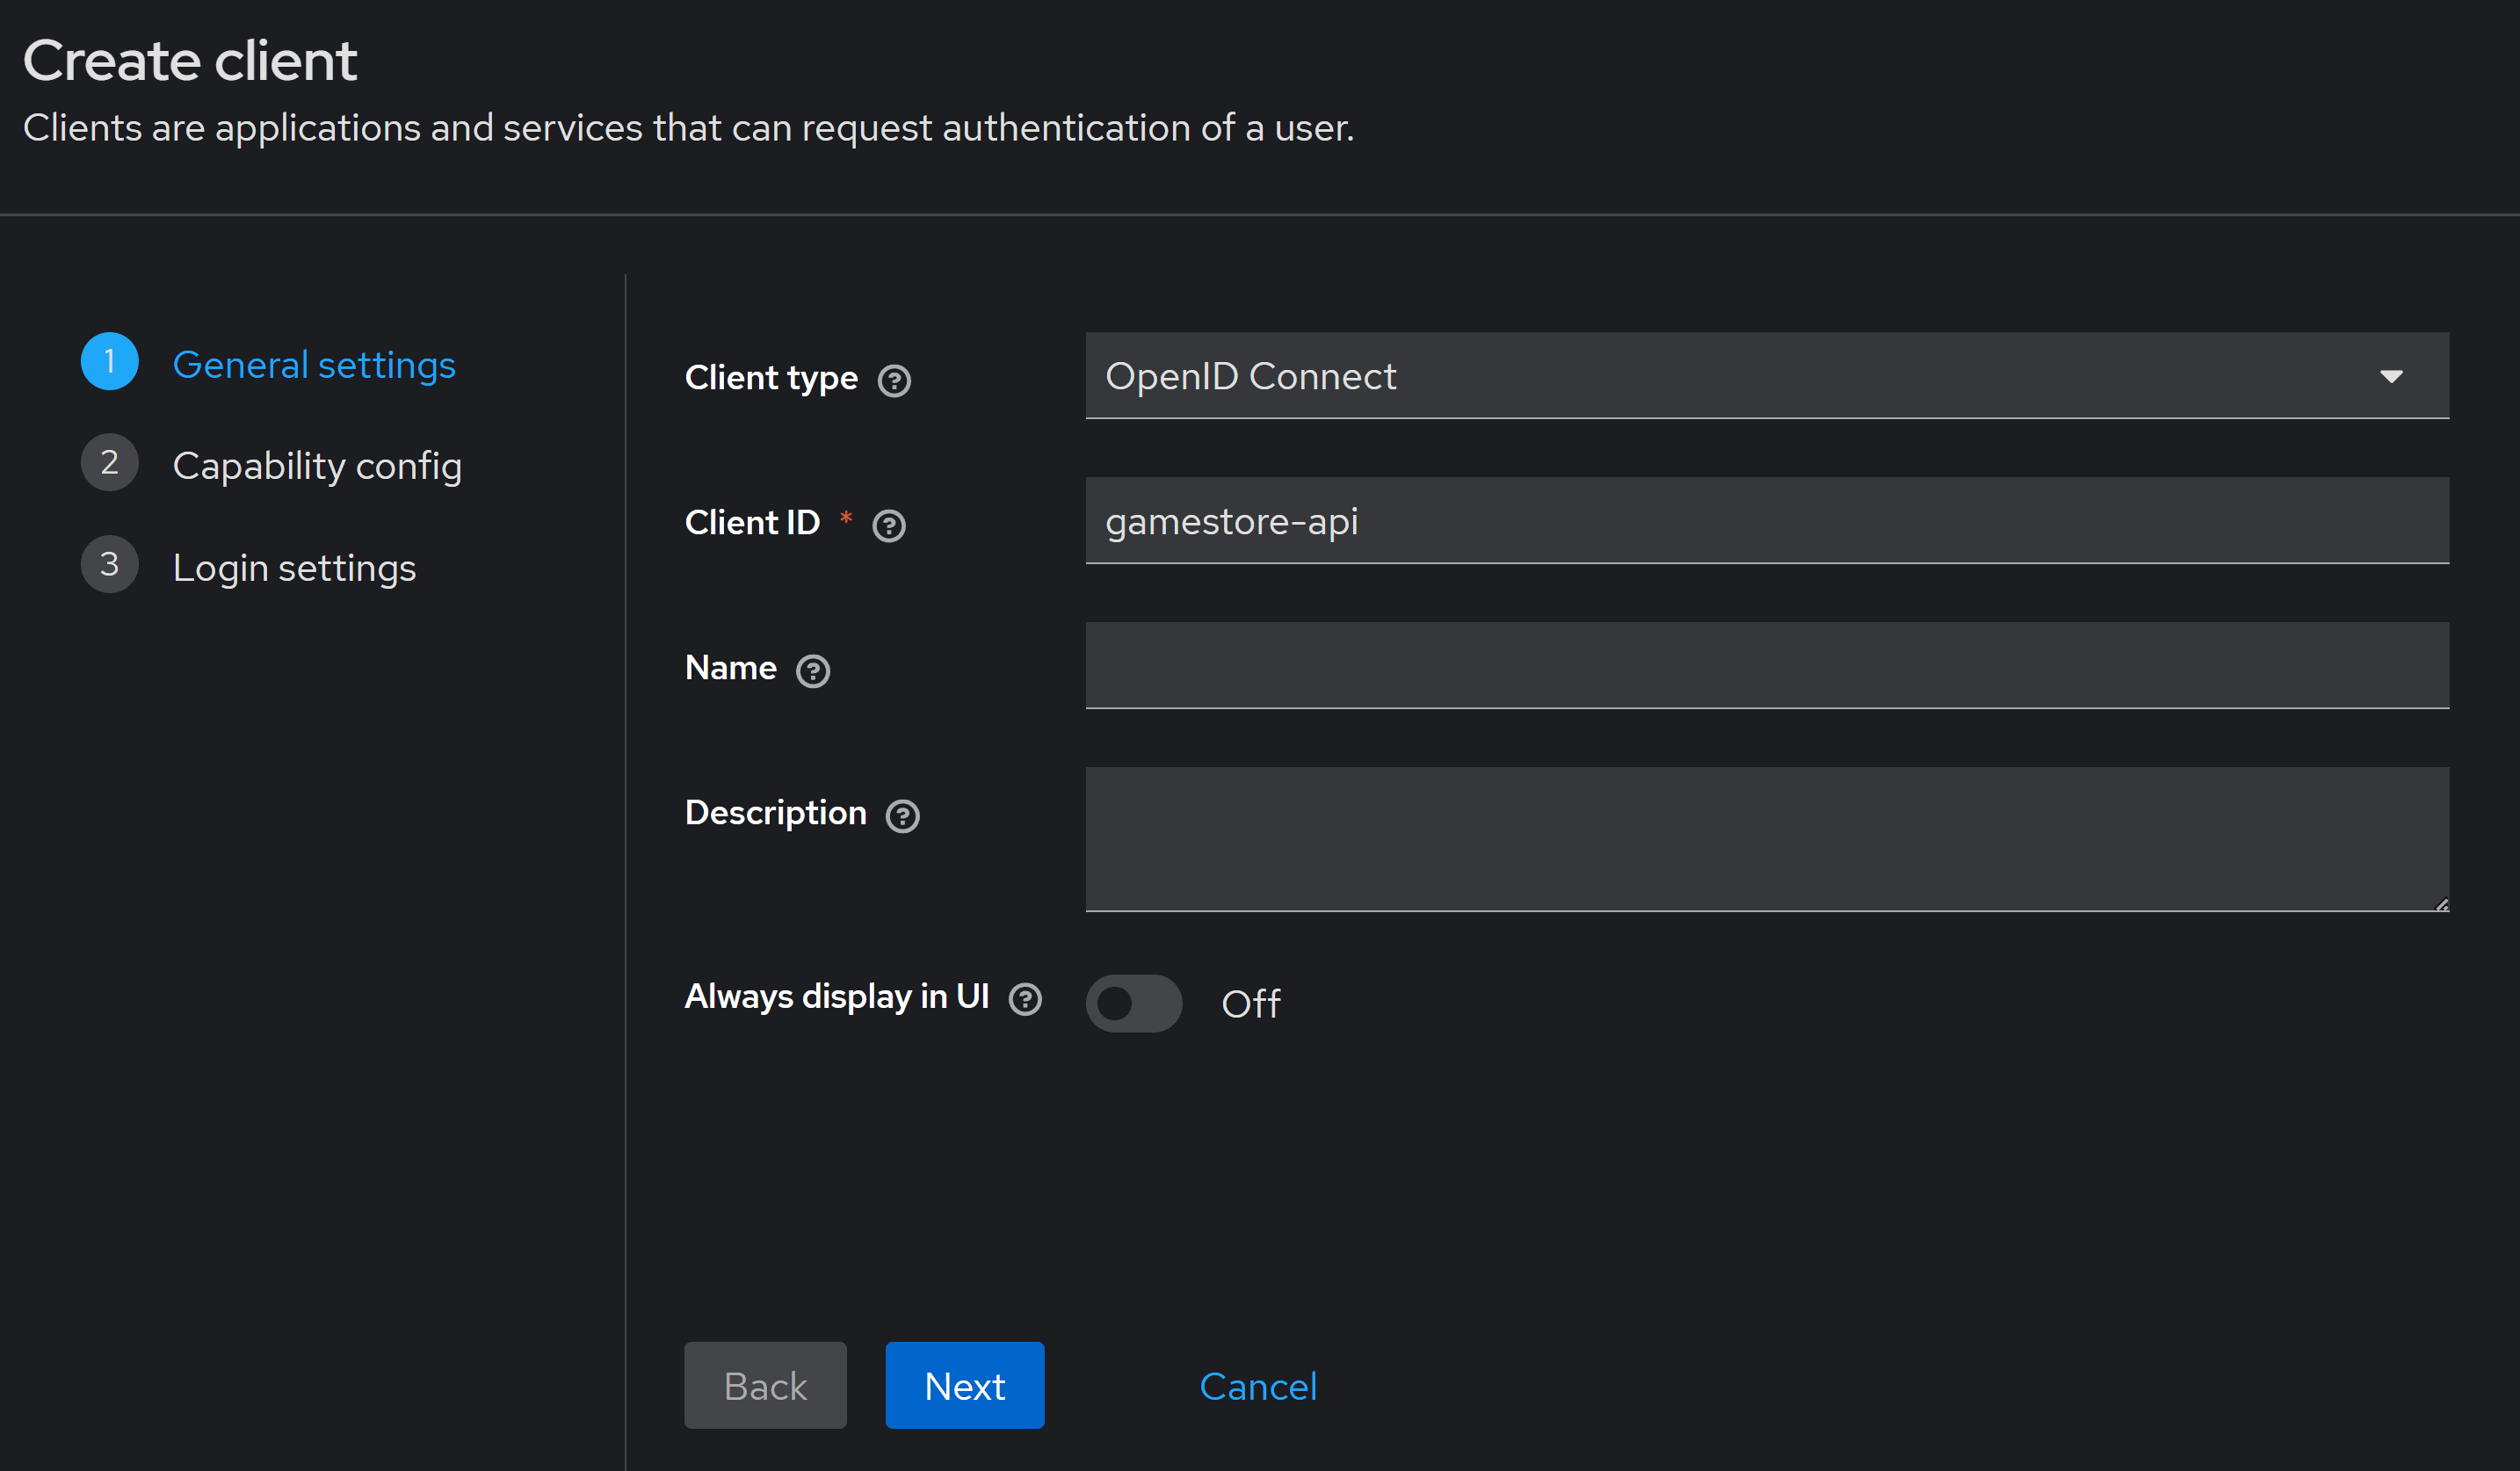
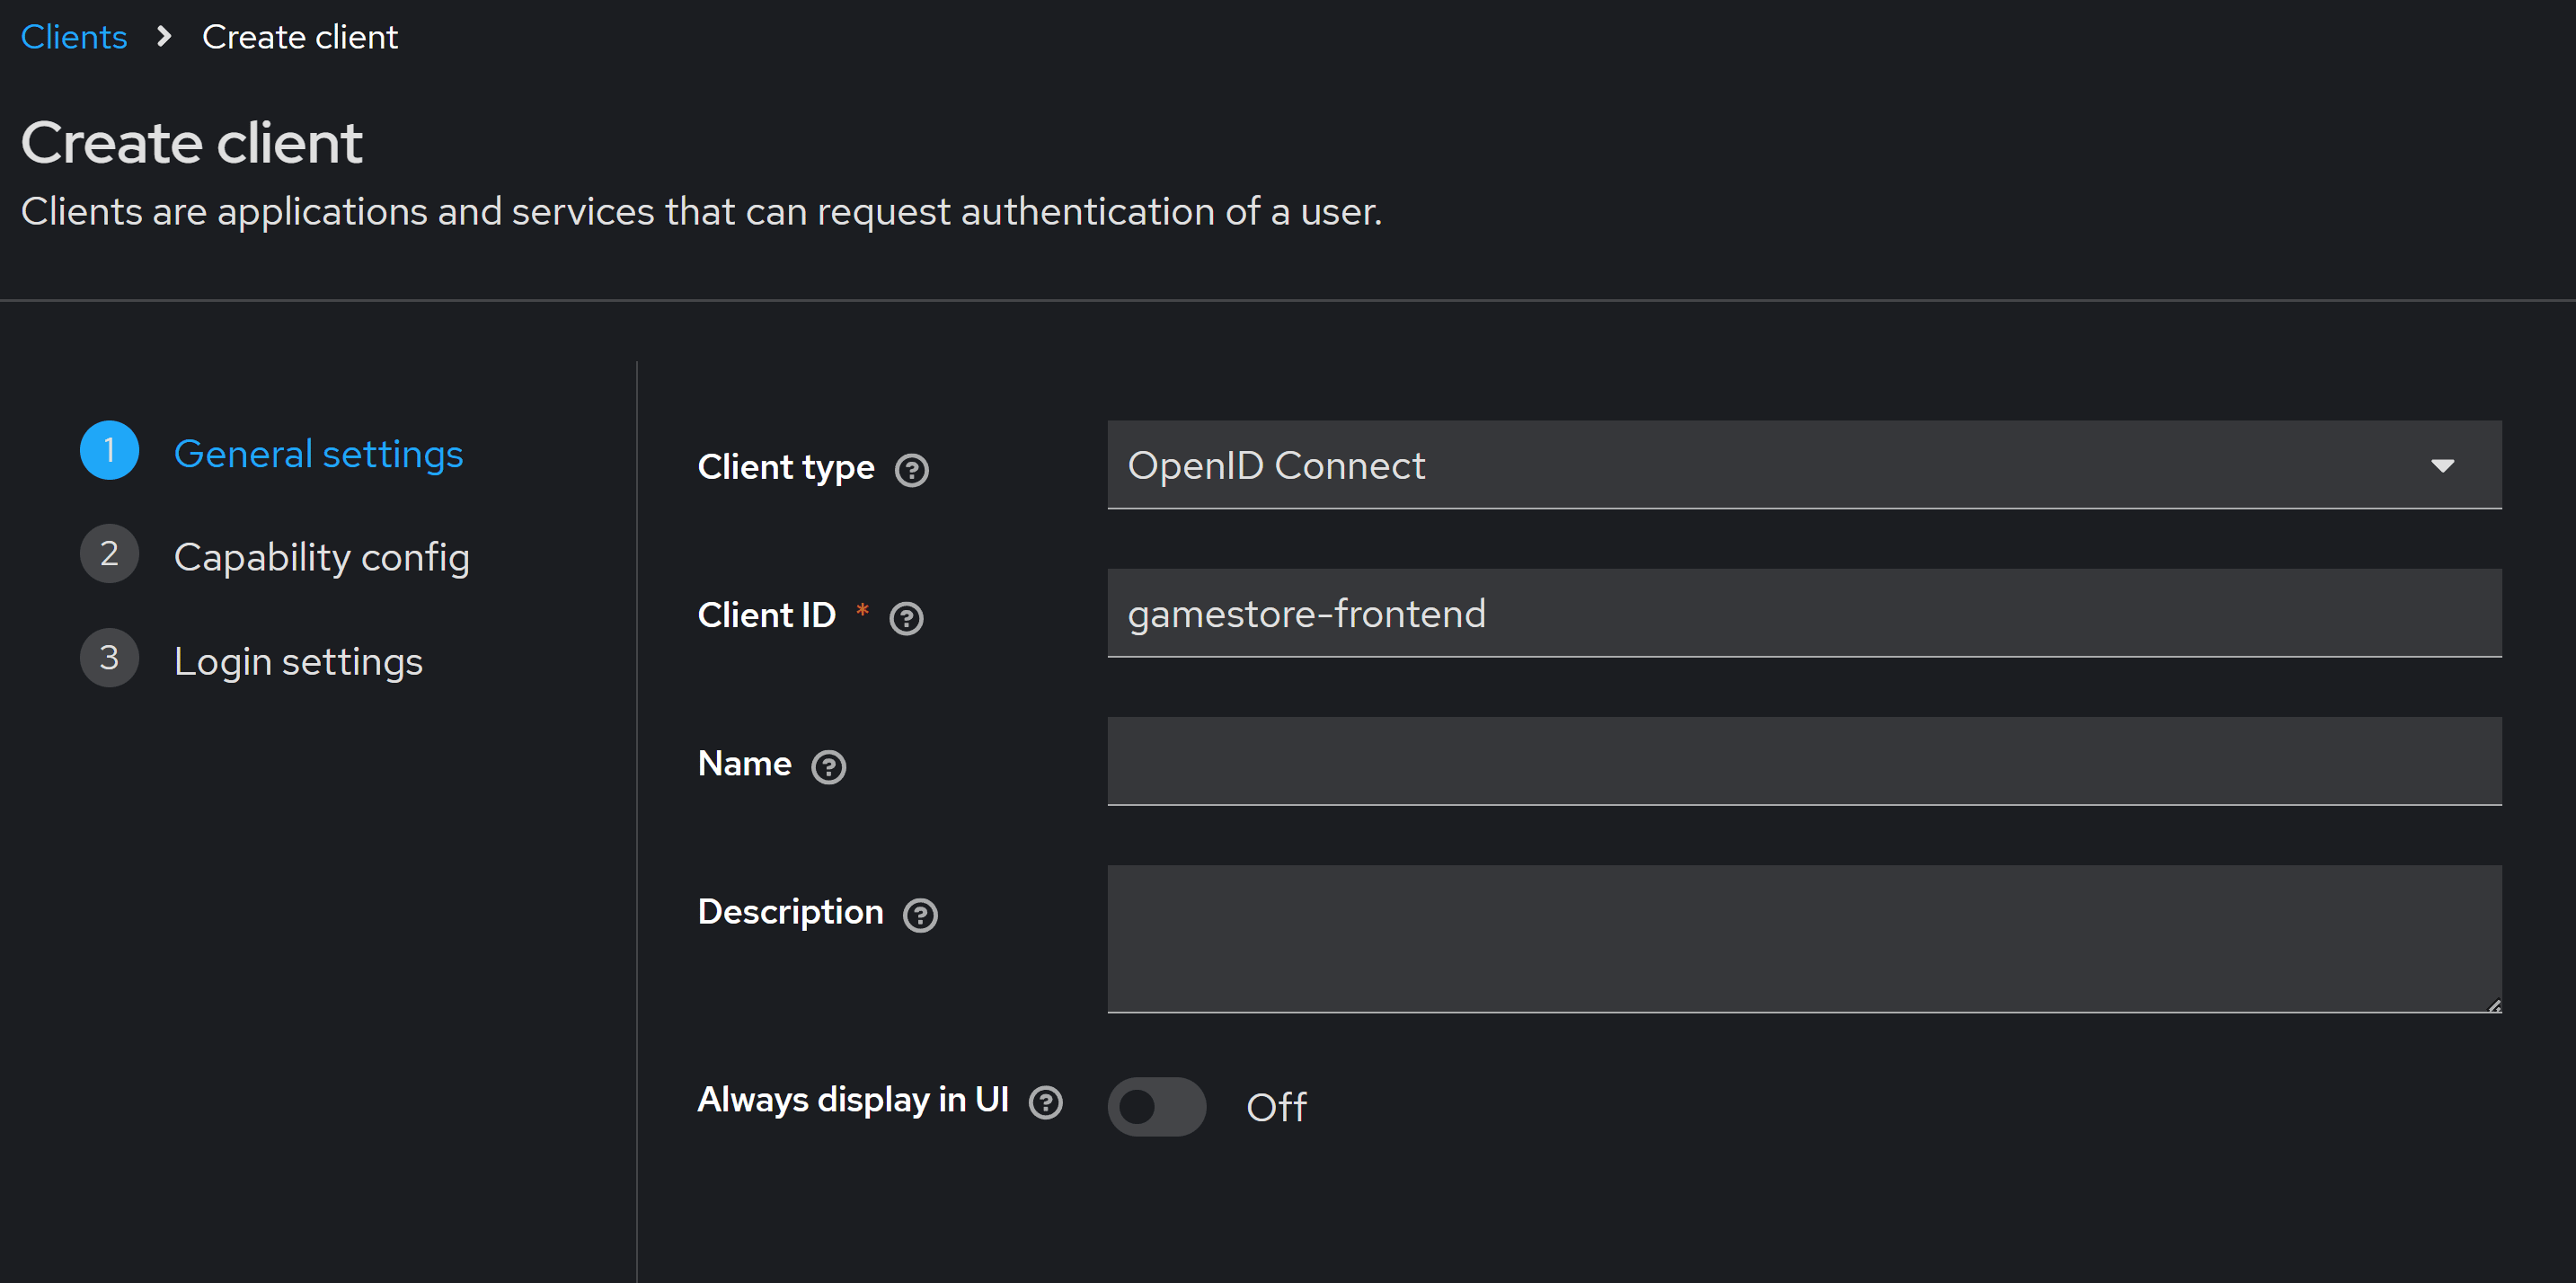
On the General settings wizard step, enter a meaningful ID for this client. I’ll use gamestore-api:
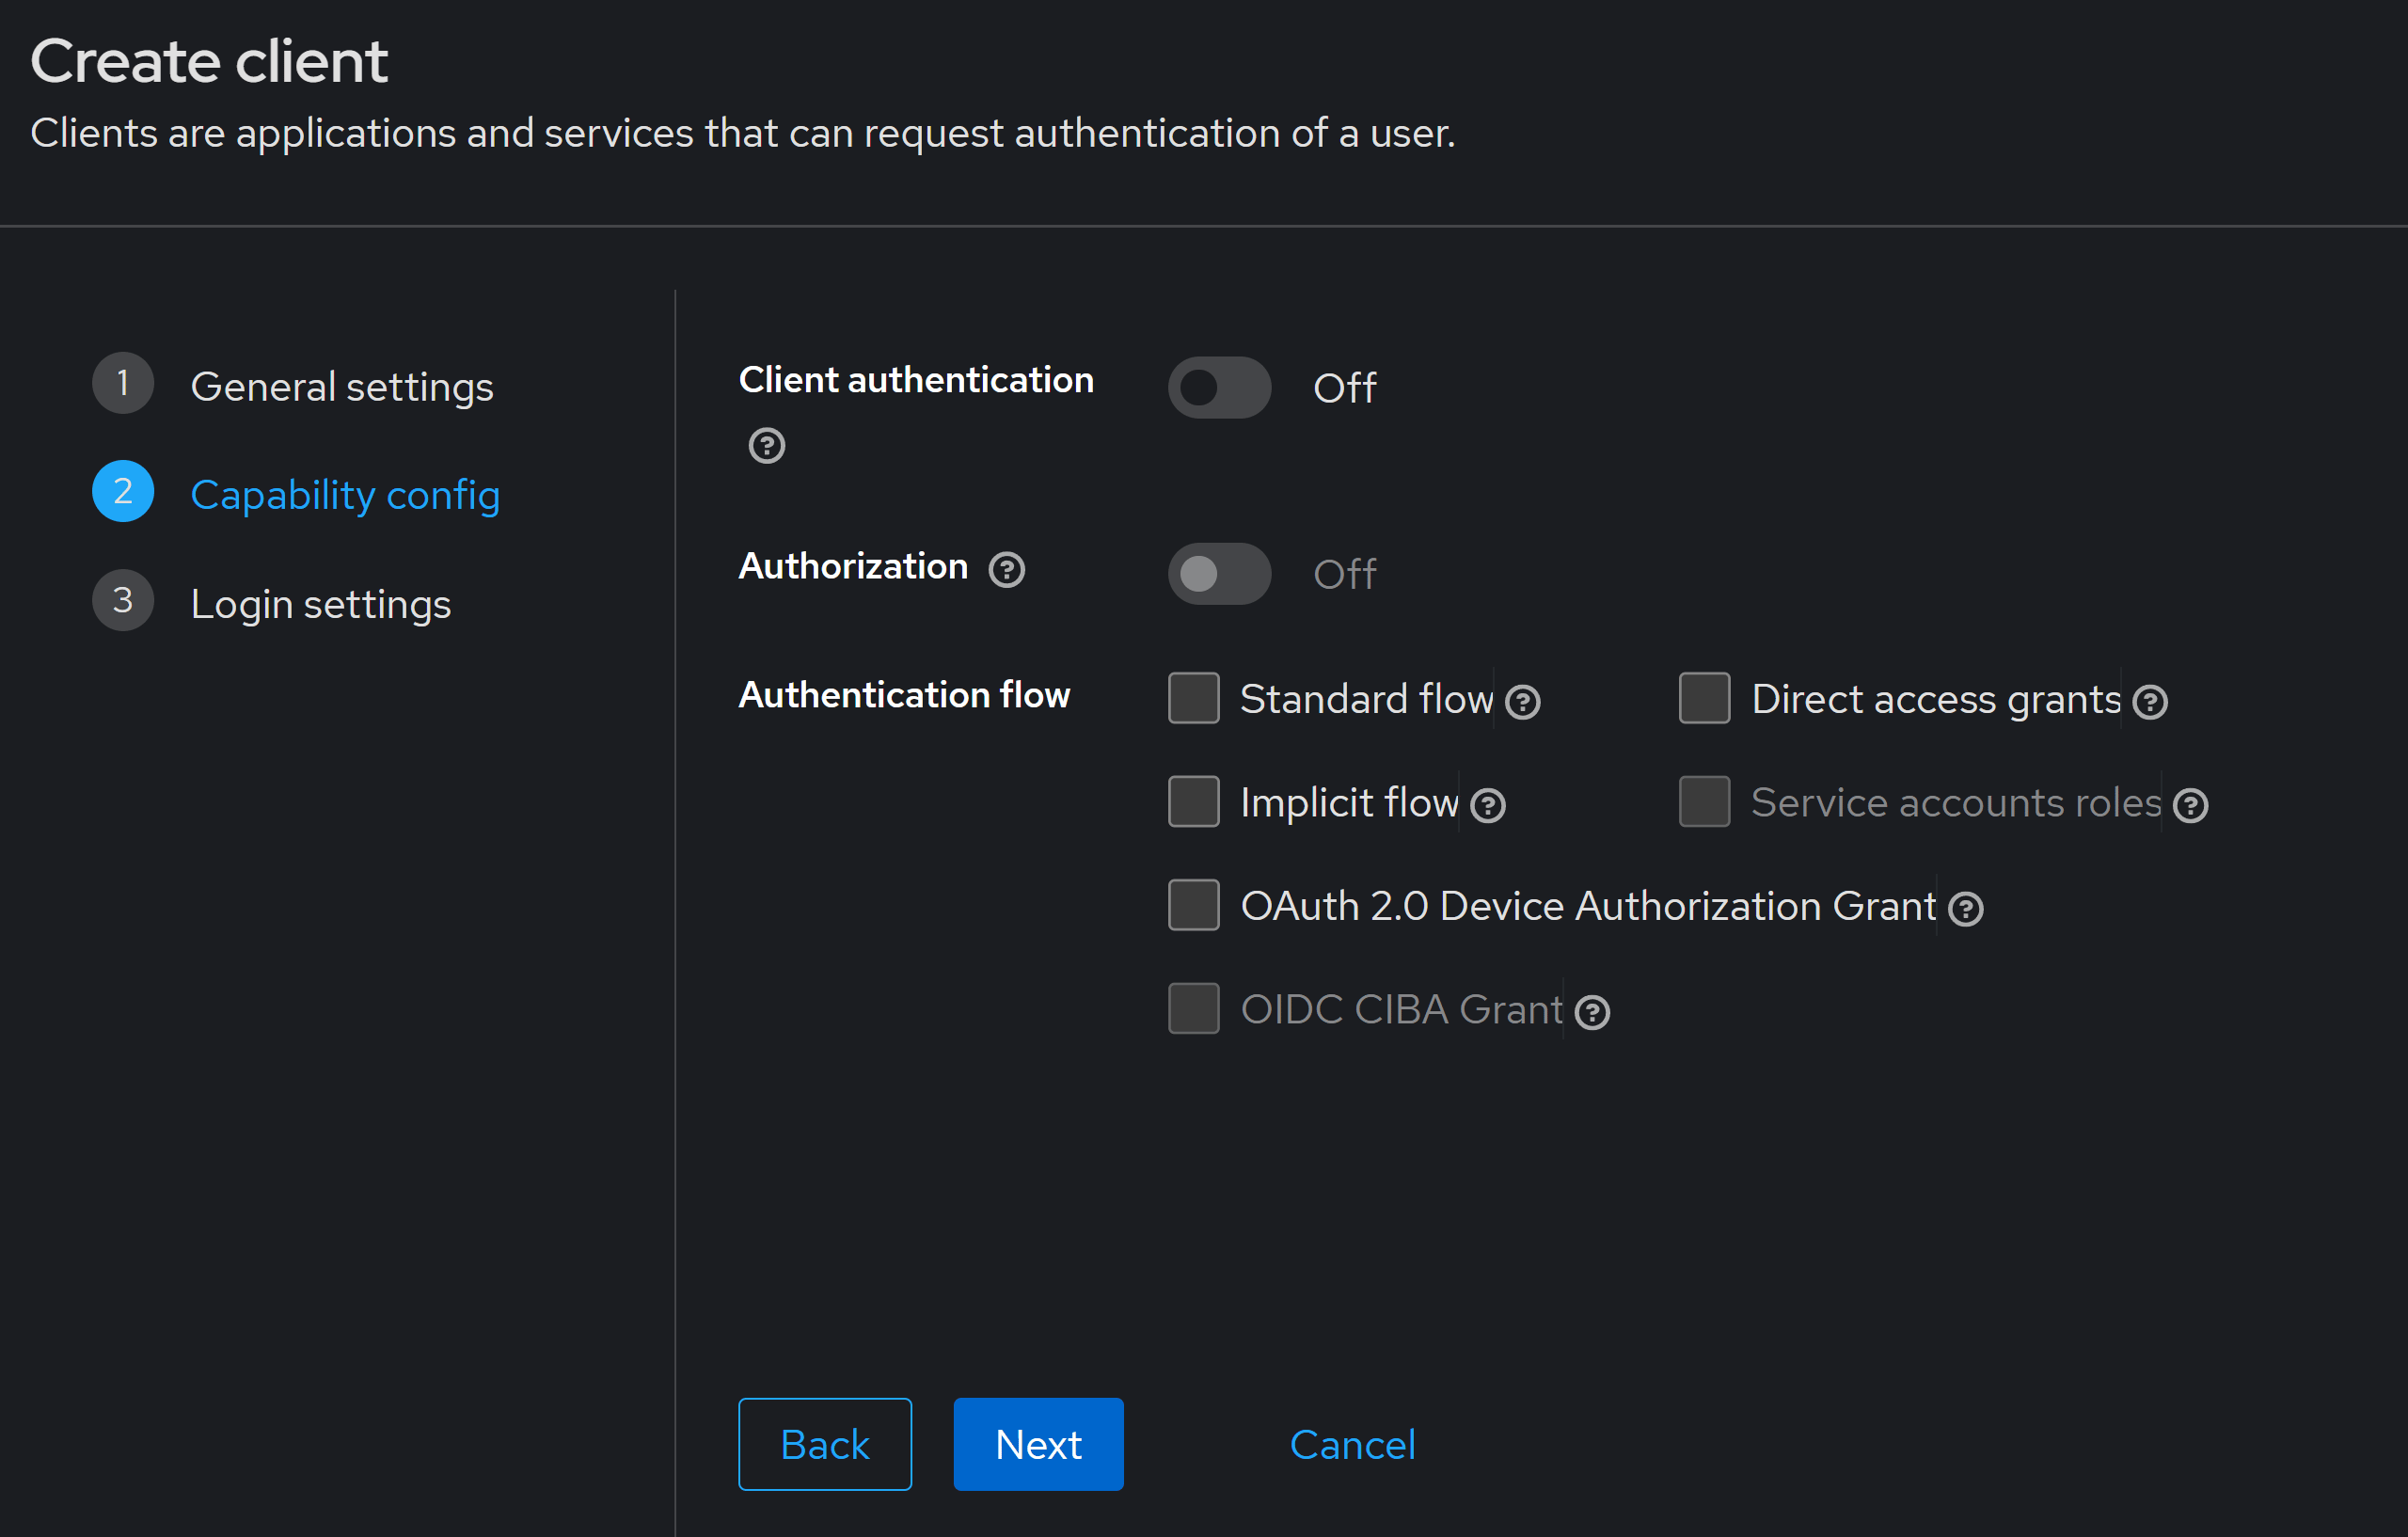
Step 2 of the wizard is meant for clients that start an OIDC authorization flow, like our front-end, but it does nothing for our backend, so you can keep everything OFF:
There’s nothing to enter in the last wizard step, so just hit Save and your client is created.
Step 5: Configure the audience
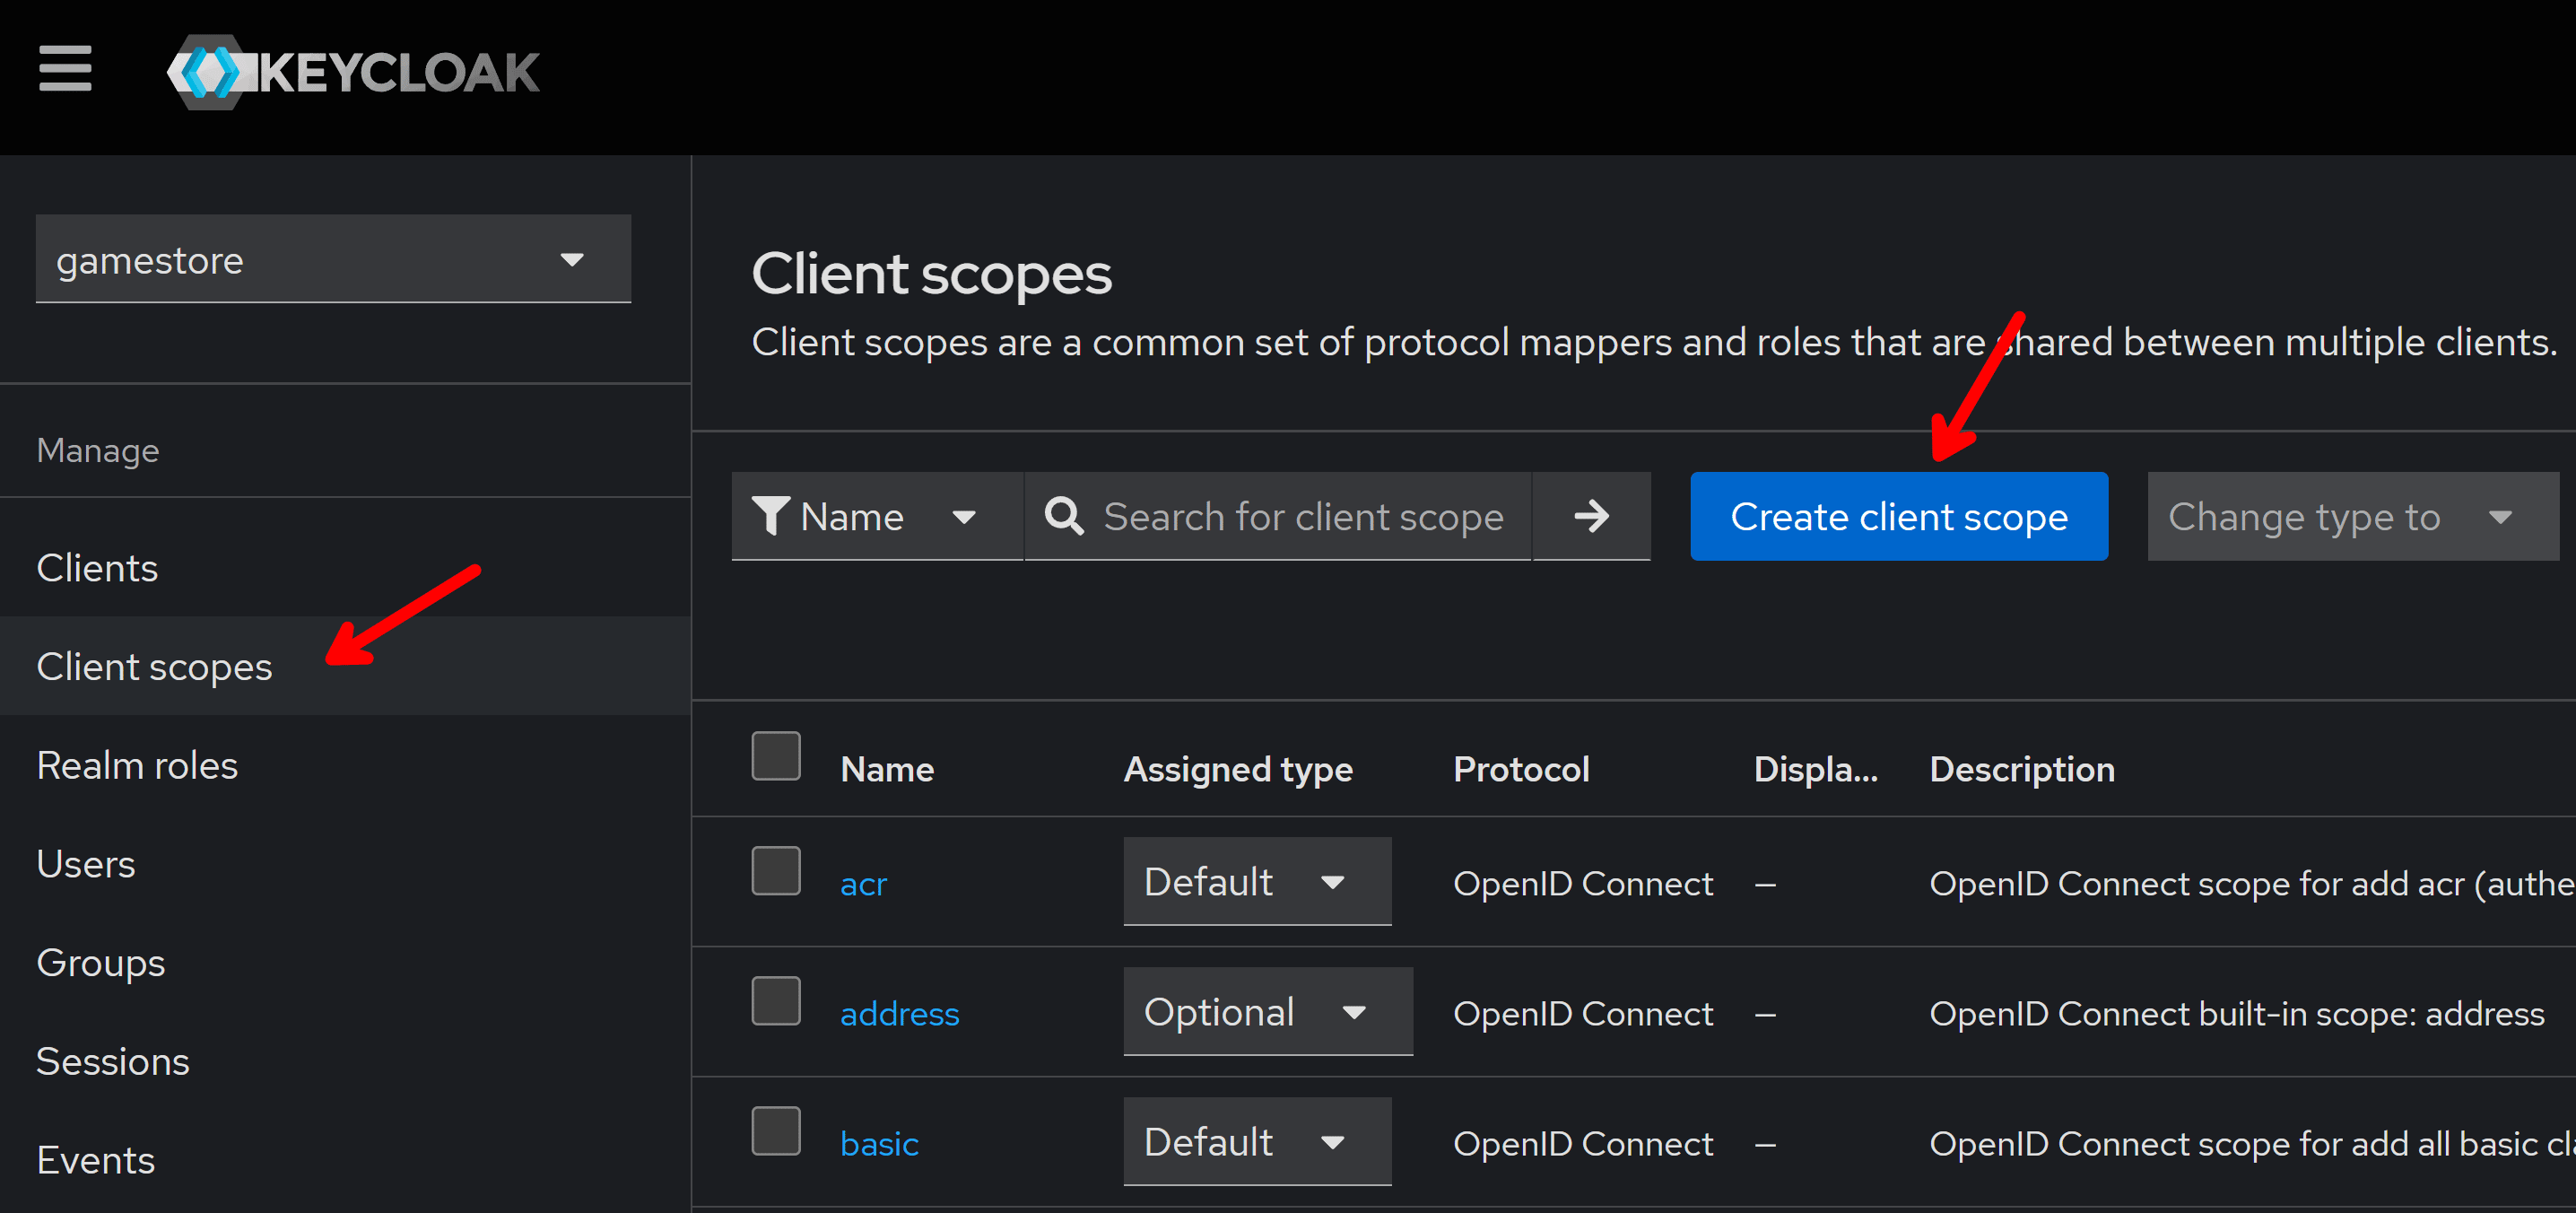
We need to create the client scope that, if granted, will attach the correct audience to the access tokens.
So, go to Client scopes and then click on Create client scope:
For the client scope name you should enter a value that reflects the kind of permissions that clients will be granted if they are allowed to request that scope.

I used gamestore_api.all since this scope grants access to the entire back-end API. This can be further enforced in your back-end authorization policies.
Turn on Include in token scope so that the scope is included in the generated access token (if you need it) and hit Save.
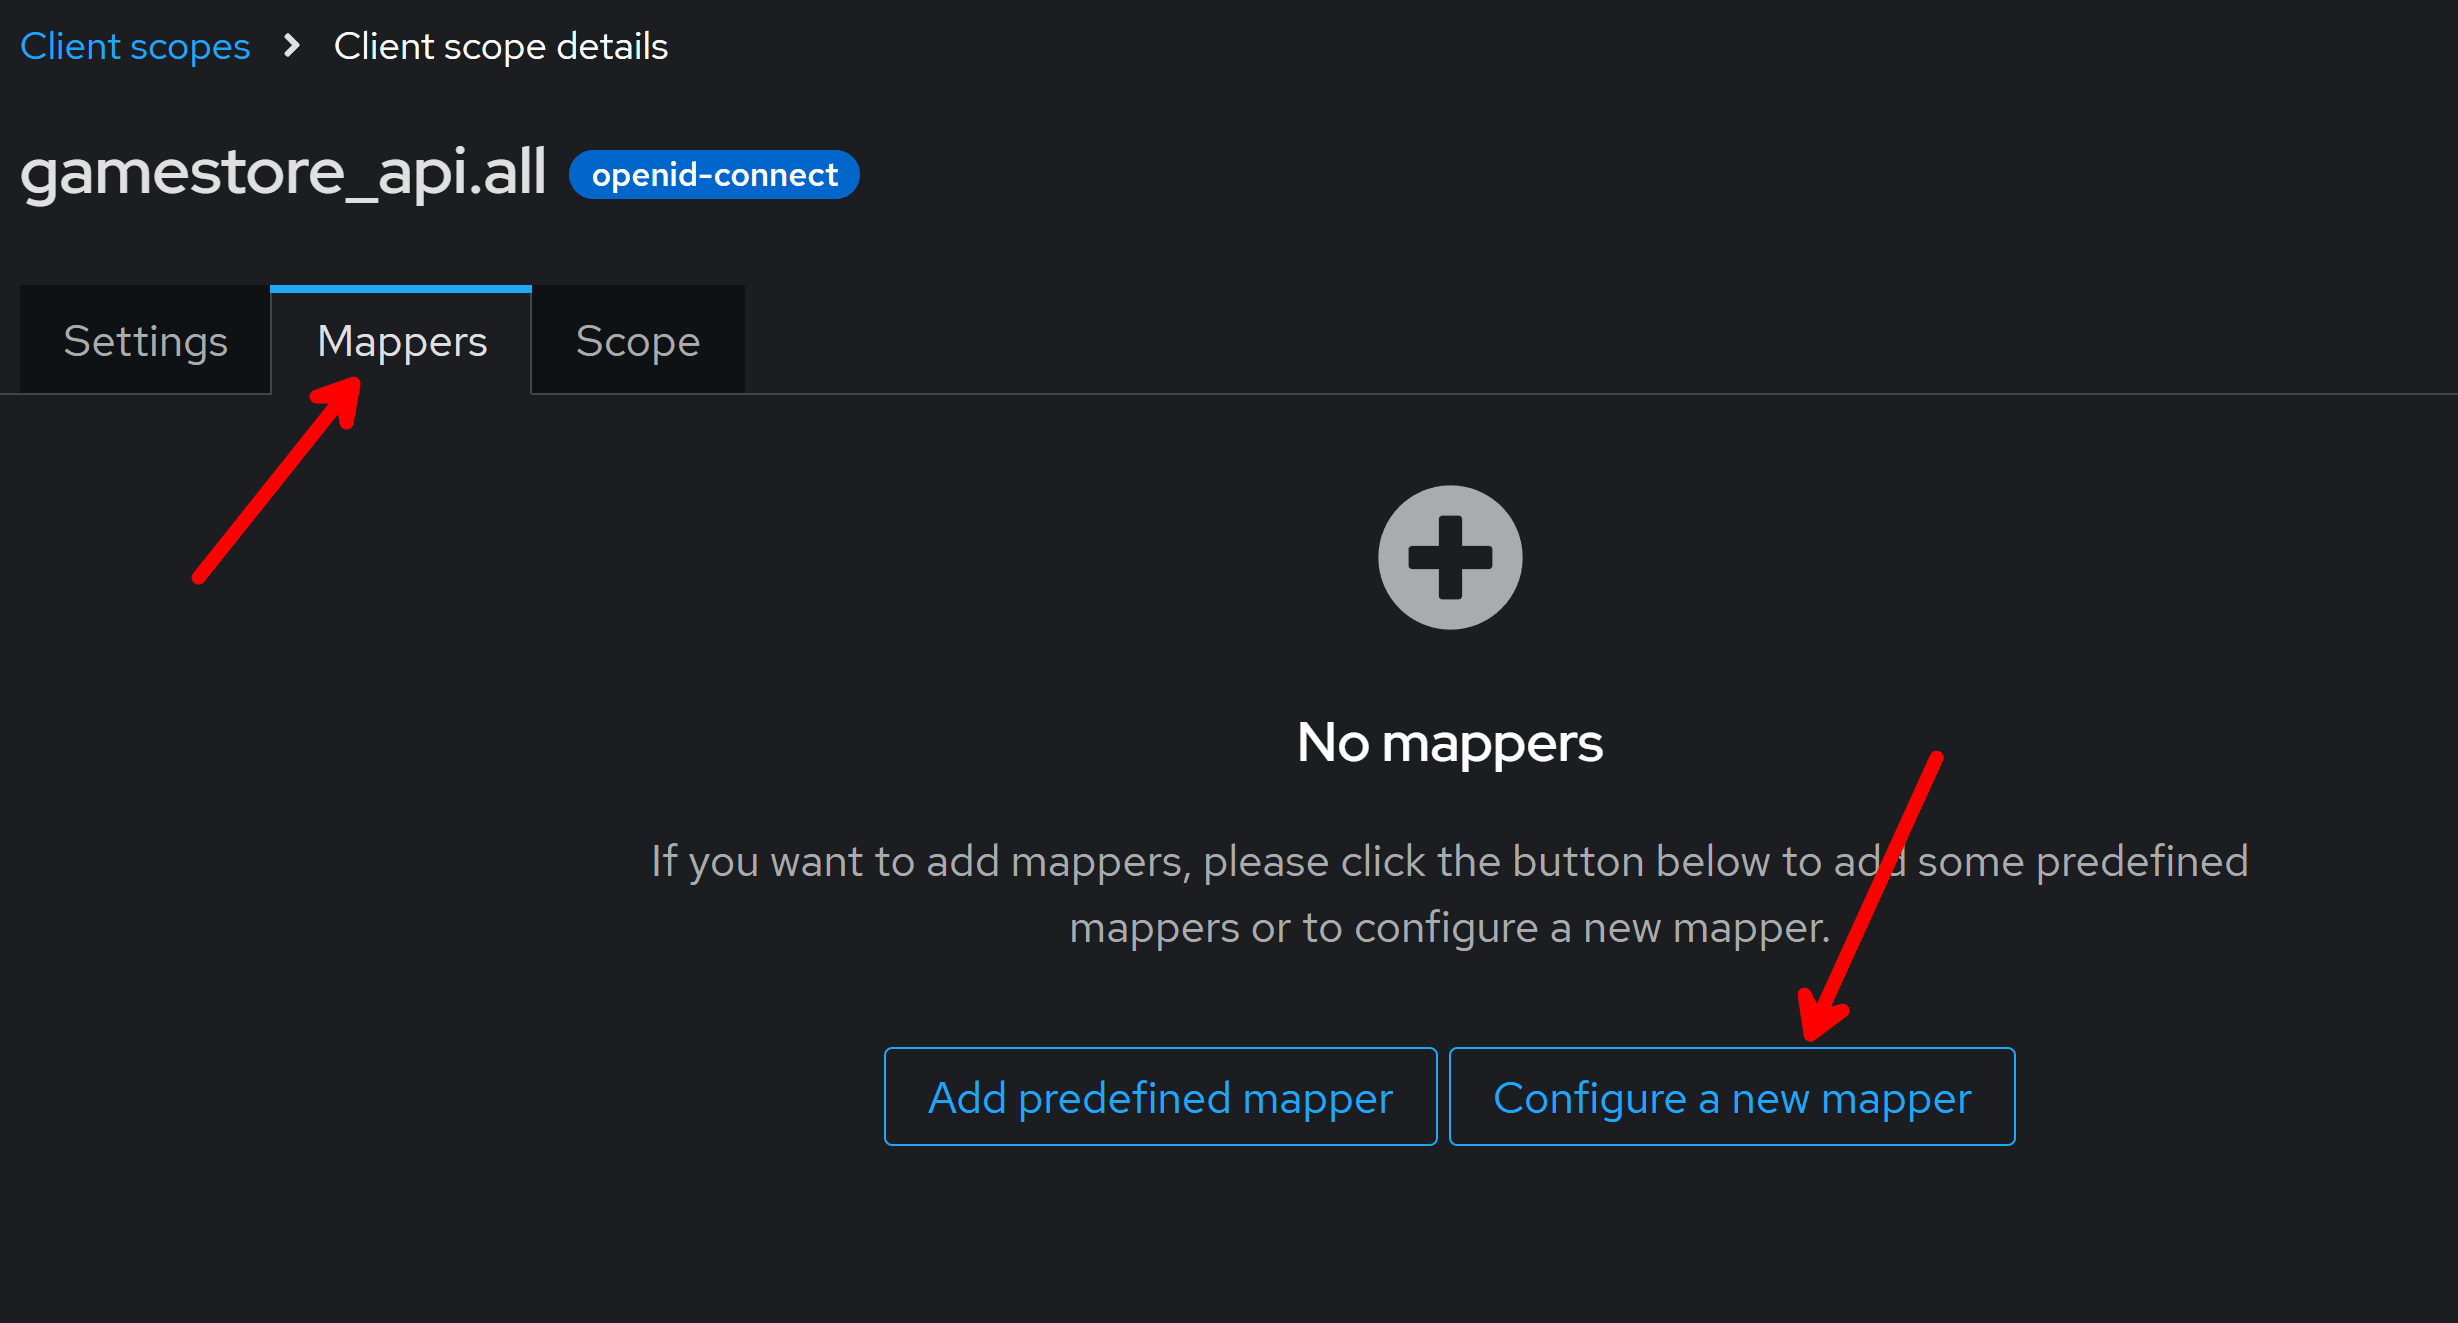
Now, we have to configure this scope so that it will produce the right audience in the token when requested. For that, while in this same client scope details screen, click on Mappers and Configure a new mapper:
From the list select Audience:

You can enter any name for this audience, it’s not very relevant, but the key detail is to ensure you select your API client for Included Client Audience:
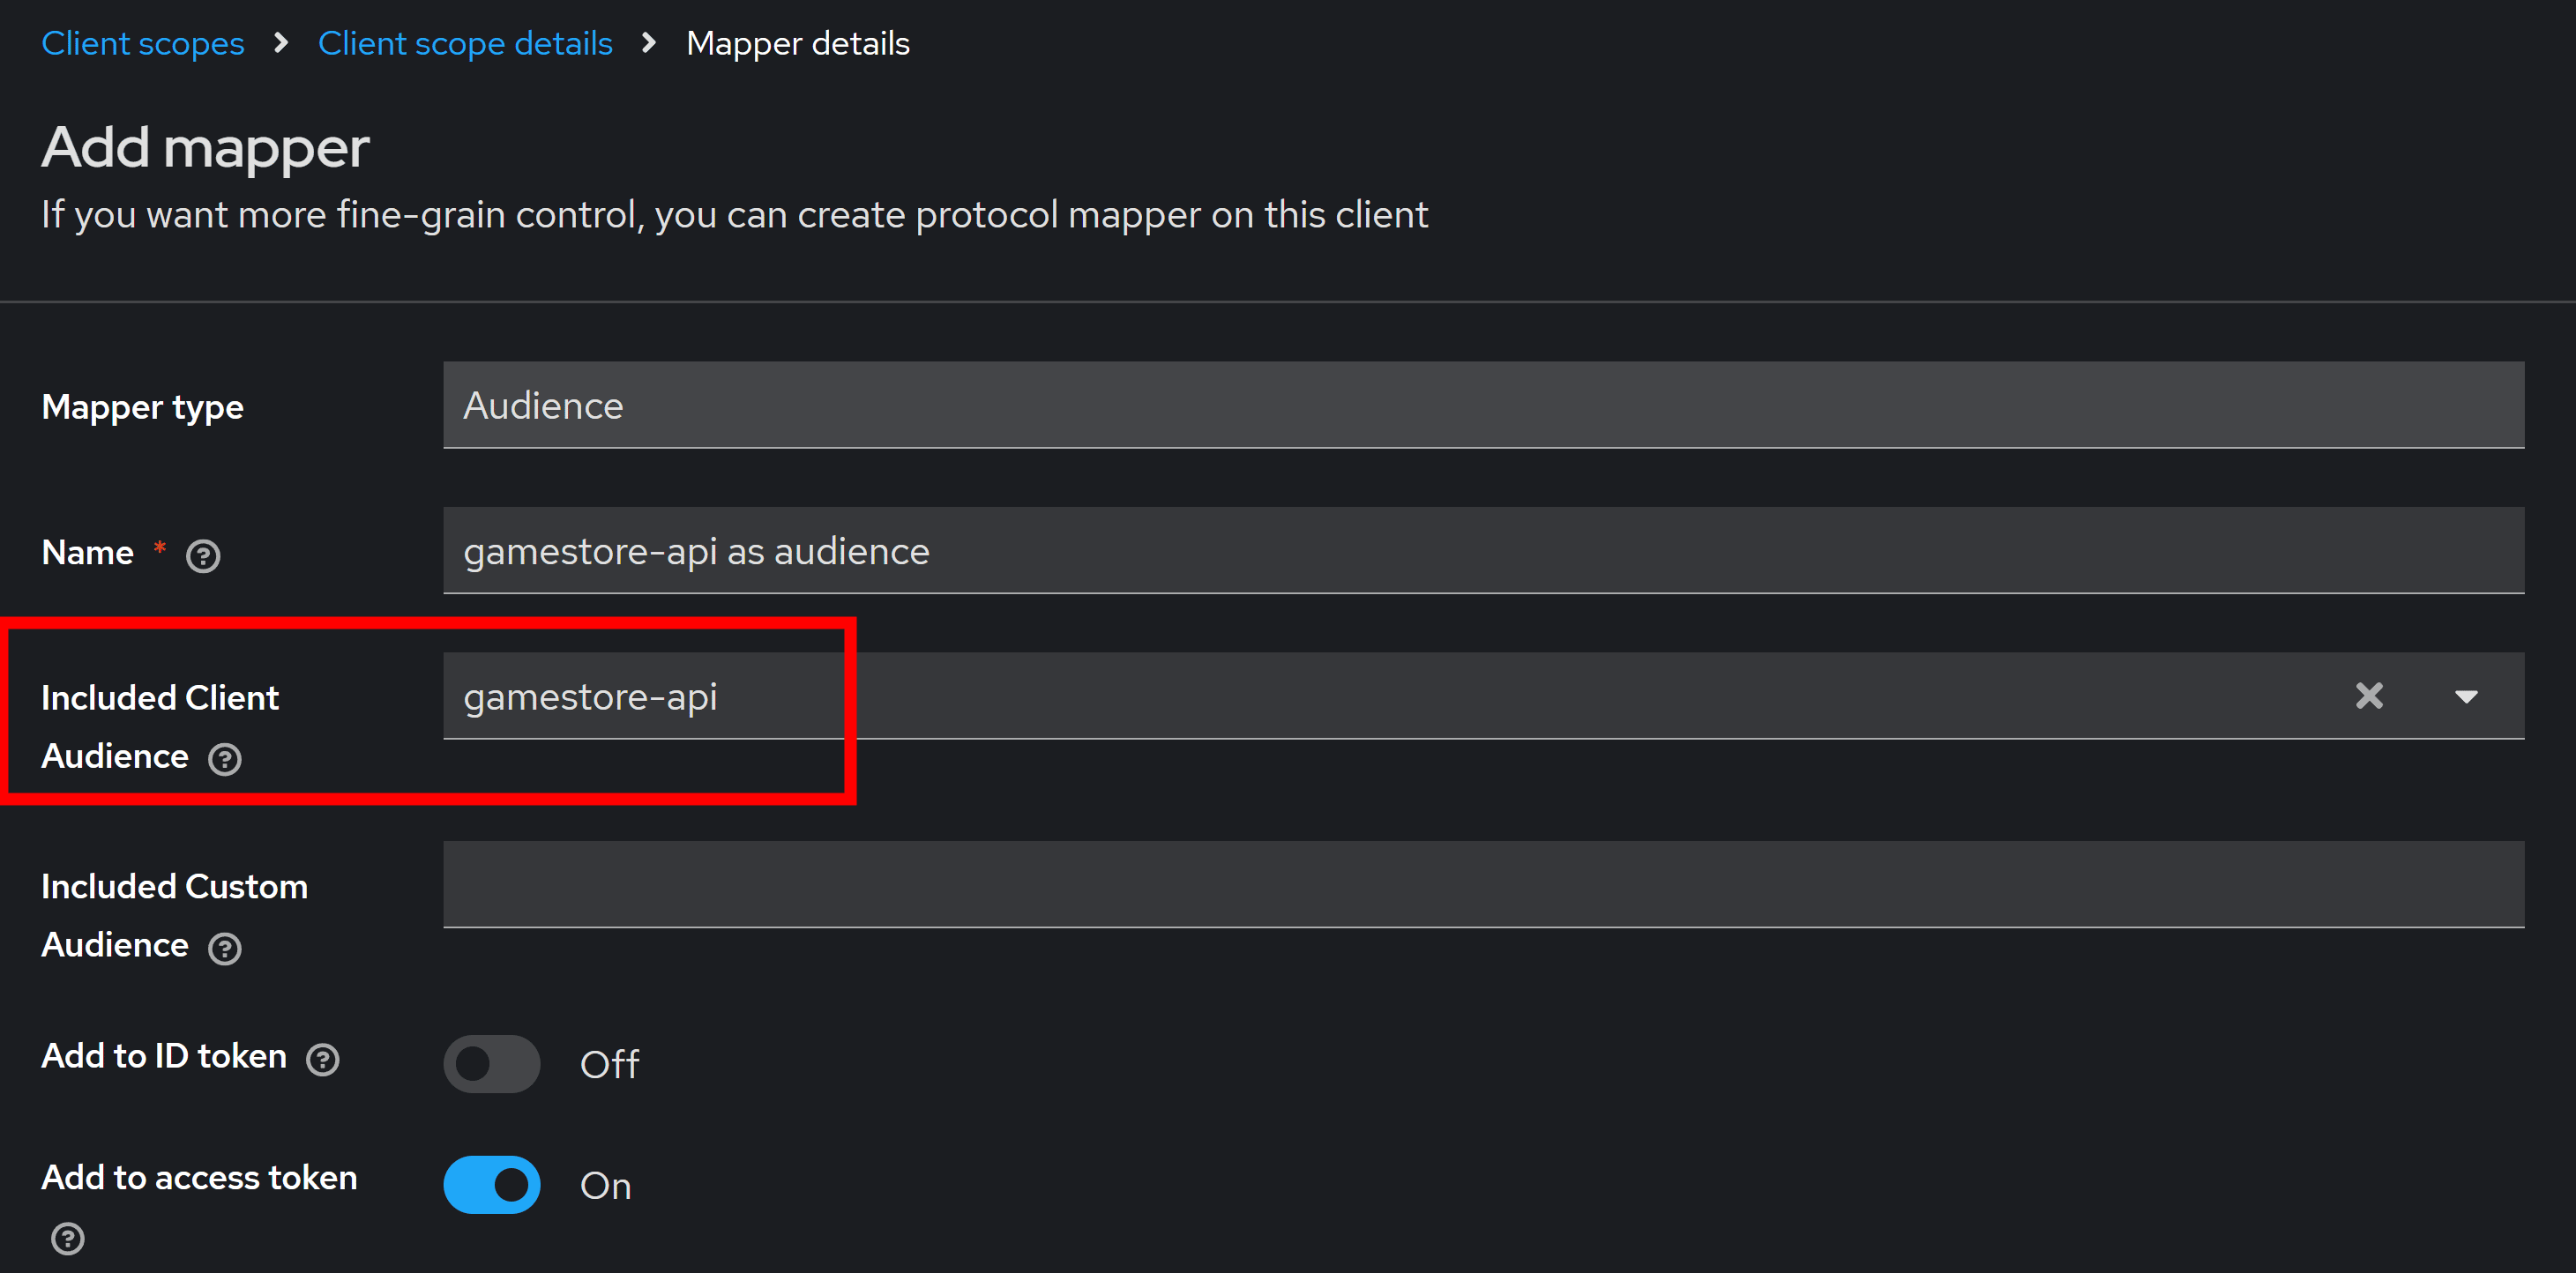
That will ensure any time the gamestore_api.all scope is requested and granted, the gamestore-api audience will be added to the access token.
There’s nothing else to do on this screen, so just hit Save.
Now let’s register our second client.
Step 6: Register the front-end
Since we’ll be using the OIDC authorization code flow, which starts from the front-end, we need to register our front-end as a client in Keycloak.
For this, go back to the Clients section and click on Create client:
In the General settings screen use a meaningful ID for your front-end, which you’ll use later in your app code:
In the Capability config step, the Client authentication check goes On or Off depending on your type of client:
- Public client -> On: This is for SPA-style clients like React, Angular, Blazor WASM, or for mobile apps, since they can’t safely store secrets (anything that runs in the user’s device can be hacked).
- Private client -> Off: This is for server-side apps, like Blazor server or old-style ASP.NET MVC or Razor apps. Those can safely store secrets on the server.
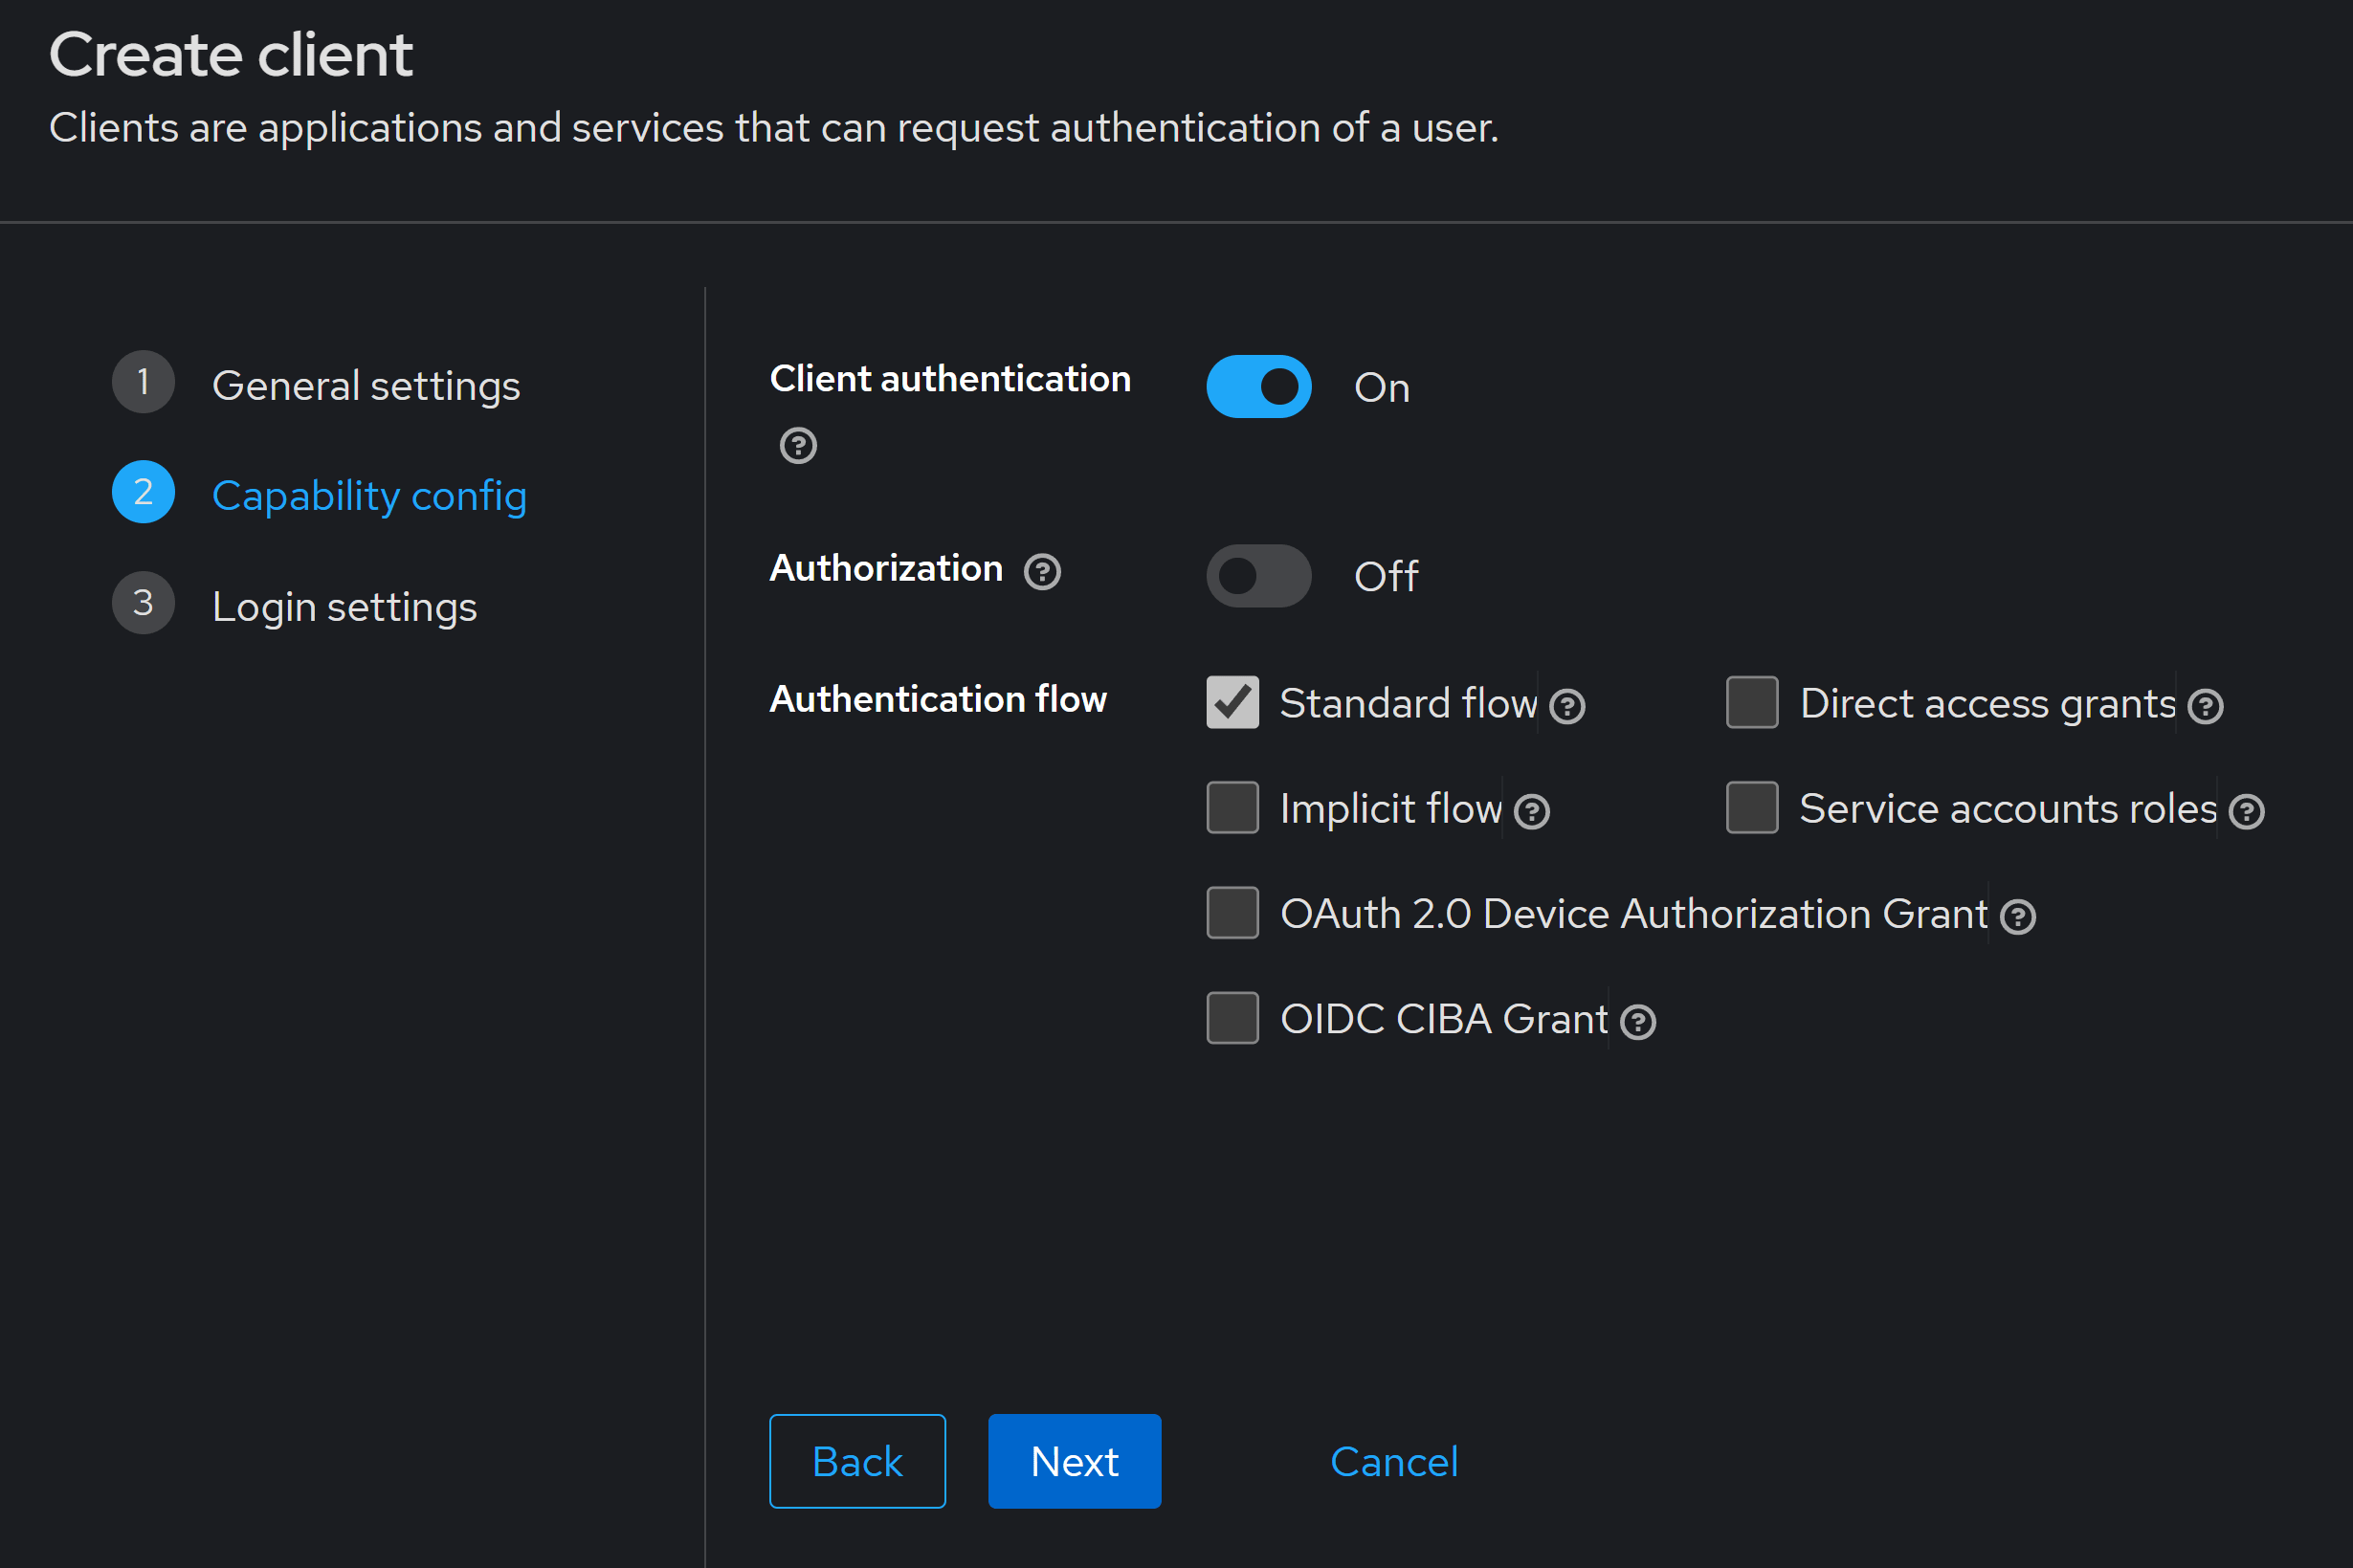
In my case, my front-end is a Blazor app with Static Server Side Rendering, no client interactivity, so I’ll turn Client authentication On.
For Authentication flow, the Standard flow is all you need.
Moving on to the Login settings, you want to enter both the Valid redirect URIs and Valid post logout redirect URIs:
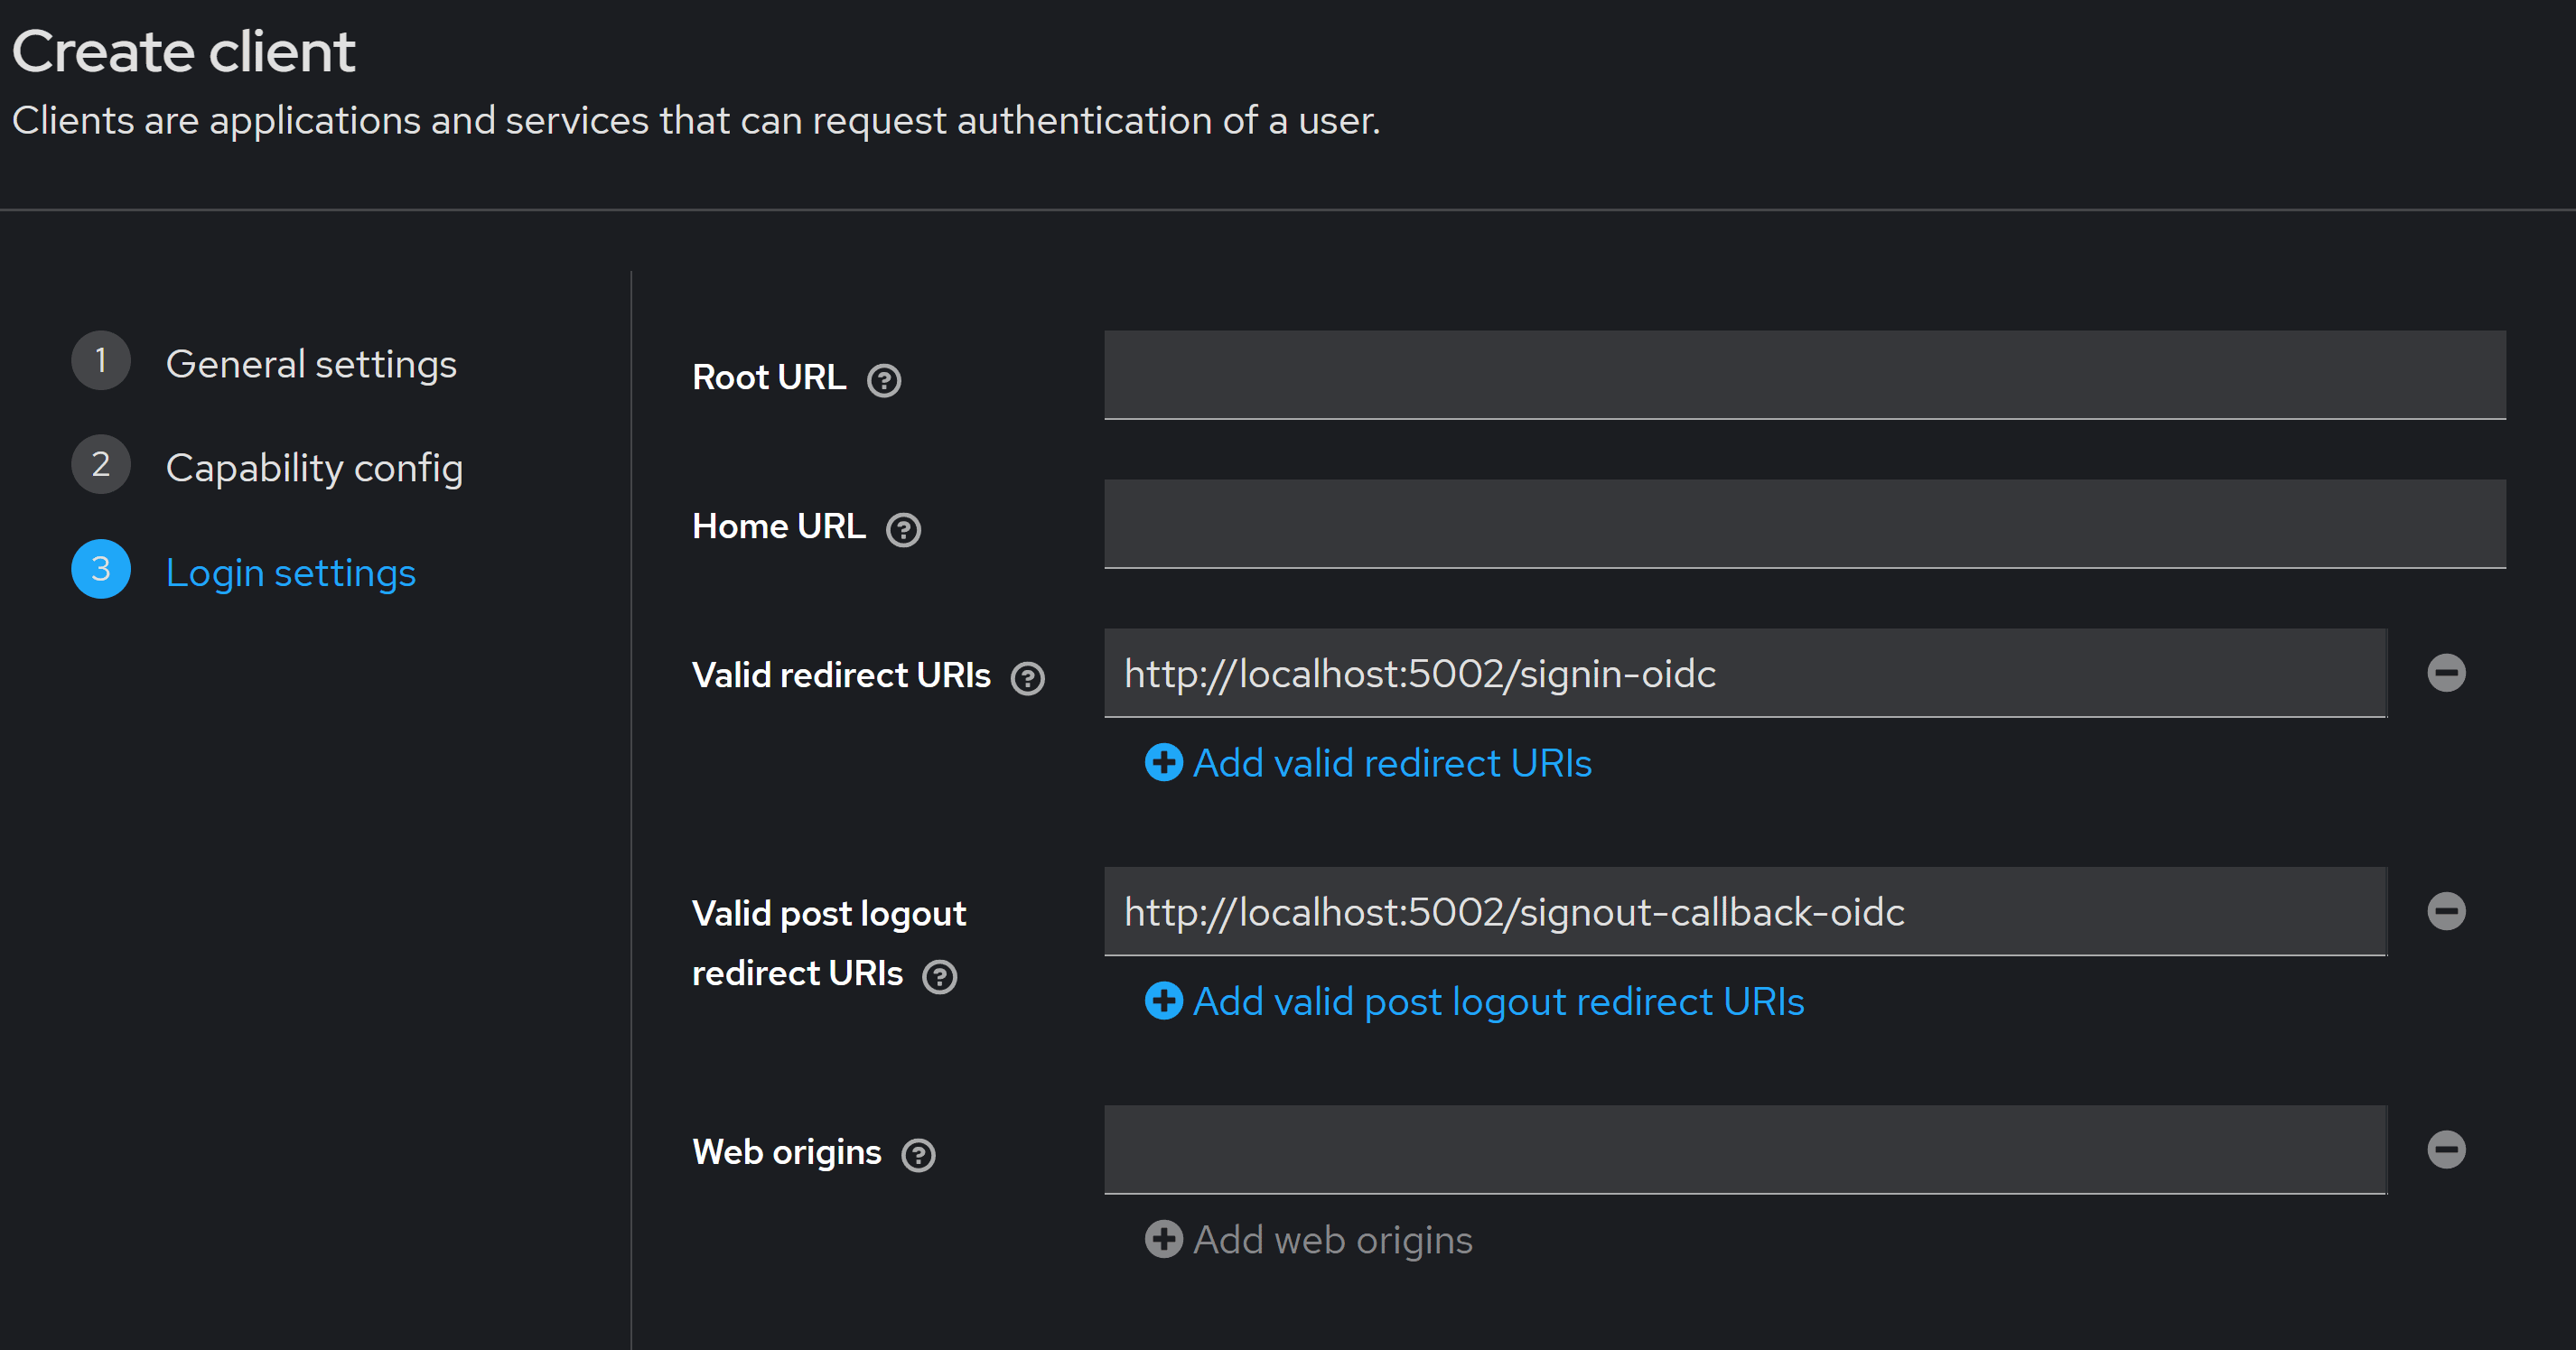
The host:port to use there depends on the host and port where you run your front-end locally, http://localhost:5002 in my case.
Then, to keep it simple, I used the default paths used by ASP.NET Core’s OIDC middleware (signin-oidc, signout-callback-oidc).
You can use any other paths there, but you have to make sure they exist in your front-end and that the OIDC middleware is aware of them.
Hit Save and your front-end is mostly good to go.
The missing piece is allowing our front-end to request the client scope we created earlier. That’s how it can get access tokens with the correct audience.
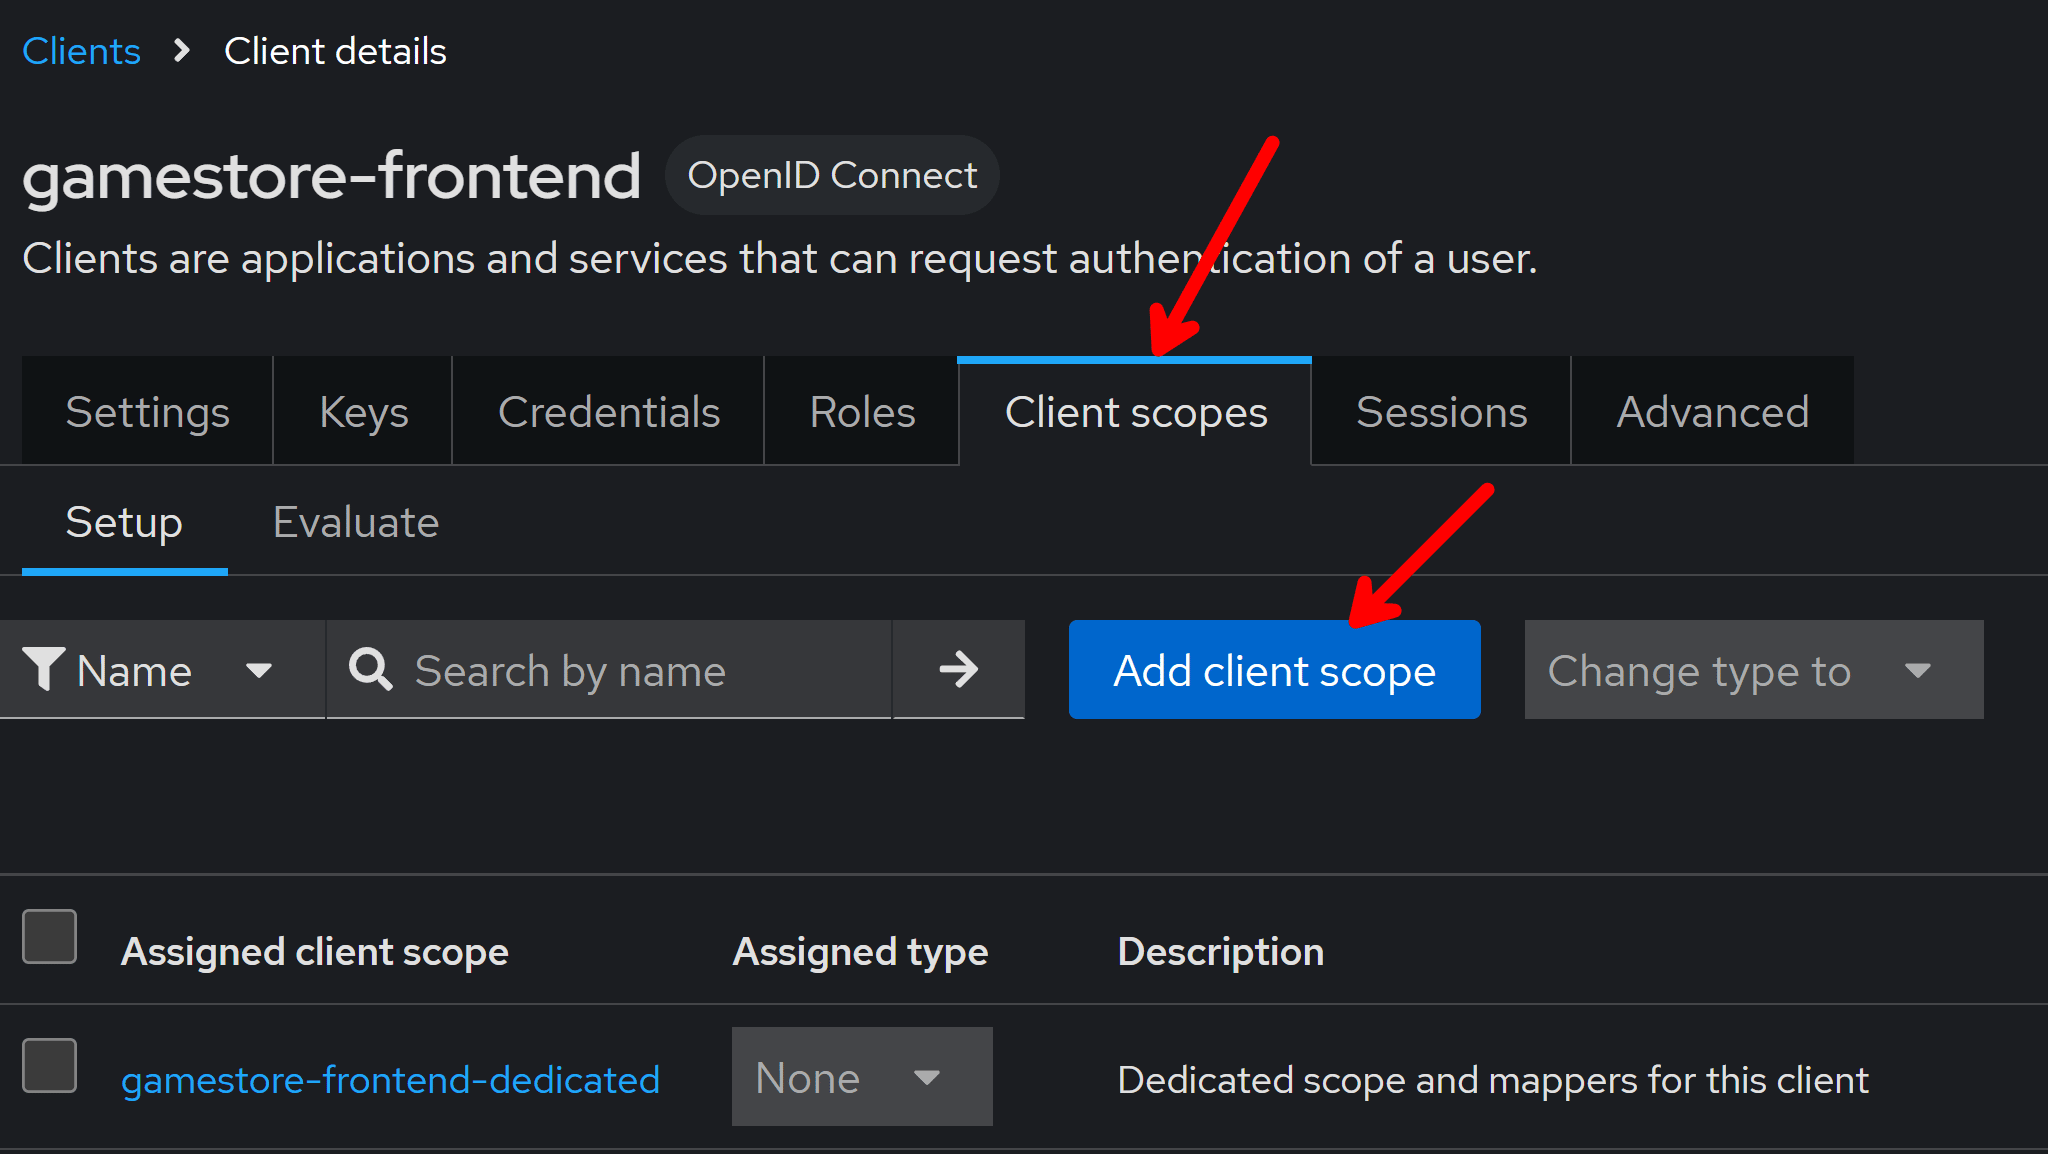
So from your front-end screen go to Client scopes and click on Add client scope:
Select the scope you had created (gamestore_api.all in my case), click Add, and choose Default or Optional.
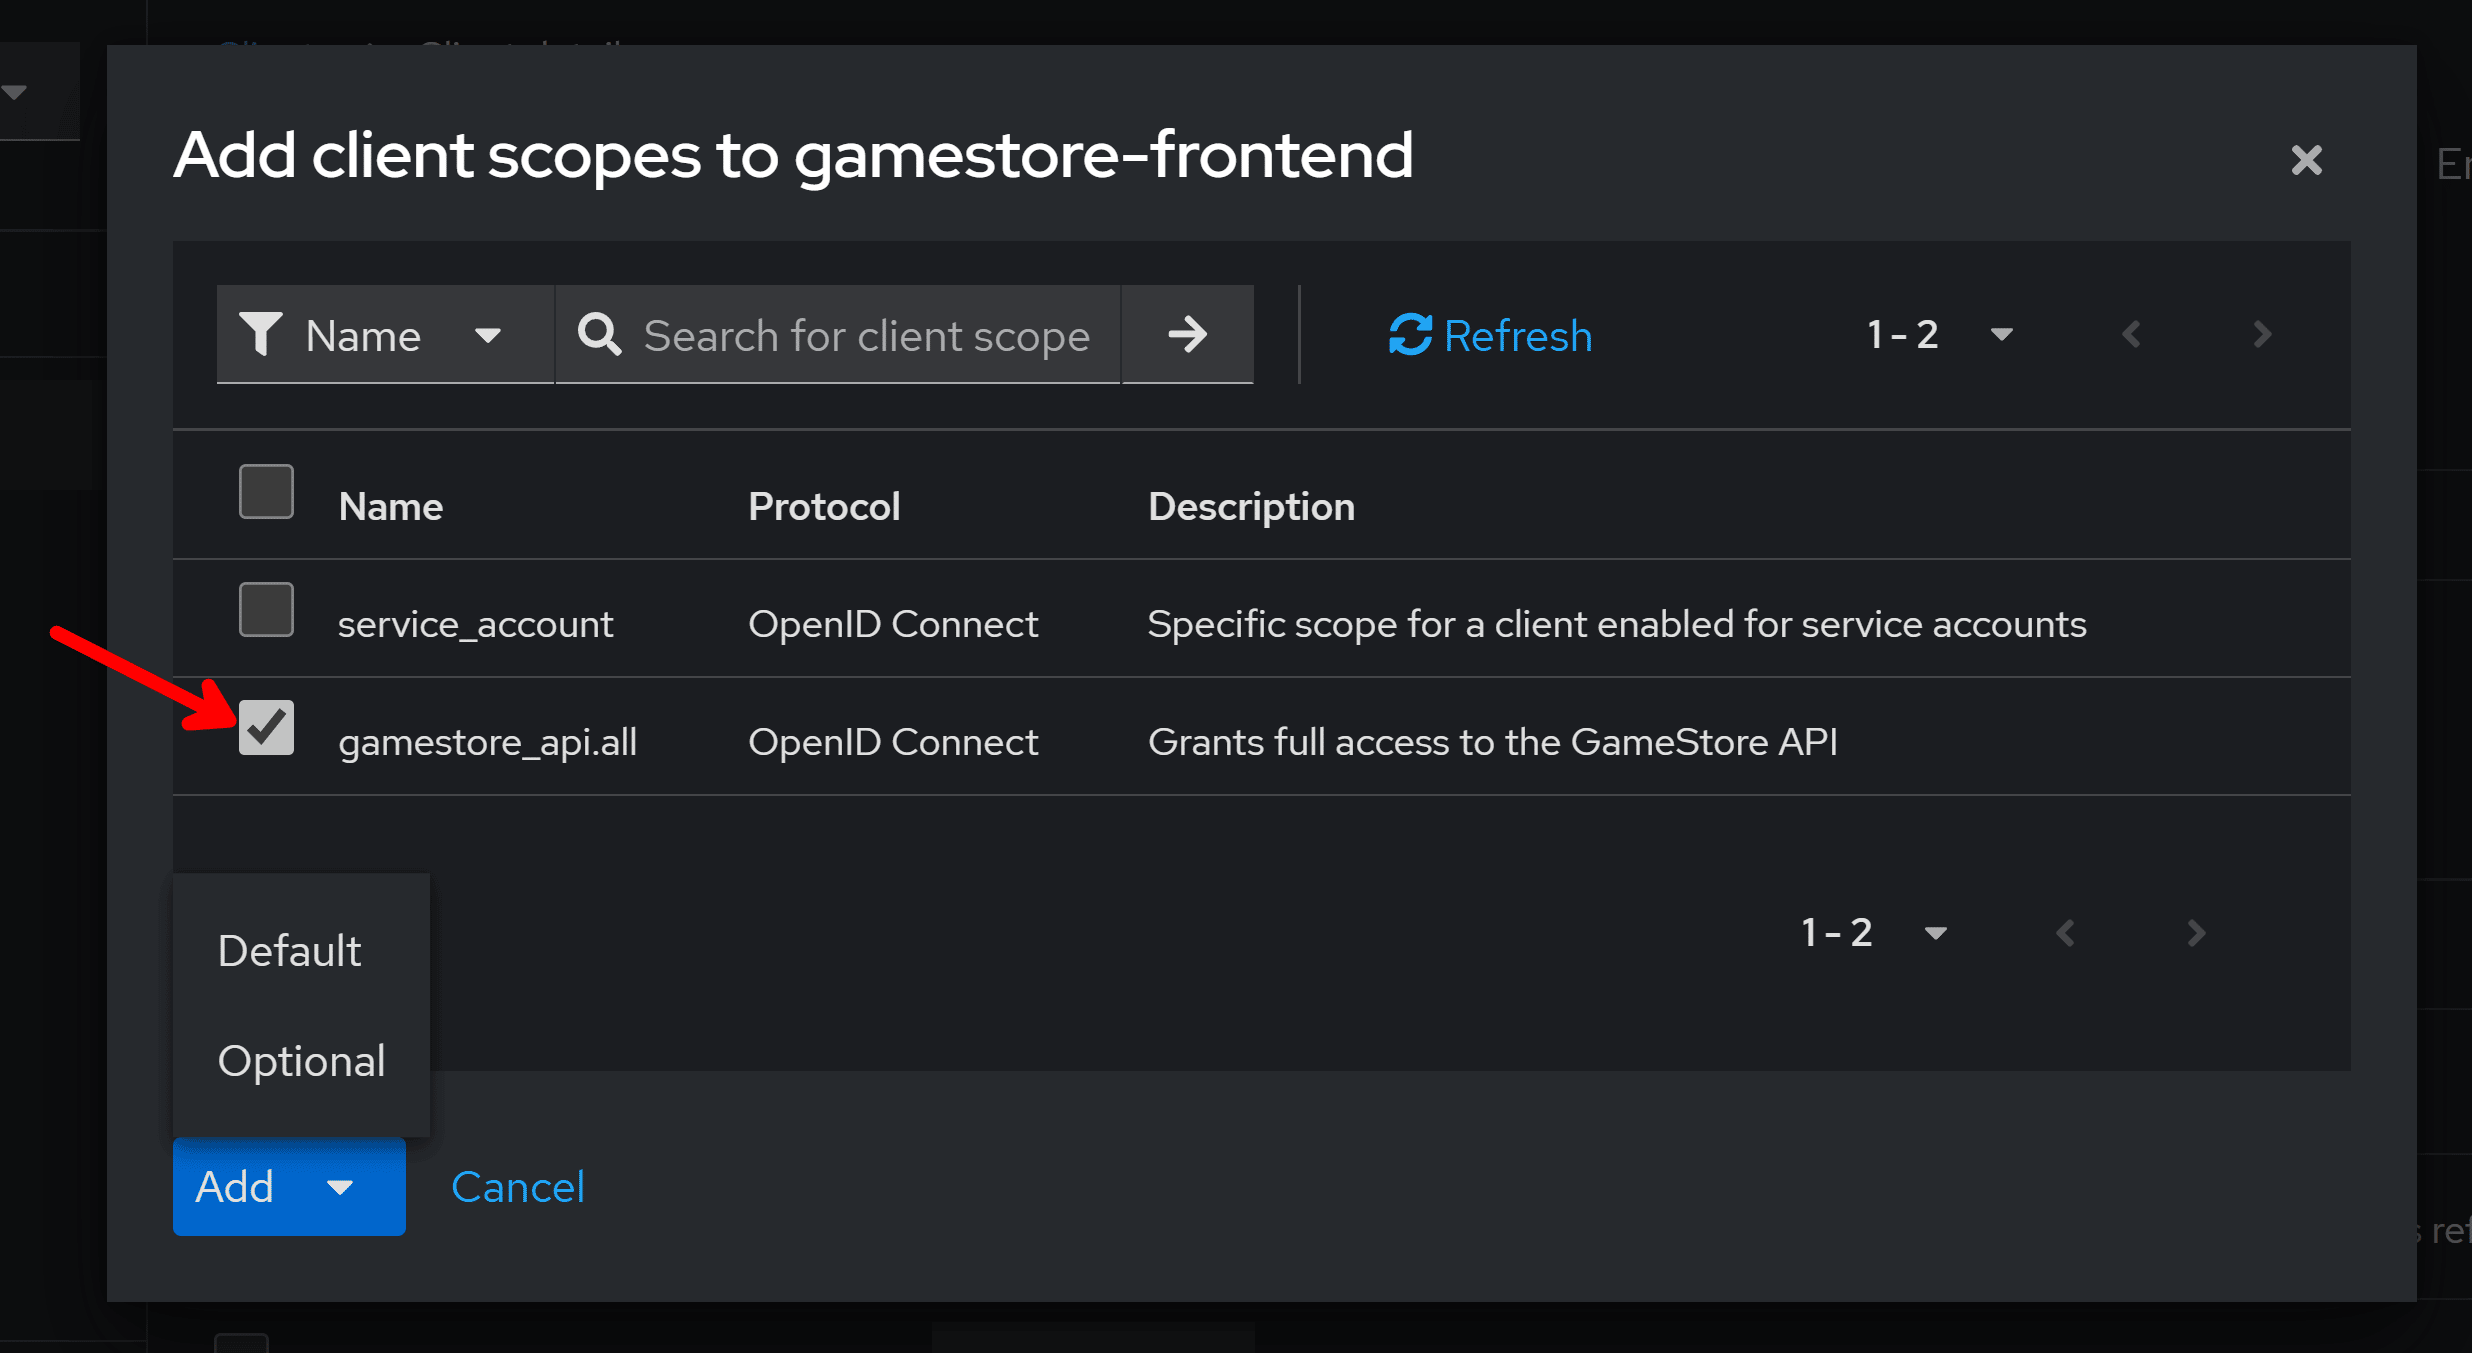
Optional means the client must request the scope, while Default means the scope is always requested for this client, even if it doesn’t ask for it.
I like to pick Optional here to let the client be very explicit on what it requests.
That’s all the required Keycloak configuration. Now let’s see what to do to wire things up on the code side.
Step 7: ASP.NET Core back-end configuration
We need to tell our back-end 2 key things:
- Who will be issuing the access tokens (Authority)
- Who are those tokens meant for (Audience)
We can achieve those by first installing the Microsoft.AspNetCore.Authentication.JwtBearer NuGet package and then registering a JWT Bearer scheme with the right values on our application startup code:
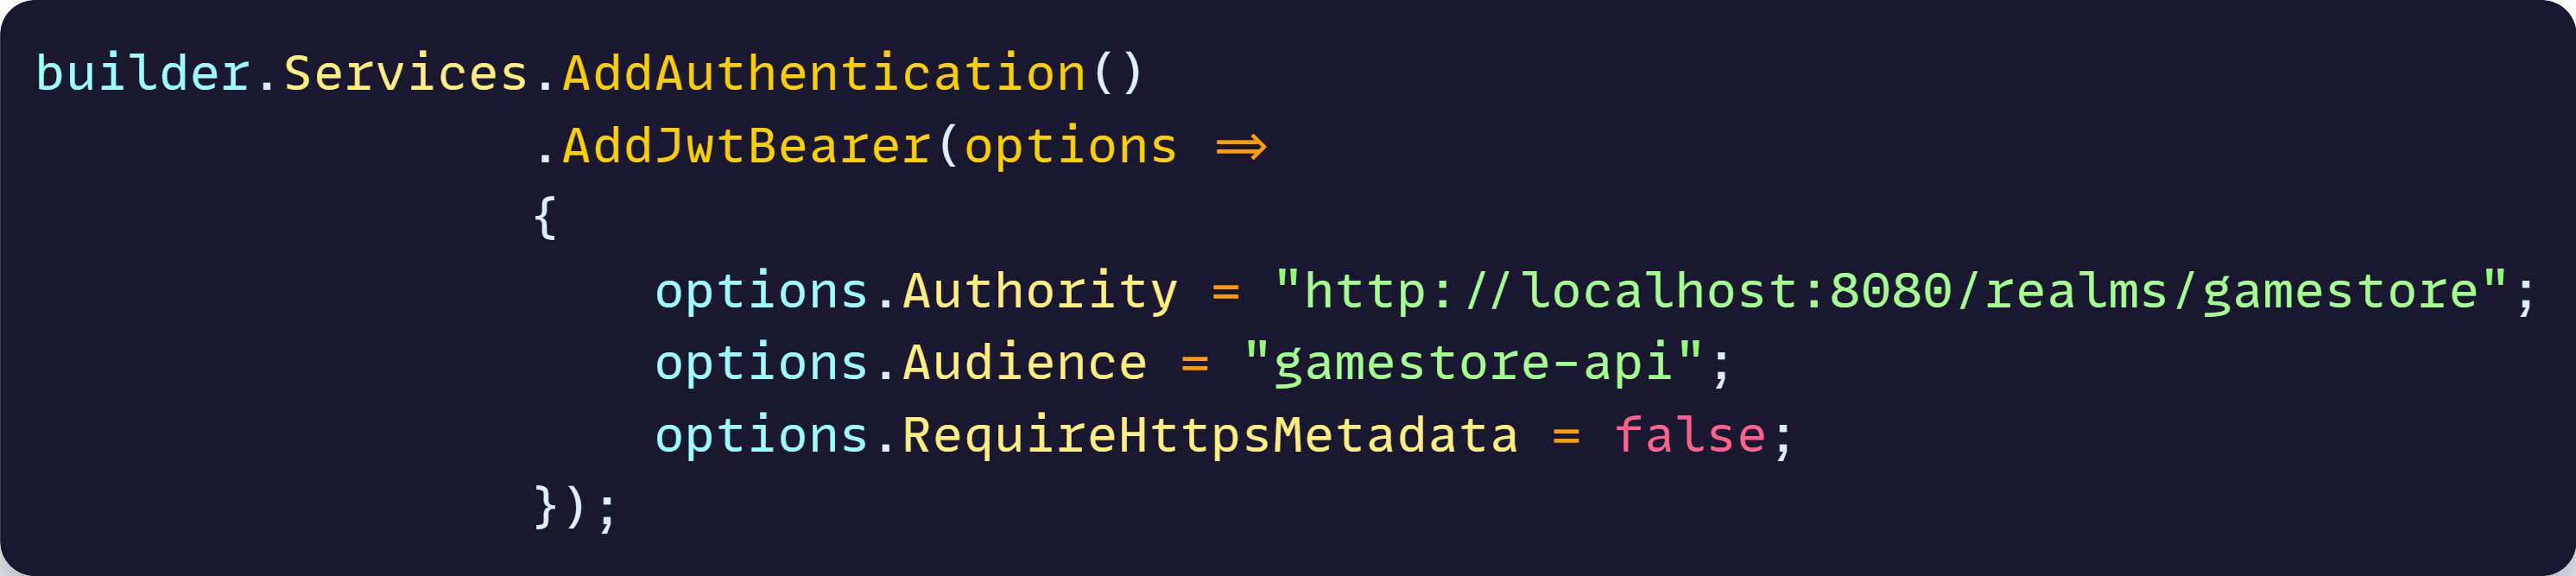
Notice that Authority is the host:port where Keycloak is running plus /realms/your-realm-name, and Audience must match exactly the audience we configured earlier on Keycloak.
RequireHttpsMetadata needs to be false so that the middleware can talk to our Keycloak server locally, which is not using HTTPS.
Also, add this line to turn on the Authorization middleware:

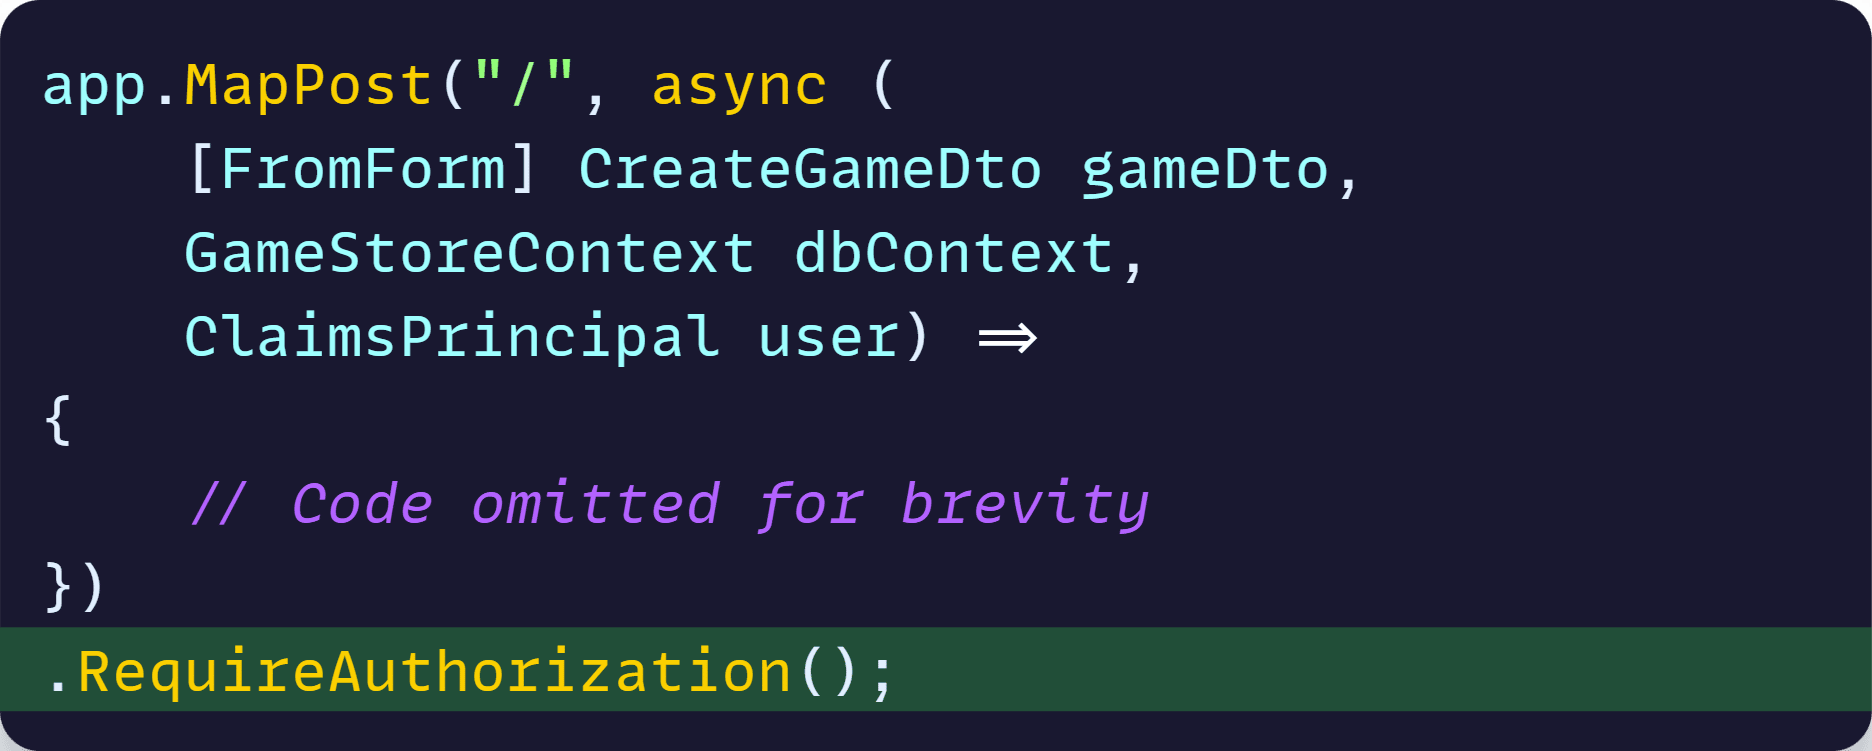
And then update your endpoints to require authorization:
The back-end should be ready. Now, let’s see what to do on the front-end.
Step 8: Front-end configuration
How you configure the front-end for OIDC will vary wildly depending on your tech stack, but here’s what you can do for a Blazor Static SSR app.
First install the Microsoft.AspNetCore.Authentication.OpenIdConnect NuGet package, which gives you access to the OIDC middleware.
Then, configure your Keycloak scheme during your application startup:
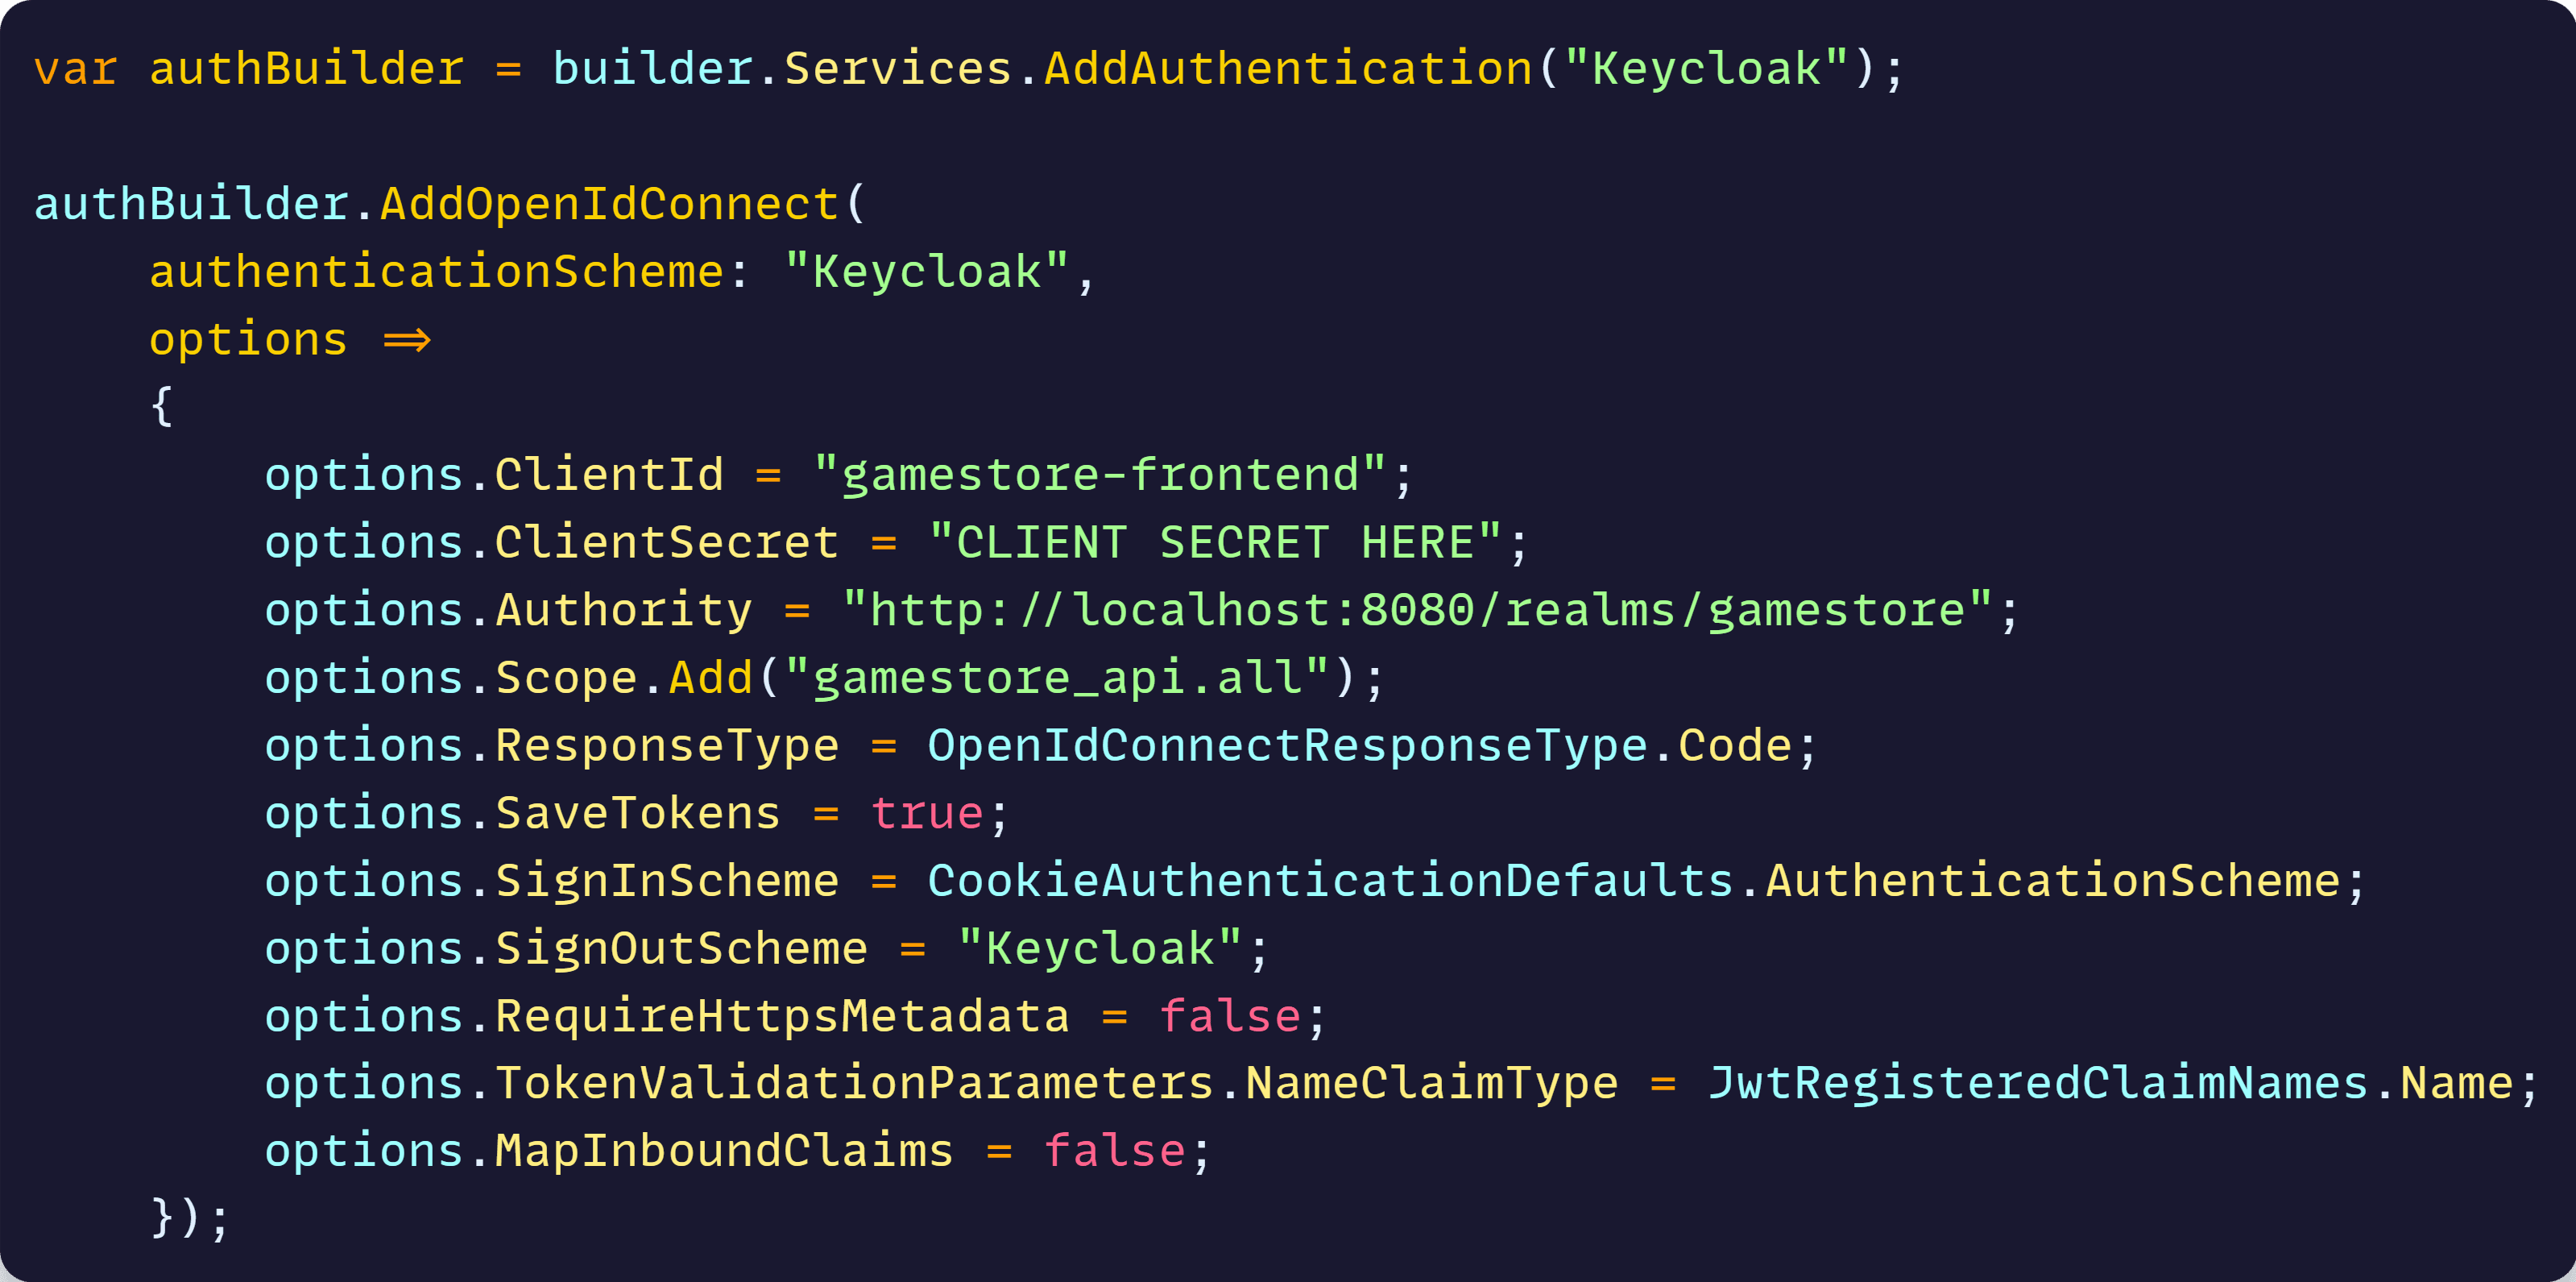
You can get your ClientId and ClientSecret from your front-end client configuration on Keycloak:
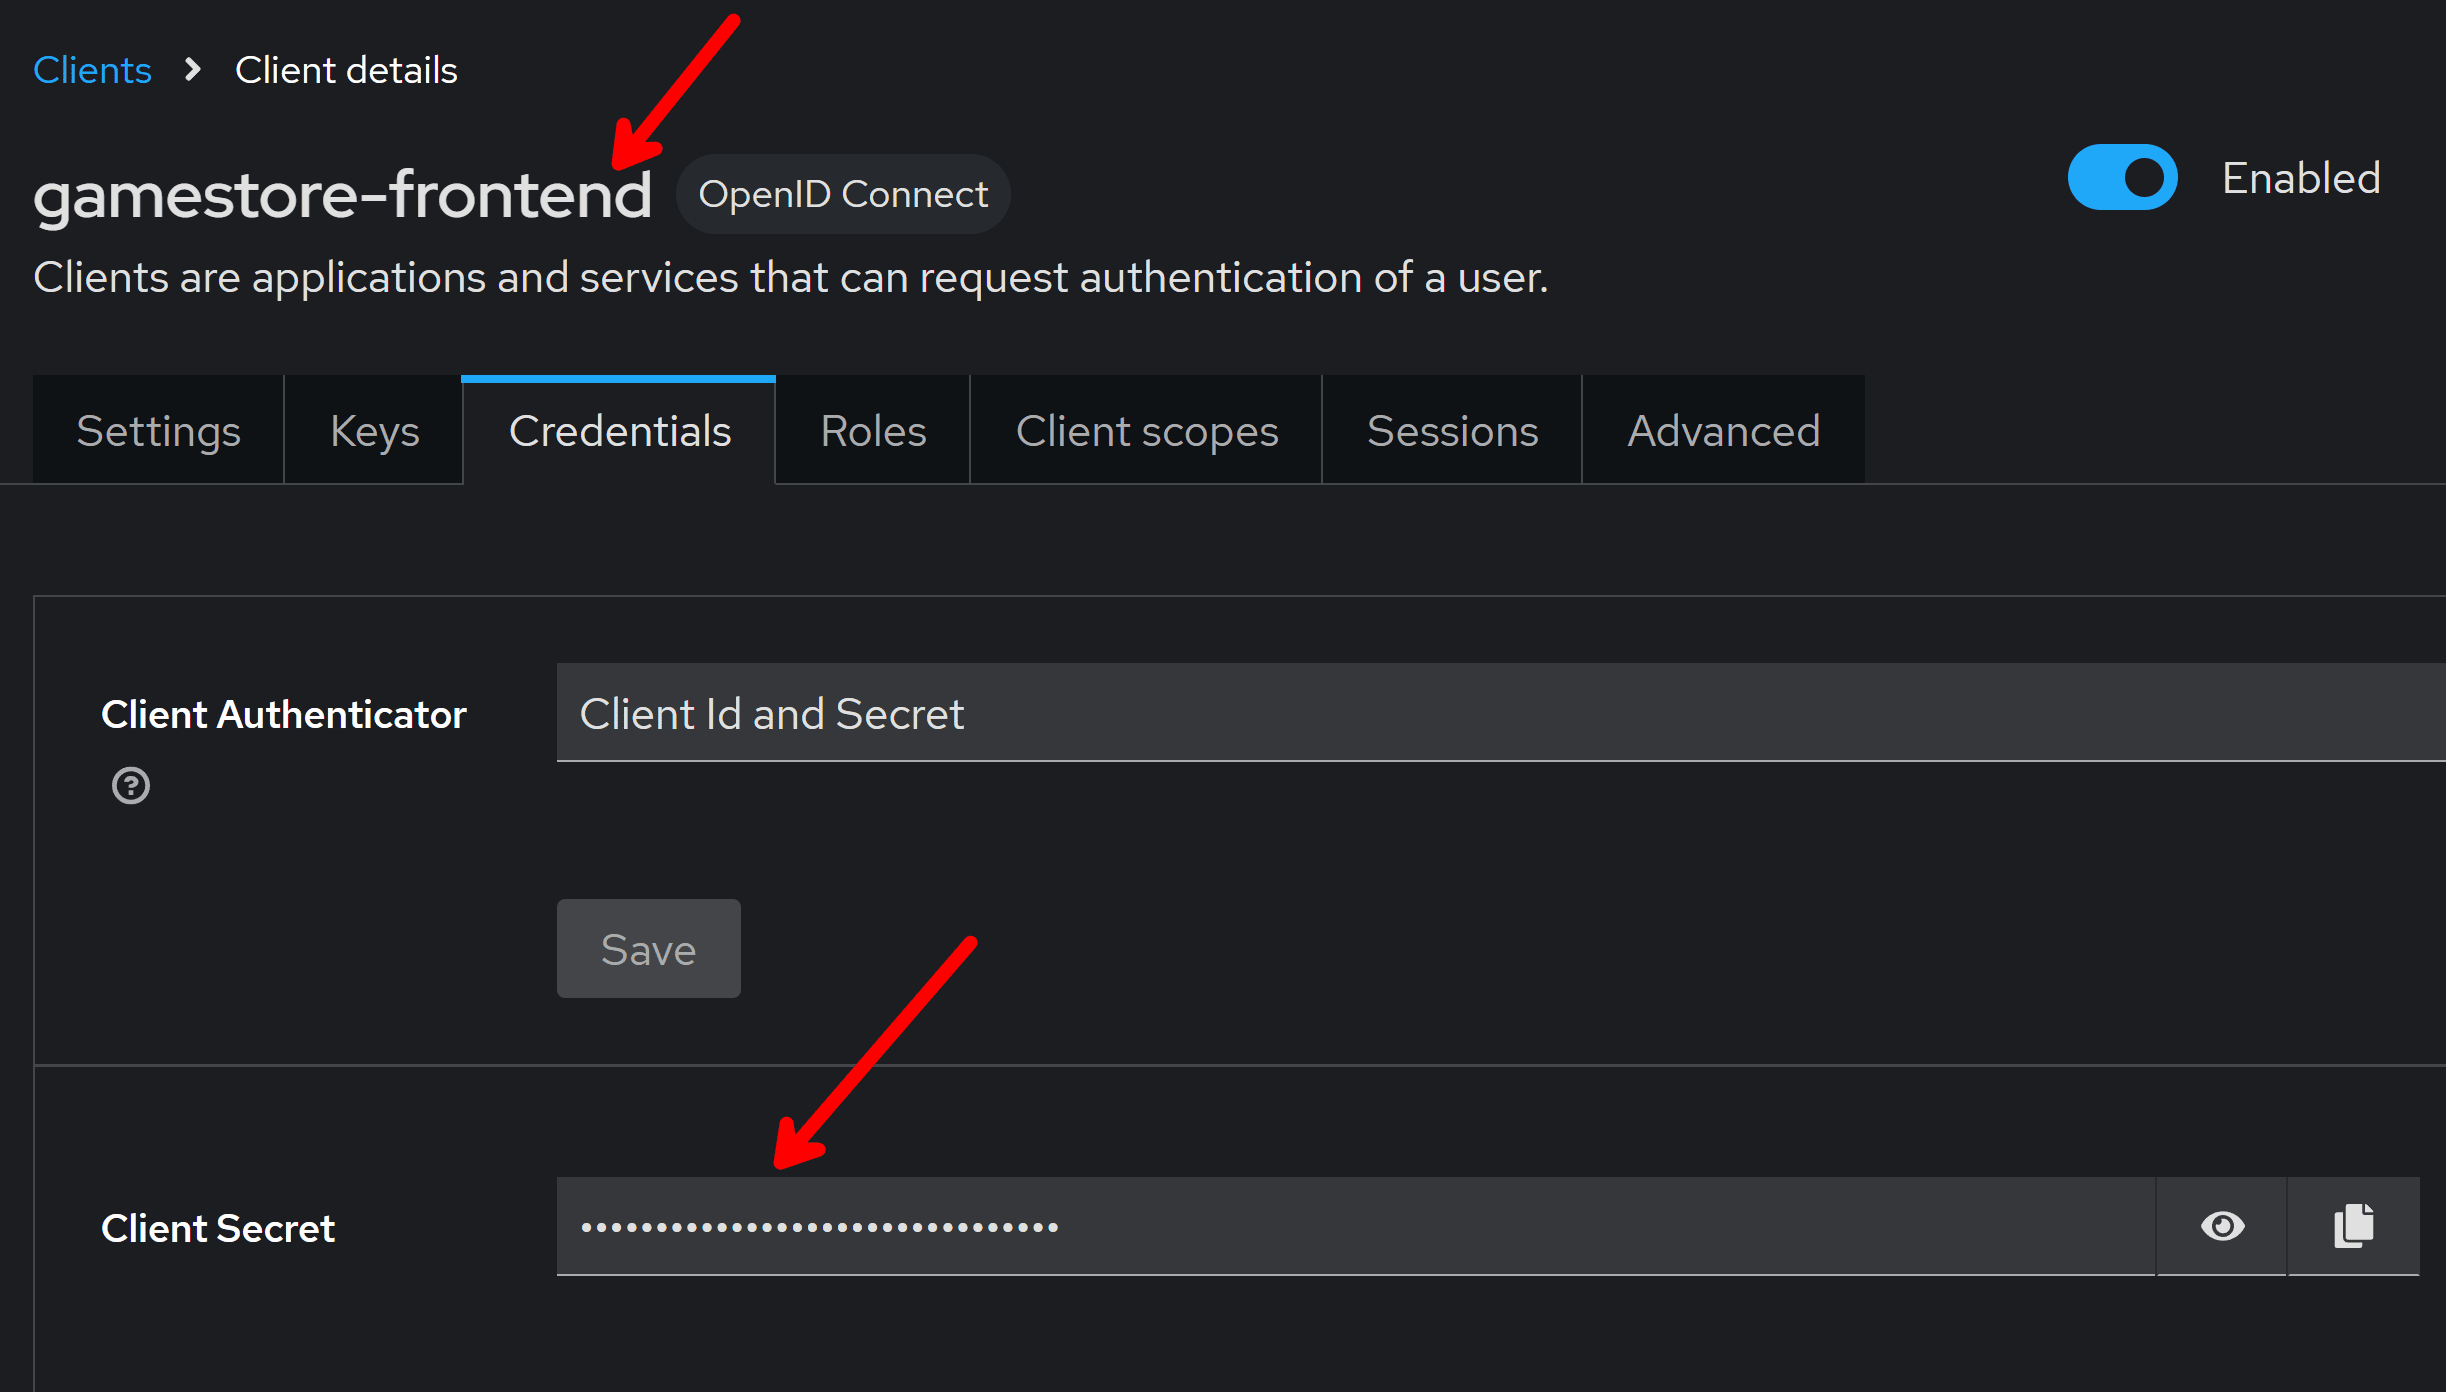
Just don’t hard code the secret there, and instead load it from .NET’s Secret Manager. Also, keep in mind that a client secret is not required for public clients since they can’t hold secrets.
Regarding the other values:
- Authority: The path to your realm in your Keycloak server.
- Scope: The exact scope we defined earlier and that grants the correct audience.
- ResponseType: The flow to use to authenticate the user. Code corresponds to the Authorization Code Flow.
- SaveTokens: True so that received tokens can be saved in the authentication cookie to be used later when we send requests to the backend.
- SignInScheme: The scheme used to sign in the user. We use cookies here so the user can remain authenticated between requests.
- SignOutScheme: The scheme used to sign out the user. We use Keycloak here so that the user is signed out of both Keycloak and the front-end.
- RequireHttpsMetadata: Needs to be false, same reason as the back-end.
- TokenValidationParameters.NameClaimType: Setting this to JwtRegisteredClaimNames.Name will make sure the user’s name is populated in the claims principal after the user authenticates.
- MapInboundClaims: Prevents ASP.NET Core from changing the name of a few key claims. We want the exact claims coming from Keycloak.
You will also need to add the Cookies auth scheme, so that it can be used alongside the OIDC middleware:

How will Blazor components know if the user is authenticated or not?
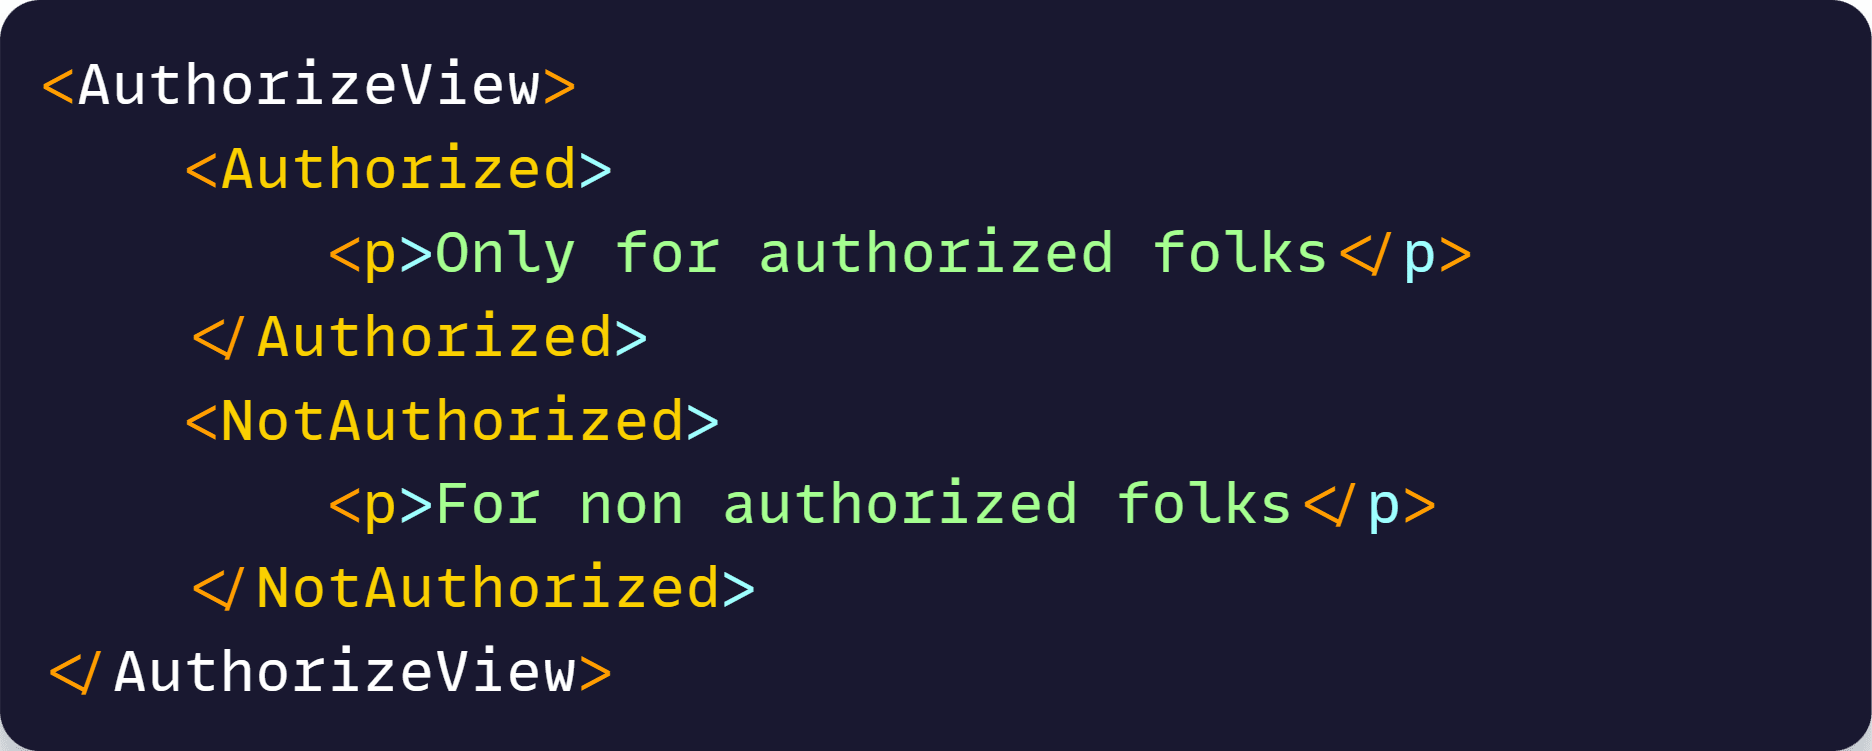
By using the authorization middleware, an authentication state provider, and the cascading authentication state, which you can register like this:

That’s how we can do stuff like this elsewhere:
We should also add an endpoint in the front-end to kick off the OIDC sign-in flow:

That endpoint will be invoked by your Login button or link. Something like this:

This should be enough for your front-end to authenticate users via Keycloak.
But, there’s one more thing needed to let the front-end make authenticated requests to the backend.
Step 9: Add an authorization handler
Just because the user is authenticated in the front-end doesn’t mean the back-end will automatically trust the front-end to make requests on behalf of the user.
We need to make sure we attach the access token as a header on every request we make to the back-end API endpoints that require authorization.
We could do this manually in every request, but it’s easier via a delegating handler like this:
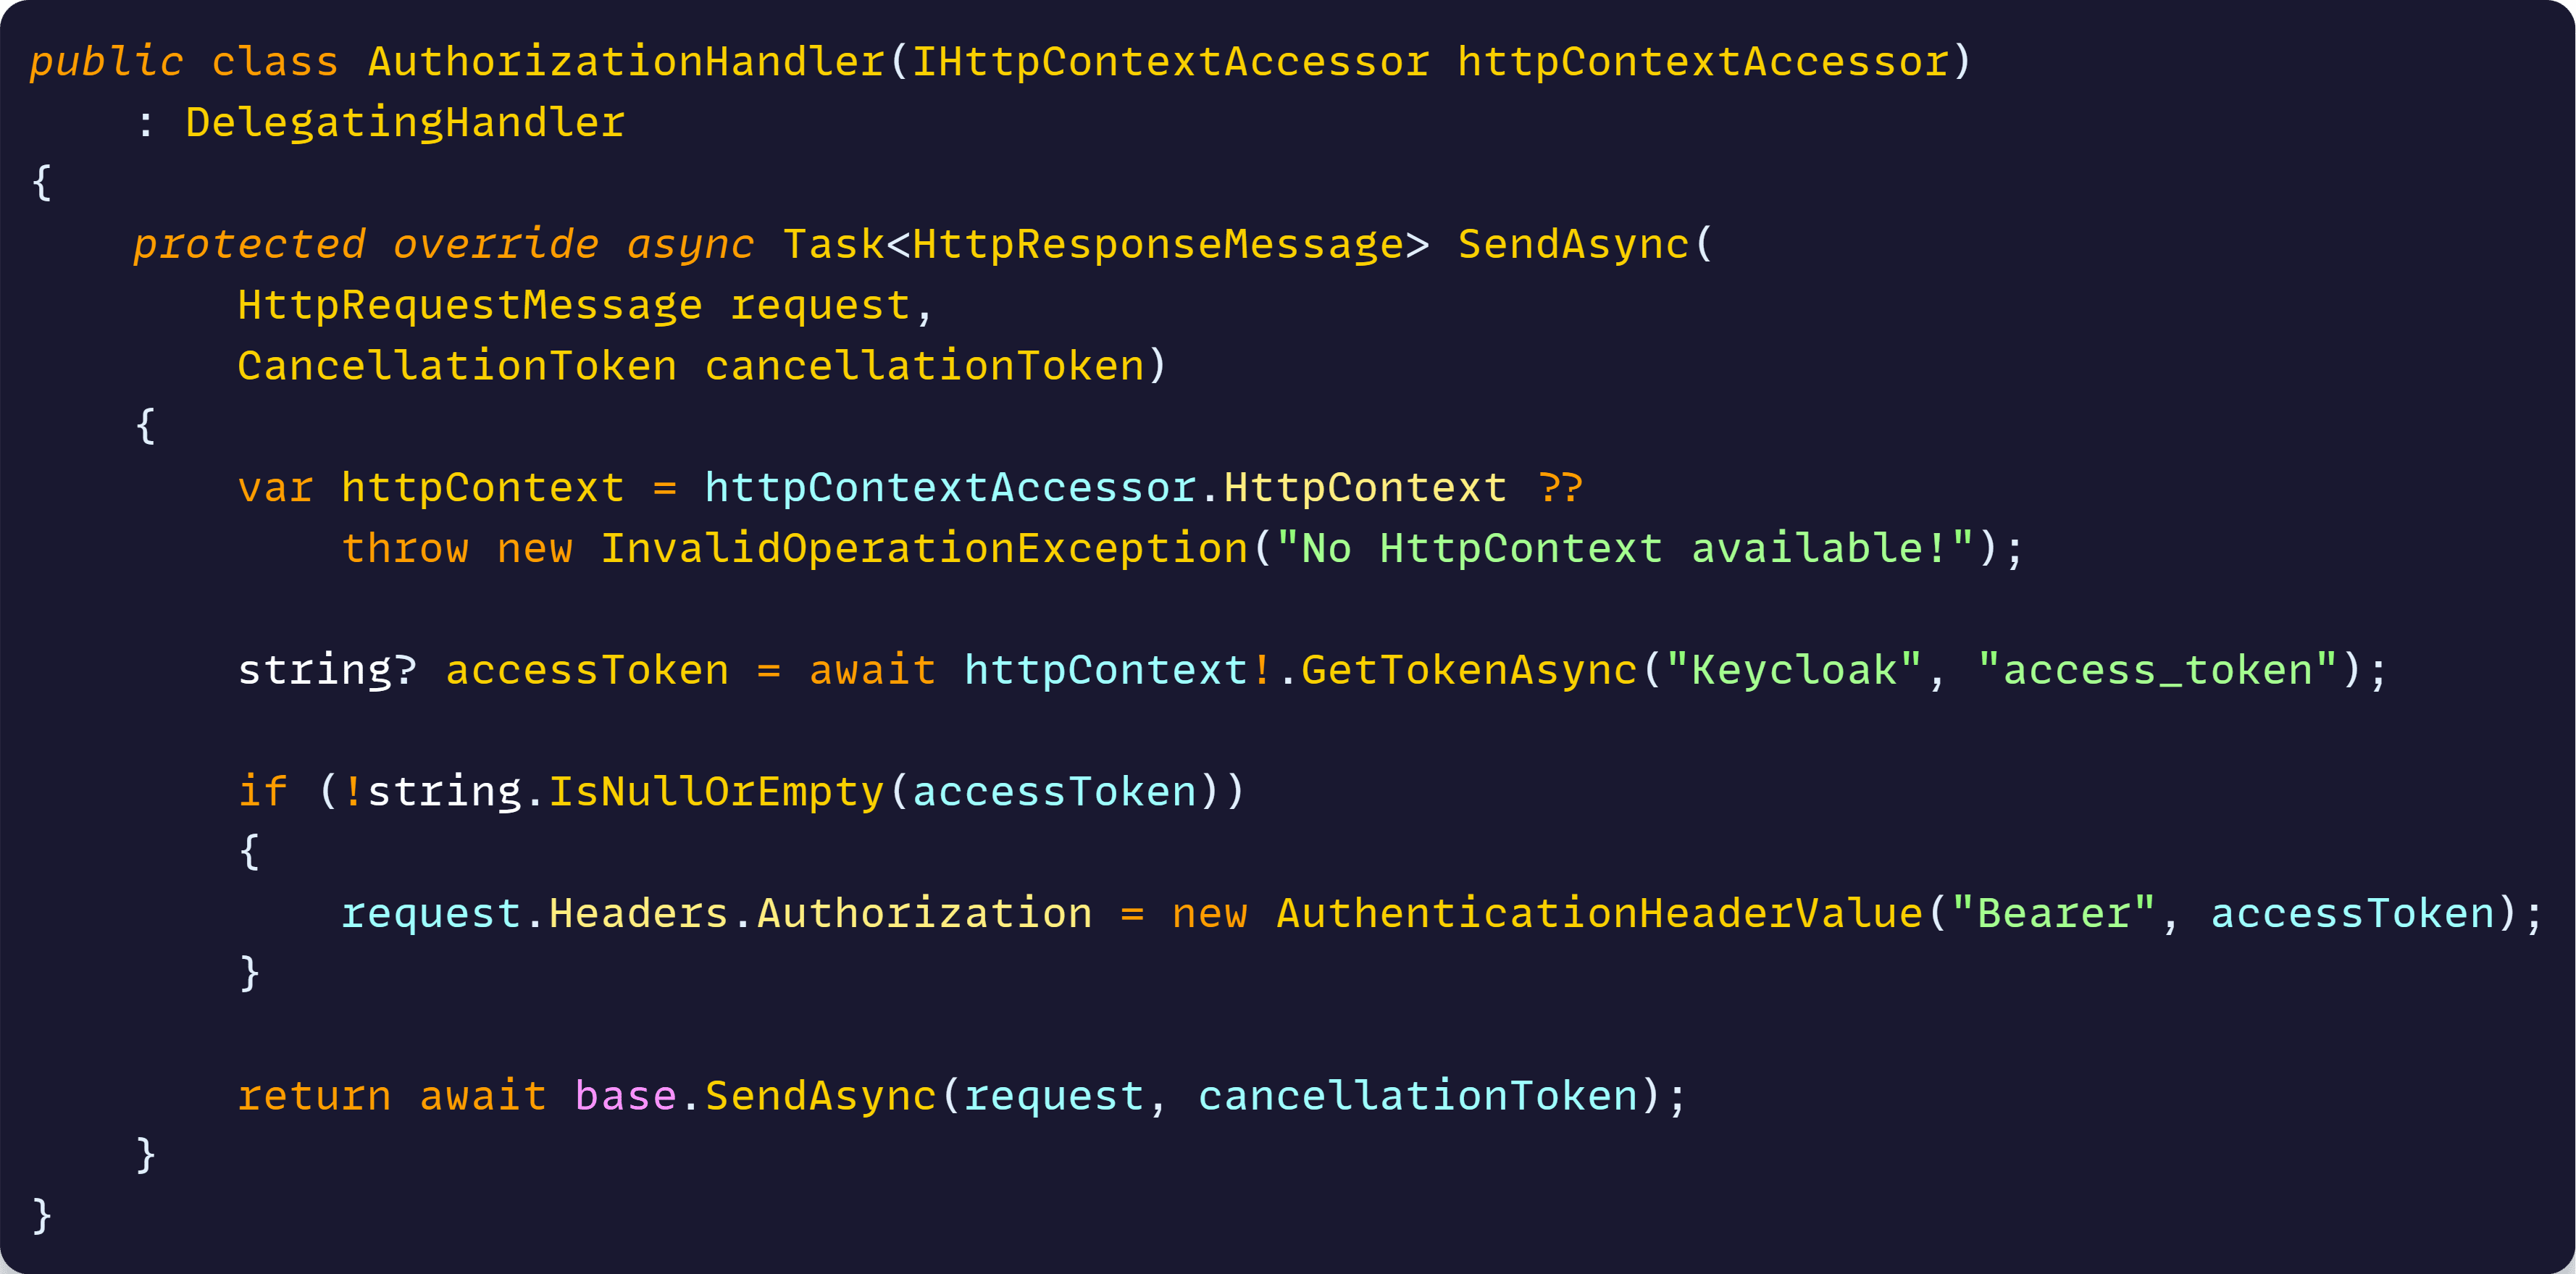
As you can see, all we do there is get the access token from the current HTTP context and attach it as a Bearer token in the Authorization header of the request.
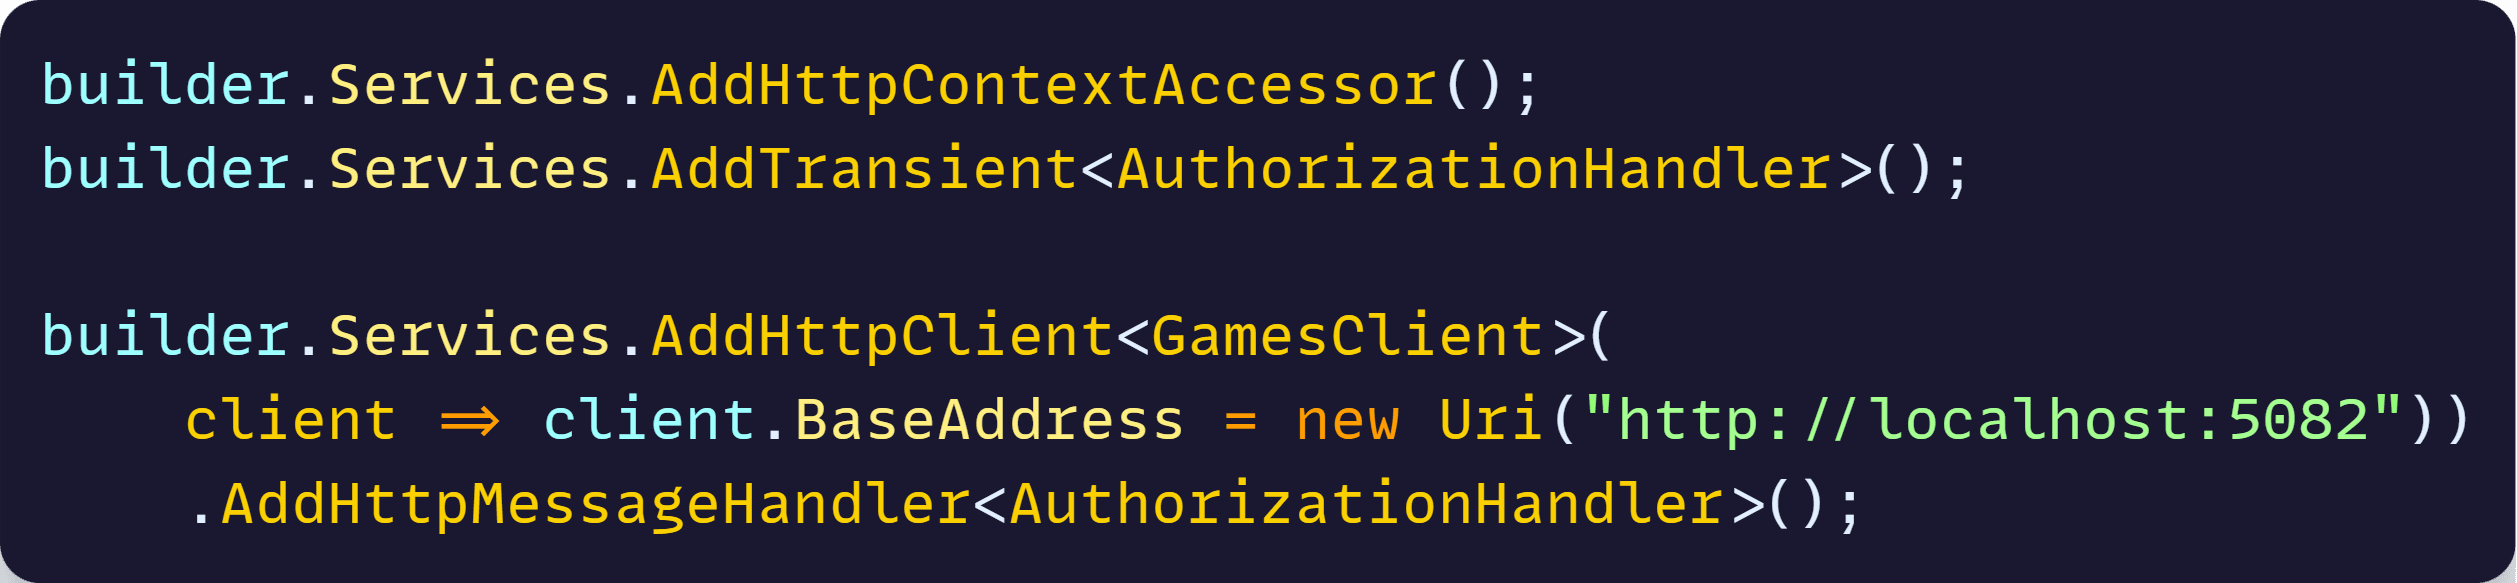
Finally, to enable our authorization hander, we need to register it and add it to our typed HTTP client in the front-end:
Step 10: ASP.NET Core + Keycloak in action
Now run your backend and frontend applications and navigate to the frontend in your browser:
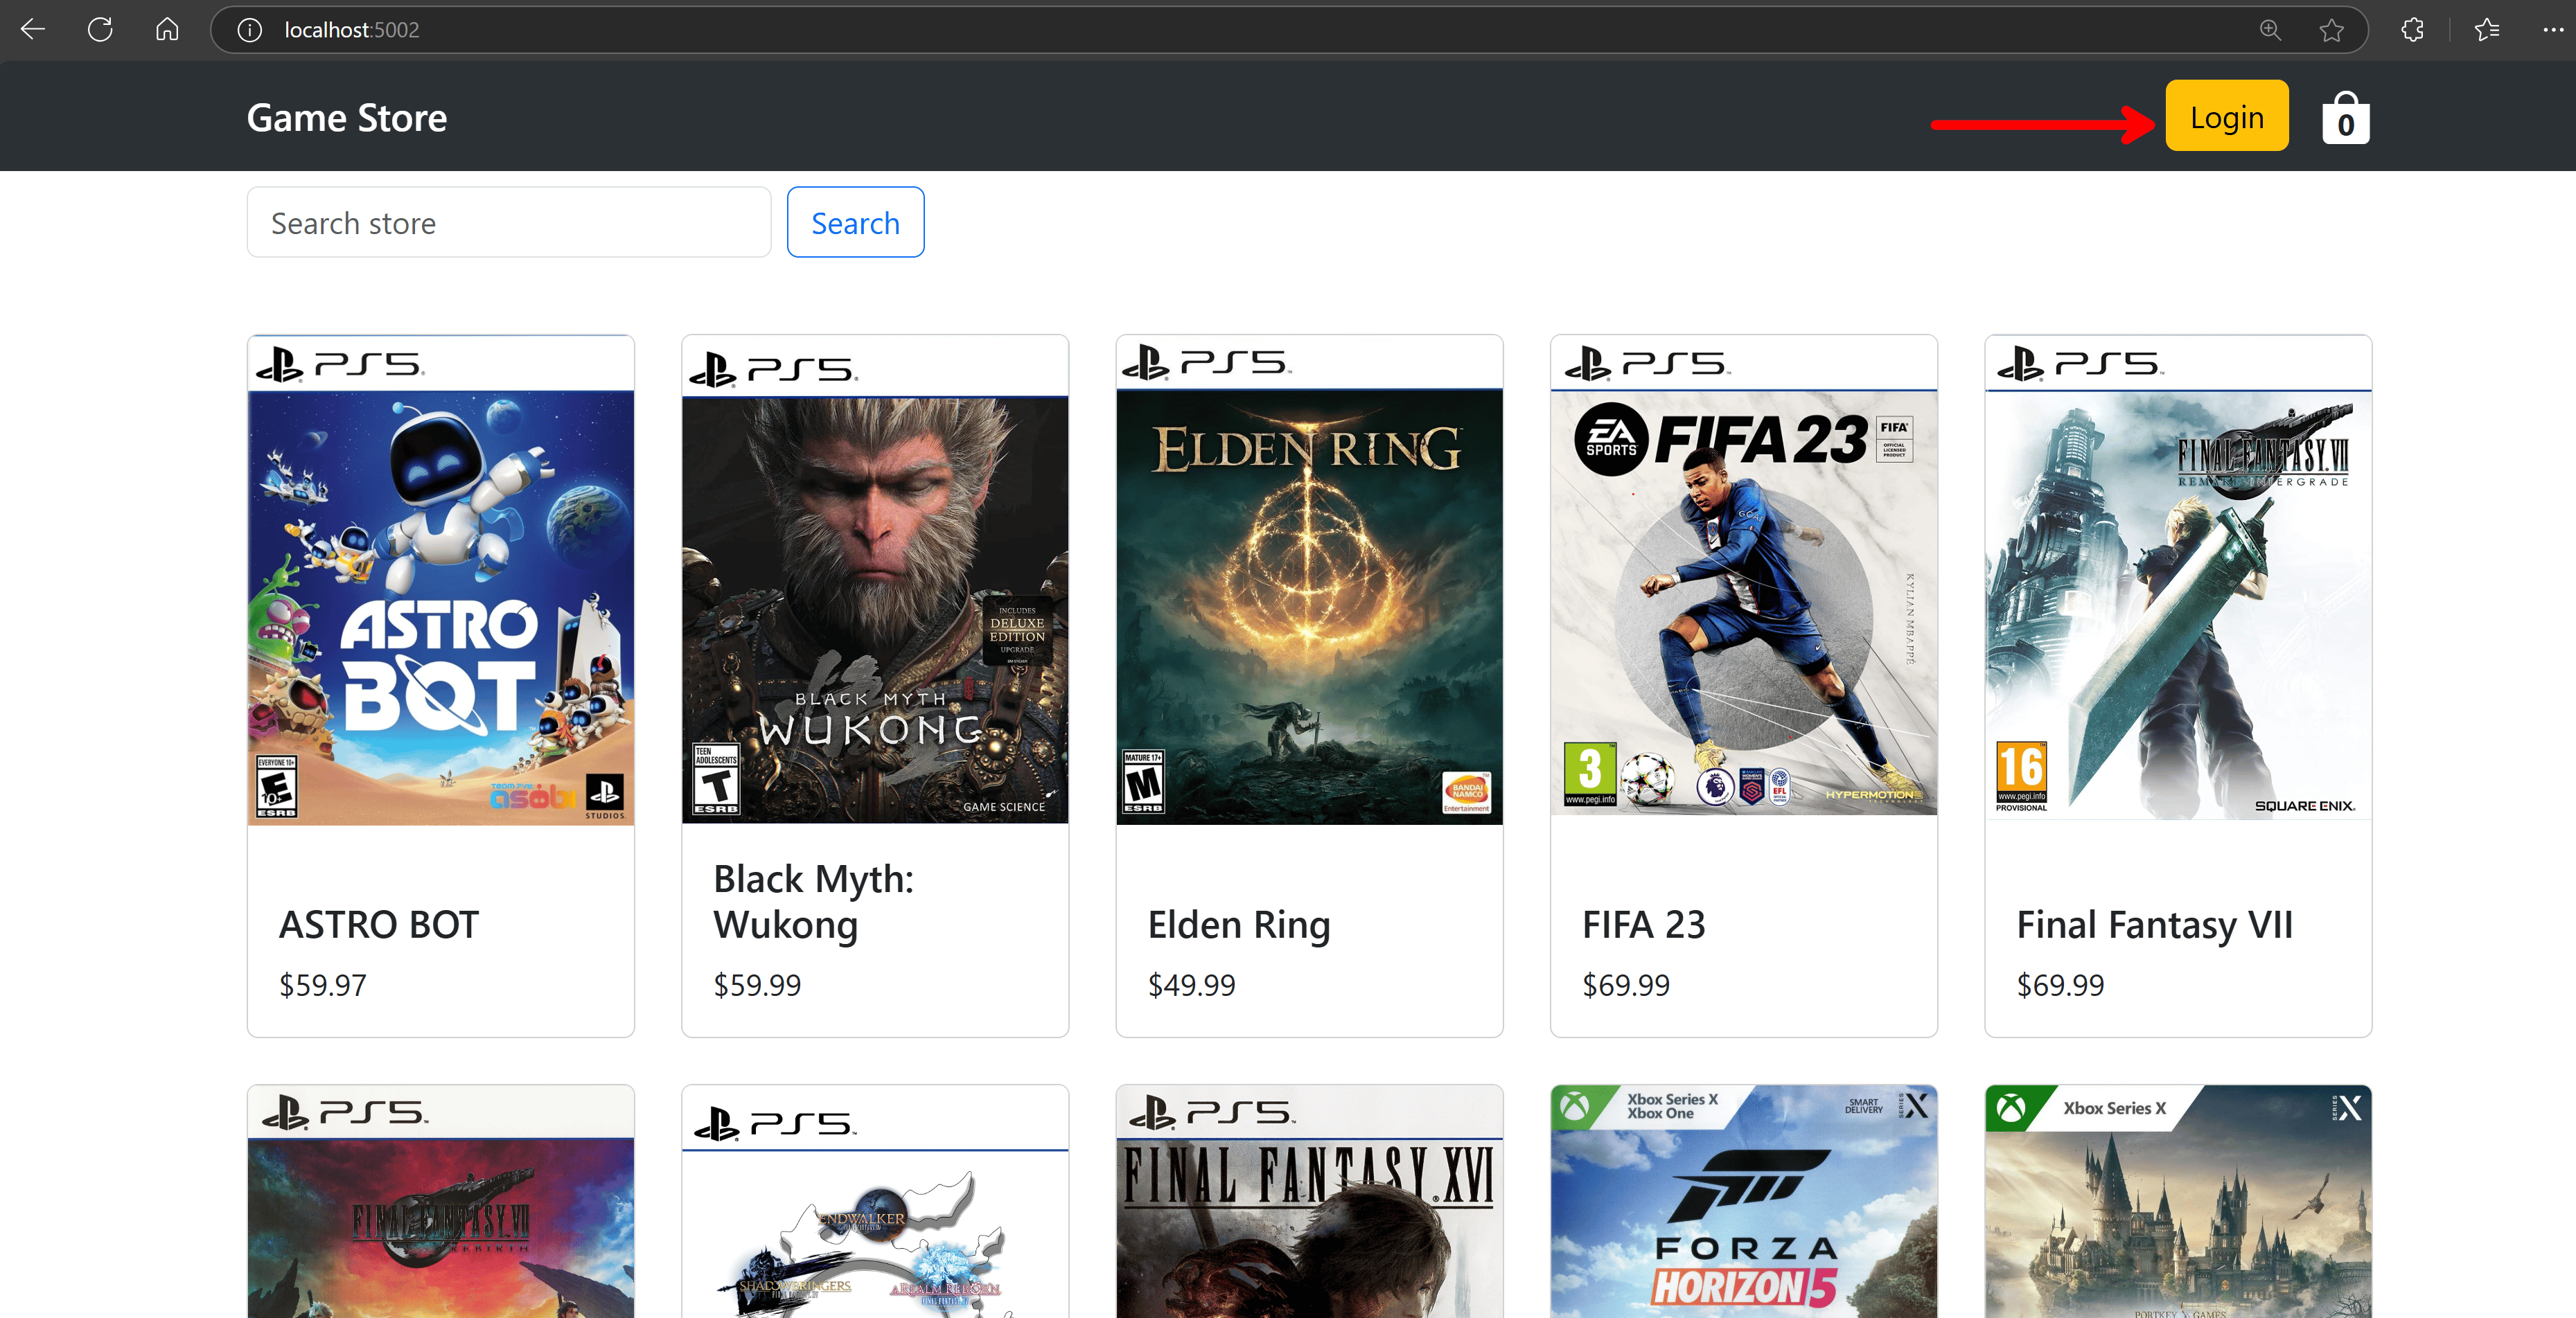
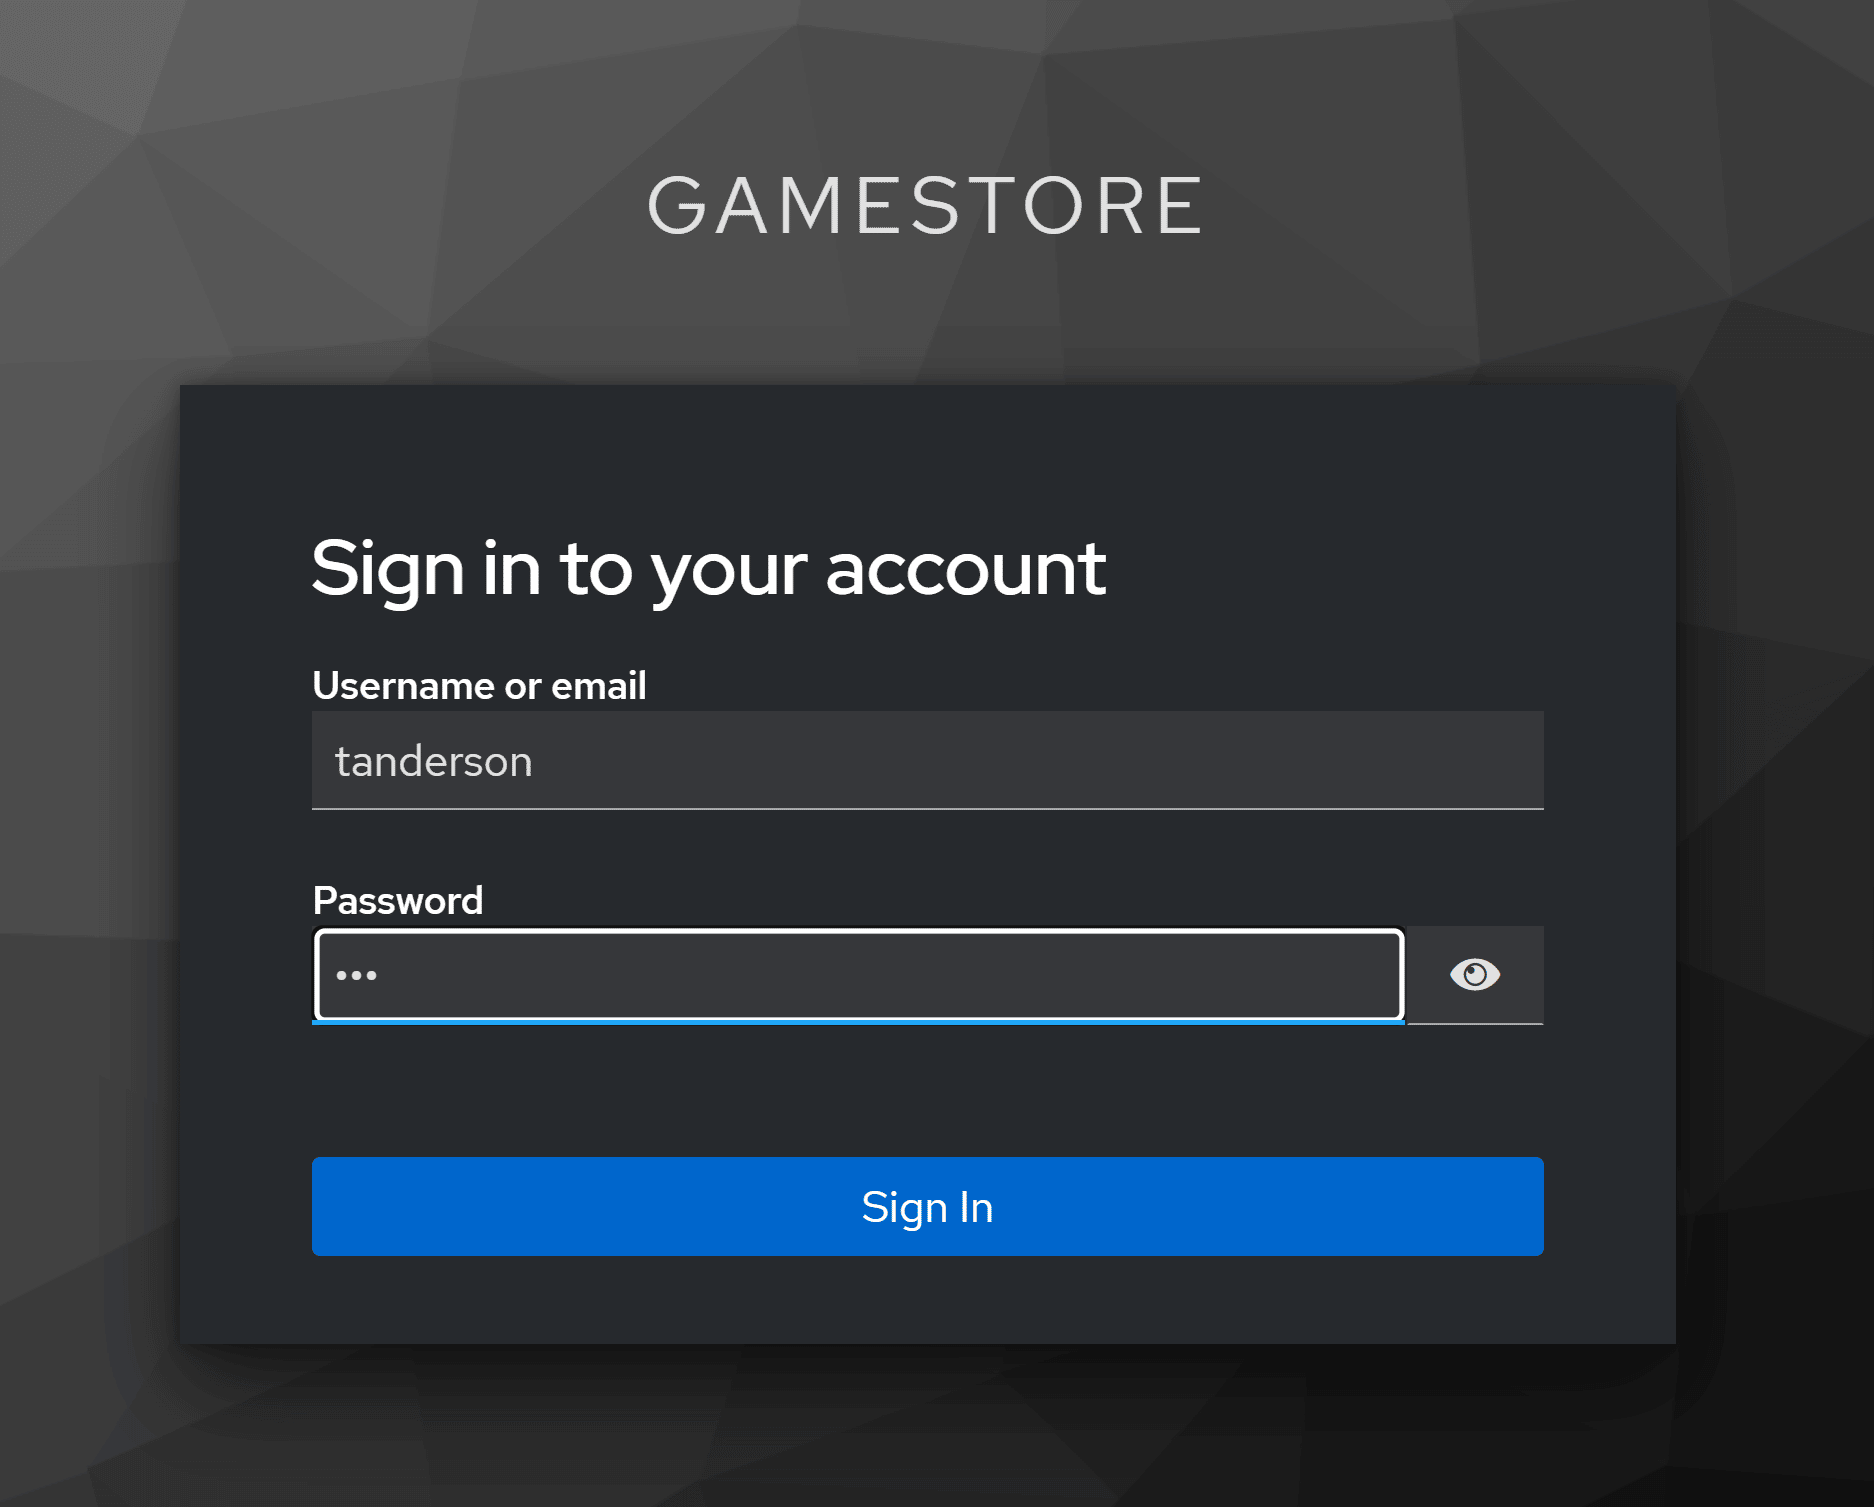
Now click on the Login button and you’ll land on Keycloak’s login page:
And, after login, you’ll get redirected to the home page, but with a few differences:
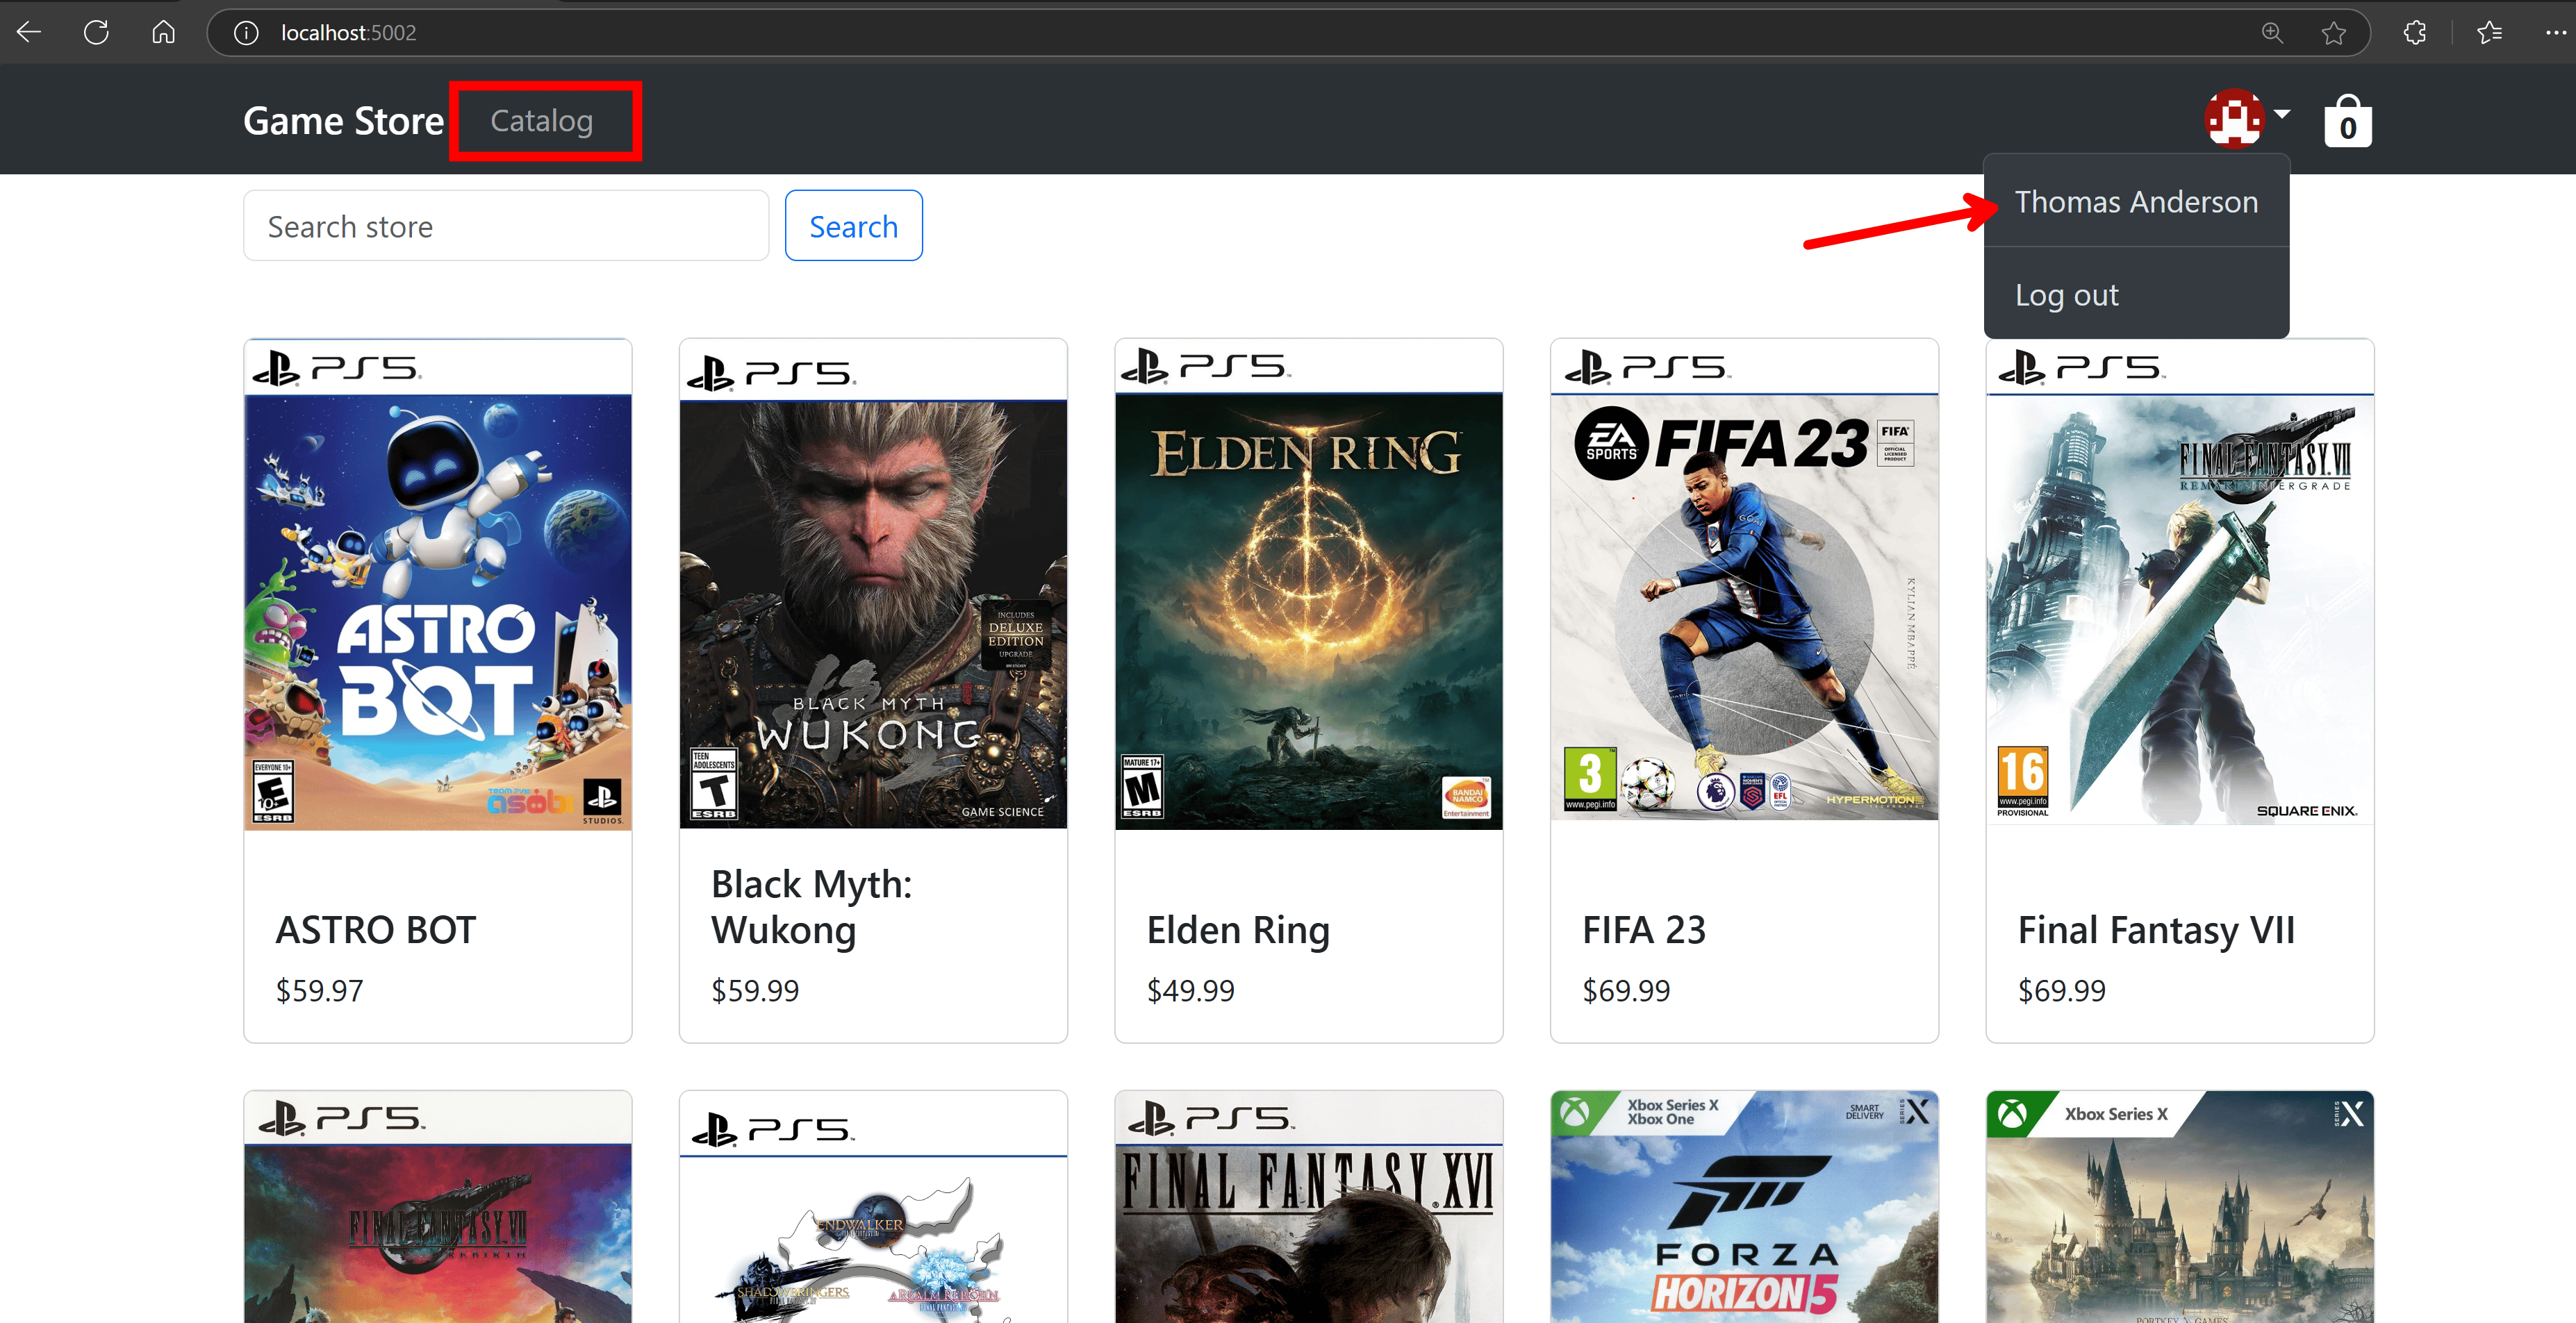
You can now see UI elements only meant for authorized users, like the Catalog link there, plus you can see details about the authenticated user, like the name and a small gravatar generated out of the user email.
You can also have the front-end make use of protected back-end APIs that require the presence of an access token.
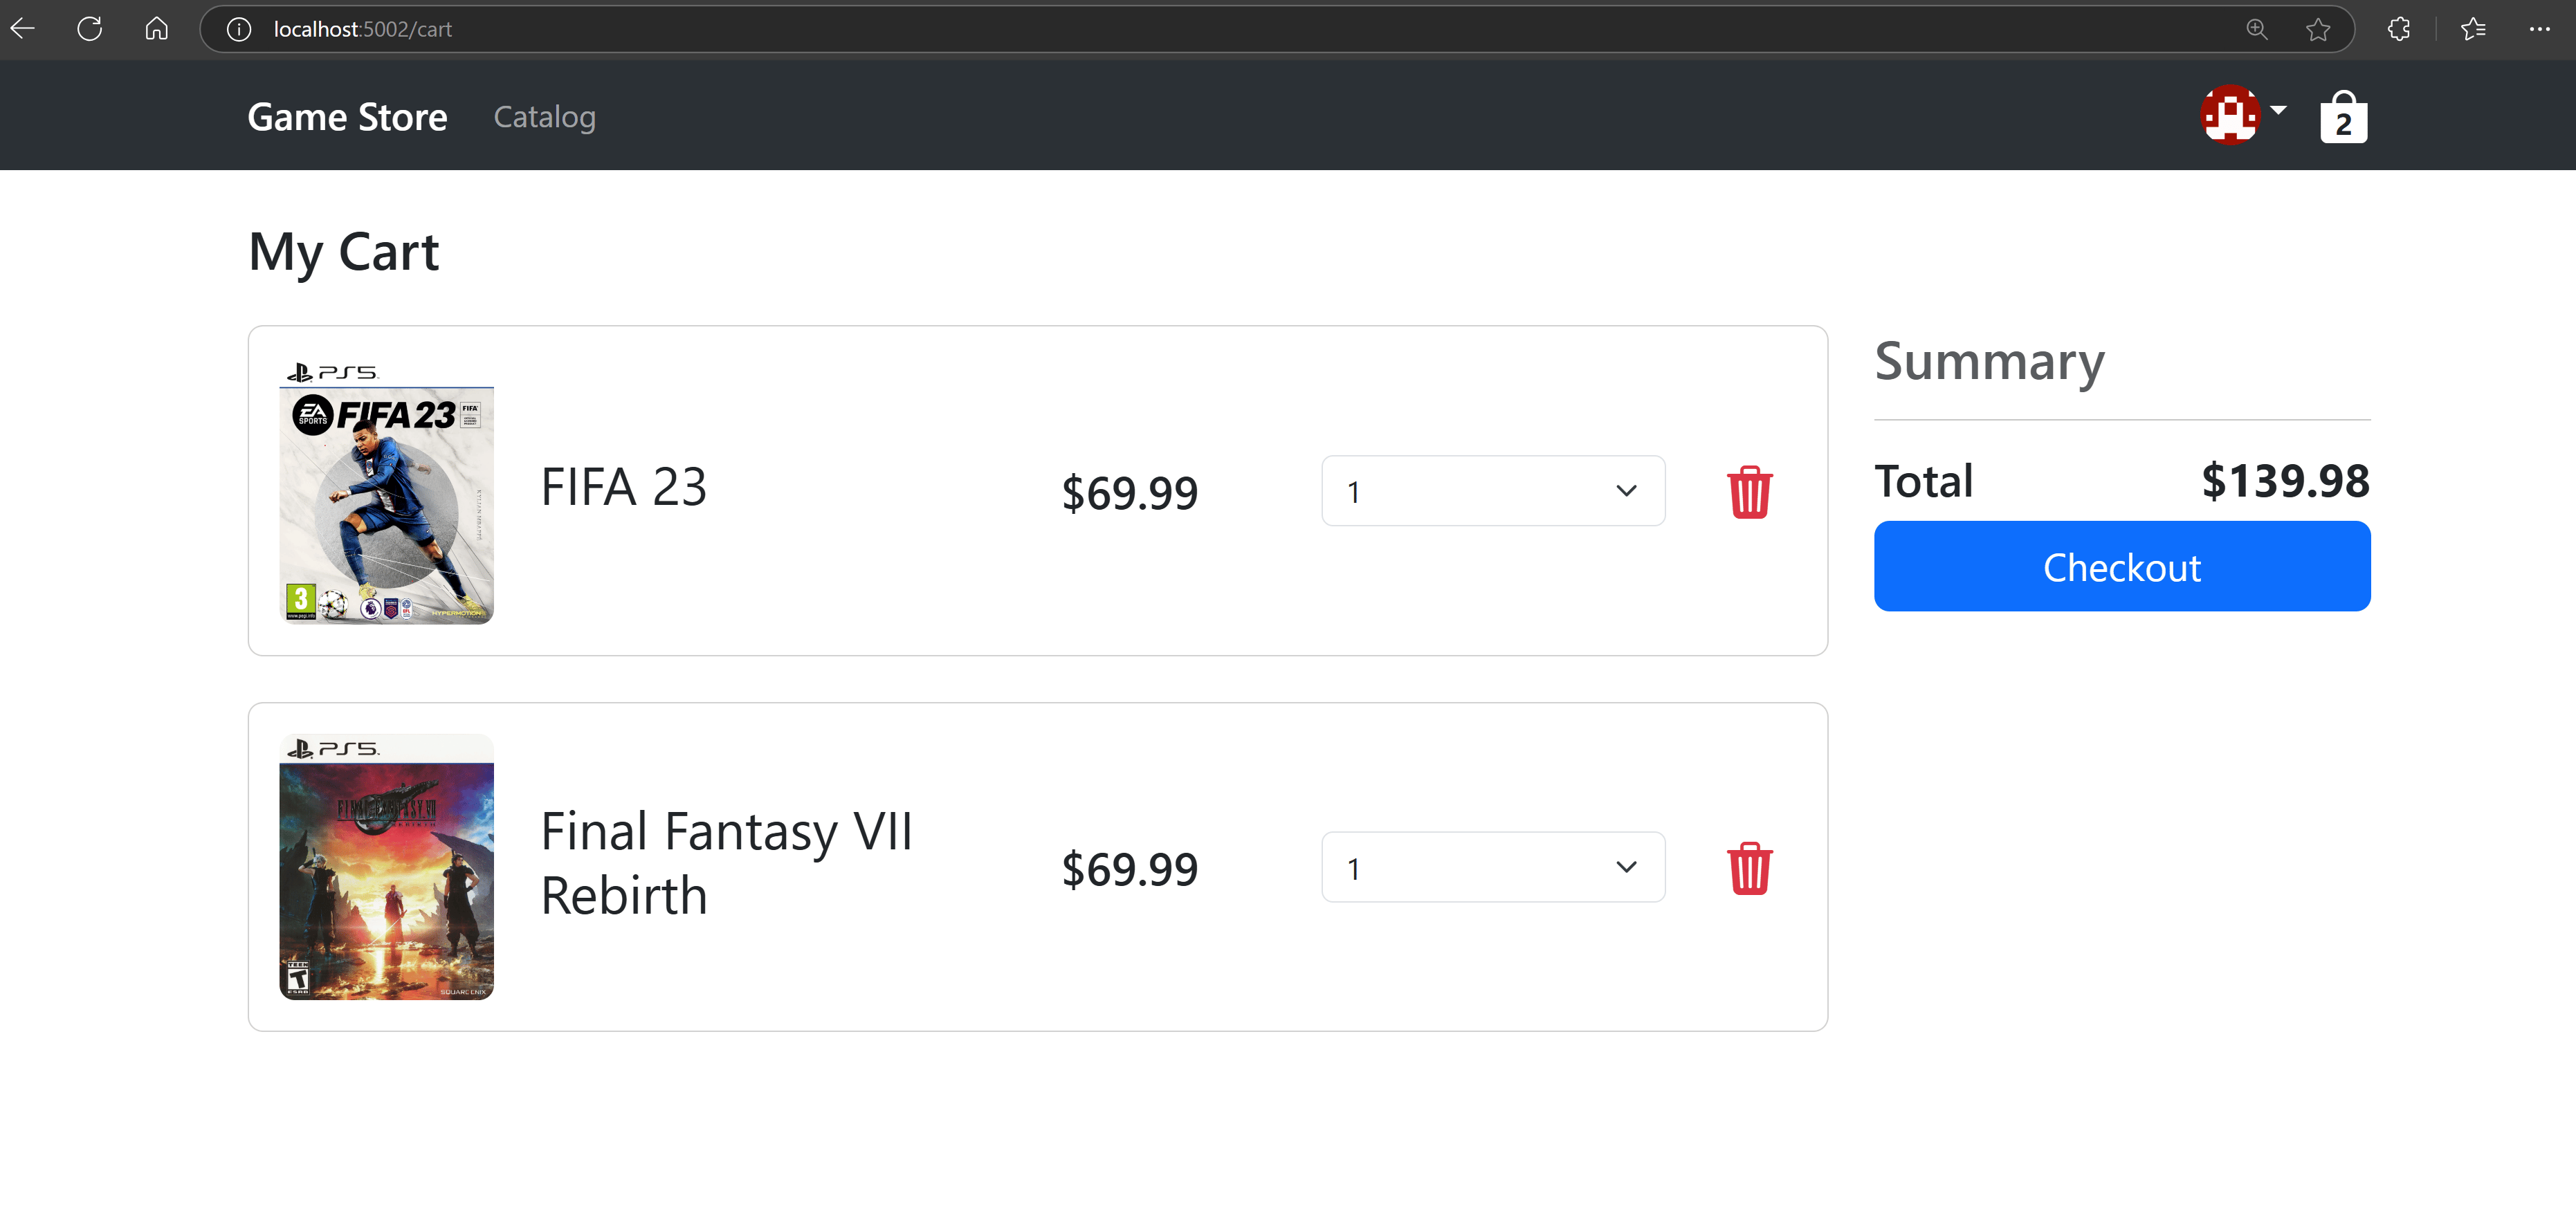
For instance, here’s the shopping cart page, where the back-end must know who the current user is and what kind of access has been granted to return the correct cart:
So there you go, ASP.NET Core + Keycloak working end to end, all secured with the industry standard OIDC protocol.
Mission accomplished!
Wrapping up
You now have a complete ASP.NET Core application secured with industry-standard OIDC authentication, all running locally without any cloud dependencies.
Your backend API validates JWT tokens properly. Your frontend handles the authorization code flow seamlessly. And Keycloak provides enterprise-grade identity management that just works.
This setup gives you everything you need for local development: a real identity provider, proper token validation, and the confidence that your authentication flow will work the same way in production.
Want to take this even further?
In Part 2 of this series, I’ll show you how to make this entire setup even more developer-friendly using .NET Aspire. We’ll eliminate the manual Keycloak configuration and make everything start automatically when you hit F5.
Just clone, run, and authenticate. Every single time.
Until next time!
P.S. For a step-by-step video guide to everything I showed you above plus advanced topics like role, claims and resource based authorization, and complete frontend integration with both Blazor and React applications, check out my ASP.NET Core Security Course.
Whenever you’re ready, here’s how I can help:
The .NET Developer Bootcamp: A complete path from ASP.NET Core fundamentals to building, containerizing, and deploying production-ready, cloud-native apps on Azure.
